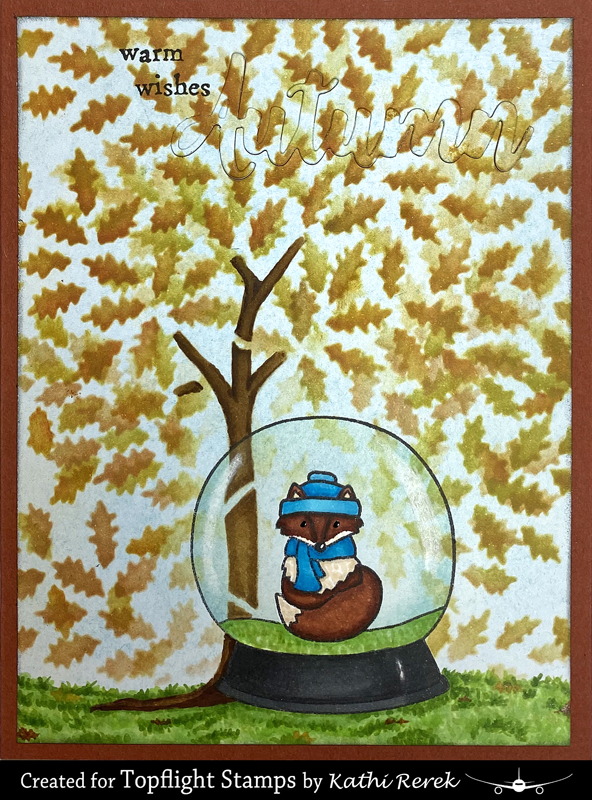
Here's the card!
Topflight Stamps Products Used:
Onyx Black VersaFine™ Ink by Tsukineko®
Other Products Used:
Solar White Classic Crest® Cardstock by Neenah Papers
Other Products Used:
Solar White Classic Crest® Cardstock by Neenah Papers
Rust Cardstock by Bazzill Basics Paper®
Tuxedo Black Memento™ Ink by Tsukineko®
Tumbled Glass, Gathered Twigs, Twisted Citron, Scattered Straw, Wild Honey, Rusted Hinge, Fired Brick, and Black Soot Distress® Inks by Tim Holtz® for Ranger Ink
Copic® Markers:
Tree: E55, E57, E59
Grass: YG03, YG05, YG11, YG13, YG17
Fox: E13, E15, E17, E19, E29, E30, E40, E93, B00, B02, B04, B14, B16
Snow Globe Base: N4, N6
Chinese White Colored Pencil by Derwent
Black Glaze® 3D Glossy Gel Pen by Sakura® of America
White Gelly Roll Gel Pen by Sakura® of America
Autumn Die: Source unknown
Repositionable Labels by Avery®
Post-It® Notes by 3M
STAY-tion™ by Wendy Vecchi for Ranger Ink
Stamping Platform
Post-It® Notes by 3M
STAY-tion™ by Wendy Vecchi for Ranger Ink
Stamping Platform
Instructions:
- Cut rust cardstock to 8.5" x 5.5". Score at 4.25" and fold to form an A2 card. Set aside.
- Remove all the stamps from the Snow Globe Clear Stamp Set's clear acetate index sheet so it can be used to determine placement of the fox and the snowglobe.
- Trim a piece of white cardstock to 4.25" x 5.25" and use magnets to secure to the base of the stamping platform.
- Place the acetate over the cardstock, positioned so that the snowglobe is close to the base of the platform and centered-ish.
- Place the fox stamp facedown on the snowglobe.
- Press the platform's lid onto the back of the stamp and lift.
- Ink the fox stamp with Tuxedo Black Memento ink and stamp onto the image panel and onto repositionable label paper,
- Fussy-cut the label paper version of the fox and place it over its counterpart as a mask.
- Remove the stamp.
- Position the snowglobe stamp facedown on the image panel over the masked fox.
- Press the platform's lid onto the back of the stamp and lift.
- Ink the snowglobe stamp with Tuxedo Black Memento ink and stamp onto the image panel and onto repositionable label paper two times.
- Fussy-cut the label paper versions of the snowglobe -- once its entirety, being sure to keep the outline space intact, the other time around the grass border and base.
- Place the snowglobe grass border and base mask over their counterparts on the image panel.
- Use magnets to secure the image panel to the STAY-tion.
- Place the flattest hill mask from the Acetate Hill Masks/Stencils over the base of the image panel. Use magnets to secure it in place.
- Lightly brush Tumbled Glass Distress ink over the masked images to add a light blue background to the image panel.
- Remove the Hill Mask.
- Position the Tree Stencil PS215 over the image panel as desired. Secure with magnets.
- Brush Gathered Twigs Distress ink over the tree trunk and branch portions of the stencil.
- Clean stencil, dry it, and reposition it over the stenciled trunk and branches.
- Brush Twisted Citron Distress ink over the leaves of the stencil onto the image panel.
- Brush Wild Honey Distress ink over some of the leaves of the stencil onto the image panel.
- Brush Scattered Straw Distress ink over some of the leaves of the stencil onto the image panel.
- Brush Rusted Hinge Distress ink over some of the leaves of the stencil onto the image panel.
- Brush Fired Brick Distress ink over some of the leaves of the stencil onto the image panel.
- Move the Tree Stencil PS215 to the right and repeat Steps #21 - #25, brushing the inks more lightly.
- Move the Tree Stencil PS215 down and to the right and repeat Steps #21 - #25, brushing the inks more lightly.
- Move the Tree Stencil PS215 to the left and repeat Steps #21 - #25, brushing the inks more lightly.
- Move the Tree Stencil PS215 to the lower left and repeat Steps #21 - #25, brushing the inks more lightly.
- Remove and clean the stencil.
- Remove the masks and reserve for later use.
- Use Copic markers to color the grass, tree trunk, tree branches, fox, and the base of the snowglobe.
- Use Black Glaze markers to highlight he fox's eyes to bring them forward.
- Add a dot of white Gelly Roll Gel ink to his nose.
- Secure the image panel to the STAY-tion with magnets.
- Place the snowglobe outline label paper mask around the snowglobe on the image panel.
- Brush Tumbled Glass Distress ink over the mask and around the interior of the globe to add depth and dimension.
- Remove the outline mask and reserve.
- Use a white pencil to add highlights to the snowglobe's glass.
- Use magnets to secure the image panel to the base of the stamping platform.
- Position the "Warm Winter Wishes" sentiment from the Holiday Fox Clear Stamp Set #607 by Janet Klein facedown on the image panel.
- Press the platform's lid onto the back of the stamp and lift.
- Place a Post-It Note over the words "Winter Wishes".
- Ink the stamp with Onyx Black VersaFine Ink, remove the Post-It Note, and stamp onto the image panel.
- Remove the stamp. Clean and dry it.
- Position the sentiment facedown on the image panel so that the word "Wishes" is where desired.
- Press the platform's lid onto the back of the stamp and lift.
- Place a Post-It Note over the words "Warm" and "Winter".
- Ink the stamp with Onyx Black VersaFine Ink, remove the Post-It Note, and stamp onto the image panel.
- Tape the Autumn word die facedown on the image panel where desired.
- Run through the die cut machine.
- Use the same word die to cut rust cardstock.
- Trim the image panel 4" x 5.25".
- Use Black Soot Distress ink to edge the image panel.
- Place a strip of double-sided tape to cover the sentiment aperture.
- Adhere the image panel to the reserved rust A2 card.
- Adhere the rust cardstock word.
- Use glue to adhere the leafy version over the rust word to finish the card.
Thanks for visiting today!
No comments:
Post a Comment