Showing posts with label Jane's Doodles. Show all posts

Tuesday, October 22, 2024

Holiday Cheers!

It's Tuesday so it's time to share a project created for Topflight Stamps. This week the team is focusing on Christmas or Winter. My favorite part of the holidays is gathering with friends and family and celebrating with a bit of Holiday Cheer. 

Green Cardstock by Bazzill Basics
Copic Markers: YR02, YR04, YR07, YR12, YR16, YR18, YR30, YR65, R0000, R000, R00, R01, R30, R32, R35, R37, YG61, YG63, YG67, C00, C0, C1, BG0000, BG000, BG10
Grey Copic Multiliner
Repositionable Sticker Paper by Avery
Stamping Platform

Instructions:
  1. Create an A2 card from dark green cardstock. Set aside.
  2. Place white cardstock onto the base of a stamping platform.
  3. Position the coupe-style cocktail glass from the Holiday Cheers Clear Stamp Set facedown on the lower left of a piece of white cardstock.
  4. Use Tuxedo Black Memento Ink  to stamp the coupe-style cocktail glass from the Holiday Cheers Clear Stamp Set twice — once onto white cardstock and once onto repositionable sticker paper. 
  5. Fussy-cut the sticker paper version and place it atop its counterpart on the image panel as a mask. 
  6. Position the tall/candy cane cocktail glass from the same stamp set to the right of the other glass, a little bit lower on the image panel but slightly overlapping the other glass. 
  7. Use Tuxedo Black Memento Ink to stamp the cocktail glass. 
  8. Remove the sticker paper mask and color the images with Copic markers. 
  9. Use the grey multiliner to add the linework back in where the cocktail glasses overlap. That area had been masked.
  10. Trim the image panel and mat with dark green cardstock.
  11. Cut a piece of green plaid patterned paper from the Distress Plaid 8x8 Paper Pad to 4" wide. 
  12. Adhere the matted image panel to the plaid paper.
  13. Position the "Holiday Cheers! sentiment facedown on the plaid paper as shown.
  14. Use Spruce VersaFine Clair Ink  to stamp the sentiment. 
  15. Trim the plaid paper to 5.25" and edge with Spruce VersaFine Clair Ink
  16. Adhere the card front onto the reserved dark green A2 card.
Thanks for visiting today!


Tuesday, August 27, 2024

Thanks a Latte

It's Tuesday, my day to share a project created for Topflight Stamps. This week my teammates and I are showcasing Creative Expressions' wonderful products. My card features the adorable critters from the Warm Hugs Clear Stamp Set, one of Jane's Doodles fabulous stamp sets for Creative Expressions, with patterned papers from two of my most-used favorite pads, A Gingham Christmas 8x8 Patterned Paper Pad by Creative Expressions and the Coffee and Chocolate 8x8 Patterned Paper Pad by Stamperia.

If you haven't checked out Jane's Doodles fabulous stamp sets for Creative Expressions, you should. The critters are way too cute. I would be remiss if I didn't tell you to click over to Topflight Stamps to see all the amazing new products!

Here's the card.


Topflight Stamps Products Used:

Other Products Used:
Solar White Classic Crest Cardstock by Neenah Papers
Bitter Chocolate Cardstock by Bazzill Basics Cardstock
Copic Markers:
Bear Fur: E79, E77, E74, E71, E70
Cheeks: R21
To Go Coffee Cups: E43, E42, BG23
Vespa (Moped) and Hat: R39, R27, R24
Headlight, Handlebars, Hubcaps: T5, T4, T3, T2
Tires: N8, N6
Black Multiliner by Copic
Frayed Burlap Distress Ink by Tim Holtz for Ranger Ink
Low-Tack Tape
Stamping Platform

Instructions:
  1. Create a 7" x 5" card from Bitter Chocolate cardstock. Set aside.
  2. Use Tuxedo Black Memento Ink to stamp both the bears from the Warm Hugs Clear Stamp Set
  3. Fussy-cut the bears, color them with Copic markers, and set aside. Don't worry, they'll keep each other amused.
  4. Trim the map paper from the Coffee and Chocolate 8x8 Patterned Paper Pad  to 5.875" x 3.875". 
  5. Use low-tack tape, Frayed Burlap Distress Ink, and Pine Cone VersaFine Clair Ink to create a  box around the "Coffee Map" on the lower left hand corner.
  6. Use the same supplies to create a .125" strip along the bottom of the panel. 
  7. Use Pine Cone VersaFine Clair Ink  to edge the entire map paper, which was then matted onto a piece of dark brown cardstock.
  8. Adhere the moped/Vespa bear on the lower right and the hat bear on the box as shown.
  9. Brush one of the labels from the inside front cover of the Coffee and Chocolate 8x8 Patterned Paper Pad* Frayed Burlap Distress Ink.
  10. Place the label onto a stamping platform, position the "Thanks a Latte" sentiment from the Warm Hugs Clear Stamp Set facedown onto the label.
  11. Press the platform's lid onto the back of the stamp, lift.
  12. Ink the stamp with Nocturne VersaFine Clair Ink and stamp.
  13. Trim the sentiment and edge with Pine Cone VersaFine Clair Ink.
  14. Trim the brown, red, goldish plaid patterned paper from the A Gingham Christmas 8x8 Patterned Paper Pad* to 6.875" x 4.875".
  15. Edge the plaid patterned paper with Pine Cone VersaFine Clair Ink, then adhere it to the reserved brown 7" x 5" card. 
  16. Adhere the image panel was adhered as shown to the plaid card front.
  17. Adhere the sentiment strip was adhered to finish the card.
Note: Every now and then you find patterned paper pads that are so fabulous and versatile that you end up using and hoarding every scrap. Both the Coffee and Chocolate 8x8 Patterned Paper Pad  and the A Gingham Christmas 8x8 Patterned Paper Pad are perfect examples. The Ink Drop 6x6 Patterned Paper Pads are incredibly versatile as well.

Tuesday, January 24, 2023

Happy Valentine's Day

It's Tuesday which means it's time to share a project created for Topflight Stamps. This week my teammates and I are showcasing products by Jane's Doodles. You might not know this, but I love penguins almost as much as I love cats. I decided to create a Valentine's Day card with the Sweater Weather Clear Stamp Set and the Snow Globe Clear Stamp Set by Jane's Doodles.

Here's my card.


Topflight Stamps Products Used:
Sweater Weather Clear Stamp Set by Jane's Doodles
Snow Globe Clear Stamp Set by Jane's Doodles

Public Service Announcement:
Do you love AALL and Create's products as much as I do?
Do you love to save money?
Do you love a good sale?
If you answered "yes" to any of those questions, you might want to pop over to Topflight Stamps to take advantage of a fabulous sale!

Other Products Used:
Solar White Classic Crest Cardstock by Neenah Papers
Classic Red Cardstock by Bazzill Basics Paper
Tuxedo Black Memento Ink by Imagine Crafts
White Shimmer Delicata Ink by Imagine Crafts
Tumbled Glass Distress Ink by Tim Holtz for Ranger Ink
Sea Salt Hybrid Ink by Taylored Expressions
Copic Markers:
Penguins: C6, C8, B0000, B60, YR12, YR14, YR16, Y32, R81
Penguins' Sweaters: R81, R83, R85, RV29, BV01, BV02, BV11
Skates: R81, R83, RV95, BV25, BV02, BV11, BV25, E70, E71, E74
Snowglobe Base: C5, C6, C7, C8
Snowglobe: BG0000, BG000
Snow and Ice in Snow Globe and on ground: T0, T1, C00 
White Gelly Roll Pen by Sakura of America
Grid of Hearts Stencil by Alexandra Renke
Fancy Tag Cutting Die Set by Spellbinders
Black Gemstones by Doodlebug Designs
Repositionable Label Paper by Avery
STAY-tion™ by Wendy Vecchi for Ranger Ink
Stamping Platform

Instructions:
  1. Cut a piece of red cardstock to 5.5" x 8.5". Score at 4.25" and fold to form an A2 card. Set aside.
  2. Using a stamping platform and Tuxedo Black Memento ink, stamp the two penguins from the Sweater Weather Clear Stamp Set onto white cardstock and onto repositionable label paper.
  3. Position the hearts from the You Go Gull Clear Stamp Set and the Perfect Blend Clear Stamp Set facedown on the penguins' sweaters.
  4. Press the platform's lid onto the back of the stamps. Lift the lid.
  5. Ink the stamps with Tuxedo Black Memento ink and stamp. Remove the stamps from the platform's lid.
  6. Fussy-cut the label paper versions of the penguins and place them atop their counterparts as masks.
  7. Position the Snow Globe from the Snow Globe Clear Stamp Set facedown between the masked penguins.
  8. Press the platform's lid onto the back of the stamp. Lift the lid.
  9. Ink the stamp with Tuxedo Black Memento ink and stamp onto the image panel and onto label paper.
  10. Fussy-cut the label paper version of the Snow Globe in parts. Cut around the outside of the Snow Globe keeping the perimeter intact. Set aside for now.
  11. Fussy-cut the globe, the snow in the globe, and the base of the Snow Globe so that you have three parts. Place all three parts over their counterparts as masks.
  12. Place the image panel, with the masks in place, onto the STAY-tion.
  13. Place a piece of plastic horizontally over the image panel below the penguins' bodies. Secure the plastic with magnets.
  14. Use the largest brush from the Black Blending Brushes to brush Periwinkle Prism Inkover the plastic and the masked images to create a sky background.
  15. Move the plastic  to cover the top part of the image.
  16. Use the the medium brush from the Black Blending Brushes to brush Sea Salt Hybrid Ink over the plastic to create an icy/snowy ground.
  17. Remove the interior globe part of the Snow Globe mask retaining the snow and the base masks in place. 
  18. Place the reserved outside circle mask from Step #11 around the globe to protect the background.  
  19. Use the smallest brush from the Black Blending Brushes to brush Tumbled Glass Distress ink around the interior of the Snow Globe. 
  20. Place the Grid of Hearts stencil over the Snow Globe. Secure with magnets.
  21. Use the Premier Ink Blending Tool and blending foam to sponge Emperor Red Elements Inkover the stencil onto the globe.
  22. Remove all the masks, retain the ones that are still useable for a later use.
  23. Color the penguins, the inside of the snow globe, and the ice background were colored with Copic markers. 
  24. Use white gel pen to add highlights to the Snow Globe's glass and base.
  25. Use White Shimmer Delicata ink to stamp the snowflakes from the Snow Globe Clear Stamp Set. Heat set. 
  26. Use the white gel pen and the Gelly Roll Bold Line Stardust Clear Glittering Ink to add white and glittery icy touches to the image panel.
  27. Trim the image panel to 5" x 3.75" and mat with black cardstock cut to 5.25" x 4".
  28. Adhere the image panel to the reserved red A2 card.
  29. Use Nocturne VersaFine Clair Inkto stamp the sentiment from the Classic Sentiments Clear Stamp Set onto red cardstock. 
  30. Heat set the sentiment and cut with a fancy label cutting die.
  31. Adhere the sentiment to the top of the card. 
  32. Adhere black gemstones to the sentiment die-cut to finish the card.
Thanks for visiting today!


Tuesday, November 8, 2022

Peace, Love, and Joy -- a Holiday Card!

It's Tuesday,my day to share a project created for Topflight Stamps! This week the TFS team's theme is Winter or Christmas. I've satisfied both criteria by creating a snowy holiday card using four of the adorable Zini  Mini Cling Rubber Stamp Sets by Elena Zinski for PaperArtsy with a sentiment from the Snow Globe Clear Stamp Set by Jane's Doodles.

Here's my card!


Topflight Stamps Products Used:
Zini Mini 56 Rubber Cling Mounted Stamp Set by Elena Zinski for PaperArtsy
Solar White Classic Crest® Cardstock by Neenah Papers
Classic Blue and Avalanche Cardstock by Bazzill Basics Paper®
Obsidian Amalgam Ink by Gina K™ Designs
Stormy Sky and Pumice Stone Distress® Inks by Tim Holtz® for Ranger Ink
Copic® Markers:
Mailbox: R12, R14, R17, R27
Paths and Sidewalk: W00, W1, W2, W3
Grass: YG03, YG11, G40
Houses: Y21, Y23, Y26,; YG41, YG45: BV20, BV23, BV25; E93, E95, E97, E99; B02, B04, B16, B18; BG90, BG93, BG95
Streetlights: B04, B05, B18; Y11, Y23, Y26
Windows: BG000, BG10
Sentiment Die: Cheery Lynn Designs
White Uni Posca Paint Pens by Mitsubishi Pencil Company
Clear Gemstones by KaiserCraft
Post-It® Notes by 3M
Repositionable Label Paper by Avery®
STAY-tion™ by Wendy Vecchi for Ranger Ink
Stamping Platform

Instructions: 
  1. Cut a piece of white cardstock to 6.25" x 9.25". Score at 5 7/8" and fold to form an A6 card. Set aside.
  2. Use Obsidian Almagam ink and a stamping platform to stamp the post box, the four houses, and the street light on the right with black ink onto white cardstock then onto repositionable label paper.
  3. Fussy-cut the label paper versions and place over their counterparts. 
  4. Remove the stamps from the stamping platform and thoroughly clean.
  5. Position the street light stamp facedown on the left over the post box mask as shown. 
  6. Press the lid of the platform onto the back of the stamp, lift the lid, ink the stamp, and stamp onto the image panel and onto repositionable label paper
  7. Fussy-cut the second street light and place it over its counterpart. 
  8. Place the flattest hill mask from the Acetate Hills Masks horizontally slightly above the base of the houses, covering the bottom portion of the image panel. 
  9. Brush Stormy Sky Distress Ink over the mask and the masked images onto the image panel to create the sky.
  10. Remove the Acetate Hills Mask.
  11. Place a ruler horizontally covering the bottom 1" of the image panel.
  12. Place a Post-It Note on a diagonal from the left side of the left-most house's door to the edge of the ruler.
  13. Brush Pumice Stone Distress Ink over the right edge of the Post-It Note onto the image panel.
  14. Move the Post-It Note to run diagonally from the right side of the door to the ruler.
  15. Brush Pumice Stone Distress Ink over the left edge of the Post-It Note onto the image panel. There's now a path from the house to the ruler, which will become the sidewalk.
  16. Repeat Steps #13 - 15 for each of the houses to create four front paths.
  17. Shift the ruler to cover the pathways.
  18. Brush Pumice Stone Distress Ink over the ruler to the base of the image panel to create the sidewalk.
  19. Remove all the masks and reserve for another use.
  20. Use Copic markers to color the houses, post box, streetlights, lawn, and stairs.
  21. Use a Posca paint pen and the Gelly Roll Bold Line Stardust Clear Glittering Ink Pen to add glittery snow to the lawn, streetlights, post box, paths, sidewalk, and houses. 
  22. Use the Gelly Roll Bold Line Stardust Clear Glittering Ink Pen to add dots of glitter pen to the windows. Use a BG000 marker to spread the glitter pen ink over the windows
  23. Squeeze a bit of Snowflake Fresco Finish Chalk Acrylic Paint onto a craft mat, mist with water, then use a paintbrush to splatter the image panel with "snow".
  24. Trim the image panel and mat with blue cardstock cut slightly larger than the image panel.
  25. Adhere the matted image panel to the reserved white card.
  26. Use a sentiment die to cut blue cardstock.
  27. Use a stamping platform and Nocturne VersaFine Clair Ink to stamp the "Peace, Love, and Joy" sentiment from the Snow Globe Clear Stamp Set onto a blue die-cut.
  28. Heat set the die-cut and adhere to the image panel as shown.
  29. Add two clear rhinestones to finish the card.
Thanks for visiting today!

Tuesday, August 23, 2022

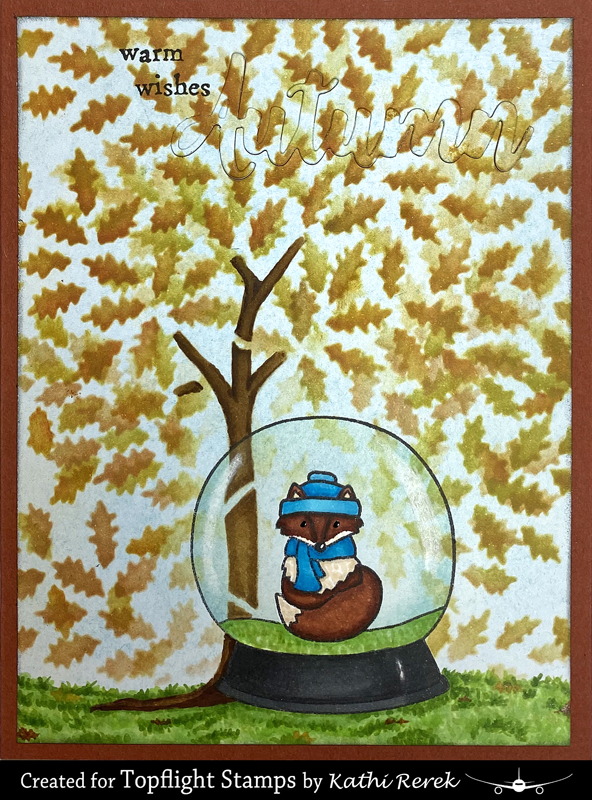
Warm Wishes

It's Tuesday which is my day to share a project created for Topflight Stamps! This week my teammates and I are showcasing Jane's Doodles Stamps. I decided to work with the Snow Globe Clear Stamp Set, which has a snow globe stamp, a Santa stamp, a Fox stamp, a penguin stamp, a snowman stamp, a Christmas Tree stamp, gift stamps, and sentiment stamps.  I know that this is the perfect stamp set for the winter holidays, however, I decided to create an autumn eclipse card to show the set's versatility.

Here's the card!


Topflight Stamps Products Used:
Onyx Black VersaFine™ Ink by Tsukineko®

Other Products Used:
Solar White Classic Crest® Cardstock by Neenah Papers
Rust Cardstock by Bazzill Basics Paper®
Tuxedo Black Memento™ Ink by Tsukineko®
Tumbled Glass, Gathered Twigs, Twisted Citron, Scattered Straw, Wild Honey, Rusted Hinge, Fired Brick, and Black Soot Distress® Inks by Tim Holtz® for Ranger Ink
Copic® Markers:
Tree: E55, E57, E59
Grass: YG03, YG05, YG11, YG13, YG17
Fox: E13, E15, E17, E19, E29, E30, E40, E93, B00, B02, B04, B14, B16
Snow Globe Base: N4, N6
Chinese White Colored Pencil by Derwent
Black Glaze® 3D Glossy Gel Pen by Sakura® of America
White Gelly Roll Gel Pen by Sakura® of America
Autumn Die: Source unknown
Repositionable Labels by Avery®
Post-It® Notes by 3M
STAY-tion™ by Wendy Vecchi for Ranger Ink
Stamping Platform

Instructions:
  1. Cut rust cardstock to 8.5" x 5.5". Score at 4.25" and fold to form an A2 card. Set aside.
  2. Remove all the stamps from the Snow Globe Clear Stamp Set's clear acetate index sheet so it can be used to determine placement of the fox and the snowglobe.
  3. Trim a piece of white cardstock to 4.25" x 5.25" and use magnets to secure to the base of the stamping platform.
  4. Place the acetate over the cardstock, positioned so that the snowglobe is close to the base of the platform and centered-ish. 
  5. Place the fox stamp facedown on the snowglobe. 
  6. Press the platform's lid onto the back of the stamp and lift.
  7. Ink the fox stamp with Tuxedo Black Memento ink and stamp onto the image panel and onto repositionable label paper,
  8. Fussy-cut the label paper version of the fox and place it over its counterpart as a mask.
  9. Remove the stamp.
  10. Position the snowglobe stamp facedown on the image panel over the masked fox.
  11. Press the platform's lid onto the back of the stamp and lift.
  12. Ink the snowglobe stamp with Tuxedo Black Memento ink and stamp onto the image panel and onto repositionable label paper two times. 
  13. Fussy-cut the label paper versions of the snowglobe -- once its entirety, being sure to keep the outline space intact, the other time around the grass border and base.
  14. Place the snowglobe grass border and base mask over their counterparts on the image panel.
  15. Use magnets to secure the image panel to the STAY-tion.
  16. Place the flattest hill mask from the Acetate Hill Masks/Stencils over the  base of the image panel. Use magnets to secure it in place.
  17. Lightly brush Tumbled Glass Distress ink over the masked images to add a light blue background to the image panel.
  18. Remove the Hill Mask.
  19. Position the Tree Stencil PS215 over the image panel as desired. Secure with magnets.
  20. Brush Gathered Twigs Distress ink over the tree trunk and branch portions of the stencil.
  21. Clean stencil, dry it, and reposition it over the stenciled trunk and branches.
  22. Brush Twisted Citron Distress ink over the leaves of the stencil onto the image panel.
  23. Brush Wild Honey Distress ink over some of the leaves of the stencil onto the image panel.
  24. Brush Scattered Straw Distress ink over some of the leaves of the stencil onto the image panel.
  25. Brush Rusted Hinge Distress ink over some of the leaves of the stencil onto the image panel.
  26. Brush Fired Brick Distress ink over some of the leaves of the stencil onto the image panel.
  27. Move the Tree Stencil PS215 to the right and repeat Steps #21 - #25, brushing the inks more lightly.
  28. Move the Tree Stencil PS215 down and to the right and repeat Steps #21 - #25, brushing the inks more lightly.
  29. Move the Tree Stencil PS215 to the left and repeat Steps #21 - #25, brushing the inks more lightly.
  30. Move the Tree Stencil PS215 to the lower left and repeat Steps #21 - #25, brushing the inks more lightly.
  31. Remove and clean the stencil. 
  32. Remove the masks  and reserve for later use. 
  33. Use Copic markers to color the grass, tree trunk, tree branches, fox, and the base of the snowglobe.
  34. Use Black Glaze markers to highlight he fox's eyes to bring them forward. 
  35. Add a dot of white Gelly Roll Gel ink to his nose.
  36. Secure the image panel to the STAY-tion with magnets.
  37. Place the snowglobe outline label paper mask around the snowglobe on the image panel. 
  38. Brush Tumbled Glass Distress ink over the mask and around the interior of the globe to add depth and dimension.
  39. Remove the outline mask and reserve. 
  40. Use a white pencil to add highlights to the snowglobe's glass.
  41. Use magnets to secure the image panel to the base of the stamping platform.
  42. Position the "Warm Winter Wishes" sentiment from the Holiday Fox Clear Stamp Set #607 by Janet Klein facedown on the image panel.
  43. Press the platform's lid onto the back of the stamp and lift.
  44. Place a Post-It Note over the words "Winter Wishes".
  45. Ink the stamp with Onyx Black VersaFine Ink, remove the Post-It Note, and stamp onto the image panel.
  46. Remove the stamp. Clean and dry it.
  47. Position the sentiment facedown on the image panel so that the word "Wishes" is where desired.
  48. Press the platform's lid onto the back of the stamp and lift.
  49. Place a Post-It Note over the words "Warm" and "Winter".
  50. Ink the stamp with Onyx Black VersaFine Ink, remove the Post-It Note, and stamp onto the image panel.
  51. Tape the Autumn word die facedown on the image panel where desired.
  52. Run through the die cut machine.
  53. Use the same word die to cut rust cardstock.
  54. Trim the image panel 4" x 5.25".
  55. Use Black Soot Distress ink to edge the image panel.
  56. Place a strip of double-sided tape to cover the sentiment aperture.
  57. Adhere the image panel to the reserved rust A2 card.
  58. Adhere the rust cardstock word. 
  59. Use glue to adhere the leafy version over the rust word to finish the card. 
Thanks for visiting today!

Tuesday, January 25, 2022

Penguin Birthday Card

It's Tuesday so it's my day to share a card created for Topflight Stamps. This week my teammates and I are creating projects using Jane's Doodles Clear Stamps. As a penguin lover, I had to have the Sweater Weather Clear Stamp Set. I decided to use the Sweater Weather Clear Stamp Set and the Snowflakes Background Stamp by Darkroom Door to create a birthday shaker card.


Topflight Stamps Products Used:

Other Products Used:
Solar White Classic Crest® Cardstock by Neenah Papers
Blue Cardstock
Tuxedo Black Memento™ Ink by Tsukineko®
Copic® Markers:
   Penguin Bodies: C00, C0, C6 C8, B000, B60
   Penguin Beaks: Y00, Y35, Y38
   Penguin Sweaters, Cap, and Skates: B02, B04, B06, B16; G02, G14, BG45, BG49; Y11, Y13, Y23, Y26
   PomPom: B60, C0, C00, <B21, RV000, BV000
 VersaMark™ Ink by Tsukineko®
Frost Sheer Shimmer™ Stix Dauber Top by Imagine®
Banner Die: Source Unknown
Elongated Oval Nestabilities® Die Set by Spellbinders®
Clear Stardust® Glitter Gel Pen by Sakura® of America
Shaker Contents by Doodles Paper Playground, Kat Scrappiness, and Gina Marie Designs
Acetate
Dimensional Foam Squares by Scrapbook Adhesives® by 3L
Repositionable Label Paper by Avery®
STAY-tion™ by Wendy Vecchi for Ranger Ink
Stamping Platform

Instructions:

I wanted to create a scene with the penguins holding hands while skating at a skating rink.
  1. Use magnets to secure white cardstock to the base of a stamping platform.
  2. Position the tall penguin facedown on the image panel centered horizontally.
  3. Press the back of the platform onto the stamp and lift.
  4. Ink the stamp with Tuxedo Black Memento ink and stamp onto the image panel and onto a piece of Repositionable Label Paper.
  5. Fussy-cut the Label Paper penguin and adhere over its counterpart on the image panel.
  6. Remove and clean the stamp.
  7. Place two other penguins facedown on the right and left of the masked penguin on the image panel so that their hands are overlapped.
  8. Press the back of the platform onto the stamps and lift.
  9. Ink the stamps with Tuxedo Black Memento ink and stamp onto the image panel and onto a piece of Repositionable Label Paper.
  10. Fussy-cut the Label Paper penguins and adhere over their counterpart on the image panel.
  11. Remove the image panel from the stamping platform. 
  12. Cut a wavy border onto copy paper.
  13. Use magnets to secure the image panel to the STAY-tion.
  14. Position the wavy border towards the top part of the image panel and secure with magnets.
  15. Brush Periwinkle Prism Ink overtop to create a sky.
  16. Use a C3 Copic marker o trace the outside of an elongated oval die to create the skating rink.
  17. Lift the masks and retaine for later use.
  18. Color the images were colored with Copic markers. 
  19. Use Cool Grey Copic markers to add detail and dimension to the snow and ice
  20. Dab Frost Shimmer dauber onto a craft mat or a piece of acetate. 
  21. Use a paint brush to apply the Frost Shimmer tot he ice rink.
  22. Use a Clear Stardust Glitter pen to add highlights to the snow and the ice rink.
  23. Set aside the image panel.
  24. Cut a piece of blue cardstock to 4.25" x 6.25" wide and pat with an embossing buddy.
  25. Use magnets to secure the blue cardstock to the base of a stamping platform.
  26. Position the Snowflakes Background Cling Rubber Stamp facedown on the blue cardstock.
  27. Press the back of the platform onto the stamp and lift.
  28. Ink the stamp with VersaMark ink and stamp. Repeat if necessary to get a good impression.
  29. Apply White Detail Embossing Powder, then remove the excess.
  30. Apply Winter Wonderland Sparkly Embossing powder, then remove the excess.
  31. Heat set the embossing powder.
  32. Trim the background panel to 5.75" x 3.75".
  33. Center the large rounded rectangle die from the Dome Jar WindowRama Die Set on the background panel, then use to cut the background to create the window/aperture for the shaker.
  34. Use the VersaMark pad or a VersaMarker to edge the die-cut's window aperture.
  35. Apply White Detail Embossing Powder, remove the excess, and heat set.
  36. Use the VersaMark pad or a VersaMarker to edge the die-cut.
  37. Apply White Detail Embossing Powder, remove the excess, and heat set.
  38. Apply Frost Shimmer Dauber to a piece of white cardstock banner and heat set. 
  39. Use a banner die to cut the white cardstock.
  40. Use magnets to secure the banner die-cut to the base of the stamping platform.
  41. Place the sentiment face down on the banner die-cut.
  42. Press the back of the platform onto the stamp and lift.
  43. Ink the stamp with Paradise VersaFine Clair Ink and heat set. 
  44. Fold the banner. 
  45. Add dimensional foam squares to the center of the banner die-cut's back and adhere to the image panel.
  46. Use glue to adhere each end of the banner to the image panel.
  47. Acetate was adhered to the back of the background panel to cover the aperture. 
  48. Apply 3D Adhesive Foam Roll around the perimeter of the window to create a well for the shaker contents.
  49. Add the shaker contents.
  50. Adhered the image panel to the background panel to seal the aperture.
  51. Adhere the shaker card front to an A4 blue card.
Notes: 
  • One day in the future, I will figure out how to prevent my shaker contents from getting stuck on the edges. So far I've tried the Embossing Buddy and a powder brush, which at least smelled nice. Neither worked. 
  • Also one day in the future, I will figure out how much to add to the shaker well so that I don't overfill and obliterate the image. That day was not today.