Showing posts with label I Brake for Stamps. Show all posts

Tuesday, September 26, 2017

Happy Halloween!

Here's a Halloween card featuring the ever-so-dapper Skelly Tonn from the Randi Dandi Halloween Series 1 Collection of Rick St. Dennis rubber stamps available exclusively at I Brake for Stamps.


Skelly Tonn was stamped with Tuxedo Black Memento ink (Imagine Crafts) and colored with Copic markers. The tip of his cigarette, eyes, and nose apertures of the skulls on his bowtie and fashionable cufflink received dabs of Red, Orange, and Yellow Spica Glitter pens(Copic). The skulls, buttons, and his cigarette holder were coated with several layers of Clear Gelly Glaze pen (Sakura) to add dimension and shine. The Skelly Tonn image was then fussy-cut and edged with a black marker.

I selected a sheet of patterned paper from the Enchanted 6x6 pad (Authentique), then placed the Skelly Tonn image upon it. I loosely traced Skelly Tonn's shape onto the patterned paper using a charcoal pencil, lifted the image, then used the charcoal pencil to color the traced image. When I was happy with the coverage, I also used the charcoal pencil to edge the image panel. The image was loosely adhered inside the charcoal-colored area.

Orange cardstock was cut and folded to form the card. The image panel was adhered to it. A scrap of the excess cardstock was die-cut with a Happy Halloween sentiment die. Pale yellow orange vellum was die-cut with the shadow dies from Happy Halloween sentiment die set and the vapor die from the Grim Cauldron die set (Memory Box). The vapor die-cut was adhered behind the cigarette on the Skelly Tonn image, which was then more firmly adhered to the image panel. The orange Happy Halloween sentiments were adhered to their vellum shadow counterparts, which were then adhered to finish the card.

I Brake for Stamps has a huge and varied collection of rubber stamps that you ought to check out right now. Just so you know, I Brake for Stamps ships internationally!

Click HERE to be whisked I Brake for Stamps to check out all of the goodies! Best of all, if you buy something, you can get a 10% discount off of your purchase if you use this coupon code:  SAVE10KATHI .


Thanks for visiting today!

Tuesday, September 12, 2017

Happy Halloween!

Here's my card featuring Tworki, one of the Rick St. Dennis rubber stamps that is exclusively available at I Brake for Stamps.


I decided that Tworki would make a fabulous ghost, so he was stamped with Tuxedo Black Memento ink (Imagine Crafts) onto a piece of very old patterned paper from a 6x6 pad, then colored with Copic markers. When Tworki was fully colored, the patterned paper was sponged with Wild Honey Distress ink (Ranger), then edged with Black Soot Distress ink

The image panel was matted with green cardstock, which was then adhered to a black card. A scrap of the leftover green cardstock was die-cut with one of the dies from the A Birdie Told Me die set (Lawn Fawn). "Happy Halloween" from the Gothic Remnant Rubs (Idea-ology) was added to the speech bubble to finish the card.

I Brake for Stamps has a huge and varied collection of rubber stamps that you ought to check out right now. Just so you know, I Brake for Stamps ships internationally!

Click HERE to be whisked I Brake for Stamps to check out all of the goodies! Best of all, if you buy something, you can get a 10% discount off of your purchase if you use this coupon code:  SAVE10KATHI .


Thanks for visiting today!

Tuesday, September 5, 2017

Floral Sugar Skull

The weather has been cool lately, which makes me think of Autumn, which makes me think of Halloween and the Day of the Dead.


The Sugar Floral Skull was stamped with Tuxedo Black Memento ink (Imagine Crafts) onto Neenah cardstock, fussy-cut, colored with Copic markers, then edged with a black marker. 

Patterned papers from an old 6x6 pad by Authentique were layered, then matted with yellow-orange cardstock. The Sugar Floral Skull was adhered and the card front was mounted onto a square black card.

I Brake for Stamps has a huge and varied collection of rubber stamps that you ought to check out right now. Just so you know, I Brake for Stamps ships internationally!

Click HERE to be whisked I Brake for Stamps to check out all of the goodies! Best of all, if you buy something, you can get a 10% discount off of your purchase if you use this code: SAVE10KATHI .


Thanks for visiting today!

Tuesday, August 29, 2017

Savor Life's Magic!

It's the end of August, the weather here in New Jersey has been wonderfully cool, squirrels have been very busy gathering acorns, and some leaves are beginning to fall. All this means is that Autumn will be here soon, which means that Halloween rapidly approacheth! Hurray!

Here's my card featuring Mardi Gras Beads, one of the Rick St. Dennis rubber stamps that is exclusively available at I Brake for Stamps.


I know the stamp's name is Mardi Gras Beads, but I think she's perfect for Halloween too! Mardi Gras Beads was stamped with Tuxedo Black Memento ink (Imagine Crafts) onto Neenah cardstock. The image panel was die-cut with one of the dies from the Card Creator Nestabilities die set (Spellbinders) then colored with Copic markers to match the wonderful Midnight Masquerade 8x8 patterned paper pad (Graphic 45).

Three different papers from the pad were layered, then the edges were distressed to reveal the white core. The card front was adhered to an off-white card and the image panel was adhered.

I Brake for Stamps has a huge and varied collection of rubber stamps that you ought to check out right now. Just so you know, I Brake for Stamps ships internationally!

Click HERE to be whisked I Brake for Stamps to check out all of the goodies! Best of all, if you buy something, you can get a 10% discount off of your purchase if you use this coupon code:  SAVE10KATHI .


Thanks for visiting today!

Tuesday, August 22, 2017

Love Bird ATC

I was feeling rather birdbrained, so I decided to create an ATC featuring the Love Bird ATC rubber stamp available at I Brake for Stamps.

Here it is!

My single Love Bird was stamped with Tuxedo Black Memento ink (Imagine Crafts) onto Neenah cardstock. After googling Love Bird images, I decided on my Love Bird's coloration and colored him with the appropriate Copic markers. The lonely Love Bird's eye, beak, and talons were coated with several layers of Clear Gelly Glaze pen (Sakura) to add dimension and shine to them.

The image panel was matted with black cardstock, adhered to patterned paper from the Nature's Sketchbook 8x8 pad (Graphic 45), then matted again with black cardstock.

I Brake for Stamps has a huge and varied collection of rubber stamps that you ought to check out right now. Just so you know, I Brake for Stamps ships internationally!

Click HERE to be whisked I Brake for Stamps to check out all of the goodies! Best of all, if you buy something, you can get a 10% discount off of your purchase if you use this coupon code:  SAVE10KATHI .


Thanks for visiting today!

Tuesday, August 15, 2017

Steampunk Nautilus Journal Page

Another Tuesday, another IBFS Steampunk project! This one is a journal page featuring Steampunk Nautilus from the New Steampunk rubber stamp set by Carmen Medlin Designsavailable at I Brake for Stamps.


Steampunk Nautilus was stamped with Tuxedo Black Memento ink (Imagine Crafts) onto Neenah cardstock, then the image panel was die-cut with one of the dies from the Rectangles Nestabilities die set (Spellbinders).  Steampunk Nautilus was colored with Copic markers and the image panel was sponged with Vintage Photo Distress Oxide ink (Ranger). I used a q-tip dipped into water to wet the ink, then heat set the image panel, matted it onto metallic copper cardstock (Neenah) and set it aside.

140 lb. Mixed Media cardstock (Strathmore) was cut down to fit in my journal. Salty Ocean Distress Oxide ink was sponged onto the Gears Skinny Minny stencil/mask (Joggles) and spritzed with water. Once the water beaded, the journal page was placed over top and smoothed over the stencil.

Peacock Feathers Distress Oxide ink was smooshed onto my craft mat, misted with water, the journal page was dragged through the puddled ink, spritzed with more water, then heat set. This was repeated a few times until I was happy with the coverage. This process was repeated again with Cracked Pistachio Distress Oxide ink.

Vintage Photo Distress Oxide ink was sponged across the bottom of the journal page, spritzed with water, and heat set. Iced Spruce Distress Oxide ink was sponged over the Moving Vines stencil (The Crafter's Workshop) at the bottom of the page and over the Gears Mini Layering stencil (Stampers Anonymous) at the top of the page. The ink was misted with water, allowed to spread a bit, then heat set.

Strips of 140 lb. Mixed Media cardstock were sponged with Abandoned Coral Distress Oxide ink, misted with water, then heat set. These pieces were die-cut with the coral die from the Under Water Build-a-Scene die set (Taylored Expressions).

Other strips of Mixed Media cardstock were sponged with Peeled Paint, Twisted Citron, and Lucky Clover Distress Oxide inks, then die-cut with the Seaweed Stalks die set (Memory Box).

The Seaweed Stalks and coral die-cuts were adhered along the bottom of the journal page, then Media Texture Sand Paste (DecoArt) was spread over the Vintage Photo Distress Oxide ink and the die-cuts. Some tiny pewter, brass, and copper  metal gears were pressed into the Media Texture Sand Paste. The page was set aside while I made and ate dinner. When I returned, the Texture Sand Paste was mostly dry, so it was heat set to totally dry it out. I did use my Vintage Photo Distress marker (Ranger) to add some depth and detail to the "sand".

Metallic copper cardstock was die-cut with the Small Alphabet Word Upper and Lower Case dies (All Occasion) and adhered to the top of the journal page.

A Remnant Rub (Idea-ology) was used to add the caption to the Steampunk Nautilus image panel, which was then adhered to the journal page using Black Photo Corners (3L Scrapbook Adhesives).

I Brake for Stamps has a huge and varied collection of rubber stamps that you ought to check out right now. Just so you know, I Brake for Stamps ships internationally!

Click HERE to be whisked I Brake for Stamps to check out all of the goodies! Best of all, if you buy something, you can get a 10% discount off of your purchase if you use this code: SAVE10KATHI .


Thanks for visiting today!

Tuesday, August 8, 2017

Adventure Awaits!

I'm still on the Steampunk Express, this time with a card featuring with the girl from the Steampunk Eyes set from the Eyes of Adventure collection by Carmen Medlin Designsavailable at I Brake for Stamps.


The girl from the Steampunk Eyes set was stamped with Tuxedo Black Memento ink (Imagine Crafts) onto Neenah cardstock and colored with Copic markers. The image panel was die-cut with one of the dies from the Long Rectangles Nestabilities die set (Spellbinders).  Clear Gelly Glaze pen (Sakura) was used to add shine and dimension to the lenses on Steampunk Eyes' goggles,  her watch crystal, and her buttons. Antique Linen Stickles (Ranger) was added to the perimeter of the image panel and heat set. It was fun to watch the glitter glue bubble and burst. I'm obviously easily amused.

A strip of patterned paper from the Timepiece 6x6 pad (Bo-Bunny) was embossed with the Clocks Embossing Plate (Cheery Lynn Designs), edged with Antique Linen Distress ink (Ranger), and layered over a sheet of patterned paper from the Timekeeper 6x6 pad (Marion Smith Designs). Clock-patterned washi tape was used to cover the seam between the papers. The card front was trimmed, the edges were sponged with Antique Linen Distress ink, then adhered to a card.

The Steampunk Eyes image panel was adhered to the card and the "Adventure Awaits" sentiment from the Quotations Metallic sticker sheet (Idea-ology) was added to finish the card.

I Brake for Stamps has a huge and varied collection of rubber stamps that you ought to check out right now. Just so you know, I Brake for Stamps ships internationally!

Click HERE to be whisked I Brake for Stamps to check out all of the goodies! Best of all, if you buy something, you can get a 10% discount off of your purchase if you use this code: SAVE10KATHI .


Thanks for visiting today!

Tuesday, August 1, 2017

Steampunk Journal 3

I seem to have a lot of Steampunk mojo, so I'm sharing another Steampunky project. This time it's a journal cover featuring Steampunk Beauty from the Eclectic Steampunk rubber stamp set by Carmen Medlin Designsavailable at I Brake for Stamps.


Steampunk Beauty was stamped with Tuxedo Black Memento ink (Imagine Crafts) onto Neenah cardsttock and colored with Copic markers. The image panel was die-cut with one of the dies from the Oval Nestabilities die set (Spellbinders).  Clear Gelly Glaze pen (Sakura) was used to add shine and dimension to the Steampunk Beauty monocle, the watch crystal, and the screws.

Black cardstock was die-cut with the matching Scalloped Oval Nestabilities die to serve as a mat for the Steampunk Beauty oval.

I used one of the Worn Journals (Idea-ology) as the base for my third Steampunk Journal. Gold metallic textured specialty paper (from my Fibermark stash) was sponged with Jet Black Archival ink (Ranger) to bring down the shine a bit. I cut the piece to 3" x 7", scored it, and backed it with double-sided tape to adhere it securely to the spine.

Patterned papers from the Timekeeper 6x6 pad (Marion Smith Designs) were edged with Jet Black Archival ink and layered onto the front and back covers of the journal.

The Double Scallop Border die (Die-namics) was used to die-cut black cardstock. The textured gold metallic cardstock used for the spine was die-cut with one of the dies from the Chains die set (Elizabeth Craft Designs) and two sizes of Upper and Lower Alphabet dies (All Occasion).

The image oval and the die-cut elements were adhered to the journal, then the ring binder insert was attached using screw-top brads. Tiny gears were adhered to the center of metallic flowers (Idea-ology and Prima Designs) with brads and/or glue. These flowers were added to the top right corner of the journal cover.

A hole was poked through the spine, a Ring Fastener (Idea-ology) and a watch charm and chain were added. I wanted to add bird and  heart charms, but I couldn't find them. No doubt they're someplace safe in the black hole that is my craft room (currently undergoing a remodel).

I Brake for Stamps has a huge and varied collection of rubber stamps that you ought to check out right now. Just so you know, I Brake for Stamps ships internationally!

Click HERE to be whisked I Brake for Stamps to check out all of the goodies! Best of all, if you buy something, you can get a 10% discount off of your purchase if you use this code:  SAVE10KATHI .


Thanks for visiting today!

Tuesday, July 25, 2017

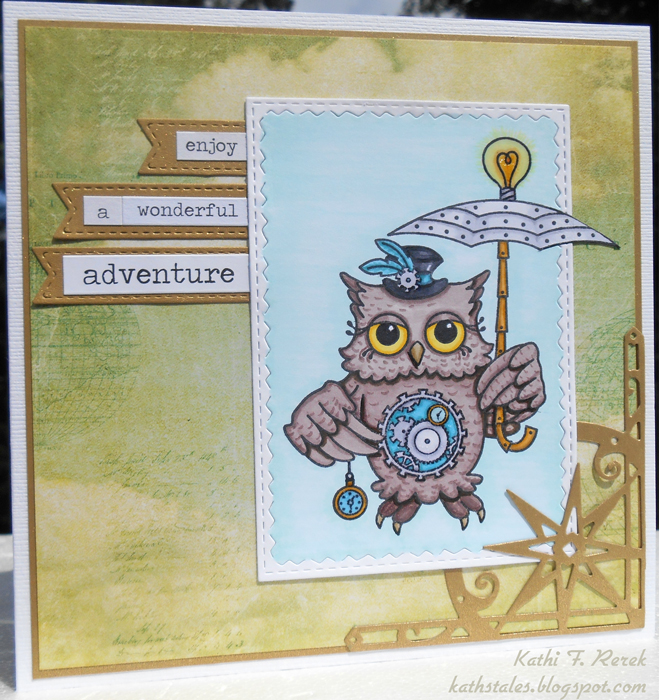
Steampunk and Owls = Perfect Together!

Another Tuesday, another Steampunky card featuring Steampunk Owl from the New Steampunk set by Carmen Medlin Designsavailable at I Brake for Stamps.


Steampunk Owl was stamped with Tuxedo Black Memento ink (Imagine Crafts) and colored with Copic markers. The image panel was die-cut with one of the dies from the Stitched Rectangles Thinlits die set (Sizzix). The background was added with Copic markers, which were also used to color the Steampunk Owl. Yellow and Orange Spica Glitter pens were used to add a glittery touch to Steampunk Owl's umbrella lightbulb. Turquoise Stardust Glitter pen added bluish glitter to the center of his gears. Clear Gelly Glaze pen (Sakura) was used to add shine and dimension to the Steampunk Owl'beak, talons, gears, lightbulb, and the Steampunk piece on his belly.

Gold cardstock was cut to a 5.75" square. Being a thrifty me, the interior of the gold cardstock was die-cut once with the Compass Corner die (Impression Obsession) and three times with one of the labels from the Stitched Double Fishtails Labels (Frantic Stamper).  Patterned paper from the Fair Skies 6x6 pad (Farmhouse Paper Company) was cut to 5 5/8" square, then matted onto the gold metallic square.Words from the Chit-Chat sticker book (Idea-ology) were added to the Fishtails Labels, which were then adhered to the card front. The Steampunk Owl image panel was adhered to the card front, which was then mounted on a 6" x 6" card.

I Brake for Stamps has a huge and varied collection of rubber stamps that you ought to check out right now. Just so you know, I Brake for Stamps ships internationally!

Click HERE to be whisked I Brake for Stamps to check out all of the goodies! Best of all, if you buy something, you can get a 10% discount off of your purchase if you use this code: SAVE10KATHI


Thanks for visiting today!

Tuesday, July 18, 2017

Adventure Awaits Steampunk Budgie!

I guess I'm still in a Steampunky mood because today's card features the budgie from the Special Delivery set from the Mech-Animals Set 1 by Carmen Medlin Designsavailable at I Brake for Stamps.


The Special Delivery Budgie was stamped with Tuxedo Black Memento ink (Imagine Crafts). I fussy-cut around the tail, then slid one of the dies from the Stitched Postage Rectangles set (La-La Land) under Special Delivery Budgie's tail, and die-cut the image. The background was added with Copic markers, which were also used to color the Special Delivery Budgie. A black Multi-liner pen was used to edge Special Delivery Budgie's tail. Clear Gelly Glaze pen (Sakura) was used to add shine and dimension to the Special Delivery Budgie's eye, talons, rivets, and collar spikes.

Patterned paper from the Uncharted 4.5" x 6.5" pad (The Paper Studio) was trimmed, edged with Hickory Smoke Distress ink (Ranger),  then matted onto silver metallic cardstock (Neenah). A scrap of the silver cardstock was die-cut with one of the labels from the Stitched Double Fishtails Labels (Frantic Stamper) and the Key Corner die from the Fuschia and Key Corner die set (Impression Obsession). The sentiment from the black and silver Quotations sticker sheet (Idea-ology) was added to the Fishtails Labels, which was then adhered to the card front. The Special Delivery Budgie image panel was adhered to the card front, which was then mounted on a white card.

I Brake for Stamps has a huge and varied collection of rubber stamps that you ought to check out right now. Just so you know, I Brake for Stamps ships internationally!

Click HERE to be whisked I Brake for Stamps to check out all of the goodies! Best of all, if you buy something, you can get a 10% discount off of your purchase if you use this code: SAVE10KATHI


Thanks for visiting today!


Thanks for visiting today!

Tuesday, July 11, 2017

Take Flight!

Here's a Steampunky card featuring Victorian Steampunk Owl from the New Steampunk set by Carmen Medlin Designsavailable at I Brake for Stamps.


Victorian Steampunk Owl was stamped with Tuxedo Black Memento ink (Imagine Crafts) and colored with Copic markers. The image panel was die-cut with one of the dies from the Stitched Rectangles Thinlits die set (Sizzix). The background was added with Copic markers, which were also used to color the Victorian Steampunk Owl. Clear Gelly Glaze pen (Sakura) was used to add shine and dimension to the Victorian Steampunk Owl's beak, screws, rivets, and the Steampunk piece on her belly.

Patterned paper from the Junque Gypsy (Marion Smith Designs) 6x6 pad was cut to 5 5/8" square, then matted onto gold metallic cardstock. A scrap of the gold cardstock was die-cut twice with one of the labels from the Stitched Double Fishtails Labels (Frantic Stamper). Words from the Chit-Chat sticker book (Idea-ology) were added to the Fishtails Labels, which were then adhered to the card front. The Victorian Steampunk Owl image panel was adhered to the card front, which was then mounted on a 6" x 6" card.

I Brake for Stamps has a huge and varied collection of rubber stamps that you ought to check out right now. Just so you know, I Brake for Stamps ships internationally!

Click HERE to be whisked I Brake for Stamps to check out all of the goodies! Best of all, if you buy something, you can get a 10% discount off of your purchase if you use this code: SAVE10KATHI


Thanks for visiting today!

Tuesday, July 4, 2017

Happy Fourth from the Gnome of the Brave!


Sorry about the pun. I couldn't help myself. I decided that one of the gnomes from the Gnome Sheet (I Brake for Stamps) would be perfect on a July 4th card, then this sentiment sprung to mind. This fabulous gnome is one of NINE (9) gnomes and a plethora of mushrooms on that sheet. Please gnote that this sheet is a great bargain!

The Gnome was stamped with Tuxedo Black Memento ink (Imagine Crafts) and colored with Copic markers. The image panel was die-cut with one of the dies from the Stitched Rectangles Thinlits die set (Sizzix). The background was added with Copic markers, which were also used to color the Gnome.

Distress Micro Glaze (Ranger) was sponged over the Stars Layering stencils (Stampers Anonymous) onto the top part of a panel cut from 140 lb. Mixed Media cardstock. Blue Bister was sprinkled over the stars, then spritzed with water, and tilted to run a bit. The excess was brushed across the page with a paint brush.  This step was repeated several times, then a tiny bit of Blueprint Sketch Distress ink (Ranger) was sponged over the stars and Blue Bister to match the colored Gnome better. The top part of the image panel was heat set.

Red Bister was sprinkled onto the bottom part of the panel, spritzed with water, brushed across the page, then heat set.
***A Digression***
By the way, Bister is very similar to Brusho Crystal Colors. In fact, the only difference (other than the shape of the packaging) that I noted was that the Bister colors have some brownish tones mixed in with the colored crystals which creates a grungier look.
The Bistered panel was put under some books to be flattened a bit. It was then die-cut with a larger die from the Stitched Rectangles Thinlits die sets, removed from the die, and the edges were lightly distressed with a scissor to add a touch of white and texture. The panel was then adhered to patterned paper from an ancient 6x6 pad.

Another sheet from the same pad was die-cut with a long rectangle die from the Card Creators A2 die set (Spellbinders) and one of the dies from the Conversations Bubble die set (Spellbinders). Simply Sweet rub-ons (Doodlebug) were used to add the sentiments.

The image panel was adhered to the card front. The sentiment strip and the conversation bubble were adhered, and the card front was adhered to a white card.

I Brake for Stamps has a huge and varied collection of rubber stamps that you ought to check out right now. Just so you know, I Brake for Stamps ships internationally!

Click HERE to be whisked over to I Brake for Stamps to check out all of the goodies! Best of all, if you buy something, you can get a 10% discount off of your purchase if you use this code: SAVE10KATHI


Thanks for visiting today!

Tuesday, June 27, 2017

By the Sea


Today's card features Watching Waves, which is a wonderful beach image with a vintage feel. This fabulous stamp is available at at I Brake for Stamps.

Watching Waves was stamped with Tuxedo Black Memento ink (Imagine Crafts) onto white cardstock, then die-cut with one of the dies from the Nestabilities Labels 8 die set (Spellbinders). I kept the image panel in the die and used Copic markers to add the edges of the sea and sand backgrounds. The image panel was then popped out of the die and I finished coloring the image. When I was done, I used an Inkssentials White gel pen to add some white caps and froth to the sea.

A strip of red gingham patterned paper from the By the Sea 8x8 pad (Graphic 45) was cut, then distressed to reveal the white edge. This was then layered atop another sheet of patterned paper from the same pad, then the image panel was adhered. The card front was adhered to a 5.5" square kraft card.

I Brake for Stamps has a huge and varied collection of rubber stamps that you ought to check out right now. Click on my badge below to be whisked over to I Brake for Stamps to check out all of the goodies! Best of all, if you buy something, you can get a 10% discount off of your purchase if you use this code: SAVE10KATHI Just so you know, I Brake for Stamps ships internationally!


Thanks for visiting today!

Tuesday, June 13, 2017

Gnome Fishing!


Oh gno! It's time for another gnome pun. Since Father's Day is coming up rather quickly, I decided that the Fishing Gnome from the Gnome Sheet (I Brake for Stamps) would be the perfect image for a card! This fabulous gnome is one of NINE (9) gnomes and a plethora of mushrooms on that sheet. Please gnote that this sheet is a great bargain!

The Fishing Gnome was stamped with Tuxedo Black Memento ink (Imagine Crafts) and colored with Copic markers. The image panel was die-cut with one of the dies from the A2 Card Creator Nestabilities die set (Spellbinders).

Old patterned paper from the Mellow collection (Basic Grey) was layered. A set of the Fancy Tags dies (Spellbinders) was used to die-cut white and patterned brown cardstock. Bon-Bon Simply Sweet rub-ons (Doodlebug) were used to add the sentiment.

I Brake for Stamps has a huge and varied collection of rubber stamps that you ought to check out right now. Just so you know, I Brake for Stamps ships internationally!

Click on my badge below to be whisked over to I Brake for Stamps to check out all of the goodies! Best of all, if you buy something, you can get a 10% discount off of your purchase if you use this code: SAVE10KATHI


Thanks for visiting today!

Tuesday, June 6, 2017

Make a Wish!

Here's a card with The Queen, one of the fabulous Rick St. Dennis rubber stamps available at I Brake for Stamps.


The Queen was stamped with Tuxedo Black Memento ink (Imagine Crafts) and colored with Copic markers. The image panel was die-cut with one of the dies from the Crea-Nest-Lies XXL Tag #6 (CREAlies). The image panel was kept in the die, so that the floor could be added. Milled Lavender Distress ink (Ranger) was sponged over the die and onto the image panel. The image panel was removed from the die, then Gold Stardust Glitter pen (Sakura) was added to star on the The Queen's wand, radiating from her fingers, and from the moon on her headdress. Clear Stardust Glitter pen was used t add sparkle to the gemstones on her dress. Black Spica Glitter pen (Copic) was used to add a touch of sparkle to the buttons on her sleeves. When the glitter ink was dry, several layers of Clear Gelly Glaze pen (Sakura) was used to add dimension and shine to the moon on the Queen's headress, her dagger, and the star on her wand.

Patterned papers, from old 6x6 pads, were selected to match the Queen's  outfit then die-cut with the one of the dies from the Crea-Nest-Lies Extreme Labels #6. The patterned papers were layered, then adhered to green cardstock which had been die-cut with a slightly larger die. A sparkly holographic foil sticker was adhered over the seam, then the The Queen image panel was adhered.

White cardstock was scored, folded, and die-cut with the largest of the Crea-Nest-Lies Extreme Labels #6. The matted tag-shaped card front was adhered and a Chit-Chat sentiment sticker (Idea-ology) was adhered to finish the card.

I Brake for Stamps has a large selection of exclusive Rick St. Dennis rubber stamps plus a huge and varied collection of rubber stamps that you ought to check out right now. Click on my badge below to be whisked over to I Brake for Stamps to check out all of the goodies! Best of all, if you buy something, you can get a 10% discount off of your purchase if you use this code: SAVE10KATHI!


Thanks for visiting today!

Tuesday, May 23, 2017

Spring Time Cat!

Cats plus flowers make me happy. The Purrfect Day Cats rubber stamp sheet (Stampinback), available at I Brake for Stamps makes me really happy ecstatic because the sheet includes TEN floral cat silhouettes, four paw prints, two sentiments, one fish skeleton, and one matching flower for a total of 18 fabulous images in this stamp set, which means you'll be seeing LOTS of flowery cats! By the way, IBFS ships internationally.

Here's my card with one of the ten floral kitties!


Fossilized Amber Distress Oxide ink(Ranger) was smooshed (technical term) onto my craft mat, spritzed with water, and then 140 lb. Mixed Media cardstock (Strathmore) was dragged through the diluted ink and heat set. This step was repeated with Spiced Marmalade Distress Oxide ink, then Worn Lipstick Distress Oxide ink. When I was happy with the coverage,  Post-It Notes were placed across the cardstock and Peeled Paint Distress Oxide ink was sponged over top. I wasn't really thrilled with the color, so I sponged Peeled Paint Distress and Mown Grass Distress ink over top.

Using my Stamp-a-Ma-Jig stamp positioner, the kitty from the Purrfect Day Cats sheet was stamped with Onyx Black VersaFine ink (Imagine Crafts). I had to re-ink the stamp and stamp it again to get better coverage probably because I was too inept to get it right the first time. I can't wait to get ahold of the of one of the new trendy stamp positioner systems so that I don't have to be quite so careful when re-stamping an incomplete image! Anyway, I touched up the image using a Black Pitt Artist Brush pen (Faber Castell).

A shadow was added under the cat using a Warm Grey Pitt Artist Brush pen.

The image panel was die-cut with one of the dies from the Mixed Rectangles Layering dies (Tonic Studios). A larger die from the same set, the "Purr-fect" die from the Cat Paw Print die set (Frantic Stamper), and the word "Just" from the Just a Note die (All Occasions) were used to die-cut black cardstock. The image panel was matted with the plain black rectangle die-cut. The sentiment was adhered in place.

The leftover Distress Oxide sponged cardstock was die-cut with the Butterfly die (Impression Obsession) and punched with a tiny dragonfly punch. The butterflies and the dragonflies were a bit boring, so I added Distress ink to them to perk 'em up a bit. My black marker was used to detail their bodies and edge them, then Black Spica Glitter pen was used to add a touch of glitter to them. The insects were adhered to the image panel and a Clear Stardust Gelly Glitter pen (Sakura) was used to add flight trails. The cardfront was adhered to a rust card.

I Brake for Stamps is where you'll find great selections of Stampinback stamps plus lots of other stamps from other stamp companies. Click on my badge below to be whisked over to I Brake for Stamps to check out all of the goodies! Best of all, if you buy something, you can get a 10% discount off of your purchase if you use this code: SAVE10KATHI!


If you have any questions about the techniques or products I used, feel free to ask!

Thanks for visiting today!

Tuesday, May 16, 2017

Sea You Soon?

I celebrated Mother's Day all weekend as my gifts started arriving on Thursday. I guess that put me in the mood to create this card!


Steampunk Sea Turtle and Steampunk Baby Sea Turtle were stamped with Tuxedo Black Memento ink (Imagine Crafts), colored with Copic markers, fussy cut, and edged with black markers. Steampunk Sea Turtle and Steampunk Baby Sea Turtle's eyes, beaks, the screws on their armor, and the lenses on Steampunk Sea Turtle's periscopes were coated with several layers of Clear Gelly Glaze pen (Sakura). Steampunk Sea Turtle and Steampunk Baby Sea Turtle were then set aside for some mother-child quality time while I created a scenic background for them.

I recently received my new Distress Oxide inks (Ranger) and have been having a blast experimenting with them. Vintage Photo, Cracked Pistachio, and Broken China Distress Oxide inks were applied in various ways to 140 lb. Mixed Media cardstock (Strathmore). When I was happy with the look, Peeled Paint Distress ink was sponged over the Moving Vines stencil (The Crafter's Workshop) and Broken China Distress ink was sponged over the Gears Mini Layering stencil (Stampers Anonymous).

Media Modeling Paste (DecoArt) was scraped across the netting on the Mini Nautical Chains stencil (The Crafter's Workshop) in three places and allowed to dry. When it was dry, Media Texture Sand Paste (DecoArt) was scraped along the bottom. Some tiny gears and an anchor charm were embedded in the wet paste. When the Media Texture Sand Paste was dry, Vintage Photo Distress ink was lightly sponged to highlight the texture and add a depth to the color. 

The netting was touched up with a White Gelly Roll gel pen (Sakura), then Steampunk Sea Turtle and Steampunk Baby Sea Turtle were adhered. The image panel was matted with metallic copper, then adhered to a green card.

I Brake for Stamps has a huge and varied collection of rubber stamps that you ought to check out right now. Click HERE to check out all of the goodies! Best of all, if you buy something, you can get a 10% discount off of your purchase if you use this code: SAVE10KATHI!


Thanks for visiting today!

I shall enter this card into the following challenges:
SanDee and amelie's Steampunk Challenges: Anything Goes
Let's Craft and Create Challenges: Create a Background

Tuesday, May 9, 2017

Celebrate!


Here's a festive card featuring Good Morning Sunshine from the fabulous and funny Humorous Senior Collection of stamps (I Brake for Stamps)FYI, IBFS ships internationally!

Good Morning Sunshine was stamped with Tuxedo Black Memento ink (Imagine Crafts) and colored with Copic markers, that were chosen to match the colors of the patterned papers from the Time to Celebrate collection (Graphic 45).

Patterned paper was die-cut with one of the dies from the Rectangle Frames die set (Die-Namics) and a nameplate die (Spellbinders). White cardstock was die-cut with a "celebrate" die from the Handwritten die set (Little B), then adhered atop the nameplate.

The image panel was adhered behind the frame die-cut. The patterned paper was layered, the image panel, and sentiment nameplate were adhered to the card front, the card front was adhered to a white card, and then white pearls were added to Good Morning Sunshine's ear and the die-cut to finish the card.

I Brake for Stamps is the home for the Humorous Senior Collection of stamps, which you ought to check out right now. IBFS also has a huge and varied collection of rubber stamps where you're sure to find something you like! Click HERE to check out all of the goodies! Best of all, if you buy something, you can get a 10% discount off of your purchase if you use this code: SAVE10KATHI!


Thanks for visiting today!

I shall enter this card into the following challenges:
Sisterhood of Snarky Stampers: Y is for Yippee
Simon Says Monday Challenges: It's a Frame Up
Corrosive Challenges: Anything Goes

Tuesday, May 2, 2017

Believe in Magic!

Here's a card with Hannah from the Mythical Reflections collection by Carmen Medlin Designs, available at I Brake for Stamps. You can buy separately or as part of the wonderful five stamp set. By the way, IBFS ships internationally!


Hannah was stamped with Tuxedo Black Memento ink (Imagine Crafts) and colored with Copic markers. The image panel was die-cut with one of the dies from the 5x7 Card Creator Nestabilities die set (Spellbinders). The image panel was kept in the die while I added the grass underneath Hannah's feet and the sky around her.

Patterned paper from my stash was layered. Chipped Sapphire Distress ink (Ranger) was sponged over the word "Magic" on the Believe Dinky stencil (That's Crafty) and heat set. When dry, "believe in" from the Christmastime Remnant Rubs sheet (Idea-ology) was added above the stenciled word. The image panel was adhered, then the card front was added to a white card.

I Brake for Stamps has a huge and varied collection of rubber stamps that you ought to check out right now. Click HERE to check out all of the goodies! Best of all, if you buy something, you can get a 10% discount off of your purchase if you use this code: SAVE10KATHI!


Thanks for visiting today!

Tuesday, April 25, 2017

Seascape Tag!

I love the ocean and I love to sail, though I don't get to do so very frequently. I guess that's why sailboats, beach scenes, and ocean-life stamps always appeal to me. 

My tag features the sailboat, gulls, and the compass from the Always Time for Friendship Half Sheet (Stampinback), available at I Brake for Stamps. By the way, IBFS ships internationally!


I recently received my long awaited set of Distress Oxide inks and after playing around a tiny bit, decided to try to create a seascape tag using them.

First I die-cut a tag from my beloved 140 lb. Mixed Media cardstock (Strathmore) using a very old Accucut die. Starting at the bottom of the tag, I sponged Vintage Photo, Faded Jeans, and Cracked Pistachio Distress Oxide inks (Ranger), spritzing the ink, then heat setting between each color. When I reached where I wanted the sun to be, I punched a circle from Eclipse Tape (Judikins), adhered it to the tag, then sponged Worn Lipstick and Broken China Distress Oxide inks, spritzing, and heat setting after the application of each color. When I was moderately happy with the colors of the tag, I lifted the circle, sponged Fossilized Amber Distress Oxide ink, spritzed it, and heat set that layer.

The next step was to stamp the sailboat from the Always Time for Friendship Half Sheet onto the tag with Jet Black Archival ink (Ranger). I colored the image using Pitt Artist pens (Faber Castell) and Zig Photo-Twin markers (EK Success).

The gulls and the compass were stamped with with Jet Black Archival ink (Ranger). White Gelly Roll gel pen (Sakura) was used to add sea foam and white caps to the ocean.

Three colors of hemp twine were added to finish the tag.

I Brake for Stamps is where you'll find great selections of Stampinback stamps plus lots of other stamps from other stamp companies. Click on my badge below to be whisked over to I Brake for Stamps to check out all of the goodies! Best of all, if you buy something, you can get a 10% discount off of your purchase if you use this code: SAVE10KATHI!


If you have any questions about the techniques or products I used, feel free to ask!

Thanks for visiting today!