Showing posts with label Stampotique. Show all posts

Tuesday, September 24, 2024

Betsy the Bird Card

It's Tuesday, my day to share a project created for Topflight Stamps! This week the team is focusing on the Stampotique Stamps being released by Katzelkraft. 

Here's my card created with the Betsy Unmounted Red Rubber Stamp by Stampotique Stamps for Katzelkraft.


Topflight Stamps Products Used:
Ink Drops - Candy 6x6 Essential Craft Papers by Craft Consortium

Other Products Used:
Solar White Classic Crest Cardstock by Neenah Papers
Raven Textured Cardstock by Bazzill Basics
Copic Markers: RV0000, RV000, RV00, RV01, RV02, RV91, B000, B00, B01, B02, B60, BV000, BV00, BV01, BV02, BV11, BV13, BV20, BV23, Y000, Y23, BG10, BG11, BG70, BG72, BG90, T0, T1, T2, C00, C0, C1 C2
Repositionable Sticker Paper by Avery
Arches Die Set: Source Unknown
91% Isopropyl Alchohol
Clear Acetate from packaging
Repositionable Scotch Tape by 3M
Stamping Platform

Instructions:
  1. Cut a piece of Raven cardstock to 9" x 6.25", score at 4.5", and fold to form an A6 card. Set aside.
  2. Use Tuxedo Black Memento Ink by Imagine Crafts/Tsukineko to stamp the bird from Betsy Unmounted Red Rubber Stamp by Katzelkraft twice –– once onto white cardstock and once onto repositionable sticker paper.
  3. Fussy-cut Betsy's body and the ground from the sticker paper version and place them over their counterparts on the image panel.
  4. Smoosh Della Blue, Blue Lagoon, Confetti, and Sundance Elements Inks, one at a time, onto a piece of leftover packaging acetate,
  5. Mist the inked acetate with a Fine Spray Misters by Spectrum Noir filled with 91% Isopropyl Alcohol, then press it facedown onto the image panel over the masked areas. 
  6. Be sure to clean and dry the acetate between colors to avoid contaminating the ink pads with another color. Continue this process until you're happy with the background. Heat set the image panel.
  7. Remove the masks from the image panel and use Copic markers to color Betsy and the ground with Copic markers. 
  8. Use Copic markers to fill in any open areas on the background.
  9. Use arch dies to create a frame from black cardstock. 
  10. Use an intermediate-sized die to cut the image panel. 
  11. Adhere the frame over the image panel die-cut.
  12. Trim a piece of patterned paper from the Ink Drops - Candy 6x6 Essential Craft Papers to 4" wide to create a background panel. 
  13. Use Nocturne VersaFine Clair In to edge the patterned paper background panel.
  14. Adhere the arch-framed image panel to the patterned paper background panel, then adhere to a black A6 card. 
  15. Add the selected black sentiment stickers from the Uplifting Stickers by Lavinia Stamps to finish the card.
Thanks for visiting today!

Thursday, October 10, 2019

CongRats - A Retirement Card

It's Thursday, which means it's time to post the second card that I created as October's Guest Designer for Topflight Stamps! It's a retirement card for my husband, who retired last week. When I first saw Katzelkraft's Les Rats des Villes - City Rats Unmounted Red Rubber Stamp Set, I knew that eventually I'd be making this card.


Topflight Stamps Products Used:
Katzelkraft's Les Rats des Villes - City Rat Unmounted Red Rubber Stamp set
Les Drôles Accessoires-Funny Accessories Unmounted Red Rubber Stamp set
Onyx Black VersaFine™ ink by Tsukineko®

Other Products Used:
Solar White Classic Crest® Cardstock by Neenah Papers
Tuxedo Black Memento™ ink by Tsukineko®
Copic® Markers:
   Rat Fur: E30, E31, N0, N1, N2, N3. N4, N5, BV000, BV20, C3, C4, C6, C6, C7
   Rat Ears, Paws, and Tails: BV000, BV20, R00, R11
   Rat Eyes: B21, B23. YG01, YG03, Y13, Y19
   Podium: W00, W1. Y000, E21. E23, E37
   Track: E13, E15
   Stands: B60, N1, N3
   Crowd: Y11, Y13, Y19, YG07, R24 ,R59, B04, B06
   Trees: G24, G85
   Sky: C4, B21
Clear Glaze® 3D Glossy Gel Pen by Sakura
Black and blue cardstock by Bazzill Basics Paper®
Black Soot Tim Holtz®Distress® ink by Ranger Industries
Speech Bubble Die set by Spellbinders®
Mixed Messages Clear Stamp Set by Paper Trey Ink
Banner Stamp by Stampotique
Glitter Alphabet Stickers by Making Memories

Instructions:
  1. Three rats from the Les Rats des Villes - City Rats Unmounted Red Rubber Stamp Set were stamped with Tuxedo Black Memento ink onto white cardstock, fussy-cut, colored with Copic markers, then edged with a dark marker to get rid of those nasty white edges. The rats' eyes and teeth were coated with several layers of Clear Glaze® 3D Glossy Gel Pen to add dimension and shine. 
  2. The winners' podium from Katzelkraft's Les Drôles Accessoires-Funny Accessories Red Rubber Stamp set was stamped with Tuxedo Black Memento ink onto white cardstock. It also was fussy cut, colored with Copic markers, and edged with a dark marker.
  3. The rats and the podium were set aside while I worked on the background. They kept each other amused while I toiled. 
  4. I googled track and field race tracks, found a suitable free photo, downloaded it, then used PhotoElements to change it from color to a black and white charcoal background, which was lightened quite a bit before being printed onto Copic friendly cardstock using my laser printer. The background image was colored with Copic markers, softened even more with the colorless blender, then trimmed to be used as the card front.
  5. The banner was stamped with Memento ink, colored, fussy-cut, edged, then adhered to the background card front. 
  6. Glittery letter stickers were added to spell out "CongRats".
  7. The card front was edged with Black Soot Distress ink, then matted with black cardstock.
  8. Light blue cardstock was die-cut with a small speech bubble die twice and the tiny sentiments were stamped with Onyx Black VersaFine ink onto them. VersaFine ink always gives a wonderful clean impression when stamping small and/or detailed stamps.
  9. The winners podium and the rats were adhered to the card front and the tiny speech bubbles were added. 
  10. The card front was then mounted onto a 5x7 blue card.
BTW, Some links in this post are affiliate links which do not affect the price you pay but allow me to earn a small percentage of a sale. Thanks! If you shop at Topflight Stamps, please use my coupon code, KATHIREREK855, for 10% off your order.

Thanks for visiting today!

Sunday, July 2, 2017

Diva!

Some news. I've stepped down from the Stampotique Design Team. It's been a fabulous run, but after several years, it's time to give some other artists a chance. They are celebrating the new team and a new release with a blog hop. You should definitely hop for a chance to win a fab prize. Click HERE to find out more information.

With that said, here's a tag for the current stencil challenge and also for "Word-Up Weekend", which is celebrated on Stampotique's Facebook page.


I used one of the cats from the Kitty Cube (Daniel Torrente) and the "What? Never seen a diva before?" (Carol's Collection), I also used one of the die-cuts that I received for the Eileen Hull/Stampotique collaboration.

I stamped the fluffy cat from the Kitty Cube with Tuxedo Black Memento ink onto the flower die-cut (Eileen Hull/Sizzix), then colored around the flower with Copic markers. Sometimes I find it easier to color the background first, especially in a small space like the flower. The cat was colored with Copic markers, then her eyes received dots of Morning Dew Nuvo Crystal Drops (Tonic Studios), which didn't sting at all.

I put her aside so her eyes could dry while I created the background of the tag. I was totally stoked to receive the newest colors of Distress Oxides today, so I just had to use a few of them. I chose Black Soot, Picked Raspberry, and a hint of Wild Honey Distress Oxide inks (Ranger). I smooshed the Black Soot Distress Oxide pad onto my craft mat, misted it with water, then dragged a piece of 140 lb. Mixed Media cardstock (Strathmore). I heat set the cardstock, then repeated the smoosh-mist-drag process with the Picked Raspberry ink pad. I did this several times until I was happy with the result, thoroughly heat set the cardstock, then sponged the same colors directly onto the cardstock, spritzing, then heat setting each color. The last touch was to sponge just the smallest amount of Wild Honey Distress Oxide ink onto the panel. Oh! I almost forgot, I used seam binding to wipe up the excess smooshed ink, then heat set it to make it all crinkly.

Picked Raspberry Distress ink was sponged over the smallest pawprints on the Pawprints stencil (Kaisercraft), then heat set. Black Soot Distress Oxide ink was sponged over the largest pawprint on the bottom right of the panel.

What? Never seen a diva before?" was stamped with Jet Black Archival ink (Ranger), then heat set. "Meow" washi tape was added to the panel, then my diva cat panel was adhered. The tag front was adhered to a black tag and the Distress Oxide dyed seam binding was threaded through the hole at the top of the tag to finish it up.

Thanks for visiting today!

Wednesday, June 28, 2017

Stencil Challenge!

This week's challenge at Stampotique Designer's Challenges is "Stencils!" Here's the blurb about the challenge!
"We are talking about Stencils for this challenge." Everyone uses a stencil every now and then. For us, we use them a ton! Let's see your best project(s) using stencils!"
During June the Stampotique Design Team is collaborating with Eileen Hull's Design Team. We were supplied die-cuts from Eileen Hull's wonderful line of Sizzix dies and were to use them in conjunction with Stampotique's stamps, so I decided to combine challenges because I like to multi-task!

If you'd like the chance to win your choice of $30 worth of Stampotique stamps, you should play along with this challenge. Visit Stampotique Designers Challenge blog and be sure to read the rules so that you'll have the chance to win that great prize!!! Remember to check to see the deadline for all of this month's Stampotique Designers Challenge blog!


Keykeeper was stamped with Tuxedo Black Memento ink (Imagine Crafts), colored with Copic markers, fussy-cut, and edged with a black marker.  Keykeeper's horns, teeth, and key were coated with several layers of Clear Gelly Glaze gel pen (Sakura), then his eyes received dots of Morning Dew Nuvo Crystal Drops (Tonic Studios), which didn't hurt him a bit.  Keykeeper was set aside to relax while I created the rest of the project.

The journal was assembled, then the back and front covers were sponged with Broken China, Worn Lipstick, and Wilted Violet Distress Oxide inks (Ranger), spritzed with water, heat-set, then the process was repeated until I was happy with the result. The inside of the journal was treated much the same way.

Folded Tags was stamped on the top of the front cover and the bottom of the back cover using Wilted Violet Distress Oxide ink. It was heat-set.

Removable Scotch Tape was placed horizontally across the bottom of the front panel. Gunmetal Cosmic Shimmer Sparkle Texture Paste (Creative Expressions) was scraped across the Small Keyholes Dylusions stencil (Ranger) and allowed to heat dry. When dry, the same texture paste was scraped over the words "Be Happy" from the Inspiration 6" x 8" stencil (DecoArt) and allowed to dry.

Wilted Violet and Worn Lipstick Distress inks (Ranger) were sponged over the Sheet Music stencil (The Crafter's Workshop), then Broken China Distress ink was sponged over the Pawprints Dinky stencil (That's Crafty).

"Love and Laughter" was stamped with Wilted Violet Distress Oxide ink, heat set, then die-cut with one of the dies from the Conversation Bubbles die set (Spellbinders). The cardstock was kept in the die and all three Distress inks were sponged over the die and the sentiment.

Music themed Washi tape (Little B) was added above and below the stenciled sparkle-pasted keyholes. Sadly when I went to trim the excess Washi tape off, the paper ripped off of the spine of the binder, so I had to repair it. Fortunately, I had some very old Gaffer cloth tape (7 Gypsies) that fit the bill. Now that there was more black, I sponged all edges of the binder with Black Soot Distress ink.

Once the torn paper emergency was resolved somewhat satisfactorily, Keykeeper was adhered and the "Love and Laughter" sentiment speech bubble was adhered over his head.

It was now time to bind the journal. I followed the directions and created some black cardstock signatures to serve as pages. Waxy Flax was threaded through the holes, tied securely, then some charms (a cat, key and lock, music notes, and "live, love, and laugh" were added with more Waxy Flax. By the way, I'm temporarily closing the journal with a beribboned binder clip.

Here's a photo that shows the spine and front/back covers.


Thanks for visiting today!

Monday, June 12, 2017

What's Up?

This month the Stampotique Design Team is pleased to be collaborating with Eileen Hull's Design Team. We were supplied die-cuts from Eileen Hull's wonderful line of Sizzix dies and were to use them in conjunction with Stampotique's stamps.


You can probably tell that my card was inspired by movie "Up!". Skull Balloons (Arwen McCullen) were stamped multiple times with Tuxedo Black Memento ink (Imagine Crafts), colored with Copic markers, fussy-cut, and edged with a black marker. The plethora of Skull Balloons were set aside while I set to work with the house die-cut.

Owl with Wings was stamped twice with Tuxedo Black Memento ink, then trimmed so that the eyes would fit behind the house's windows. The Owl's eyes and the backgrounds were colored with Copic markers and set aside to watch over the Skull Balloons.

 Alpha Background was stamped with Brick Red Distress Oxide ink Ranger), then the letters that I needed for my sentiment were punched with my handy-dandy Small Rectangle Paper Shaper punch (EK Success).

I initially sponged pink and grey Archival inks onto the house die-cut, but the paper ended up pilling. Luckily Carbon Black and Titanium White Media Fluid Acrylic (MFA) paints (DecoArt) rescued the house. The paint was heat set, reapplied, then heat set again. Actually, the pilling might have caused one of those "happy accidents" because the house gained a bit more age and texture. The windows, roof ruffles, chimney, and door were also painted with Media Fluid Acrylic (MFA) paints.

When the paint was dry, Neverending Wall, Small was stamped onto the house with Watering Can Archival ink (Ranger), then dried with a heat gun. The house was assembled, the  Alpha Background sentiment was adhered, and dimensional foam tape was added to the reverse.

I found some cloudy patterned blue cardstock in my stash, which was cut to serve as my card front. Black thread was adhered to the back of each Skull Balloon, then the Skull Balloons were adhered to the card front with dimensional foam adhesive squares. The house was adhered over the balloons' thread strings and a silver metallic pearl was added to the door to act as a door knob.

The card front was edged with my beloved Black Soot Distress ink (Ranger), then adhered to a blue card.

Thanks for visiting today!

Wednesday, June 7, 2017

Flowers!

This week's challenge at Stampotique Designer's Challenges is "Flowers!" Here's the blurb about the challenge!
"Let's see your favorite flowers this week!"
If you'd like the chance to win your choice of $30 worth of Stampotique stamps, you should play along with this challenge. Visit Stampotique Designers Challenge blog and be sure to read the rules so that you'll have the chance to win that great prize!!! Remember to check to see the deadline for all of this month's Stampotique Designers Challenge blog!

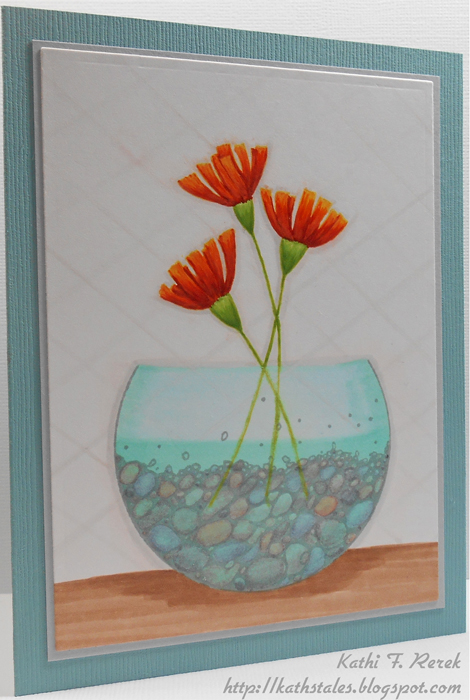
Here's my card with the wonderful new Microscopic (France Papillon) and Prairie Flowers (Terri Richardson).


I wanted to make the image look like a round vase, which was done by covering the top of the Microscopic stamp with Removable Scotch Tape®. The stamp was inked with London Fog Memento ink (Imagine Crafts), the tape was removed, and the image was stamped. 

Likewise, I wanted to use just the flowers from the Prairie Flowers stamp, so strips of Removable Scotch Tape® were placed over the frame around the flowers and the stamp was inked with Dandelion Memento ink, the tape was removed, and the Prairie Flowersimage was stamped so that the stems went into the "vase".

All images were colored with Copic markers, which were also used to create the background around the flower vase. 

The image panel was die-cut with one of the dies from the A2 Card Creator Nestabilities die set (Spellbinders), matted on grey cardstock, and adhered to a aqua/bluish card.

Retrospectively, I should have added more flowers to the vase, but I didn't want to mess with success! I know that I'll use this card design again, so there's always next time!

Thanks for visiting today!

Wednesday, May 31, 2017

Cats 'n Books! Perfect Together!

This week's challenge at Stampotique Designer's Challenges is "Oldies but Goodies!" Here's the blurb about the challenge!
"Well, we want you to use one of your older stamps but even though it's an older one, you absolutely love it! "
If you'd like the chance to win your choice of $30 worth of Stampotique stamps, you should play along with this challenge. Visit Stampotique Designers Challenge blog and be sure to read the rules so that you'll have the chance to win that great prize!!! Remember to check to see the deadline for all of this month's Stampotique Designers Challenge blog!


Cat on Books was stamped with Tuxedo Black Memento ink (Imagine Crafts) and colored with Copic markers. The image panel was trimmed and matted with black cardstock.

Livres was stamped multiple times with the help of my Stamp-a-Ma-Jig stamp positioner, then colored with Copic markers. This image panel was also matted with black cardstock, then theCat on Books image panel was adhered over it.

The sentiment was added with Chit-Chat, Big Chat, and Label Letters stickers (Idea-ology), then the card front was adhered to a kraft card.

Thanks for visiting today!

I shall enter this card into the following challenges:
• Simon Says Wednesday Challenges: Anything Goes
• Show Us Your Pussies Challenges: Furrything Goes
• Addicted to Stamps Challenges: Animals

Saturday, May 27, 2017

What's Up? Giorgio is up!

Here I go again, combining this fortnight's challenge "Oldie But Goodie" challenge at Stampotique Designer's Challenges with Stampotique's Facebook Group's "Word-Up Weekends" where we share projects created with Stampotique's many Words, Phrases, Letters, and Numbers.

If you'd like the chance to win your choice of $30 worth of Stampotique stamps, you should play along with this challenge. Visit Stampotique Designer's Challenges and be sure to read the rules so that you'll have the chance to win that great prize!!! Remember to check to see the deadline for all of this month's Stampotique Designers Challenge blog!

Giorgio was stamped with Tuxedo Black Memento ink (Imagine Crafts), colored with Copic markers, fussy-cut, and edged with a black marker. Giorgio's goggle lenses and his shell were coated with several layers of Clear Gelly Glaze pen (Sakura) to make them dimensional and shiny.

Here's a close-up to see the shiny dimension on Giorgio's goggle lenses and his shell.


Giorgio was set aside while I created a background for him. Spiced Marmalade, Broken China, Cracked Pistachio, and Tea Dye Oxide Distress inks (Ranger) were smushed onto my craft mat, spritzed with water, and a piece of 140 lb. Mixed Media cardstock (Strathmore) was dipped, dragged, and pressed into the ink, sprayed with water, and heat set. This process was repeated until I was happy with the look.

Bundled Sage and Peeled Paint Distress inks were sponged over the Moving Vines stencil (The Crafter's Workshop). The tree/coral from the Design Cube was stamped with Abandoned Coral Distress ink. The stamped image was immediately dabbed with a paper towel to soften it. This process was repeated with Tea Dye Distress ink. 


Old Linen Distress paint was dabbed along the bottom of the image panel, then heat set. This was repeated several times until layers of paint were built up a bit. Some of the paint was intentionally heat set too long to make the paint bubble to add additional texture. When the paint dried, Pumice Stone Distress marker was used to add some depth and detail to the the painted area to make it appear more like sand. Pumice Stone Distress ink was sponged along the edges of the image panel.

"This Side Up!" from the Barcode Text stamp was stamped with Jet Black Archival ink (Ranger), was adhered in place, and the image panel was adhered to a card front.

Thanks for visiting today!

I shall enter this card into the following challenges:
• Creative Artist Mixed Media Challenges: Anything Goes
• Crafty Awesomeness Challenges: Anything Goes
• Creatalicious Challenges: Anything Goes (Stencils Option)
• Let's Craft and Create Challenges: Create a Background

Wednesday, May 17, 2017

My Own Little World!

This week's challenge at Stampotique Designer's Challenges is "For the Boys!" Here's the blurb about the challenge!
"Sometimes it's so difficult to create a "guy" card or project so we want to challenge you to do just that this week."
If you'd like the chance to win your choice of $30 worth of Stampotique stamps, you should play along with this challenge. Visit Stampotique Designers Challenge blog and be sure to read the rules so that you'll have the chance to win that great prize!!! Remember to check to see the deadline for all of this month's Stampotique Designers Challenge blog!

Here's my card with Mokiwea (Daniel Torrente), Design Cube #2 (France Papillon), and Quotes #1 (Carol's Collection).


Mokiwea was stamped with Tuxedo Black Memento ink (Imagine Crafts), colored with Copic markers, fussy-cut, and edged with black marker. A silver gel pen was used to add detail to the studs on Mokiwea's trousers. Mokiwea was set aside while I created a world for him.

A piece of Kraft Resist Paper Stash (Idea-ology) was sponged with Broken China and Wilted Violet Distress Oxide inks (Ranger), spritzed with water, and heat set. This was repeated until I was pleased with the look, though I then proceeded to cover up most of it. Poor planning on my part I suppose!

Black Shimmer Delicata ink (Imagine Crafts) was sponged over the New York City Skyline Stencil and Masks (Michelle Ward/The Ink Pad). Broken China and Wilted Violet Distress Oxide inks were sponged over the clock on the Made To Measure stencil (Andy Skinner/DecoArt). Black Soot Distress ink was sponged over the Mini Batground Layering stencil (Stampers Anonymous).

The hexagon pattern from the Design Cube #2 was randomly stamped with Faded Jeans Distress ink (Ranger). 

Ruler patterned Washi tape was adhered to the base of the background panel, then Mokiwea was positioned and adhered.

Pale purple vellum was die-cut with one of the dies from the Stitched Speech Bubble Edges die set (Die-Namics) and one of the sentiments from the was stamped onto it with Jet Black StazOn ink, then adhered to the top of the card.

The entire image panel was sponged with Black Soot Distress ink, then adhered to a black card.

Thanks for visiting today.

I shall enter this card into the following challenges:

Sunday, May 7, 2017

Word-Up Weekend/One Layer Combo Card

I'm multi-tasking, combining this fortnight's challenge "One Layer" challenge at Stampotique Designer's Challenges  with Stampotique's Facebook Group's "Word-Up Weekends" where we share projects created with Stampotique's many Words, Phrases, Letters, and Numbers.

If you'd like the chance to win your choice of $30 worth of Stampotique stamps, you should play along with this month's challenges. Visit Stampotique Designers Challenge blog and be sure to read the rules so that you'll have the chance to win that great prize!!! Remember to check to see the deadline for all of this month's Stampotique Designers Challenges!

Here's a card with two of Stampotique's May release stamps, Isabelle (Tracy Scott) and one of the sentiments from Quotes #1 (Carol Ramsay).


Isabelle was stamped onto a 3.5" x 5" card with Jet Black Archival ink (Ranger) and colored with Zig Photo-Twin markers (EK Success). Purple Stardust Glitter Gel pen (Sakura) was used to make the baubles in Isabelle's crown sparkly. Red Stardust Glitter Gel pen added sparkle to the heart in her crown and the eyes of the skull. Orange Spica Glitter pen (Copic) was used to add glitter to the skull and crown. Clear Stardust Glitter Gel pen was used to outline the image.

The sentiment was stamped under the image with Jet Black Archival ink and the assistance of a stamp positioner. I decided that the card wasn't glittery enough so I used Clear Spectrum Noir Glitter Brush marker over the image and to underline the sentiment. Clear Gelly Glaze pen was used to add a touch of dimension and shine to the skull, heart, and baubles.

Thanks for visiting today!

Sunday, April 30, 2017

Coffee Enhances Everything!

Due to a bunch of stuff, I almost missed "Word-Up Weekends" where we share projects created with Stampotique's many Words, Phrases, Letters, and Numbers.


Baby Cakes was stamped with Tuxedo Black Memento ink (Imagine Crafts) and colored with Copic markers. The image panel was die-cut with one of the dies from the Long Rectangles Nestabilities die set (Spellbinders), then matted onto pink cardstock sized slightly larger than the image panel.

"I'll Love You More After Coffee" from the Phrase Cube 2  was also stamped with Tuxedo Black Memento ink, then die-cut with one of the dies from the Birthday Speech Bubbles die set (Die-namics). Dotty colors were added with Copic markers.

Patterned paper from a seriously old 6x6 pad was cut to size, then the edges were distressed. The patterned paper was adhered to a pink card. The image panel was adhered, then the sentiment was popped up a bit and adhered as shown.

Thanks for visiting today!

Wednesday, April 26, 2017

A Time Tag!

This week's challenge at Stampotique Designer's Challenges is "One Layer" (#272). Here's the blurb about the challenge!
"You can only have one layer on your projects this week."
If you'd like the chance to win your choice of $30 worth of Stampotique stamps, you should play along with this challenge. Visit Stampotique Designers Challenge blog and be sure to read the rules so that you'll have the chance to win that great prize!!! Remember to check to see the deadline for all of this month's Stampotique Designers Challenges!

Here's my tag with Goth Grandfather Clock (Arwen McCullen), Design Cube 2 (France Papillon), and "One Second, One Minute, One Hour, One Day" (Janet Klein).


The Goth Grandfather Clock was stamped with Tuxedo Black Memento ink (Imagine Crafts) onto a tag die-cut from 140 lb. Mixed Media cardstock (Strathmore) with my trust Tag Alterations die (Sizzix). Goth Grandfather Clock was colored with Copic markers. The was also stamped onto Eclipse Tape (Judikins) then fussy-cut to be used as a mask.

The mask was placed over its counterpart on the tag, a Post-It Note was used to cover the top part of the cardstock and Copic markers were used to add the floor. The Post-It Note was moved to cover the floor and Tattered Rose, Milled Lavender, and Blueprint Sketch Distress inks (Ranger) were sponged over the tag, spritzed with water, then heat set. The same colors of Distress ink were sponged over the Gothic and the Clockwork Layering stencils (Stampers Anonymous), then spritzed, and heat set repeatedly to knock the patterns way back.

The crackle pattern from the Design Cube 2 was repeatedly stamped using the same colors of Distress ink. Again, the tag was spritzed with water and heat set. This process was repeated several times until I was happy.

Post-It Notes were used to cover the One Second, One Minute, One Hour, One Day" stamp, one phrase at a time was inked, the Post-It Notes were removed, and each phrase was stamped with Distress ink. When all four time phrases were stamped, the tag was once again spritzed with water and heat set to make the sentiments fade into the background.

The entire One Second, One Minute, One Hour, One Day" sentiment was stamped at the top, the mask was removed, and clear polka-dotted ribbon was added to finish the tag.

Thanks for visiting today!

I shall enter this card into the following challenges:
• Dies R Us Challenges: Tags
• Stamping Sensations Challenges: Anything Goes


Sunday, April 16, 2017

Happy Easter!

Happy Easter! I've created an Easter carad for Stampotique's Facebook Group's "Word-Up Weekends" where we share projects created with Stampotique's many Words, Phrases, Letters, and Numbers.


Bunny Boy was stamped with Jet Black Archival ink (Ranger) onto 140 lb. Mixed Media cardstock (Strathmore) and onto Eclipse Tape (Judikins). The Eclipse Tape version was fussy-cut then set aside while its counterpart was colored using Zig Photo-Twin markers (EK Success). These markers are meant to be used to tint black and white photos, but I like to use them as watercolor markers. They're not as "juicy" as some and come in soft, subtle colors. These markers were used to add grass under Bunny Boy's feet.

The fussy-cut Eclipse Tape Bunny Boy was adhered over his brother on the image panel. Summer Sky and Angel Pink Memento inks were sponged over the Picasso Shield/Stencil (Stampendous) to create a cloudy sky.

I used one of the Zig Photo-Twin marker to color letters on the Alpha Background stamp, huffed on the stamp, and stamped the letters that I needed. The letters were punched with a small rectangle Paper Shaper punch (EK Success) and the color was touched up with the marker.

Patterned papers (Doodlebug) was layered as shown. Ancient Paper Frill borders were added over the seam between the patterned papers. Happy, Happy" was stamped onto the top border and the word "Easter" with the letters stamped with the Alpha Background stamp were added along the bottom. The image panel was adhered to the card front, which was then added to a white card.

Thanks for visiting today!

Thursday, April 13, 2017

Bling It On!

This week's challenge at Stampotique Designer's Challenges is "Bling It On!" (#271). Here's the blurb about the challenge!
"Think shimmer, shine, or sparkle. Add something "blingy" to your project this week."
If you'd like the chance to win your choice of $30 worth of Stampotique stamps, you should play along with this challenge. Visit Stampotique Designers Challenge blog and be sure to read the rules so that you'll have the chance to win that great prize!!! Remember to check to see the deadline for all of this month's Stampotique Designers Challenges!


Patterned Circles was stamped onto 140 lb. Mixed Media cardstock (Strathmore) using Onyx Black VersaFine ink (Imagine Crafts), then heat embossed with Clear Detail embossing powder (Ranger). Agatha's Parrot was then stamped with Onyx Black VersaFine ink using a stamp positioner to perch him on one of the center circles. He was then heat embossed with Clear Detail embossing powder. The Patterned Circles and Agatha's Parrot were colored using PrismaColor markers because I didn't want to risk ruining my beloved Copics.

When I was done coloring Patterned Circles and Agatha's Parrot, a VersaMarker pen (Imagine Crafts) was used to cover the images with embossing ink. Polysparkle embossing powder (Ranger) was heat set. This process was repeated three times to add shiny, dimensional, and glittery look to Patterned Circles and Agatha's Parrot. 

Sketch and Wash pencil (General) was used to add a horizon to the image panel, then the top part of the image was covered with Post-It Notes. Hickory Smoke Distress ink (Ranger) was sponged over the bottom part of the image panel, the sponged again over the stencil included with the NK Studio Urban Scribble Foam and Cling Stamp set (Stampendous).

The Post-It Notes were removed and placed over the bottom portion of the image panel. Squeezed Lemonade Distress ink was sponged over the top portion of the image, then over the Bubbles stencil (Stampers Anonymous). Apparently, I had forgotten to clean the stencil, so a bit of blue ink ended up in the mix. Fossilized Amber Distress ink was then sponged over the stencil to add a bit of contrast.

Since the challenge theme is Bling It On, Royal Peacock Fire Glitz Spray (Lindy's Stamp Gang), was sprayed over the entire image panel to add additional shimmer. I figured more glitter was needed, so Black Diamond Stickles glitter glue (Ranger) was added to the edges of the image panel. Then I was a good me and let it sit for several hours to dry.

While it was drying, Alpha Background  was stamped several times with Onyx Black VersaFine ink. I was thrilled to discover that my small rectangle Paper Shaper punch (EK Success) was (almost) the perfect fit for the letters in the Alpha Background . I punched out the letters I needed for my sentiment, touched them up with a grey Copic marker, then adhered them to the image panel.

The piece still needed more glitter, sparkle, shimmer, and shine, so I used glitter paper to mat the image panel, then adhered the matted image panel to a white card. A strand of rhinestone jewels was added to Agatha's Parrot's beak to finish the card.

Thanks for visiting today!

I shall enter this card into the following challenges:
• Moving Along with the Times Challenges: Birds or Feathers
• Addicted to Stamps and More: Make Your Mark
• Crafty Cardmakers Challenges: Things with Wings

Sunday, April 9, 2017

Word-Up Weekend/Text Challenge Combo!

Here I am multi-tasking by combining this week's challenge at Stampotique Designer's Challenges is Text (#270) with Stampotique's Facebook Group's "Word-Up Weekends" where we share projects created with Stampotique's many Words, Phrases, Letters, and Numbers.

If you'd like the chance to win your choice of $30 worth of Stampotique stamps, you should play along with this month's challenges. Visit Stampotique Designers Challenge blog and be sure to read the rules so that you'll have the chance to win that great prize!!! Remember to check to see the deadline for all of this month's Stampotique Designers Challenges!

Here's my rather large tag that uses the new Cooee (Karen Hayselden) stamp with "Make Magic Wherever You Go! (Amy Wilson-Wellenstein).


Cooee was stamped onto text paper from the Once Upon a Time stack (DCWV) with Tuxedo Black Memento ink (Imagine Crafts), then colored with Copic markers. Picket Fence Distress marker (Ranger) was used to color Cooee's eyes white. The image panel and another sheet from the same paper stack were die-cut with a die from the 5x7 Card Creator die set (Spellbinders). The edges were sponged with Shaded Lilac and Tea Dye Distress ink (Ranger), then adhered over a sheet with a castle on it. The edges of that sheet were also sponged with the same colors of Distress ink.

"Make Magic Wherever You Go! was stamped onto another scrap, then matted with a slightly larger scrap. Dimensional foam adhesive was used to adhere the sentiment to the tag panel.

I had found #10 Inkssentials Manila Tags  (Ranger) for dirt cheap. Shaded Lilac and Tea Dye Distress ink (Ranger) was sponged over the Flourish Layering stencil (Stampers Anonymous). Some hand-dyed seam binding was used to finish the tag.

Thanks for visiting today!

Wednesday, April 5, 2017

Live from New York, it's Caturday Night Live!

This week's challenge at Stampotique Designer's Challenges is Text (#270). Here's the blurb about the challenge!
"We are asking you to use some sort of text in your backgrounds this week. Weather it be newspaper, books, stamped words, something printed.. there possibilities are forever with this one."
If you'd like the chance to win your choice of $30 worth of Stampotique stamps, you should play along with this challenge. Visit Stampotique Designers Challenge blog and be sure to read the rules so that you'll have the chance to win that great prize!!! Remember to check to see the deadline for all of this month's Stampotique Designers Challenges!


TV, one of Stampotique's new April stamps, was stamped with Jet Black Archival ink (Ranger). The edges of the TV were covered with Post-It Notes. The other three cats on the Kitty Squad stamp were covered with Post-It Notes, the remaining cat was inked, then stamped into the TV screen.

First the Cat and the TV were slightly shaded with Copic markers. The Cat's body was colored with Oktoberfest Orange Magical Shaker. His ears were colored with Oom Pah Pah Pink Magical Shaker. His eyes were colored with the Freaky Frankenlime Magical Powder from the Haunted Halloween set of Magical Powders.

The exterior of the  TV was colored with Black Forest Black Magical Shaker (Lindy's Stamp Gang). The TV screen was colored with Tainted Love Teal Magical Powder from the Haunted Halloween set of Magical Powders. The TV logo was colored with Yodeling Yellow Magical Shaker and the table was colored with Bratwurst Brown Magical Shaker. The background of the image panel was coloreded with Bavarian Blue Magical Shaker.

The image panel and black metallic cardstsock were die-cut with two of the dies from the 5x7 Card Creator Nestabilities die set (Spellbinders). The image panel was matted with the black metallic cardstock and the sentiment was added with Simply Sweet rub-ons (Doodlebug Designs).

A newspaper television listing was scanned, then printed onto cardstock. It was colored with Black Forest Black Magical Shaker, heat set, and placed under heavy books to flatten. When completely dry, it was trimmed to 4.75" x 6.75".

Metallic black was die-cut three times with the Cityscape die (Memory Box). Yellow cardstock was die-cut three times with the Cityscape Silhouette die (Memory Box). Silver cardstock was die-cut with the Sturdy Bridge die (Memory Box).

The matted Cat and the TV image panel was adhered to the colored television listing, then the various cityscape and bridge dies were layered over the base of the image panel. The image panel was adhered to a 5x7 card.

Thanks for visiting today.

Saturday, April 1, 2017

Stampotique Stamps & Lindy's Stamp Gang: Color Challenge!

April is such an exciting month. Not only is Stampotique releasing new stamps, but the Stampotique Design Team is doing a collaboration with Lindy's Stamp Gang's Design Team! Lindy's Stamp Gang sent some of their wonderful products to us for use on our Stampotique projects this month. They also will send a prize pack to one of the participants at Stampotique Designers Challenges! The winner will be drawn at the end of April.

Here's a link to see Lindy's wonderful product line of colorful sprays, Magical Powders, embossing powders, and tools. We're kicking off our collaboration by participating in Lindy's Stamp Gang's Design Team's monthly color challenge!


Here's the color palette:


Here's the first card that I created with Cupcake Girl (Tera Callihan), which is one of April's new stamps. It also uses Skull Balloons (Arwen McMullen) and "Happy Birthday" (Janet Klein).


Cupcake Girl and Skull Balloons were stamped with Tuxedo Black Memento ink (Imagine Crafts), colored with Copic markers, fussy-cut, and edged with black marker. They were set aside while I worked on a background for them.

Media Modeling Paste (DecoArt) was scraped over the Chequered Dots stencil (Ranger), the Dinky Arrows stencil (That's Crafty), and Dinky Circles stencil (That's Crafty) onto 140 lb. Mixed Media cardstock (Strathmore) then allowed to dry.

When dry, Royal Peacock Fire Glitz Spray, Royal Emerald Fire Glitz Spray, Blue Hawaiian Blue Starburst Spray, and a tiny bit of Raspberry Lemonade Flat Fabio Spray was repeatedly sprayed and spritzed over the textured background until I was happy with the way it looked. The background was allowed to air dry, then heat set as well.

Cupcake Girl and Skull Balloons were adhered to the background. A thin black Sharpie pen was used to draw in the strings to the Skull Balloons. The image panel was matted with black cardstock, then adhered to a blue card. A scrap of the blue cardstock was die-cut with a nameplate die and "Happy Birthday" was stamped on it. The sentiment tag was adhered to finish this card.


Cupcake and Plushy were both stamped twice. Hand was stamped once. All images were fussy-cut, though the Cupcake and the Cupcake's frosting were fussy-cut separately.

The Cupcake paper wrapper was sprayed with Royal Emerald Fire Glitz Spray and Royal Peacock Fire Spray then allowed to dry. The Cupcake's frosting was sprayed with Raspberry Lemonade Flat Fabio Spray. The spray was allowed to dry. The frosting still looked a bit flat to me, so Sidewalk Chalk Magical Powder was mixed with Raspberry Lemonade Flat Fabio Spray on a palette. The resulting color was applied with my finger and/or a sponge dauber. The Cupcake liner and frosting were set aside to dry.

The Plushies and the Hand were colored with Copic markers and edged with a black marker. The  Plushies ' eyes were coated with several layers of Clear Gelly Glaze pen (Sakura) to make them shiny and dimensional. Gold gel pen was used to trace the Plushies ' earrings. The Plushies  and the Hand both joined the Cupcake while I created a background for them.

140 lb. Mixed Media cardstock was die-cut with one of the dies from the Rectangle Frames die set (Die-namics). It was sprayed with Rusty Lantern Lime Stardust Spray.

Another piece of 140 lb. Mixed Media cardstock was Royal Peacock Fire Glitz Spray and heat set. Then Royal Peacock Fire Glitz Spray, Blue Hawaiian Starburst Spray, and Raspberry Lemonade  Flat Fabio Spray were sprayed over a Bubbles stencil (Ranger). This was repeated until I was happy with the coverage. The sprayed stenciled cardstock was heat set and trimmed to size. 

A scrap of the sprayed cardstock was die-cut with a label die (Spellbinders) and the Ta-dah sentiment was stamped onto the die-cut.

Washi tape was added to the base of the stencilled sprayed cardstock panel. The Hand was adhered to the upper right of the panel The frame was adhered over it, then the Cupcake parts were pieced back together, and adhered to image panel. The Plushies were adhered as shown, and the Ta-dah sentiment was added to the frame and enhanced with a fuschia rhinestone flower. The card front was mounted onto a plain white card to finish the project!

Thanks for visiting today!