Things have been a bit hectic here as my father has had emergency surgery and is still in ICU. I've been doing a fair amount of driving to and from my parents' house, the hospital, and home, which has left me tired and mojo-less.
Right now, this card sums up one of my most earnest desires. Serenity for me and my family accompanied by a smooth recovery for my dad.
The stamp is called Supplication (CH-708-H) and is by Third Coast Rubber Stamps. She was colored with Copic markers, then masked. Next she was diecut and while the paper was still in the Nestabilities die, Memento ink sponged through a cloud stencil to create the sky and the grass. Darker green Memento was added with Fantastix to create a bit more texture.
The sentiment was composed with gold sticker letters. This circle was matted onto gold metallic paper then adhered to a scalloped circle card.
Thanks for visiting today!
Thursday, June 30, 2011
Wednesday, June 29, 2011
Bombshell Stamps Hump Day Hop!
Woo-hoo! Today's the day for the monthly Bombshell Stamps Hump Day Hop, which occur on the last Wednesday of each month!
Alas and alack, I was not able to participate this month, so get thee to Bombshell Blog to find out the theme and start the blog hop.
Friday, June 24, 2011
Taylored Expressions Guest Sketch Designer!
Greetings!
I'm stoked to participating in this sketch challenge as a Guest Sketch Designer! You can see the sketch and read the details of the challenge over at Taylor VanBruggen's blog.
Here's my card!
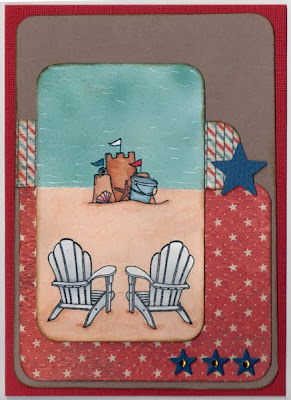
I used the Adirondack chairs and the sand castle from Taylored Expressions A Day in Paradise set, which I just had to have when it was released last month. I fell in love with the Adirondack chairs, that castle, and the beach cottage. But since I used a house-type image yesterday, I didn't want to use another one.
All the images were colored with Copic markers and once again, I tried my hand at airbrushing. I'm getting better, but I'm still way down on the learning curve. I added a bit of white gel pen accents for surf and foam. The patterned paper is from Basic Grey's Life of the Party 6x6 pad. The stars are really old metal ones that are meant to go with eyelets, but I used gemstones instead. I meant to coat the starfish and the shell with Glaze Pen, but forgot, especially since this was my second take on the card. The first one had issues when the paper peeled after sponging ink over the stamped, colored, and masked images. *sigh*
Oh. The background paper is actually dark kraft, though the scan makes it look way darker. The "sand" is lighterer irl. I discovered that I can use my daughter's scanner remotely from my computer using the network, so I tried that since my photography skillz need work.
Anyways, now that you've seen my take on the sketch, hop along to the other participants or visit Taylored Expressions' forum at Splitcoast.
Taylored Expressions Sketch Crew:
Dawn Easton
Jami Sibley
Lisa Hjulberg
Lori Craig
Monika Davis
Rachel Sztonyk
Taylor VanBruggen
Tracy Clemente
Guest Designer:
Jasmin Owsley
Thursday, June 23, 2011
"Old Glory" Taylored Expressions Blast from the Past Blog Hop!
Once a month, Taylored Expressions holds a Blast from the Past Blog Hop, where the customers play along with Taylored Expressions' very talented design team! Everyone uses older stamp sets on their projects (hence the Blast from the Past)! This month's theme is Old Glory, where we were to use the colors red, white, and blue!
Here's my card, which will go to friends who are relocating to the Pacific Northwest in July!
The card uses the window, shutters, and window box from the Fresh Flowers set along with the flower patch from the In The Park set. The sentiment and banner are from the Banner Day #1 set, which was used with the matching die. I've gotta say I love the matching stamps and dies. I especially love that they give you a plastic template so you can position your dies perfectly after you stamp. It's almost idiot proof. *snort*
The flower patch was stamped twice, masked with Miskit Frisket (which has become my favorite liquid mask), then a third patch was stamped and masked. The window box was stamped, then the window was stamped. Even with my Stamp-a-ma-jig, I managed to mess up the positioning of the second shutter, so I ended up cutting 'em out. All elements were colored with Copic markers in the required color scheme. Some Iridescent Medium was added to the window panes to give them some glitz.
The window and shutters needed a house, but I didn't have any patterned paper for that and didn't feel like drawing siding. I went to my trusty stash and found some textured striped paper that I white washed with two layers of Picket Fence Dabber, which was brushed (not dabbed) on. Then I wanted some grass (of the lawn variety ;D) and remembered that I had a stash of seriously old die cuts. Perfect! I did a bit of matting, stamped the sentiment and banner, die cut it, and popped it onto dimensionals.
Coincidentally, this card qualifies for a Splitcoast Stampers challenge (CC328).
Now that you've read this ridiculously long description, hop along to the next person on the blog hop -- Corinna! If you get lost, the hop list is below.
Wednesday, June 15, 2011
"Wild Thing" challenge!
Bombshell Stamps' Ms. June, Emily, set this month's "Wild Thing" challenge. We were dared to create a project using an animal print stamp.
Here's mine!
I decided to use the "formal pin-up with fan" from Bombshell's Lucky Bride and dress her in leopard print silk! I stamped the leopard print stamp from Bombshell's Bombshell Patterns set several times with StazOn black ink onto Shantung Silk specialty paper by FiberMark. This paper has the sheen and feel of real silk! I then stamped the pin-up onto plain white cardstock and colored her with Copic markers. A touch of glitter pen was added to her eyelids and a few gemstones were added as bracelets. Then I stamped the pin-up onto the leopard print stamped silky paper, cut out her dress, headpiece, and fan, and paper pieced her back together again.
The pin-up was cut out, popped up on dimensional foam, and adhered to a metallic black cardstock oval die cut. I used the other part of the leopard stamped sheet for the die cut, which was edged with Stickles (that I actually left overnight to dry. See? I can exercise patience!). A border punch was used on both sides of the plain silk paper and mounted onto a black metallic card.
By the way, if you play along with Ms. June's challenge AND share it at either Bombshell's Blog or on the Bombshell Forum, you can be entered for a chance to win a free set of your choosing!
Thanks for visiting today!
Wednesday, June 8, 2011
June's Bombshell Sketch Challenge!
Greetings! As you may or may not know, I design a sketch for Bombshell Stamps each month!
Here's June's sketch!
Here's my take on the sketch!
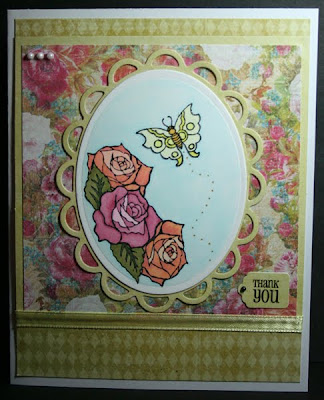
The card features the rose garland from the Dead Necessities set and one of the many butterflies from the Butterfly Dreams set.
The roses and butterfly were colored with Copic markers. I added Glaze pen eyes and a glitter pen trail to the butterfly. The patterned paper is from a 6x6 pad by Prima. I must've gotten a whacked pad because the papers were not cut square. I thought it was me, but after messing up a LOT of paper, I actually measured one straight out of the pad before cutting it. The harlequins were not straight across and there was a 1/16" - 1/8" discrepancy. Anyways, I was pleased that there are several sheets of each pattern, and with some judiciously placed ribbon, it looks less crooked.
I added a few pearls and a rub-on sentiment on a tag to finish the 5" x 6.25" card.
Bop on over to the Bombshell Blog to see what the other Bombshell Girls and Pin-ups (Guest DT) have created with this sketch. If you feel motivated, get out your Bombshell stamps and play along! Share with us on the blog and/or the forum for a chance to win a free set of Bombshell stamps!
Thanks for visiting today!
Tuesday, June 7, 2011
I'm over the moon!
I love Third Coast Rubber Stamps. I truly believe they have stamps to suit everyone's taste, from cute to elegant, from magical to realistic, and lots in between!
So when I found out that Val was holding her first ever dt call, I submitted my application within minutes!!! I honestly believe that I broke some kind of record. I know that I just copy, pasted, and hit send.
Then I waited and hoped. And hoped and waited. Being a me of little patience, it felt like freakin' eons had passed.
In reality, it was only a few short weeks. Each applicant emailed their applications, links to their blogs, online galleries, and up to ten project jpgs each. I understood that the process would take time. I also knew that I'd be up against some seriously stiff competition and whereas Val would be treated some awesome eye candy, she had to make difficult decisions.
So, I was over the moon with excitement and elation to receive word that I made the team and will be working with fourteen other ladies, some guest designers, and some incredibly fabulous stamps. Check out their blogs in the blogroll down to the right. It's going to be a fun ride for all of us!
Here are two cards using Kitty Luna (CH-707-H)
Both cats were colored with Copic markers. I've been playing around with Miskit Frisket liquid mask and wanted to see how it did with a background with lots of sponged Distress Ink vs. airbrushed Copic. I also used an Eclipse tape die cut.
Here's the Distress Inked card.
As you can see, when I spritzed the sponged ink with water, the ink migrated under both the liquid mask and the Eclipse tape mask. The moon and cat's wings got especially "corrupted", so I used Pearl paint dabber on the moon and Twinkling H20s on the wings. The background cardstock (both the lavender and white are shimmery.
Here's the airbrushed version.
It's clear that I'm still trying to figure out the pressure to use whilst airbrushing. As you can see, there was less migration on this version, though there are lots of user-error airbrush blotches. The migration is primarily under the paper mask, which might not have been down as firmly as it should have been. The Miskit Frisket did lift some of the glimmer from the Iridescent medium that I used over the moon, so I reapplied it. It's shimmery, but you can't tell from the photo. Oh well. I used patterned paper by the Memory Box and shimmery white cardstock for this version. I also added some irridescent and silver border stickers and corner stickers.
Thanks for visiting today.
Saturday, June 4, 2011
Skull Appreciation Day Blog Hop!
Hello and welcome to the Skull Appreciation Day Blog Hop! You should have gotten here from Judi's blog. If you didn't, there's a complete hop list below!
The talented and somewhat bizarre-but-in-a-good-way ladies at Smeared & Smudged are sponsoring a blog hop to honor Skull Appreciation Day. Yes. There is such a thing. I don't know about you, but I sure appreciate my skull! After all, without it, I'd be more scatter-brained (literally) than usual!
Anyway, here's the info I swiped from their Smeared & Smudged.
Not quite sure what Skull Appreciation Day is? Here is what the Skull-A-Day have to say about it... after all they are the ones who started this movement!
Here's my card!
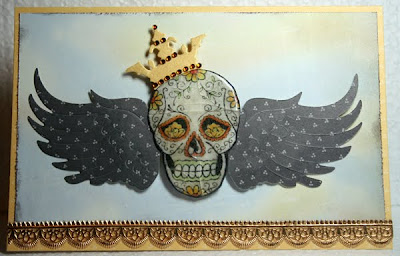
I stamped the alter skull from the Alter Skulls set by Bombshell Stamps, colored it with Copic markers, fussy cut just the skull (omitting the candles), then added several layers of UTEE, popped it into the freezer, and got some cool cracking. Wing die cuts (QuicKutz) were added along with a bejeweled golden die cut crown. The whole thing was popped up onto dimensionals and put onto blue sky patterned paper. Some German Scrap was added to finish it off. As often happens, this didn't come out the way I envisioned, but done is done and done is good! When I decide what to do with it, I'll add a sentiment.
Now that you've seen my project, hop along to Steph! Be sure to comment along the way for a chance to win fabulous prizes!!!
If you get lost, refer to the list below!
The talented and somewhat bizarre-but-in-a-good-way ladies at Smeared & Smudged are sponsoring a blog hop to honor Skull Appreciation Day. Yes. There is such a thing. I don't know about you, but I sure appreciate my skull! After all, without it, I'd be more scatter-brained (literally) than usual!
Anyway, here's the info I swiped from their Smeared & Smudged.
Not quite sure what Skull Appreciation Day is? Here is what the Skull-A-Day have to say about it... after all they are the ones who started this movement!
"We here at Skull-A-Day have decided that there needs to be an official international day of cranial love! To that end we're starting a campaign to get June 4th (the day Skull-A-Day started) officially recognized as Skull Appreciation Day around the world in 2011, and of course to get as many people celebrating it as possible. Since we have absolutely no idea about how to go about doing this we've decided to ask you the dedicated fans of this project to help!"
Here's my card!
I stamped the alter skull from the Alter Skulls set by Bombshell Stamps, colored it with Copic markers, fussy cut just the skull (omitting the candles), then added several layers of UTEE, popped it into the freezer, and got some cool cracking. Wing die cuts (QuicKutz) were added along with a bejeweled golden die cut crown. The whole thing was popped up onto dimensionals and put onto blue sky patterned paper. Some German Scrap was added to finish it off. As often happens, this didn't come out the way I envisioned, but done is done and done is good! When I decide what to do with it, I'll add a sentiment.
Now that you've seen my project, hop along to Steph! Be sure to comment along the way for a chance to win fabulous prizes!!!
If you get lost, refer to the list below!
Subscribe to:
Posts (Atom)