Monday, August 31, 2015

Steampunk Seahorse - Journal Page

If you've been here before, you know that I love Steampunk. A while back, I decided that I was going to create a series of Steampunk Journals. I'd have one for  creatures of the sky, creatures of the sea, machines, people, fashion, etc. Then I'd fill each journal with pages. Being me, I've created Steampunk Journals, Volume One - The Aviary. But I can't share it with you now. I'm such a tease.

I will be working on the other covers soon, but meanwhile, I'm making journal pages. I apparently like to do things backwards.

Here's the first one. It features a Steampunk Seahorse, SCACD's Nancy's Seahorse.


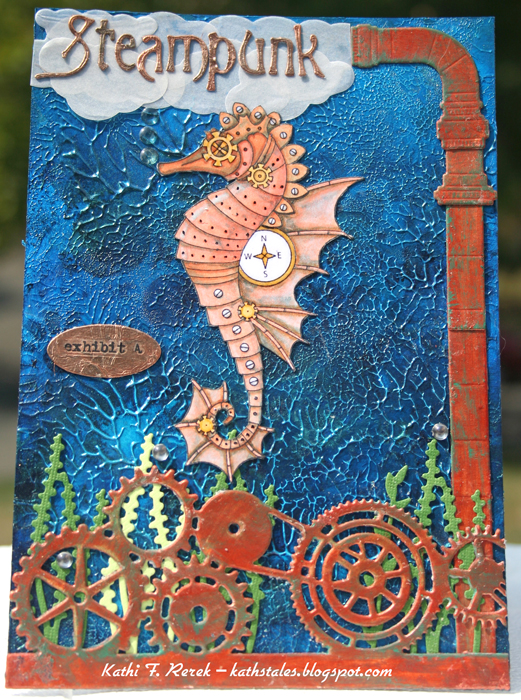
FYI, SCACD has loads of marvelous Steampunk stamps, in both rubber and digital format! If you're a Steampunk afficionado, you owe yourself to check 'em out. Just sayin'. 

Nancy's Seahorse is available as a rubber stamp, which is what I used for this page. The Steampunk Seahorse is also available as a digital stamp, Nancy's Mechanical Seahorse. If you're an international visitor, you can purchase this digi and others, HERE.

Nancy's Seahorse was stamped with Tuxedo Black Memento ink (Tsukineko/Imagine Crafts), colored with Copic markers, fussy-cut, and edged with a Black Pitt Artist Brush pen (Faber Castell). Several layers of Clear Gelly Glaze pen (Sakura) was used to add dimension and shine to the compass, screws, rivets, and gears.  Nancy's Seahorse was set aside while I worked on the background. True confession. He sat for awhile as my mojo disappeared and was replaced by sudden sleepiness. That went on for several days.

I cut two pieces of 140 lb. Mixed Media cardstock (Strathmore) to 4.75" x 6.75". White Media Gesso (DecoArt) was liberally spread with a palette knife onto one of the pieces. The second piece was pressed against the be-Gessoed cardstock, squished a bit, then the two pieces were pulled apart and left to dry for an hour or so.

When I returned, the two sheets were covered with a totally lovely texture. Cobalt Blue Hue, Cobalt Turquoise Hue, Ultramarine blue, Pthalo Blue, and Pthalo Turquoise Media Fluid Acrylic (MFA) paints (DecoArt) were sponged over the background using Mini Ink Blending Tools and Replacement Foams (Ranger). The foam applicators are great for this because they're pliable enough to make sure that the paint gets into all those nooks and crannies.

Prussian Blue MFA paint was thinned a bit with water and sponged over the Gears Skinny Minny Mask/Stencil (Joggles). When the paint was dry, I decided to lighten things up a bit by lightly sponging Interference Turquoise and Interference Blue MFA paints over the textured background, so that the top bits received the paint.

140 lb. Mixed Media cardstock was die-cut with the Medium Steampunk Pipes dies (Memory Box) and the Edge Gears die (Joy Craft). These die-cuts were painted with Copper Dazzling Metallic Acrylic paint (DecoArt). When the Copper paint was dry, Blue Green Light MFA paint was randlomly sponged the pipes and gears.

Green cardstock was die-cut with a few dies from the dies from the Build a Scene: Underwater die set (Taylored Expressions). This greenery was adhered to the bottom of journal page with Media Matte Medium (Deco Art). The painted Medium Steampunk Pipes die-cuts were adhered, then the Edge Gears die-cut was added. 

Vellum was die-cut with my Puffy Clouds (Memory Box), run through a Xyron machine, then adhered to the top of the journal page.

Copper Foil tape, purchased at a gardening center*, was adhered to black cardstock. These strips were airbrushed with BG72, BG75, and BG 78 Copic markers to add an aged patina look to them. The strips took a run through a Xyron machine to add adhesive to the cardstock, then were die-cut with Eliza Mini font dies (QuicKutz). The Copper Foil word was adhered over the clouds at the top ofthe page.

An extra piece of foil was die-cut with an old oval label die (QuicKutz). Apothecary Remnant Rubs (Idea-ology) was used to add "Exhibit A" to the foil, which was then adhered to the page.

Clear pearls were added here and there to finish the page.

I also created this card for SanDee and amelie's Steampunk Challenges. They've had a TicTacToe summer challenge all summer. Being a master procrastinator, I waited til the very last moment. No lie. 

Here's the TicTacToe board. I chose the left vertical row. (words, stencils, the (deep) sea).


*Copper Foil Tape is in one's garden (not mine) to ward off snails. Go know.

I shall enter this in the following challenges:

Friday, August 28, 2015

Twist: Anything Goes!

This week's the challenge at The Outlawz Coloring Challenges is Anything Goes and/or Christmas. My Outlawz Coloring Challenge teammates, Carla, Penny, Karen, Vannessa, and I challenge you to use create a project for this challenge. You should check out their blogs to see their gorgeous artwork. 

Our August sponsor at The Outlawz Coloring Challenges is Sweet Pea Stamps, who is offering our lucky winner three digis of his/her choice from the Sweet Pea Digi Stamp Store.  Play along with us for your chance to win!


Goth Fairy was reduced in PhotoElements, printed out with my laser printer onto Neenah cardstock, colored with Copic markers, then die-cut with one of the dies from the 5x7 Card Creator Nestabilities die set (Spellbinders). 

Plaid patterned paper from the old, but well loved (hoarded) Black Tie collection (Basic Grey) was die-cut with the next largest die from the 5x7 Card Creator Nestabilities die set. This was edged with Aged Mahogany Distress ink (Ranger) then matted with shimmery black cardstock. This was adhered to another sheet from the Black Tie collection, also edged with Aged Mahogany Distress ink, leaving the top part of the matted image panel free from adhesive. 

Dark red cardstock was die-cut with a Fancy Floral Lace Border die (Cottage Cutz) and adhered at the base of the image panel. Barbed Wire Fence border die (Die-namics) was used to die-cut flashing tape, which was adhered over the lace die-cut border.

My Tiny Attacher (Idea-ology) was used to secure the image panel/pocket to the tag front. Grey roses (Recollections?) were also attached to the tag front with the Tiny Attacher. 

Red cardstock was cut to size, then the top corners were punched with the Ticket and Tag Duo Corner punch (Tonic Studios). A hole was punched in the center. The tag front was adhered the red card. Silver Foil Corners (Stampendous) were added to the top corners of the tag front. "For You" from the Handwritten die set (Little B) was used to die-cut flashing tape. The sentiment was adhered to the tag. Sheer black ribbon was threaded through the hole in the tag. A hand charm was added to the tag with silver thread.

Thanks for visiting today.

I shall enter this tag into the following challenges:
Scrapy Land Challenges: Tags and Pockets
Crafting By Designs Challenges: Things with Wings 
Fab and Funky Challenges: Things with Wings
Simon Says Stamp Wednesday Challenges: Anything Goes 

Monday, August 24, 2015

Stampotique New Release Blog Hop!


Today the Stampotique Design Team is showcasing the images released from Stampotique this month.  If you haven't had a chance to see what's new, you can do that over on the Stampotique website here.

Here's the scoop about this very special blog hop.

As with any of the releases, there is a variety of stamps from our artists for any stampers, scrapbookers, and journalers out there.  We always love to see what your favorites are so while you are hopping around, make sure to stop by and say "hi" on our blogs and come back here and tell us what some of your favorite images from this release were.

We'll be giving away a $30 gift certificate for stamps and a grab bag of stamps on two of the blogs-but you won't know which ones they are so stop by and visit them all.  We will pick the winners on our first challenge in September.

Have fun hopping!

You should have arrived here from Corrie Herriman's blog, where she wowed you with her fabulous artwork.

Here's my card with Lucilla, Lucius, and Mirror, Mirror, which are all stamps by Arwen McCullen.


Lucilla, Lucius, and Mirror, Mirror were stamped with Tuxedo Black Memento ink onto Eclipse Tape and the plastic sheet from my Stamp-a-ma-jig stamp positioner. The Eclipse Tape versions were fussy-cut. Lucilla was stamped onto cardstock and masked. Lucius was then positioned, stamped, and masked. Then Mirror, Mirror was stamped and masked.

E70, E71, and T02 Copic markers were airbrushed over the masks to form the first layer of the background. The same color markers, plus T04 were airbrushed over the Brick Wall stencil (Stampers Anonymous/Wendy Vecchi).


The masks were all lifted and the images were colored with Copic markers. Clear Gelly Glaze pen (Sakura) was used to add dimension and shine to Lucius's bat buttons and skull boot studs. Black Spica Glitter pen (Copic) was used to add some shimmer to Lucilla's earrings.


T01 and T02 Copic markers were used to outline a few of the skulls from the Small Skulls stencil (Staampers Anonymous/Dyan Reaveley).


Greyish white cardstock was die-cut with Spider Web Border die (Memory Box). Black cardstock was die-cut with the Scary Spiders die (Memory Box) and the Dangling Spider die (Memory Box).


Two purple hearts were punched and attached to each other with my Tiny Attacher (Idea-ology). Dimensional foam adhesive and glue dots were used to raise the spiders up a bit.


That's all for me! Your next stop is Samantha Read's blog. I'm quite sure she has a fabulous project that is sure to delight. If you get lost along the way, you should pop back over to the Stampotique Designers Challenge blog.

P.S. I apologize in advance for any spacing issues. Blogger is acting wonky today and not recognizing paragraph returns. 

P.P.S. I'd like to take this opportunity to thank Kim Howard and wish her the best. Kim is stepping down from her spot as Stampotique's Design Team Coordinator. She's done such a wonderful job with the team. Coordinating artists can be akin to herding cats, so she deserves kudos (and some cocktails).

P.P.P.S. Congrats and good wishes to Claudine Criner, who is taking over for Kim. She's got some big shoes to fill (figuratively as I don't think Kim's got big feet), but I know she's up to the task.

Friday, August 21, 2015

Color Challenge!

This week's the challenge at The Outlawz Coloring Challenges is a color challenge. My Outlawz Coloring Challenge teammates, Carla, Penny, Karen, Vannessa, and I challenge you to use create a project for this challenge. You should check out their blogs to see their gorgeous artwork.

Our August sponsor at The Outlawz Coloring Challenges is Sweet Pea Stamps, who is offering our lucky winner three digis of his/her choice from the Sweet Pea Digi Stamp Store.  Play along with us for your chance to win!


Here's the color palette, courtesy of Design Seeds.


I should mention that Teresa's Marina is available in both rubber and as a digital stamp. I used the rubber version. Marina was stamped with Tuxedo Black Memento ink (Tsukineko/Imagine Crafts) and colored with Copic markers. Turquoise Spica Glitter pen (Sakura) was used on the swirls in her hair. White Gelly Roll Glaze pen (Sakura) was used on the pearls in her hair. Clear Gelly Roll Glaze pen (Sakura) was used on her bracelet, the coral, and the miscellaneous water droplets/bubbles.

The image panel was die-cut and matching cardstock was die-cut with dies from the A2 Card Creator Nestabilities set (Spellbinders). One of the dies from the 5" x 7" Card Creator Nestabilities set (Spellbinders) was used to die-cut the darkest aqua/teal paper, which then took a ride through my Big Kick inside the Waterfall 5" x 7" embossing folder (Couture Creations). Cardstock was also die-cut with two of the three dies from the Grommet Tag die (Spellbinders). "Hello" from the Handwritten Sentiments die set (Little B) was die-cut from the tannish cardstock. The starfish and shell were die-cut and enhanced with my VersaMarker pen (Tsukineko/Imagine Crafts). A Crab punch (Punch Bunch) was ued to punch a tiny crab to adorn the sentiment tag.

Thanks for visiting today!

I shall enter this card into the following challenges:
Deep Ocean Challenges: Maritime
Papertake Weekly Challenges: To Die For
Fashionable Stamping Challenges: Seaside or Beach
Stamping Sensations Challenges: Anything Goes with a Stamp or a Die

Wednesday, August 19, 2015

Tardy Space Shot v2.0 -- Animals challenge

I honestly don't know what's been going on with my brain lately. I'll actually complete a project on time, then either forget to take a photo of it or forget to post it. Or both. This was a case of both.

Jackie Payne was the hostess for the Animals challenge at Stampotique Designers Challenge Blog.
We all love our animals, incorporate an animal into your project.
If you'd like the chance to win your choice of $30 worth of Stampotique stamps, you should play along with this challenge. Visit Stampotique Designers Challenge blog and be sure to read the rules so that you'll have the chance to win that great prize!!!  Remember to check to see the deadline for all of this month's Stampotique Designers Challenges!


Foxy, Henny Penny, and Rootie Toot were stamped with Tuxedo Black Memento ink (Tsukineko/Imagine Crafts), colored with Copic markers, fussy-cut, then edged with a Black Pitt Artist Brush pen (Faber Castell). They were set aside while I worked on their background.

Brown cardstock was die-cut twice with dies from the A2 Card Creator Nestabilities die set (Spellbinders). One of the rectangles was die-cut again to create a frame. This frame was detailed with Polychromos pencils (Faber Castell) to make the brown cardstock look woodier. 

Silver metallic cardstock (Recollections) was die-cut with the Chicken Wire die (Die-Namics), then adhered to the back of the frame. Dimensional adhesive was attached to the back of the combination of the frame and chicken wire. 

Some raffia was adhered to the bottom of the solid brown rectangle, then Foxy was adhered. A VersaMarker was used to outline Foxy to create a shadow behind him. The chicken wire frame was adhered over Foxy, trapping him in a chicken coop!

Red cardstock was cut to a bit wider than the rectangle, detailed with colored pencils, and smudgily edged with Black Soot Distress ink (Ranger). The top of the rectangle was was scored, then adhered flush at the top of the rectangle. Several layers of dimensional foam adhesive was added to create depth on the lower part of the rectangle to make it look more like a roof.

"Grounded" was stamped onto white cardstock, die-cut with one of the thought bubble dies from the Talk Bubbles die set (Simon Says Stamp),  and sponged with Black Soot Distress ink (Ranger). The stamped talk bubble was adhered to the roof over Foxy's head.

"Incident Report" and "Approach with Caution were stamped onto one of the sheets from the White Basics (Basic Grey) 6x6 pad, die-cut with two different rectangle dies from the A2 Card Creator Nestabilities set, sponged with Black Soot Distress ink, and adhered to the top of the card. Staples from my Tiny Attacher (Idea-ology) were add a further detail.

A strip of brown cardstock was cut, sponged with Black Soot Distress ink, popped up on dimensional adhesive, and added to the base of the newly constructed chicken coop. Henny Penny, and Rootie Toot were adhered chicken coop, and the chicken coop was adhered to a scrap of patterned blue cardstock (Club Scrap). The card front was adhered to a card and I called it done!

Thanks for visiting today!  

I'm a tardy space-shot -- Under The Sea challenge!


I'm a bad, forgetful me. I was running late, finished this project, then forgot that I hadn't posted it or shared it.

Kristen Catalano was the hostess for this challenge and this is what she had to say about it.

"The ocean is my happy place. It is calm and soothing and I love the sound of the waves. So this week, I challenge you to create an ocean themed project. I can't wait to see what you come up with."
If you'd like the chance to win your choice of $30 worth of Stampotique stamps, you should play along with our challenge at the Stampotique Designers Challenge blog. Be sure to read the rules so that you'll have the chance to win that great prize!!! 

As often happens, this card was inspired by music, specifically Octopus' Garden which was written by Ringo Starr and performed by The Beatles. The role of the octopus is played by Octopet (Daniel Torrente).

Octopet was stamped with Tuxedo Black Memento ink (Tsukineko/Imagine Crafts), colored with Copic markers, fussy-cut, then edged with a Black Pitt Artist Brush pen (Faber Castell). Octopet was set aside while I created his garden in the sea.

A variety of blues and green Brusho Crystal Colours were sprinkled onto 140 lb. Mixed Media cardstock, sprayed with water, and spread with a paintbrush. Various colors of cardstock were die-cut with the dies from the Build a Scene: Underwater die set (Taylored Expressions). The Garden Tools die set (Memory Box) was used to die-cut white cardstock, which were then colored with Copic markers.

The die-cuts were adhered and ancient Jolie flower stickers (EK Success) were added for more color.

Texture Sand Paste (DecoArt) was scraped along the bottom of the panel with a palette knife. The panel then was left to dry for a bit. When it was dry, the Texture Sand Paste was painted with Titan Buff, Burnt Umber, Raw Sienna, and Transparent Yellow Oxide Media Fluid Acrylic paints (DecoArt). 

The underwater scene was matted with black cardstock then adhered to a blue card. The card was finished with a Dymo Tape sentiment.

Thanks for visiting today.

Repeat Yourself!

Samantha Read is the hostess this week at Stampotique Designers Challenge Blog and her challenge is to "Repeat Yourself". Here's what she had to say about her challenge.
"I recently read that the human eye likes things that are repeated, so for this week's challenge I'm inviting you to use some sort of repetition on your creations. A stamp stamped more than once or even your own doodling, it's up to you but most importantly have fun!"
If you'd like the chance to win your choice of $30 worth of Stampotique stamps, you should play along with this challenge. Visit Stampotique Designers Challenge blog and be sure to read the rules so that you'll have the chance to win that great prize!!!  Remember to check to see the deadline for all of this month's Stampotique Designers Challenges!

Here's my card that uses Stampotique's fun new Jasper Fruhling (Daniel Torrente) and "Just Keep On" (Kate Crane).


Have you seen all of Stampotique's new release stamps yet? If not, why not? What's your favorite? There's no way that I could choose a favorite, so I'm glad no one forced me to choose one!

However, I really like Jasper Fruhling because I think he looks like he's singing and dancing. So I decided to create a scene where he was doing just that. While I was doing so, kept hearing a medley of dance music in my head, including the Jackson Five's Dance Machine. I'm weird like that. 

Jasper Fruhling was stamped with Tuxedo Black Memento ink (Tsukineko/Imagine Crafts) onto Neenah cardstock, then again onto Eclipse Tape (Judikins). The Eclipse Tape version was fussy-cut, then placed on the cardstock to mask Jasper. Using my Stamp-a-ma-jig stamp positioner, Jasper Fruhling was stamped two more times. Technically, since I was primarily hearing Dance Machine in my head, I should have stamped five Jaspers. The Eclipse tape mask was lifted and set aside for another day. All three Jaspers were colored with Copic markers, which retrospectively, I should have colored with a different color scheme. Nothing like 20/20 hindsight.

Anyway, after I was done coloring all three Jaspers, I carefully traced the Rays Layering stencil (Tim Holtz/Stampers Anonymous) with a Y00 Copic marker, lifted the stencil, and colored in the rays. I also sponged Ripe Persimmon and Spiced Marmalade Distress ink (Ranger) over the Dot Fade Layering stencil randomly.

Musical notation Washi tape was used to ground the Jaspers, so they didn't look like they were dancing in mid-air. Since my stash is a bit low on birthday cards, I die-cut Celebrate (Die-Versions) and Party (Little B) from orange cardstock to match Jasper's hair. 

The image panel's edges were distressed using my Paper Distressor (Tonic Studios) and the edge of a scissor. The image panel was matted with blue cardstock, then stapled to a card front cut from green polka-dotted patterned paper from a 6x6 Double Dot pad (Bo-Bunny) using my Tiny Attacher Tool (Idea-ology).

"Just Keep On" was stamped onto vellum with Jet Black StazOn ink (Tsukineko/Imagine Crafts), then die-cut with one of the dies from the Fishtail Flags set (Die-namics).

Since the theme of this challenge is "Repeat Yourself", I also used Tiny Attacher staples to attach the sentiment flag between the two pieces of Washi tape.

Thanks for visiting today!

I shall enter this card into the following challenges:

Monday, August 10, 2015

Season's Greetings -- Addams Family Style!

This week's challenge theme at The Outlawz Coloring Challenges is "Kids and/or Family" in honor of Son and Daughter Day. My Outlawz Coloring Challenge teammates, Carla, Penny, Karen, Vannessa, and I challenge you to use create a project for this challenge. You should check out their blogs to see their gorgeous artwork.

Our August sponsor at The Outlawz Coloring Challenges is Sweet Pea Stamps, who is offering our lucky winner three digis of his/her choice from the Sweet Pea Digi Stamp Store.  Play along with us for your chance to win!


My take on the "Kids" challenge is a bit odd. Such is life.


Aren't they fabulous??? I just love them to pieces. I reduced and positioned the images using PhotoElements. Gomez took up a bit too much space, so I stretched him by reducing him disproportionately. He's now taller than Morticia and thinner than he had been. Personally, I wish I had that option. I would love to be taller and thinner. Alas.

The scene was then reduced and printed out four-up onto Neenah cardstock using Copic markers. I found Morticia to be a bit challenging to color due to her black dress and black hair. It took several tries, but I finally found a color combination where her hair did not fade into her dress. I used the same color combination on Wednesday's hair and dress. I will list the colors that I used below.

Puggsley was the last image that I colored. As my luck would have it, my Copic markers decided to get all gloopy on his shirt. I got rid of most of the shine, but if you look closely, it's not even close to perfect. Perfection is overrated, Or so I tell myself. Constantly.

Anyway, I added Garnet and Red Spica glitter pens (Copic) to Morticia's ruby ring, then added Clear Gelly Glaze pen (Sakura) on top of it. Red and Lemon Spica Glitter pen were added to the lit part of Gomez' cigar.  

I decided to keep the design of the card relatively simple. I finished the image panel by adding a floor and a light violet background. I did add some doodled smoke coming from Gomez' cigar. Black Soot Distress ink (Ranger) was sponged on the edges of the image panel.

Off-white variegated vellum was die-cut with the Spider Web Border die (Memory Box), the spider web corner die from the Lacy Corner Deco Die Set (Cherry Lynn Designs) and the Season's Greetings die (Poppy Stamps). Black cardstock was die-cut with the Scary Spiders die (Memory Box).

The patterned paper is from a 6x6 pad by Recollections.

Thanks for visiting today!

Copic markers used:
Morticia's and Wednesday's skin: E40, E50, R000, R00, E0000, BV000
Morticia's and Wednesday's hair: B41, C08, C07, C06, C04
Morticia's, Wednesday's dress, and Gomez' tie: BV29, BV25, BV23, N07, N06, N05
Morticia's lips: R59, R56, R35
Wednesday's skin: R00, R000, E50, BV0000, BV000
Gomez' skin: E01, E11, E21, E000, BV20
Gomez' and Puggley's hair: E49, E47, E44
Gomez' cigar: E43, E44, R08, YR18 FY1
Gomez' suit and Puggley's shorts: B39, B37
Gomez' shirt: C01, C0, C00
Puggsley skin: R00, R000, R01, BV00, BV00
Puggsley shirt: YG93, YG95, E81, E84 

I shall enter this card into the following challenges:
Die Cut Divas Challenges: Favorite Holiday
Scrapy Land Challenges: Anything Goes with a Die 

Wednesday, August 5, 2015

Selfies or Photo Bomb Challenge

Claudine Criner is the hostess this week at Stampotique Designers Challenge Blog and her challenge is "Selfies or Photo Bomb". Here's what she had to say about her challenge.

"I think selfies can be so funny and I also know how much the Photo Bomb ATC trade was on the Facebook group, so I challenge you this week to do something with either "Selfies" or "Photo Bomb" as your theme."
If you'd like the chance to win your choice of $30 worth of Stampotique stamps, you should play along with this challenge. Visit Stampotique Designers Challenge blog and be sure to read the rules so that you'll have the chance to win that great prize!!!

Here's my card with Stampotique's  Tin Man, Scarecrow, and Chessy (all three designed by Janet Klein).


I opted to go with the "Photo Bomb" option of the challenge. My idea was to have Tin Man and Scarecrow posing for a photo in Bay Ridge, Brooklyn (not remotely Oz) and to be photo-bombed by Chessy.

Tin Man, Scarecrow, and Chessy were stamped with Tuxedo Black Memento ink (Tsukineko/Imagine Crafts), colored with Copic markers, fussy-cut, then edged with black markers. The three characters were set aside while I worked on a background for them.

The Cityscape stencil (The Crafter's Workshop) was taped over a piece of 140 lb. Mixed Media cardstock (Strathmore). Post-it Notes were placed over the the sky and bridge area of the stencil and Tumbled Glass Distress ink (Ranger) was sponged over the windows of the buildings. The buildings, watertower, and bridge were traced with a Copic Multi-liner. The Post-it Notes were lifted and repositioned to cover the buildings and bridge. Broken China and Chipped Sapphire Distress inks were sponged over the stencil and Post-it Notes. Worn Lipstick Distress ink was sponged over the sky to warm it up a bit. The buildings and bridge were filled in with Copic marker.

White Glossy cardstock (Ranger) was die-cut with the Polaroid Cover-up die(Die-namics). Tin Man, Scarecrow, and Chessy were adhered to the Cityscape background and the Polaroid Cover-up die-cut was adhered over top.

Black Metallic cardstock was die-cut with the Smiles die (Frantic Stamper). The sentiment was adhered to the Polaroid Cover-up die-cut. The card front was adhered to a black card to finish up the project.

Thanks for visiting today!

I shall enter this card into the following challenges:
Marker Pop Challenges: Anything Goes
Paper Creator's Crafts Challenges: Dies or Punches