Thursday, September 30, 2010
Third Coast Thursday!
I guess I'm in a philosophical mood. Here's a card using Butterfly Ride by Third Coast Rubber Stamps. The stamp comes in more than one size. I got both because I love the image!
The image was colored with Copic markers, which actually match the background papers, which are by My Mind's Eye (mat layer) and Graphic 45 (background layer). I diecut the image, then masked it, kept it in the Nestabilities Label 11 die, and sponged Distress Ink over the image to be matchy-matchy with the background paper.
The sentiment is by Wordsworth/Rubber Soul and was punched out with the Word Window punch, then layered onto another Nestabilities die cut, and a Cuddlebug diecut strip.
Thanks for visiting today!
Wednesday, September 29, 2010
Bombshell Stamps' Hump Day Hop!
Yes! It's the last Wednesday of the month, which means it's time to hop with the Bombshells! Yahoo!
Kas, our able Bombshell Hop Captain, set this month's theme, which is Back to School, Time For Geography!
I hope you got here from Kas's blog!
Here's my project:
This will ultimately end up being a wall-hanging, though I originally meant it to be a long tall card using this month's sketch (see post below), tilted 90°. Like my last project, this one also took a left turn at Albuquerque, though it was a more a veer than a turn.
The cadillac from Bombshell's Speed Shop set was stamped onto white cardstock and colored with Copic markers. I recently rediscovered the fun that is QuicKutz and used a QuicKutz embossing folder to emboss the quote on the right. I masked and used Distress Ink to create the sky and the roadway. Then I used Black Distress ink to make the quote pop out a bit more. The interstate sign is a QuicKutz die cut, colored with Copics, with QuicKutz die cut letters on it. The map is an actual map (of Maine), which was cut to size and sponged with Distress ink.
Once I decided I wanted to hang this in my craft room, I added a few more mat layers to it.
Now that you've seen my take on the theme, hop along to Anita Marie's blog.
Remember that each comment you make along the blog hop will earn one more chance for you to win this month's fabulous prize!
BTW, if you've gotten lost on the hop, here's the complete list.
Hump Day Hopper List:
Kas
Kathi
AnitaMarie
Katie
MaryG
Cheryl
Kelli
Meredith
Alaine
Alison
WildRose
Tuesday, September 28, 2010
Bombshell Sketch Challenge Card
I apparently forgot to post my sketch for Bombshell Stamps on my blog this month. Bad, bad, forgetful me.
If you use the sketch to create a project using Bombshell Stamps and post it in the sketch area of Bombshell's forum, you get a chance to win a terrific prize.
Feel free to flip it, flop it, and make it your own. Just have fun with it! You have until September 30th, so there is still a tiny bit of time!
Here's the sketch.
Here's my take on the sketch:
My plan was to create a card to fit into a business sized envelope. Then my mad mad math skillz messed up that plan. The card is now longer than the envelope. You'll also notice that the card only bears a slight resemblance to the sketch. That's because my so-called creative process took a left turn at Albuquerque. Oh well.
OK. The card uses Bombshell's Tiki Party as the focal image. I used two of the Tikis and stacked 'em, colored 'em, and cut 'em out. I diecut the flame from yellow cardstock, then stamped the flame from the same set to make the flame flamier. Yes. I just typed "flamier", which is so not a word.
The hibiscus motif from Bombshell Pattern set was stamped repeatedly using pink and orange Distress Inks to create the background pattern.
I masked the words on the banner stamp from the Tattoo Backgrounds set and used rub-ons to add the sentiment.
BTW, the fabulous new Banner Sayings set includes sentiments in banners and some blank banners too. I can't wait to get my grubby paws on them along with the other three new sets (featuring butterflies and Sacred Hearts).
Thanks for visiting today. Come back tomorrow for the Bombshell Hump Day Hop!!!
Monday, September 27, 2010
Smeared & Smudged Blog Hop!
It's the End-of-term Blog Hop for Smeared & Smudged's current Design Team. We were challenged to use stamps from at least three Smeared Ink sets to create a cohesive project.
I used four. Go me!
Here's my card, which is huge at 8.5" x 5.5".
I used Creepy Li'l Grumpies (Frankenstein Grumpy), Li'l Grumpies (purple Grumpy), Shadow Thingies (moon & clouds), and Chicks Dig Guns (target).
I used Copic markers to color the Grumpies and two colors of Distress ink to create the night sky. Yes. I got carried away. Again. The Frankenstein Grumpy's scars and wounds are colored with red Glaze pen. The patterned paper is from a K & Company pad I got a few years ago. "Boo" is Uptown Girl by QuicKutz. The "Trick or Treat" sign being held by the purple Grumpy is from a Halloween sticker sheet by 7 Gypsies.
Now that you've seen my monsterpiece, hop along to the next person on the list!
Here's the hop list:
Terra http://moresmearedink.blogspot.com/
Tori http://ndustrial-lemon.blogspot.com/
Alison http://www.alisonsrandomthoughts.blogspot.com/
Kelli http://www.cajunstampingqueen.blogspot.com/
Lady Brayton http://ladybrayton71.blogspot.com/
Meredith http://www.papercanteen.com/
Danielle http://www.scrappy-arts-n-thoughts.blogspot.com/
Kathi http://kathstales.blogspot.com/
Black Dragon http://lynsblogger.blogspot.com/
Kim http://www.offthewallcraftiness.blogspot.com/
Jean http://www.etsysdarkside.ning.com/
Friday, September 24, 2010
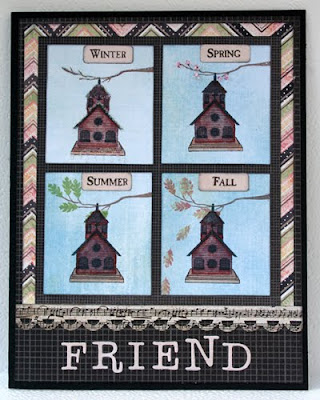
Card for a friend
Whilst driving the other day, I heard "You've got a friend" by Carole King on the radio.
The song was the inspiration for this card featuring the Home Tweet Home set by Technique Tuesday.
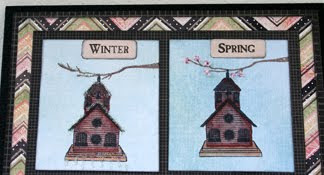
Close-ups of card to show details:
Memento Ink was used to stamp all four scenes on blue patterned paper by Fancy Pants. The edges were distressed with Black Soot Distress Ink. There's glitter on the branch and birdhouse in the winter scene and Flower Soft on the branch in the spring scene.
The grid, flame-patterned paper, and pinkish paper are by Basic Grey. The music staff paper is by 7 Gypsies. I used QuicKutz font dies for the first time in forever. It was fun.
Thanks for visiting today!
Thursday, September 23, 2010
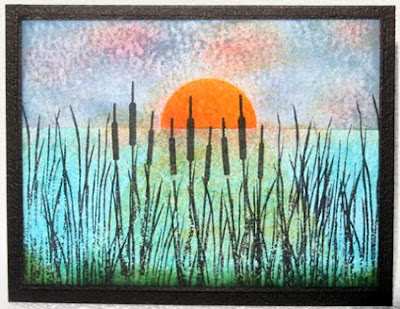
Cattails on Kat's Tales!
Hee. That blog title amuses me. Muchly.
When I saw Technique Tuesday's Growing Wild set, I fell in love with the hummingbird, the bitty dragonfly, and the cattails. In fact, while just looking at the set online, my mind was just flooded with card ideas.
This is one of them.
I built a scene with masking and a variety of Distress Inks. Then I overstamped the cattails and grass from the set. Since it's such a colorful scene, I just mounted it on black cardstock, then layered it onto a black card.
This card is one of those rare ones where the result matches how you pictured it in your mind's eye. I love when that happens!
Thanks for visiting today!
Wednesday, September 22, 2010
Oh well.
I submitted this card to a mag (along with three others). They all got rejected. Big bummer. Picked myself up, dusted myself off, and said "Oh well!". I'll just post 'em here or submit them elsewhere.
Here's a card that was fun because it was an experiment that went well. Gotta love that.
I used VersaMark to stamp the quote from Rose's Portrait set and the large rose from from the Love and Luck set. Both sets are by Bombshell Stamps. I then added gold detail embossing powder and heat set them. I flipped the vellum and colored the rose with Copic markers. It created a cool mottled effect, though shading is very difficult since the Copics just re-wet each other.
The patterned paper is from the Le ' Romantique 8x8 pad by Graphic 45. I got the gold foil border stickers at a stamping show. Sadly, I couldn't go this past year to get more since I was on crutches at the time. Po' me. :(
Thanks for visiting today!
Tuesday, September 21, 2010
Time Flies! A Challenge Tag!
Here's a tag that I created for a challenge over at Splitcoast. Actually, it fulfills two challenges in one because I'm efficient like that. It also meets the "Challenge Challenge" at Technique Tuesday's Splitcoast forum.
Here it is!
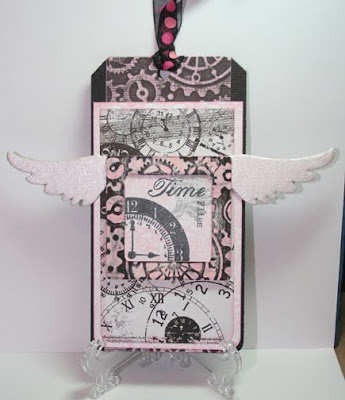
I really do love making tags and must make more of them. Note to self: "Make more tags!" :D I hadn't gotten grungy in a while, so I did that too. Plus, I used a bunch of the new stuff that I got for myself with birthday ca$h. You know, "the gift to me from me with love" thang.
Here are the details. All of the stamps are from Technique Tuesday. I used some old ones that have been retired... the right wing from Skin Deep set and the clock from the Olde World set. I also used some new sets... words from the Time Flies set and a motif from the Crown Jewel set.
The Technique Tuesday Tile Frame was run through my Big Kick using my new Clockworks Cuddlebug embossing folder. I inked the raised bits with Black Soot Distress Ink. When it was dry, I smooshed the pink Distress Ink onto my craft sheet, used a waterpen to pick up color, which was applied to the flat portions of the tile frame.
I created background paper by repeatedly stamping the motifs from the Crown Jewels set in pink Distress Ink, then stamped the clock and the words.
I ran Core'Dinations Color Core cardstock through the same Cuddlebug folder and then sanded off the black.
The Maya Road wings were painted with a Pearl Adirondack Paint Dabber. When they were dry, I added pink Distress Ink to them to match the rest of the piece.
The patterned paper is from 7 Gypsies.
If you've made it through my excruciatingly long explanation, give yourself a pat on the back. ;)
Thanks for visiting today!
Sunday, September 19, 2010
Announcing Bombshell Stamps' World Card Making Day Challenges!
Greetings! In honor of World Card Making Day on October 2, 2010, Bombshell Stamps would like to challenge you!
Every few days between now and October 2nd one of the design team members will post a challenge for you!
The “rules” are simple:
1. Use Bombshell Stamps somewhere on your project.
2. All submissions will be eligible for Bombshells' monthly drawing.
3. Challenge submission cards should be posted in the appropriate challenge thread on Bombshell's forum.
4. All posted entries will receive a 25% off coupon toward the purchase of Bombshell Stamps.
5. Feel free to participate in one or more of the challenges.
6. The deadline to post your challenge submissions--World Card Making Day, Saturday, October 2, 2010.
My challenge to you is to use the smaller stamps and/or icons included in each set of Bombshell Stamps to create a project of any kind. These stamps are great to use to create backgrounds, to use as embellishment accents, to decorate elements, or to support the larger focal image of each set.
Here's my card!
I used my Martha Stewart Scoreboard to score a piece of Basic Grey's Kraft Basics. I folded the background paper at each score and then distressed along the fold line.I stamped the icons from Bombshell's Love & Luck, Lady Luck, Tattoo Backgrounds, Sacred Heart, and Man's Ruin sets in each square. Then I weighted the whole thing down with books to flatten it.
While it was getting smushed, I stamped the Skull & Rose from the Man's Ruin set and the corner embellishment from the Dead Necessities sets. Both were colored with Copic markers and then sponged with Distress Ink. A bit of red glitter pen then Glaze pen was added to the droplet.
Thanks for visiting today. I hope that you play along with my challenge! I can't wait to see what you create!
Wednesday, September 15, 2010
Variations on a theme
The theme is Thank You cards. The stamp set is Growing Wild by Technique Tuesday. Oddly enough (for me), these cards will actually be mailed as acknowledgement and gratitude for birthdayversary gifts.
Merci Bouquet: Sentiment by Savvy Stamps
The grass was stamped using three different shades of Memento Green ink. The flowers were stamped with Dauber Duo inks. I don't know if these are still being made. They are very useful for inking portions of stamps. Fortunately, I still have a cache of them. So glad I'm a hoarder.
Thanks just doesn't seem like enough: Sentiment from the Autumn Abundance set by Paper Trey Ink.
The grass was done the same way, but this time the flower portion of the stamp was colored with Pentel Watercolor pens direct to the stamp and then inked.
Thanks so much: Sentiment by Paper Trey Ink
One of the main reasons I bought this set was because I loved the hummingbird. However, as a bird-brained bird-watcher, I needed the flower to reflect a food source for hummers. I found the flower stamp in a Technique Tuesday set that was retired. I call it "Little Flower" set because it's comprised of little flower heads, stems, and some leaves. So I inked the flower stems from the Growing Wild set and used the other flower. Everything on this one was inked with Memento inks with the exception of the hummer, which was inked with Adirondack Stream.
The blue paper for all cards is by Fancy Pants. The last card also uses papers by My Mind's Eye and Cosmo Cricket.
That's probably enough babble for now.
Thanks for visiting!
Monday, September 13, 2010
Stained-glass Card Set!
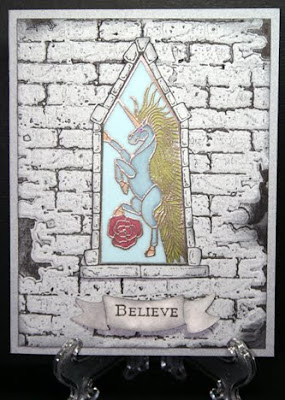
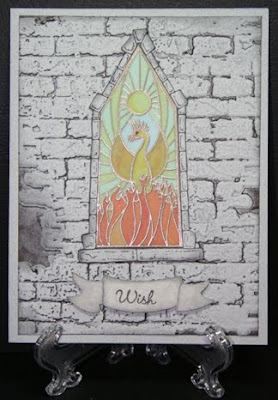
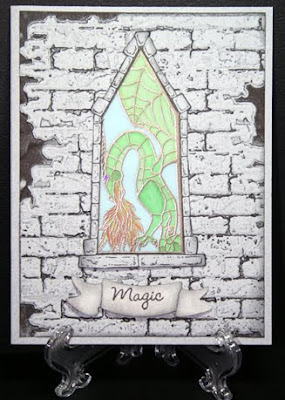
I'm actually pretty excited about this set of six cards (two each of three designs) because they were a lot of fun to make and used some fun techniques. My excitement will probably manifest in a sickening amount of detail as I describe my so-called creative process.
The cards feature Third Coast Stamps' Stained Glass Window set(CH-SGW).
All three stained glass panels were stamped onto inkjet vellum with VersaFine ink, then embossed with Platinum embossing powder. I flipped the vellum and colored the reverse sides with Copic markers. The markers do dry on the vellum, but don't blend very well. Additionally, a bit of the ink sometimes transferred from the colored surface to the tip of a different marker, so I had to be very careful to clean the marker tips by scribbling on scrap paper.
The windows were stamped on grey granitey-looking cardstock, cut out, and adhered over the vellum windows. Light blue cardstock was adhered to the back of the vellum.
The Bricks Alterations embossing folder (Sizzix) was inked with Black Soot Distress ink and then used to emboss and ink the grey cardstock in one pass through the Big Kick. These textured pieces were then adhered to side-folded A2 cards. The stained glass windows were adhered to each card.
A Sizzlets Banner die was used to cut the sentiment banners from parchment paper. I don't know who made the sentiment stamps since the labels are gone. The sentiment banners were then added to the cards, which can be used for birthdays, encouragement, and holidays.
Thanks for visiting today!
Sunday, September 12, 2010
Moon Cat
I've been making a concerted effort to get inky every day AND to use stamps from my collections. I figure if I use them, I can buy more. *big grin*
The Moon Cat by Third Coast Rubber Stamps was stamped then colored with Copic markers. I decided he needed to be a Siamese if you please.
A VersaMarker was used to ink over his wings, then Polysparkle embossing powder was heat set to add sparkle, dimension, and serve as a resist. The moon was also colored with VersaMarker, then heat embossed with a combo of silver, white, and Polysparkle embossing powder. Some of the embossing powder escaped, but it kind of adds to the nebula-like look.
Eclipse tape was used to mask the body of the cat. Sakura Glitter pen was used to add sparkle to the stars, which were then coated with a layer of Sakura Glaze pen to act as a resist.
Once everything was masked and/or coated with a resisting medium, I sponged blue and purple Distress Ink over the image. When the ink was dry, but before the mask was removed, water was sprinkled to add some splotches and dots.
The stamped and inked scene was mounted onto plain white cardstock, then onto patterned papers from the Lime Rickey collection by Basic Grey!
Thanks for visiting today!
Friday, September 10, 2010
Peace in the New Year!
Yesterday was Rosh Hashanah, the Jewish New Year. One of my most fervent wishes for the coming year is peace -- in the world, for my family, and friends.
I did this card last week for a challenge over at the Technique Tuesday forum at SCS and meant to post it yesterday, but being me, forgot.
The Peace stamp is one of the fabulous Little Treasures sets by Technique Tuesday. It was big fun to color. I was feeling nostalgic and paired the brightly colored image with a rather busy pattern from the 6x6 Lime Rickey pad by Basic Grey. I added Sakura glitter pen accents to the stars at the end of the rainbow and to various layers of the card. Sadly, my photo doesn't like glitter. :(
Yesterday we celebrated the New Year, our 30th anniversary, and my birthday with my family, my parents, and my sister's family. The icing on the cake was the arrival of an awesome RAK from my friend, Danielle. I'm a lucky gal.
Thanks for visiting today!
Wednesday, September 8, 2010
Something completely different!
Trying my hand at a different style. I've been wanting to try a white on white card for a while. I also decided to participate in Crafty Secrets' forum challenge #136 to cut it out. While I was at it, I also met the F4A28 (Free For All) – Birds of a Feather …! challenge. Yahoo!
Here it is!
I used two different Cuttlebug folders to emboss white cardstock. I also used a Nestabilities die and two QuicKutz dies for the sentiment. The cage and the bird are from the Birdies set by Crafty Secrets. The tiny sentiment is from the Mixed Message set by Paper Trey. I stamped the bird with Memento ink and colored him with a Copic marker. Then I stamped the bird cage over him with Starlite Silver Brilliance ink and heat embossed with clear embossing powder. The cage and bird are popped up on dimensionals.
Thanks for visiting today!
Friday, September 3, 2010
Thanks!
Thanks to random draw (as opposed to my mad skillz), I won the Metro Squares set
by Technique Tuesday.
This is the first card I made with the set.
I used Distress Inks, Basic Grey paper, a bit of ribbon, and a Technique Tile Button that I stamped (with a TT flower) and heat embossed to give it a clear, glossy finish.
It's straight irl.
Thanks for visiting today!
by Technique Tuesday.
This is the first card I made with the set.
I used Distress Inks, Basic Grey paper, a bit of ribbon, and a Technique Tile Button that I stamped (with a TT flower) and heat embossed to give it a clear, glossy finish.
It's straight irl.
Thanks for visiting today!
Wednesday, September 1, 2010
Smeared & Smudged Blog Hop!
The Smeared & Smudged Design Team members are participating in a blog hop in honor of Smeared Ink's new Fall Release. Smeared Ink's Fall release will feature five brand new rubber sets and a new line of digi images that will be available as sets or single images. They will be available in the shop on Sept 1st and rubber sets will begin shipping on Monday the 6th.
Here's my card featuring Grumpenstein and one of the sentiments in that set.
He was colored with Copic markers. His eyes were colored with Sakura Glitter pens and then coated with a layer of Glaze pen. I probably should have used Glossy Accents for more dimension, but I've had an issue with ink running from Glossy Accents lately. If you look closely, you might see some red Glaze pen in the stitches and open wounds.
I distressed the heck out of the image piece, then used Distress Inks to add some color to the background. I got a bit carried away and got some color on his neck bolts. Bad me. Staples were added to mimic his stitches.
The patterned paper is by the late lamented Flair Designs. I have a stash, so I'll keep using 'em.
Now that you've seen my monsterpiece, visit the others to see what they're sneak peeking from the new Smeared Ink release.
Subscribe to:
Posts (Atom)