Tuesday, May 31, 2022

Happy Bird Day!

It's Tuesday which means it's my day to share a project created for Topflight Stamps! It's also May 31st which is World Parrot Day so I decided to celebrate this holiday with a slimline birthday card featuring the wonder Wingman Clear Stamp Set by Heffy Doodle


Topflight Stamps Products Used:

Other Products Used:
140 lb. Mixed Media Paper by Strathmore®
Solar White Classic Crest® Cardstock by Neenah Papers
Parrot My Colors Cardstock by My Mind's Eye
Tuxedo Black Memento™ Ink by Tsukineko®
Stitched Slimline Die Set by Creekbank Creations
No Frills Plain Slimline Die Set by Gina Marie Designs
Copic® Markers:
Parrots Left to Right: B37, B39, Y17, Y19, BV23, BV25, BV29, C6, C7, C8;  B02, B04, B16, R35, R39, YG03, YG05, YG07, YG17, BV23, BV25, BV29, C6, C7, C8; B18, B28, B29, BV23, BV25, BV29, C6, C7, C8; Stand and Swing: BV23, BV25, BV29, C6, C7, C8
Dimensional Foam Squares by Scrapbook Adhesives® by 3L
Repositionable Label Paper by Avery®
STAY-tion™ by Wendy Vecchi for Ranger Ink
Stamping Platform

Instructions:
  1. Use Tuxedo Black Memento ink to stamp three of the adorable parrots onto Copic-friendly cardstock and onto respositionable label paper. 
  2. Fussy-cut the label paper version of the flying bird.
  3. Fussy-cut the label paper versions of the two left-facing parrots so that their bodies and wings are separated from their tails.
  4. Place the body/wing masks for the left-facing parrots and the entire flying parrot over their counterparts on the image panel.
  5. Using a stamping platform and Memento ink, stamp the stand and the swing onto the image panels for the two left-facing birds and onto label paper.
  6. Fussy-cut the stand and the swing and place them atop their counterparts. 
  7. Place the tail masks for the two left-facing parrots were adhered in place. All stamped elements should now be masked.
  8. Trim all three image panels to 2.5" square.
  9. Brush or sponge the masked image panels with Jersey Cream Prism Ink to create a colored background.  
  10. Using the STAY-tion, place the corner flourish from the Found in the Woods - Scrapcosy Stencil PS190 on the upper right corner of the swinging parrot and secure with a magnet.
  11. Brush Jersey Cream Prism Ink over the stencil onto the image panel.
  12. Clean the stencil, flip it, and position the corner flourish on the upper left of the parrot on the stand. Secure the stencil in place with a magnet.
  13. Brush Jersey Cream Prism Ink over the corner flourish onto the image panel.
  14. Clean the stencil, then place the plain flourish from the same stencil onto the top of the panel with the flying parrot.
  15. Brush Jersey Cream Prism Ink over the plain flourish onto the image panel.
  16. Place a piece of clear acetate horizontally across the base of the parrot on the stand,
  17. Brush Desert Sand Memento ink across the base of the panel to ground the stand. 
  18. Set all three square image panels aside.
  19. Brush Pine and Lime Punch Elements Inks over a piece of mixed media paper and heat set to create the background panel. 
  20. Brush Green Oasis VersaFine Clair Ink over the Glory Stencil onto the background panel. 
  21. Use the largest die from the stitched slimline die set to cut the background panel.
  22. Edge the panel with Green Oasis VersaFine Clair Ink.
  23. Use the Green Oasis VersaFine Clair Ink to edge all three of the reserved parrot squares.
  24. Adhere the parrot squares to the background panel.
  25. Brush a strip of white cardstock with Jersey Cream Prism Ink.
  26. Using a stamping platform, use Green Oasis VersaFine Clair Ink to stamp the sentiments. 
  27. Use a die from the Plain Slimline Die Set to cut the sentiment.
  28. Use the Green Oasis VersaFine Clair Ink to edge the sentiment die-cut. 
  29. Adhere the sentiment to the cardfront with foam adhesive popping up the center of the sentiment strip and the ends glued down. 
  30. Adhere the cardfront to a green slimline card. 
Thanks for visiting today!

Tuesday, May 24, 2022

Penguins!

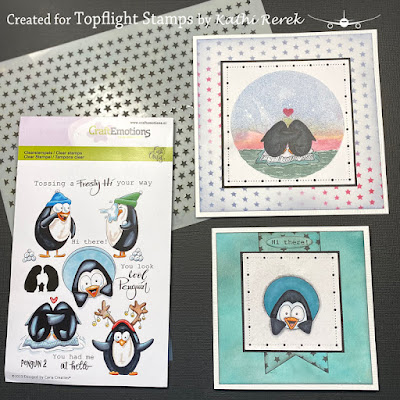
It's Tuesday which means it's my day to share a project created for Topflight Stamps. This week my teammates and I are showcasing Craft Emotions' wonderful products. I've created two cards using the Penguins 2 Clear Polymer Stamp Set and the Stardots Stencil by Craft Emotions.

Here are the two cards, the stencil, and the stamp set.


Here's the 4" square card.


Here's the 5" square card.


Topflight Stamps Products Used:
Frost Prism Glimmer Spray by Hunkydory Crafts

Other Products Used:
Solar White Classic Crest® Cardstock by Neenah
Avalanche Cardstock by Bazzill Basics Paper®
Raven Cardstock by Bazzill Basics Paper®
Tuxedo Black Memento™ Ink by Tsukineko®
Copic® Markers: 
Penguins: C10, C8, C7, C6, BV29, BV25, BV23, YR12, YR15, YR18, C00, C0, C1, C2, B21, B52, B60, BG72, E04, RV52
Big and Little Chain Square Die Set by Gina Marie Designs
Fishtail Flag Stax Die-Namics Die Set by My Favorite Things
Tiny Oval Die by The Stamp Doctor
White Gelly Roll® Gel Pen by Sakura® of America
Repositionable Label Paper by Avery®
STAY-tion™ by Wendy Vecchi for Ranger Ink
Stamping Platform

Instructions for the 4" square card:
  1. Cut a piece of Avalanche cardstock to 8" x 4", score at 4", and fold to form a 4" square card. Set aside.
  2. Use Tuxedo Black Memento ink to stamp the single penguin onto a white cardstock panels and onto repositionable label paper.  
  3. Fussy-cut the label paper image and place the masks over its counterpart.
  4. Use one of the dies from the Big and Little Chain Square Die Set to cut single penguin masked image panel.
  5. With the mask still in place, spray the die-cut with Frost Glimmer Spray by Hunkydory Crafts. 
  6. Lift the mask and be chagrinned to see that the spray made the black ink run slightly. Alas.
  7. Color the penguin with Copic markers. 
  8. Use black cardstock cut .25" larger than the die-cut to mat it.
  9. Start to create the background for this card by sponging white cardstock with BermudaMermaid, and Blue Lagoon Elements Inks by Lavinia Stamps.
  10. Trim the background panel was to 3.75" square and edge it with Graphite Elements Ink by Lavinia Stamps
  11. Brush or sponge  Graphite Elements Ink over the Stardots Stencil by Craft Emotions onto the remaining strip of sponged paper (from Step #11).
  12. Use a fishtail flag die to cut the stenciled strip.
  13. Edge the fishtail flag with Graphite Elements Ink
  14. Use a stamp positioner and Onyx Black VersaFine Ink to stamp the "Hi there" sentiment from the stamp set onto a scrap of sponged cardstock.
  15. Use a tiny oval die to cut the sentiment, then edge it with Graphite Elements Ink
  16. Adhere the background panel to the reserved 4" square white card.
  17. Adhere the flag die-cut and image panel to the card front.
  18. Adhere the sentiment to finish the card.
For the second card, I wanted to experiment to see if my Gel Press Petites would work to add a background to a masked image.

Instructions for the 5" square card:
  1. Cut another piece of Avalanche cardstock to 10" x 5", score at 5", and fold to form a 5" square card. Set aside.
  2. Use Tuxedo Black Memento ink to stamp the penguin pair onto a white cardstock panel and onto repositionable label paper.  
  3. Fussy-cut the label paper images and place the mask over its counterpart.
  4. Place the circle from the the circle Gel Press Petites on a clear stamping block. 
  5. Using the 2" Speedball Brayer, apply Della Blue to the top part of the circle gel press.
  6. Clean and dry the brayer. 
  7. Using the brayer, apply Bermuda Elements Ink to the bottom part of the circular gel press.
  8. Use a cotton bud to remove some of the ink between the two colors.
  9. Use a paint brush to add horizontal stripes of Sundance and Confetti Elements Inks in the space provided by Step #8. 
  10. Stamp the gel press over the masked penguin couple on the image panel.
  11. Keeping the mask in place, add more color or improve the gel print background circle by smooshing the Elements Ink pads onto a craft mat and misting with water, then using paint brushes to apply the diluted ink.*
  12. When happy(ish) with the results, heat set the image and remove the mask covering the penguin pair.
  13. Color the penguins, ice cap, and sea with Copic markers. 
  14. Use a white gel pen to add some whitecaps to the sea.
  15. Brush or sponge Confetti Elements Ink over one of the hearts on the Cascading Hearts Medium Stencil by Darkroom Door.
  16. Use a die from Big and Little Chain Square Die Set to cut the image panel and mat with black cardstock cut .25" larger than the die-cut image panel.
  17. Create the background panel by sponging Della Blue and Confetti Elements Inks over the Stardots Stencil by Craft Emotions onto white cardstock. 
  18. Trim the background pane to 4.75" square and edge it with Della Blue Elements Ink.
  19. Adhere the background panel to the reserved 5" square white card. 
  20. Adhere the image panel to finish the card.
Notes:
  • I forgot how much fun it is to make 4" cards! 
  • The cardstock started to pill a bit when adding diluted ink with a paintbrush. 
  • Using the smaller gel press to add a background was somewhat successful. I'll have to try again using Bristol, Mixed Media, or Watercolor paper. I'll also have to try using different media. Stay tuned! 
  • The 5" card would work well for a friends, anniversary, wedding, or Valentine's Day card. Hence no sentiment yet!
Thanks for visiting today!


Sunday, May 22, 2022

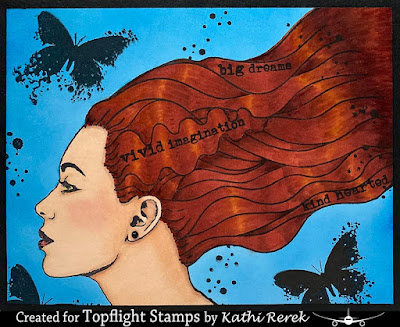
Big Dreams, Vivid Imagination, and Kind Hearted

Here's an encouragement card for a recent graduate created for Topflight Stamps using stamps by Visible Image


Topflight Stamps Products Used:

Other Products Used:
Solar White Classic Crest® Cardstock by Neenah Papers
Black Cardstock by Bazzill Basics Paper®
Tuxedo Black Memento™ Ink by Tsukineko®
Copic® Markers:
Skin: BB0000, B000, E50, E21, E11, E00, E000
Lips: E04, R22
Eyes: YG05
Hair: E07, E08, E19, YR24
Black Medium Brush Multiliner by Copic®
Pink Chalk Pencil by General's®
Black Pearl by Kaisercraft
Repositionable Label Paper by Avery®
STAY-tion™ by Wendy Vecchi for Ranger Ink
Stamping Platform

Instructions:
  1. Use Tuxedo Black Memento ink to stamp the gorgeous woman from the Beautiful Soul Clear Polymer Stamp Set onto white cardstock and onto repositionable label paper. Set aside the label version for now.
  2. Color the image with Copic markers.
  3. Use magnets to secure the image panel to the base of the stamping platform.
  4. Remove all the stamps from the acetate on the Beautiful Soul Clear Polymer Stamp Set and use the printed acetate to position the "Big Dreams" sentiment onto a section of hair.
  5. Place the "big dreams" sentiment facedown on top of the acetate, press the platform's lid onto the back of the stamp, and lift.
  6. Repeat Steps #5 with the "vivid imaginations" and the "kind hearted" sentiments.
  7. Remove the printed acetate from the platform.
  8. Ink all three sentiment with Nocturne VersaFine Clair Ink and heat set.
  9. Realize that the "kind hearted" sentiment was stamped very close to the right edge of the hair, so remedy the situation by adding Copic colored hair extensions.
  10. Fussy-cut the label paper version of the e Beautiful Soul woman and place it over its counterpart on the image panel.
  11. Brush or sponge Blue Lagoon Elements Ink by Lavinia Stamps over the masked image.
  12. Use Nocturne VersaFine Clair Ink to stamp the butterfly from the Nothing to Wear Clear Polymer Stamp Set and the splotches from the 99% Chance of Wine Clear Polymer Stamp Set as shown. Retrospectively, I should have measured the image panel before stamping the butterflies and the splotches as I ended up having to trim them off. Oops.
  13. Remove the mask.
  14. Use pink chalk pencil to add a touch of blush to her cheeks, her ear lobe, and her shoulder. 
  15. Adhere a small black pearl was added to her ear lobe as an earring.
  16. Trim the image panel to 5.25" x 4", edge, with a black marker, then adhered to a black A2 card.

Thanks for visiting today!

Friday, May 20, 2022

Comfy and Cozy!


Stampendous! Products Used:

Other Products Used:
Décor Cling Rubber Stamp by Stampendous!®
Tuxedo Black Memento™ Ink by Tsukineko®
Pine Elements Ink by Lavinia Stamps
Green Cardstock
Copic® Markers:
Flower: YR20, YR23, YR31, Y0000, Y000, Y23, RV52, RV55
Leaves: G40, G43, G46
Mouse Skin: BV000, E51, E50, RV91, R00, R000, R20 (Cheeks) R21 (Noses)
Mouse Fur (left to right): E31, E33, E35, E44, R00; E21, E23, E25, E37, E44, R00; R35, E44, E55, E57, E59, R00
Outline: N0, C00
Stamping Platform
Pouncy Tool (looks like steel wool on a  wood base)

Instructions:
  1. Cut a piece of 12x12 Green cardstock in half.
  2. Score one piece at 6" and fold to form a 6" card. Set aside.
  3. Use magnets to secure the other piece of green cardstock to the base of a stamping platform.
  4. Press the platform's lid onto the back of the stamp. Lift the lid.
  5. Ink the stamp with Pine Elements ink and stamp. Re-ink and stamp again if needed.
  6. Trim the green cardstock to 5.75" square and edge with Pine Elements ink.
  7. Press the Pouncy tool onto the ink pad and randomly pounce onto the green panel.
  8. Heat set the green panel and set aside.
  9. Use Tuxedo Black Memento ink to stamp the image.
  10. Color with Copic markers.
  11. Trim the image panel to 4.75" x 3.75" and mat with green cardstock cut to 5" x 4".
  12. Edge the mat with Pine Elements ink.
  13. Adhere the matted image panel to the green background panel as shown.
  14. Adhere the card front to the card.

Tuesday, May 17, 2022

Birthday Shaker Card!

It's Tuesday so it's time to share a project created for Topflight Stamps. I was feeling groovy, so I decided to channel my inner flower child and create a birthday shaker card. 

Here it is!


Topflight Stamps Products Used:

Other Products Used:
Solar White Classic Crest® Cardstock by Neenah Papers
140 lb. Mixed Media Cardstock by Strathmore®
Avalanche White Cardstock by Bazzill Basics®
Black Glitter Paper from the Glitter Stack by DCWV®
Tuxedo Black Memento® Ink by Tsukineko®
Copic® Markers:
Skin: BV0000, BV000, E50, E21, E11, E00, R20
Hair: C8, C10
Eyes: RV63,  RV66, B63, B66
Lips: RV66, RV69
Shirt: V09, V17, RV66
Jeans: B34, B37, B39
Hat: RV63, RV66, V09, V17, B34, 
Rainbow Star and Mixed Flower Sprinkles by Kat Scrappiness
Acetate from packaging*
STAY-tion™ by Wendy Vecchi for Ranger Ink
Stamping Platform

Instructions:
  1. Cut a piece of 12x12 Avalanche cardstock in half. Score one piece at 6" and fold to form a 6" square card. Set aside.
  2. Use Tuxedo Black Memento Ink to stamp the sweet hippie chick from the Little Hippie Clear Stamp Set 511 by Janet Klein for AALL and Create onto Neenah cardstock. 
  3. Use Copic markers to color her, then fussy-cut and edge her with a dark marker. Set aside.
  4. Use magnets to secure the Awesome Medium Stencil by Darkroom Door and a piece of Media cardstock to the STAY-tion.
  5. Brush Violet ChalkDella Blue, and Confetti Elements Inks by Lavinia Stamps over the Awesome Medium Stencil onto Mixed Media cardstock to create a background panel. 
  6. Trim this panel to 5.5" square, edge with the same Elements Inks, and set aside.
  7. Use the smaller of the two dies from the Scalloped Rectangle Frames Die Set by Paper Rose to cut another piece of Mixed Media cardstock.
  8. Brush the scalloped frame die-cut with  Violet ChalkDella Blue, and Confetti Elements Inks.*
  9. Brush the same colors of Elements Inks over the Abundance Stencil 85 by AALL and Create onto another piece of Mixed Media cardstock. 
  10. Use a stamping platform and Onyx Black VersaFine Ink by Tsukineko to stamp the peace sign from the Little Hippie Clear Stamp Set 511 and the Happy Birthday sentiment from the Everyday Sentiments Clear Stamp Set 666 onto the stenciled Mixed Media cardstock. Heat set.
  11. Trim a piece of acetate to cover the aperture of the frame die-cut, then adhere the acetate to the reverse of the frame die-cut.
  12. Use foam tape to create an enclosed well around the acetate covered window on the rear of the frame die-cut.*
  13. Add the goodies to the well formed by foam tape.
  14. Remove the backing from the foam tape and carefully adhere the panel created in Steps #9 and #10 facedown over the aperture to seal it.
  15. Cut a piece of black glitter cardstock to 5.75" square, edge with a black marker, and use to mat the background panel.
  16. Adhere the matted background panel to the reserved white 6" square card.
  17. Adhere the shaker die-cut to the background panel.
  18. Adhere Little Hippie to finish the card.
Notes:
  • Save your acetate from clear stamps or packaging! It's ever-so useful. This packaging makes great shaker covers, can be used to apply ink, can be used as canvas for paints, and can even be used as a stamping surface. 
  • I didn't do such a great job blending inks on the scalloped frame die-cut. Elements inks are usually very blendable. My bad.
  • I had to cut my foam tape vertically so that it would fit the reverse of the die-cut. 
Thanks for visiting today!

Tuesday, May 10, 2022

In My Head I'm Busy!

It's Tuesday which means it's time to share a project created for Topflight Stamps! This week my teammates and I are showcasing Hobby Arts Ltd.'s fabulous products! 

Since Topflight Stamps is a sponsor of the 2022 Spring/Summer Coffee Lovers Blog Hop, I decided to use the super-cute coffee-sipping cozy sloth from the Sloths Clear Polymer Stamp Set by Hobby Art Ltd. with the polaroid frame from the Sloths Clear Polymer Stamp Set, also by Hobby Art Ltd.

Here's the card!


Topflight Stamps Products Used:

Other Products Used:
Solar White Classic Crest® Cardstock by Neenah Papers
Avalanche White Cardstock by Bazzill Basics Paper®
Tuxedo Black Memento™ Ink by Tsukineko®
Copic® Markers: W00, W0, W1, W2, W3, W4, W6, E30, E40, E41, E42, E43, E74, E81, E84, R32, R21, Y23, Y26, Y28, B24, B32, BV31, BV34, YR16, YG25, YG45
Cool Grey 230, Light Indigo 220 Pitt Artist Pens by Faber Castell
Repositionable Label Paper by Avery®
Post-It Notes® by 3M
STAY-tion™ by Wendy Vecchi for Ranger Ink
Stamping Platform

Instructions:
  1. Cut a piece of Avalanche cardstock to 8.5" x 5.5". Score at 4.25" and fold to form an A2 card. Set aside.
  2. Use a stamping platform and Tuxedo Black Memento ink to stamp the polaroid frame, from the Funky Pigeons Clear Polymer Stamp Set, onto a 4.25" x 5.5" piece of white Neehah cardstock and onto repositionable label paper. 
  3. Place Post-It notes around the aperture of the polaroid frame.
  4. Use the stamping platform to stamp the coffee-sipping sloth, one of five adorable sloths from the Sloths Clear Polymer Stamp Set, into the frame on the image panel and onto repositionable label paper.
  5. Fussy-cut the label paper versions of the sloth and the polaroid frame.
  6. Keep the Post-It Notes in place on the image panel and adhere the Sloth's mask atop its counterpart.
  7. Sponge or brush Della Blue Elements Ink over the the masked sloth and the Post-It Notes to add a blue background to the photo portion of the Polaroid.
  8. Adhere the fussy-cut label paper version of the polaroid frame over its counterpart on the image panel.
  9. Use magnets to secure the image panel to the STAY-tion.
  10. Position the Profusion Stencil #84 over the image panel and secure with magnets.
  11. Sponge or brush Lime PunchPineDella Blue, and Bermuda Elements Inks  over the stencil onto the image panel to add a tropical-ish background to the image panel.
  12. Remove and clean the stencil.
  13. Remove and retain the masks and retain for a later use. 
  14. Use Copic markers to color the sloth and his accoutrements.
  15. Use a stamping platform and Onyx Black VersaFine Ink by Tsukineko to stamp the sentiment from the Sloths Clear Polymer Stamp Set onto the polaroid frame on the image panel.
  16. Use Pitt Artist pens to outline the outside of the polaroid frame and the inside of the photo aperture.
  17. Trim the image panel to 4" x 5.25".
  18. Adhere the image panel to the reserved white A2 card.
Thank you for visiting today!

Tuesday, May 3, 2022

Gear Up for a Great Birthday!

It's Tuesday so it's time to share a project created for Topflight Stamps. I love birds and I love Steampunk, so I'm created a card with the Steampunk Bird Cling Mounted Stamp Set by Indigo BluBell Flower Vine Clear Polymer Stamp by Lavinia Stamps, the Industrial Elements 6x6 Stencil by Paper Rose, and a sentiment from the Gear Up and Some Assembly Required Clear Polymer Stamp Set by Hobby Art Ltd.

Here it is!


Topflight Stamps Products Used:

Other Products Used:
Solar White Classic Crest® Cardstock by Neenah Papers
Ash Cardstock by Bazzill Basics Paper®
Tuxedo Black, London Fog, and Summer Sky Memento™ Inks by Tsukineko
Copic® Markers:
C00, C0, C1, C2, C3, C4 C5, E95,E97, E99,YR23, Y21, Y23, Y26, Y28, BG72, BG75, BG78, BV13, BV17, RV52, RV63, RV91, RV93, RV95, B34, YG45, N0, N1
Cloud Stencil by My Favorite Things
Clear Glaze® 3D Glossy Gel Pen by Sakura® of America
Repositionable Label Paper by Avery®
STAY-tion™ by Wendy Vecchi for Ranger Ink
Stamping Platform

Instructions:
  1. Cut a piece of Ash cardstock to 10" x 6.5". Score at 5" and fold to form a card. Set aside.
  2. Use Tuxedo Black to stamp the bird with black ink onto white cardstock and onto repositionable label paper. 
  3. Fussy-cut the label paper version and place atop its counterpart as a mask. 
  4. Place a ruler horizontally over the base of the image panel to ground the bird's wheels.
  5. Sponge or brush Summer Sky Memento ink over the cloud stencil to give the bird a cloudy sky background. 
  6. Sponge or brush London Fog Memento ink over the the Industrial Elements 6x6 Stencil by Paper Rose onto the image panel. 
  7. Move the ruler so that the top part of the image panel is covered.
  8. Sponge or brush London Fog Memento ink over the ruler onto the base of the image panel
  9. Position the vertical ruler lines on the Industrial Elements 6x6 Stencil along the base of the image, then sponge or brush London Fog Memento ink over the stencil onto the image panel to add some visual interest.
  10. Use a stamping platform and Tuxedo Black Memento ink to stamp the Bell Flower Vine Clear Polymer Stamp by Lavinia Stamps along the right edge or the image panel, so the bird has something to see and smell. After all, it's important to stop and smell the flowers, right?
  11. Lift the mask and retain for another use
  12. Use Copic markers to color the Steampunk Bird, the flowers, and the leaves. I decided that the bird had stayed outside in the rain too often, so I added some rust to his gears and wheels.
  13. Apply several layers of Clear Glaze pen to the rivets on the image, letting the gel ink dry between layers. 
  14. Use a stamping platform and Morning Mist VersaFine Clair Inkto stamp the sentiment from the Gear Up and Some Assembly Required Clear Polymer Stamp Set by Hobby Art Ltd.
  15. Heat Set.
  16. Adhere the image panel to the reserved card.
Thanks for visiting today!

Sunday, May 1, 2022

BEE-U-TIFUL!

Here's a card created for Topflight Stamps with Tracy Scott's Rubber Cling Mounted Stamp Set 59 by PaperArtsy, I love bees and am absolutely enamored of this gorgeous set that contains this gorgeous bee plus coordinating decorative hexagons and squares. 


Topflight Stamp Products Used:

Other Products Used:
Solar White Classic Crest® Cardstock by Neenah Papers
Yellow Cardstock
Tuxedo Black Memento™ Ink by Tsukineko®
Copic® Markers: Y13, Y15, Y17, &19, Y26, Y28, B60, B63, B66, RV52, RV63, N9
Black Medium Brush Multiliner by Copic®
Blueberry Very Vintage Double Dot Patterned Paper by BoBunny Press®
Queen Bee from the Let It Bee 8x8 Patterned Paper Pad by Graphic 45® 
Fishtail Flag Stax Die-Namics Die Set by My Favorite Things
Repositionable Label Paper by Avery®
STAY-tion™ by Wendy Vecchi for Ranger Ink
Stamping Platform

Instructions:
  1. Cut a piece of 12x12 yellow cardstock in half. Reserve one half. Score the other piece at 6"' and fold to form a 6" square card. Set aside.
  2. Use a stamping platform and Memento ink to stamp the beautiful bee from Tracy Scott's Rubber Cling Mounted Stamp Set 59 onto a 6" square piece of white cardstock and onto repositionable label paper. 
  3. Fussy-cut the label paper version and place it over its counterpart on the image panel.
  4. Use magnets to secure the image panel to the STAY-tion.
  5. Lightly brush Sundance Elements Ink by Lavinia Stamps over the masked image to add a yellow background behind the been.
  6. Use magnets to secure the Honeycomb Stencil by Darkroom Door diagonally over the the image panel.
  7. Use more pressure to brush Sundance Elements Ink over the stencil onto the image panel. 
  8. Shift the stencil down towards the right bottom corner, taking care to line up the hexagons and secure with magnets.
  9. Continue to heavily brush Sundance Elements Ink over the stencil.
  10. Remove the mask over the bee was lifted and retain for a later use. 
  11. Use Copic markers to color the bee.
  12. Use the stamping platform and Nocturne VersaFine Clair Ink to stamp the hexagon with the matching flower from the Tracy Scott's Rubber Cling Mounted Stamp Set 59 twice onto yellow cardstock and heat set.
  13. Fussy-cut the hexagons and edge with a black pen.
  14. Trim the image panel.
  15. Cut blue patterned paper to 5.75" square, edge with a B63 marker, then adhere it to the reserved  6x6 yellow card. 
  16. Adhere the image panel to the card front.
  17. Adhere the two hexagons as shown. 
  18. Trim the sentiment from G45 patterned paper and edge with a yellow marker.
  19. Use a flag die to cut a scrap of black cardstock.
  20. Mat the sentiment with the black flag die-cut.
  21. Adhere the matted sentiment die-cut as shown to finish the card.
Thanks for visiting today!