Showing posts with label Top Dog Dies. Show all posts

Friday, May 22, 2026

Coffee Card!


Products Used:
To Go Coffee Cup, Mat, and Accessories Die Set by Top Dog Dies/Accucut
Bristol Paper by Strathmore
Grey and Black Chalk Pencils by Generals
Kraft Cardstock by Bazzill Basics
Coffee Beans 6x6 Stencil by Paper Rose
Coffee Bean Brilliance Ink by Imagine Crafts/Tsukineko
VersaMark Ink by Imagine Crafts/Tsukineko
Anti-static Pouch
Clear Detail Embossing Powder by Stampendous
Gold Zig Mangaka OpaqueLiner by Kuretake
Movers and Shakers Alarm Clock Alterations Die by Tim Holtz for Sizzix
Black Pigma Pen by Sakura
1/8 Gold Washi Tape: Source Unknown (Little B?)
Clock Patterned Washi Tape: Source Unknown
Rhinestones by KaiserCraft
Low-tack Tape
STAY-tion by Wendy Vecchi for Ranger Ink
Glassboard by Glassboard Studios
Stamping Platform

Please Note: Products marked with an asterisk ( * ) are available at Topflight Stamps.

Instructions:
  1. Create a 6" square card from Kraft cardstock. Set aside.
  2. Use the coffee sleeve die from the To Go Coffee Cup Die Set to cut Bristol Paper, then secure the die-cut onto the base of a stamping platform with magnets and/or low-tack tape. 
  3. Position the "Coffee Makes It Possible" Clear Stamp by Carmen's Veranda, facedown on the die-cut. 
  4. Press the platform's lid onto the back of the stamp. Lift the lid.
  5. Ink the stamp with Warm Breeze VersaFine Clair Ink and stamp. Re-ink and stamp again if needed to attain a good impression. 
  6. Edge the coffee sleeve/sentiment die-cut with Warm Breeze VSFC Ink, heat set the entire die-cut, and set it aside.
  7. Use the to-go cup die from the coffee set to cut patterned paper from the Ink Drops - Candy 6x6 Patterned Paper Pad. 
  8. Edge the patterned paper to-go cup die-cut with Warm Breeze VSFC Ink then heat set the ink.
  9. Use the to-go cup's lid die to cut Bristol Paper. 
  10. Adhere the lid and the sleeve die-cuts to the patterned paper to-go cup. 
  11. Use a grey chalk pencil to add a slight shadow under the lid. 
  12. Set the assembled to-go coffee cup aside.
  13. Cut a 6" square of Kraft cardstock to create a background panel. 
  14. Place the panel onto a magnetic craft mat. 
  15. Pounce an anti-static pouch onto the Kraft background panel. 
  16. Place a coffee bean stencil over the Kraft background panel and secure with low-tack tape and/or magnets. 
  17. Sponge or brush Coffee Bean Brilliance Ink over the stencil onto the background panel. 
  18. Keeping the stencil in place, wipe the ink off of the stencil with a tissue.
  19. Sponge or brush VersaMark Ink over the stencil onto the background panel.
  20. Remove the stencil and pour clear detail embossing powder onto the wet ink.
  21. Pour the excess embossing powder back into its container, then heat set t background panel.
  22. Trim the panel to 5.75" square and heavily edge it with Coffee Bean Brilliance Ink. 
  23. Add clock-patterned Washi tape to the bottom edge. 
  24. Add 1/8" gold Washi tape to the bottom and top edges of the clock-patterned Washi tape. 
  25. Adhere the assembled to-go cup to the background panel as shown.
  26. Use an alarm clock die to cut metallic gold cardstock and Bristol Paper.
  27. Assemble the alarm clock and detail it with a black marker. 
  28. Adhere the assembled alarm clock onto the background panel as shown.
  29. Use a gold metallic pen to add dots to the background to echo the gold of the Washi tape and the alarm clock.
  30. Adhere the background panel to the reserved 6" square Kraft card.
  31. Use aqua and turquoise rhinestones to finish the card.
~ ~ ~

You should participate in Lost Coast Designs Portal to Creativity May "No Body Here Challenge 209" for the chance to win Lo$t Coa$t Ca$h!


Saturday, May 31, 2025

Funky Fossil Coffee Card

Greetings! Saturday is my day to share a Funky Fossil Designs project. I've used their Coffee Cat Clear Stamp Set, the Steampunk Cat Repeat Stencil, and the 8x8 Mixed Media Compendium Paper Pad to create a coffee themed card.


Funky Fossil Designs Products Used:
Steampunk Washi Tape (Retired)

Other Products Used:
Solar White Classic Crest Cardstock by Neenah Papers
Bristol Paper by Strathmore
White Cardboard Packaging
Raven Black Textured Black Cardstock by Bazzill Basics
Tuxedo Black Memento Ink by Imagine Crafts/Tsukineko
Jet Black StazOn Ink by Imagine Crafts/Tsukineko
Garden Party, All That Jazz, and Suede Shoes Dye Inks by Catherine Pooler Designs
Copic Markers: C2, C1, C0, C00, BG49, BG19, BG18, G40, G20, YG01
Grey MultiLiner Pen by Copic
White Gelly Roll Gel Pen by Sakura
Black Pigma Pen by Sakura
Black Chalk Pencil by General's
Ink Jet Vellum by Strathmore
Sookwang Double-sided Tape
Coffee Cup Die Set by Big Dog Dies
Speech Bubble Die: Source Unknown
Corner Dies: Source Unknown
Low-tack Tape
STAY-tion by Wendy Vecchi for Ranger Ink
Glassboard by Glassboard Studios
Stamping Platform

Instructions:
  1. Create a 5" x 7" card from Raven cardstock. Set aside.
  2. Use Tuxedo Black Memento Ink to stamp the cat and mug from the Coffee Cat Clear Stamp Set onto white cardstock.
  3. Fussy-cut the Coffee Cat color with Copic markers, and edge with a black pen
  4. Use the white gel pen to add highlights to the cat's eyes and the coffee mug.
  5. Set the Coffee Cat aside.
  6. Use the Coffee Cup die to cut Bristol Paper.
  7. Use the Coffee Cup Lid die to cut the white cardboard packaging. Set the die-cut aside.
  8. Place the Coffee Cup die-cut onto the STAY-tion.
  9. Sponge or brush Garden Party Dye ink onto the Coffee Cup die-cut, sponging more heavily around the edges of the die-cut.
  10. Use low-tack tape and/or magnets to secure the Steampunk Cat Repeat Stencil over the coffee cup die-cut.
  11. Sponge All That Jazz Dye ink over the stencil onto the coffee cup die-cut.
  12. Wipe the stencil with a paper towel.
  13. Use a small brush to brush Suede Shoes over the fish bones and pawprints on the stencil onto the coffee cup die-cut.
  14. Cut a piece of teal patterned paper from the 8x8 Mixed Media Compendium Paper Pad to 4.75" x 6.75" to create the background panel. 
  15. Sponge or brush Garden Party Dye ink around the edges and into some of the lighter areas of the background panel to make the patterned paper coordinate better with coffee-cup.
  16. Adhere rust and rivet Washi tape to the bottom of the background panel and onto the patterned paper scrap left from Step 14.
  17. Use a black chalk pencil to add some shading to the top of the Washi tape.
  18. Use the corner die to cut the Washi-tape covered scrap.
  19. Edge the background panel and the corner die-cuts with Nocturne VersaFine Clair Ink.
  20. Adhere the coffee cup die-cut and the Coffee Cat to the background panel as shown.
  21. Adhere the corner die-cuts to the top corners of the background panel.
  22. Back a strip of vellum with Sookwang Tape.
  23. Use Jet Black StazOn Ink to stamp the sentiment from the Coffee Cat Clear Stamp Set onto vellum. Let it dry.
  24. Use a speech bubble die to cut the sentiment.
  25. Adhere the sentiment die-cut above the cat as shown.
  26. Trim the right side of the die-cut.
  27. Use a grey multi-liner to outline the vellum speech bubble die-cut.
  28. Adhere the background panel to the reserved black card.
Thanks for visiting today!


Tuesday, December 24, 2024

Happy New Year - A Miss Dee Calendar

Greetings! It's Tuesday so it's time to share a project created for Topflight Stamps. This week the team is focusing on New Year/New Beginnings, so I've made a 2025 calendar wall hanging with the Fortuneteller Dee Clear Stamp Set 1211 by Janet Klein, the Mosaic Stencil 54, and the Skycrossed Paradise Die Set 34 –– all by AALL and Create.


Other Products Used:
Solar White Classic Crest Cardstock by Neenah Papers
Black Metallic Cardstock by Recolletions
Black Tie Metallic Textured Cardstock by Bazzill Basics
Origins Patterned Paper by Basic Grey (old and hoarded)
Copic Markers:
Skin: BV000, BV0000, E50, E21, E11, E00, R20 (cheeks)
Hair: BV29, BV25, BV23, N6, N5, N4
Eyes: B91, B52
Eye Shadow: YG45, YG41
Earrings: Y28, Y26, Y23
Blouse/Apron: B91, B52
Belt: E39, E35, E33, R46
Skirt: YG67, YG63, YG45, YG41
Shoes: R46, R35
Booth: B95, B91, W3, W1, E25, E04, N6, N4, YG67,  YG45, YG41
Tablecloth: BV17, BV13, YG63, YG41, Y28, Y26, R46
Crystal Ball Base:  E37, E25
Crystal Ball: BG11, BG10, B41, C00
White Gelly Roll Gel Pen by Sakura of America
Corner Rounder Punch by Creative Memories
Number Dies by Top Dog Dies
Happy New Year Die: Source Unknown
Black Chalk Pencil by General's 
Mini Tear Off Calendar
Low-tack Tape
Sookwang Tape
Stamping Positioner
STAY-tion by Wendy Vecchi for Ranger Ink
Stamping Platform

Instructions:
  1. Use Tuxedo Black Memento Ink to stamp Fortuneteller Dee, the fortune teller booth, and the alternate sign from the Fortuneteller Dee Clear Stamp Set 1211 onto white cardstock. 
  2. Use Tuxedo Black Memento Ink and a stamping platform to stamp the crystal ball stamp from the set twice — once onto white cardstock and once onto repositionable sticker paper.
  3. Fussy-cut the sticker paper version and place it over its counterpart as a mask.
  4. Position the table facedown on the image under the base of the crystal ball.
  5. Lift the platform's lid, ink the stamp with Tuxedo Black Memento Ink, and stamp.
  6. Fussy-cut all of the images, color them with Copic markers, and edge them with black markers. 
  7. Adhere the alternate sign over the existing sign. 
  8. Use Gelly Roll Bold Line Stardust Clear Glittering Ink Pen to add some glitter gel ink to the crystal ball, then quickly use a CG00 marker to spread the glitter over the ball. Scribble the marker's nib onto scrap paper to remove the glitter.
  9. Use a white gel pen to add highlights to the ball.
  10. Use the largest die from the Skycrossed Paradise Die Set 34 to cut metallic cardstock. 
  11. Trim a piece of white cardstock so that it was a bit bigger than rounded rectangle die that is part of the Skycrossed Paradise Die Set 34
  12. Use a corner rounder punch to round the corners of the background panel.
  13. Place low-tack tape along the base of the white cardstock. 
  14. Brush Golden Meadow VersaFine Clair Inkover the tape to cover the background panel. I was fairly heavy handed with the ink, so I heat set it. 
  15. Place the Mosaic Stencil 54 over the background, then brush Golden Meadow VersaFine Clair Ink over the stencil onto the inked cardstock to create a tone-on-tone look. 
  16. Remove the stencil and clean.
  17. Heat set the panel.
  18. Remove the horizontal strip of low-tack tape and cover the top portion of the panel.
  19. Brush Morning Mist VersaFine Clair Ink over the bottom portion of the background panel. 
  20. Thoroughly heat set the background panel.
  21. Place the Fortuneteller Booth where you'd like it. Use a black chalk pencil to draw a rough outline around the booth, remove the booth, and use a cotton swab to blend the chalk.
  22. Adhere the Fortuneteller booth. 
  23. Place Fortuneteller Dee and the table where you'd like them and use the black chalk pencil to outline and ground them. 
  24. Use the cotton bud to soften and blend out the black chalk.
  25. Adhere Fortuneteller Dee and the table/crystal ball.
  26. Use Nocturne VersaFine Clair Ink to edge the image panel, then adhere it to the black metallic die-cut. 
  27. Use a "Happy New Year" die and number dies to cut  black metallic cardstock.
  28. Adhere the "Happy New Year" sentiment die-cuts to the image panel as shown.
  29. Adhere the matted image panel to patterned paper.
  30. Adhere the calendar to metallic black paper cut to 3.25" x 2.5".
  31. Adhere the number dies and the matted mini-calendar to the patterned paper panel.
  32. Edge the patterned paper panel with Grass Green VersaFine Clair Ink
  33. Adhere the calendar to Black Tie textured metallic cardstock to finish the piece.
Thanks for visiting today!


Tuesday, May 26, 2020

Spring/Summer Coffee Lovers Blog Hop -- Card #3

It's still Tuesday, which means that it's still my day to share a project created for Topflight Stamps and for the Spring/Summer Coffee Lovers Blog Hop! Topflight Stamps is a sponsor and is offering a $25 gift card to one lucky person. All winners will be announced on the Coffee Lover's Blog. Pretty nifty, eh?

As stated, I had started a second card, but ran out of time to get it posted at midnight. Alas. So, here it is! Two cards in one day! Don't get spoiled!

BTW, if you'd like to get 12% off your order at Topflight Stamps use THIS LINK or the Coupon Code: KATHIREREK855!

Here's the card which features the "Safety First" Clear Stamp Set #254 by AALL and Create.


Basically, the safety warning sentiment included in the "Safety First" best reminded me that I had the Caution Washi tape in my stash and also had the Redemption Stencil which had words like Dark, Danger, Poison, Toxic, etc, all of which describe my usual morning mood. Hence this card. 

Topflight Stamps Products Used:
Pumpkin Soup and Yellow Submarine Fresco Chalk Paints by Paper Artsy

Other Products Used:
Solar White Classic Crest® Cardstock by Neenah Papers
White Metallic Cardstock by Neenah Papers
Kraft Cardstock by Bazzill Basics Paper, Inc.®
Dot Embossed Kraft Cardstock by Bazzill Basics Paper, Inc.®
Copic® Markers: C0, C1, C2, C4, Y11, Y13, Y15, Y19, Y26, Y28, R14, R17
Coffee Cup Die Set by Top Dog Dies/Accucut®
Steampunk Man Stencil by Stamperia
Ochre Archival™ Ink by Ranger Industries
Caution Washi Tape: Source Unknown
Clear Embossing Powder by Stampendous!®
Label Die Set by Spellbinders®
Faucet: Prima Marketing
Drip Epoxy Stickers by Cloud 9/Fiskar's®
STAY-tion® by Wendy Vecchi/Ranger Industries
Adhesive Foam Squares by Scrapbook Adhesives® by 3L

Instructions: 
  1. Cut a sheet of 12x12 Kraft cardstock in half. Reserve one 6x12 piece.
  2. Score at 6" and fold to form a 6" square card.
  3. Take the other piece of Kraft cardstock and place it onto the STAY-tion.
  4. Secure the 7x7 Redemption stencil over the Kraft cardstock with magnets.
  5. Sponge yellow ink over the stencil onto the Kraft cardstock.
  6. Remove the stencil and place the Time Tunnel stencil over the word-stenciled cardstock. Secure with magnets.
  7. Sponge Ochre ink, which is a paler yellow) over the Time Tunnel stencil.
  8. Remove the stencil, trim the stenciled panel to 5.75" square. Edge with yellow ink.
  9. Add the Caution Washi tape to the panel and secure on the reverse.
  10. Adhere the stenciled Washi embellished cardstock panel to the card.
  11. Using the Coffee Cup Die set, cut chipboard, white metallic cardstock, textured Kraft cardstock.
  12. Paint the chipboard Coffee cup with Fresco Finish Acrylic paints. Heat set.
  13. Use magnets to secure the chipboard coffee cup to the STAY-tion. Position the Steampunk Man  stencil so the man is trimmed off and the clock shows. 
  14. Sponge Yellow Prism ink over the stencil onto the painted chipboard coffee cup.
  15. Lift the coffee cup from the STAY-tion and sprinkle clear embossing powder onto the cup. Dump off the excess embossing powder, and heat set. Yep! Prism ink stays wet and tacky enough to use with embossing powder. Sweet!
  16. Stamp the sentiment with VersaFine Ink.
  17. Cut the sentiment with a label die, then edge with Red Chili Prism Ink.
  18. Assemble the coffee cup as shown.
  19. Stamp the Grumpy Cat with Tuxedo Black Memento ink.
  20. Fussy-cut, edge with a Multiliner pen, and color with Copic markers.
  21. Adhere the assembled coffee cup to the card. 
  22. Use wet adhesive or strong tape to secure the faucet to the coffee cup.
  23. Use a dark brown Copic marker to color the clear epoxy drip stickers.
  24. Adhere the colored Grumpy cat to the card front using dimensional foam squares.
  25. Add the colored clear epoxy drip stickers under the faucet and above the cat to finish the card.
Thanks for visiting today!

Tuesday, March 15, 2016

Feeling Lucky?


I know that it's a bit early for St. Patrick's Day, but I figured that I might as well get into the spirit. This card features the very versatile Marcie, one of the Divas by Rubber Romance that is available at I Brake for Stamps. What I like about Marcie is that you can change the color of her dress and her hair, plus add the perfect sentiment to her sign to fit your card's occasion!

Marcie was stamped with Tuxedo Black Memento ink (Imagine Crafts), colored with Copic markers, fussy-cut, then edged with a Black Pitt Artist pen (Faber Castell). The sentiment was added with Life Quotes Remnant Rubs (Idea-ology). Marcie was set aside while I created a suitable background for her.

Green cardstock was die-cut with the A2 Scalloped Card die (Top Dog Dies). I found the perfect patterned paper in my stash. It's from the Tell Your Story 6x6 pad (Webster's Pages). Both the card front and the patterned paper were edged with a Gold Leafing pen (Krylon). Gold Foil Green Stripes Washi tape (Little B) was used to add a bit more gold and green to the card and to give Marcie somewhere to stand!

I Brake for Stamps is where you'll find great selections of Rubber Romance stamps plus lots of other stamp companies. Click on my badge below to be whisked over there to check out all of the goodies! Best of all, if you buy something, you can get a 10% discount off of your purchase if you use this code: SAVE10KATHI!


Thanks for visiting today!

I shall enter this card into the following challenges:
• Open-Minded Crafting Challenges: St. Patrick's Day
• Crafty Girls Creations Challenges: Anything Goes
• Craft for the Craic Challenges: Luck of the Irish


Thursday, June 11, 2015

At Last! Favorite Friends!

Last week was crazy, so I didn't get much done craft-wise. Here's my project that works for two challenges!

Gez Butterworth was the hostess last week at Stampotique Designers Challenge Blog. Her challenge is "Favorite Stamp!" Here's what she said about her challenge!

"We've ALL got one! What's yours? We would love to see your favorite Stampotique images (if you can't pick just one) on your creations this week. Which stamp makes your heart skip a beat?"
If you'd like the chance to win your choice of $30 worth of Stampotique stamps, you should play along with this challenge. You have until the end of the month to create and share your challenge projects for this month. Visit Stampotique Designers Challenge blog and be sure to read the rules so that you'll have the chance to win that great prize!!

This week's challenge at The Outlawz Coloring Challenges is Friends, in honor of National Best Friend Day. My Outlawz Coloring Challenge teammates, Carla, Penny, Karen, Vannessa, and I challenge you to use create a project for this challenge. You can use any coloring medium you like, just as long as you color!  

Here's my card featuring the four friends from my beloved Birdy Up (Kira Nichols) stamp.


Birdy Up is one of my favorite stamps because it has four adorable birds. Each bird can be used alone or in combination with the others, which gives the stamp incredible versatility.

Birdy Up was stamped with Tuxedo Black Memento ink (Ranger) and colored with Copic markers. Each bird was fussy-cut then edged with black marker. Clear Gelly Glaze pen (Sakura) was used on their claws, beaks, and some of their eyes. I assure you that it merely tickled them. They laughed. I heard them.

The birds in Birdy Up like to create scenes, so that's exactly what I did. The Carousel Bird Cage die (Poppystamps), the Delicate Chain die (Poppystamps), the door die from Our Home Album and Finishers Die Set (Top Dog Dies), and the Lock and Key die (QuicKutz) were used to die-cut a sheet of Metal Foil Tape(Ranger).

One of the two Carousel Bird Cage die-cuts underwent surgery to create an doorway, the door die-cut was adhered, and a link from the Delicate Chain die-cut was used to create a latch on the door. The main part of the cage was gently shaped. The second The Carousel Bird Cage die-cut was adhered behind the altered cage using dimensional tape. One of the Birdy Up birds was positioned in the doorway then adhered using dimensional adhesive.

Kraft cardstock was die-cut with the Garden Step Ladder die (Poppystamps) and assembled.

The patterned paper used for the wallpaper is very, very old Chatterbox paper. White cardstock was scored, cut to size, then added as bead board along the bottom. Floor boards were drawn onto brown cardstock, which was then adhered to the bottom of the card. One of the sayings from a Friends rub-on (7 Gypsies) was added to a scrap of patterned paper that had been die-cut with one of the dies from the Rectangle Nestabilities die set (Spellbinders), then matted onto brown cardstock that was die-cut with a slightly larger die from the same set.

The Garden Step Ladder die-cut was adhered to the card front and two of the birds from Birdy Up were adhered to the ladder. The fourth bird was adhered to the floor. The key was added below the beak of the top Birdy Up bird.

The Carousel Bird Cage die-cut was adhered to the card front, the Delicate Chain die-cut was threaded through the Carousel Bird Cage's top, and then hung. The hasp on the QuicKutz Lock was cut and the lock was added to the door latch using a foam adhesive square.

The sentiment/picture frame was adhered to the scene, the cardfront was adhered to a card, and I called it done!

Thanks for visiting today!

I shall enter this card into the following challenges:
Poppystamps Challenges: Oh Boy!
Scrapyland Challenges: Anything Goes
Dies R Us Challenges: Love Birds
Ladybug Craft Challenges: Use Your Dies

Wednesday, December 31, 2014

The last post of 2014!

It's been a mite bit hectic here in Kathiland with birthdays, Chanukah, and Christmas with all the prep that entails, which in our case involved traveling, cooking, catering, etc. Sadly, it also included receiving special gifts that kept on giving. No not stds, but colds and other nastiness. Blech.

So, here's my last project for the year, which is 2015 tear-off calendar, which should keep me aware of the date. Or not. Mostly not! The photo was just retaken outside in the New Year's noon-day sun, so there are some monster shadows! FYI, that's a flag stand that served to hang it for the photo!


I'm not going to go into my usual blather except to say that a whole lotta time and products were used to create lots of texture. There's flock, crackle, modeling paste, sparkly embossing, mica, and vellum!

Media Fluid Acrylic (MFA) paints, Media Gesso, Matte Medium, Black Modeling Paste, White Crackle Paint, and One Step Crackle by DecoArt and Stack Art Cling Rubber Stamps Regal Bird Kit, Stack Art Kraftboard Regal Bird Kit, Stack Art Elements Fusion Kit, old white and brown Fun Flock by Stampendous, the Our Home Album and Finishers die set by Top Dog Dies, a banner set by Die-namics, A Hint of Lime font dies by Die-Versions, Frills by DoodleBug, stencils, various inks, sparkly embossing powder, chains, and charms were used, plus some ancient eyelets! Such fun to pound the bejeepers out of those!

Now that it's finished, I can't decide if I like it, but after all that work and all the products used, it'll be up on the wall of my craft room.

Thanks for visiting today and Happy New Year!

I shall enter this project in the following challenges:
Not Just Cards Challenges: Anything Goes
Monday Morning Challenges: Something New (2015!)
Simon Says Stamp Wednesday Challenges: Anything Goes

Wednesday, June 18, 2014

Getting Sentimental

Gez is hosting Stampotique Designers Challenge this week and she's challenged us to Get Sentimental! Here's what she has to say about her challenge!

"Hi Gez here, I am delighted to be your hostess for this challenge.. I love sentiments and sayings, they really say it all to me! They make a piece finished! I'd like you to share some of your favourite words with us this week! They can be a main focal point or an embellishment, it's your choice! Say it with words... "

If you'd like the chance to win $30 worth of Stampotique stamps, you should play along. Visit Stampotique Designers Challenge blog and be sure to read the rules, so that you'll have the chance to win a great prize!!!

Here's my card, which uses Stampotique's Owl with Wings (Jo Capper-Sandon) and One Second...(Janet Klein).
 
Owl with Wings (Jo Capper-Sandon) was stamped with Tuxedo Black Memento ink, colored with Copic markers and fussy-cut. Clear Gelly Glaze pen was used on the owl's talons and beak. Glossy Accents were added to his eyes. The owl was then set aside to dry overnight.

Several clock and gear dies (Sizzix Alterations, Spellbinders, Die-Namics, and Cherry Lynn) were used to die-cut black and/or silver metallic cardstock. All the die-cuts were adhered to a card base and Owl with Wings was perched on a watch hand.

The Vintage Alphabet die from Top Dog Dies was used to die-cut silver metallic cardstock. "Tick Tock" was adhered to the upper right and lower left corners.

One Second... was stamped on the upper right and lower left corners with VersaMark and heat embossed with silver embossing powder.

Some gemstones were used to finish the card.

Thanks for visiting today!

I will enter this card in the following challenges:
Simon Says Stamp Mondays: Anything Goes!
Die Cuttin' Divas: Things with Wings

Thursday, June 5, 2014

Bombshell's June Pin-Up Challenge: Skulls!

The talented and lovely Cheryl Valadez has returned to the Bombshell fold in the role of Ms. June! As a guest designer, she got to select the challenge and chose "Skulls"!

I love me some skulls, so this one was a lot of fun, though my project went to visit Cheryl in Albuquerque, where it took a left turn.

Here it is!

I decided to use the Muertos Doll Digital stamp set for my project. I'll admit that I saw a "See no evil" skull thing somewhere on Pinterest and decided to put my own spin on it, so this digi set was perfect for it. The Muertos Doll Digital set contains two full skeletons and skulls 'n body parts. I took the skulls 'n body parts, manipulated them in Photo Elements, until I had a "See No Evil", "Hear No Evil", and a "Speak No Evil" doll. These were saved, reduced, printed out onto Neenah cardstock using my laser printer, then colored using Copic markers. I put a yellow Copic background around the dolls, then had a bit of a mishap with Antique Linen Distress ink and ended up having to add some Squeezed Lemonade Distress ink as well. This was put aside while I created my background.

While I was creating my "No Evil" trio, I realized that "No Evil" backwards was "Live On" and I went with that idea.

I dug deep into my stash and found ginormous slide mounts. I die-cut the title (Top Dog Dies), some skulls (BossKut), heart lockets, keys, pointing hand, (QuicKutz), flames (Die-Namics) and then punched some hearts and flowers. I dug up some old Jolie's flowers as well. All of the die-cuts and punches were adhered to the slide mount and coated with a layer of gesso. Then I went to pick up my CSA share.

When I got home, the gesso was dry. I decided to try out my new DecoArt's new Media Fluid Acrylics, which are part of the new DecoArt Media program. I painted the entire piece with Medium Grey Value 6 because I wanted to have good coverage in and around all of the die-cuts. I then blended Dioxazine Purple into Phthalo Blue from the bottom to the top and Cadmium Red into Quinacridone Red from top to bottom. Some watered down Titanium White was sponged onto the lower left hand corner and a few other places. The skulls were painted with straight up Titanium White and Carbon Black was dabbed into the skulls' eye and nose holes. The flames along the right side were painted with a combination of yellow, orange, and red (I forgot to mark the color names down, bad me). 

My first impression of these paints is that a little bit goes a long way, that they blend really easily, and that they dry quickly. I really like that their relative opacity is on the label, so I knew which were opaque and which were translucent.

But I digressed. When the paint was dry, I added White Fire, Pewter, Indigo, Rose Quartz, Onyxite, and Florentine Treasure Gold to all the die-cuts to make them metallic and shimmery. Jet Black StazOn ink was sponged through a skull stencil by Andy Skinner for Tando Creative. 

I adhered the two parts and decided that adding metallic charms was overkill, so I proclaimed it done. I'm not sure how I feel about the project, but I did have fun making it, so I guess that's what counts.

Thanks for visiting today!

Monday, May 5, 2014

In Honor of Cinco de Mayo


That's Frida Kahlo from VeraLane Studio's Frida Kahlo digital stamp set. She was resized in PhotoElements, printed out onto Neenah cardstock using my laser printer, and colored with Copic markers. Clear Gelly Glaze pen was used on her jewelry. Her cheeks received a touch of blush courtesy of chalk pencils.

An additional  Frida was printed out onto regular paper using an ink jet printer and fussy cut to become a mask. Y0000 Copic marker was airbrushed around her, then Y000 Copic marker was airbrushed through the Sunburst stencil by The Crafter's Workshop.

The patterned paper is from the Couture Collection 8x8 pad by Graphic 45. The striped paper is from an older Graphic 45 collection. Black patterned paper was die-cut using a die from Top Dog Dies. Ribbon was adhered, a bow was tied, and a sugar skull charm was used to finish the card.

Thanks for visiting today!

Wednesday, March 5, 2014

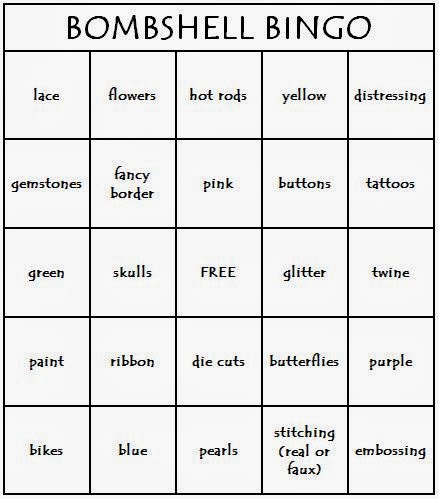
Bombshell Bingo -- Ms. March's Challenge

Leslie Turner, who is Ms. March, set this month's challenge over at the Bombshell's Blog! Her challenge is Bombshell Bingo!

Here's the Bingo Board!


Here's my card using the Man's Ruin and Dead Necessities sets and the row containing
flowers, fancy border, skulls, ribbon, and blue.

My card uses the skull from the Man's Ruin set and the roses from the Dead Necessities set. The skull was stamped first with Tuxedo Black Memento ink onto Neenah cardstock. It was die-cut using a Die-Namics die. The trio of roses was then stamped onto two corners, using Tuxedo Black Memento ink. The images were colored with Copic markers. Old Paper Distress ink was sponged around the images over the roses a bit.

Wesley Border die by Top Dog Dies was used to die-cut blue cardstock. Red ribbon was threaded through the holes at the top. The corner dies are from that same Spellbinders set that I found on cut-out at AC Moore. Red metal roses were added to the corners to finish the card!

Feel free to take this challenge, which you can find over at the Bombshell Blog. This month you do NOT have to use Bombshell stamps. However, if you do have them (and you should), use them for a second chance to win a fabulous prize! 

BTW, if you love Bombshell Stamps, why not try out to be a Bombshell Pin-Up? Click on this link to check out the details on our blog.

Thanks for visiting today! 


Wednesday, January 8, 2014

Stampotique Designers Challenge #130: Something New

This week's Stampotique Designers Challenge is brought to you by Kaz. This is what she had to say about the challenge!
I am just a little bit nosey, so for this challenge I'd like you to use something that Santa brought you! Don't worry if you didn't get crafty stash, just use something that you recently bought for yourself. If you really want to, you could make something with the theme of something new as well. Just make sure you enjoy making it.
I recently got Stampotique's Dance Party Breakup for myself. Santa doesn't visit me, but Harry (Hanukkah) does in the guise of my husband. This year he got me a bunch of crafty goodies and I've used two on this card. Specifically, I used the guitar die from the Rock and Roll Accents set by Die-Namics and the Vintage Alphabet die by Top Dog Dies, which imho is an unfortunate name. I asked for the guitar die because my husband recently started to play guitar again after a brief 35-year hiatus. He's started to teach himself, but just began to take guitar lessons. He's improving daily and really loves to play. I figured with a few guitarists in the family, the guitar die would get lots of use. I asked for the alphabet set because I love the Vintage font. I think it's very edgy and cool and kind of tattoo-ish.

Anyways, here's my card.


Dance Party Breakup became a guitarist for my card. S/he was stamped with Tuxedo Black Memento ink and colored with Copic markers.  The earpieces of his/her headphones and the wires issuing from them were coated with a layer of Clear Gelly Glaze pen to add dimension and shine. Black Glaze pen was used to highlight his eyes. A silver gel pen was used to outline the top of the headphones. I used a Fiskar's Fingertip Craft Knife to cut his/her hands free so that s/he could hold the guitar.

Dance Party Breakup was also stamped onto Eclipse tape, fussy cut, and placed over its counterpart on the card panel. T0, T1, and V000 were airbrushed over the mask. The mask was lifted and musical washi tape was added beneath Dance Party Breakup's feet.

The guitar was die-cut from glossy white cardstock, then colored with Copic markers. The guitar's pickups, tuning knobs, and other stuff were touched up with silver gel pen. I slid the guitar in place so that Dance Party Breakup looked as though s/he were playing.

Scattered Straw, Spiced Marmalade, Barn Red, and Black Soot Distress inks were sponged over a Flames stencil by The Crafter's Workshop onto a kraft card front. I used the Vintage Alphabet to die cut kraft cardstock, then sponged them with the same colors. Then I put the card together and pronounced it done!

Thanks for visiting today!