Stampendous! Products Used:
Other Products Used:
Tuxedo Black Memento™ Ink by Tsukineko®
Copic® Markers:
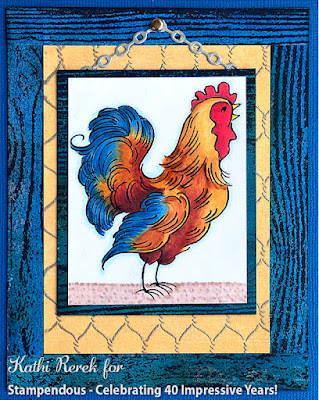
Beak: Y19
Face and Comb: B34, R24, R27
Feathers: Y23, Y26, Y28, YR24, YR27, E08, E18, B34, B37
Ground: E41, E42, E43
Outline: B0000
VersaMark™ Ink by Tsukineko®
Nocturne VersaFine Clair™ Ink by Tsukineko®
Blue Lagoon Elements Ink by Lavinia Stamps
Blueprint Sketch, Chipped Sapphire, and Black Soot Distress® Ink by Tim Holtz® for Ranger Ink
Delicate Chain Die by Memory Box
Silver Cardstock by Neenah Papers
Blue, Yellow, and Black Cardstock
Silver Brad
Stamping Platform
Intructions:
- Cut a piece of 8.5" x 11" blue cardstock in half.
- Score at 4.25" and fold to form an A2 card. Set aside.
- Use Tuxedo Black ink to stamp the rooster onto white paper.
- Color with Copic markers.
- Trim the image panel to 2.375" x 3.125". Set aside.
- Cut a piece of white media paper in half vertically.
- Sponge Blue Lagoon Elements inks to cover the paper. Heat set.
- Sponge Blueprint Sketch and Chipped Sapphire Distress ink overtop to deepen the color. Heat set.
- Use magnets to secure the inked paper to the base of the stamping platform.
- Place the Slim Cling Woodgrain Rubber stamp facedown on the blue cardstock.
- Press the platform's lid onto the back of the stamp and lift.
- Ink the stamp with Nocturne VersaFine Clair ink and stamp.
- Re-ink and stamp if necessary to get a good impression. Heat set.
- Cut four .5" strips from the stamped blue paper, then cut two 5.25" strips and two 4" strips
- Edge each strip with Black Soot Distress ink.
- Cut a piece of black cardstock to 4" x 5.25".
- Adhere the two .5" x 5.25" strips to either side of black cardstock.
- Adhere the two 4" x .5" strips to the top and bottom of the black cardstock.
- Use VersaMark ink to stamp the Chicken Wire onto yellow cardstock.
- Add Detail Silver Embossing powder and heat set.
- Trim the yellow panel to 3" x 4.25" and adhere to the center of the black cardstock.
- Cut the remaining piece of blue woodgrain paper to 2.625" x 3.375" and use to mat the reserved image panel.
- Use a pokey tool to poke a hole in the top panel of the frame.
- Use chain die to cut the silver cardstock.
- Cut the chain in half and adhere to the reverse of the matted image panel.
- Bring the two parts of the chain together at the top and attach with a silver brad as shown.
Thanks for visiting today!