Stampendous! Products Used:
Other Products Used:
Tuxedo Black Memento™ Ink by Tsukineko®
Copic® Markers:
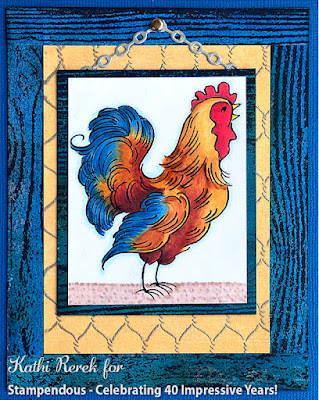
Beak: Y19
Face and Comb: B34, R24, R27
Feathers: Y23, Y26, Y28, YR24, YR27, E08, E18, B34, B37
Ground: E41, E42, E43
Outline: B0000
VersaMark™ Ink by Tsukineko®
Nocturne VersaFine Clair™ Ink by Tsukineko®
Blue Lagoon Elements Ink by Lavinia Stamps
Blueprint Sketch, Chipped Sapphire, and Black Soot Distress® Ink by Tim Holtz® for Ranger Ink
Delicate Chain Die by Memory Box
Silver Cardstock by Neenah Papers
Blue, Yellow, and Black Cardstock
Silver Brad
Stamping Platform
Intructions:
- Cut a piece of 8.5" x 11" blue cardstock in half.
- Score at 4.25" and fold to form an A2 card. Set aside.
- Use Tuxedo Black ink to stamp the rooster onto white paper.
- Color with Copic markers.
- Trim the image panel to 2.375" x 3.125". Set aside.
- Cut a piece of white media paper in half vertically.
- Sponge Blue Lagoon Elements inks to cover the paper. Heat set.
- Sponge Blueprint Sketch and Chipped Sapphire Distress ink overtop to deepen the color. Heat set.
- Use magnets to secure the inked paper to the base of the stamping platform.
- Place the Slim Cling Woodgrain Rubber stamp facedown on the blue cardstock.
- Press the platform's lid onto the back of the stamp and lift.
- Ink the stamp with Nocturne VersaFine Clair ink and stamp.
- Re-ink and stamp if necessary to get a good impression. Heat set.
- Cut four .5" strips from the stamped blue paper, then cut two 5.25" strips and two 4" strips
- Edge each strip with Black Soot Distress ink.
- Cut a piece of black cardstock to 4" x 5.25".
- Adhere the two .5" x 5.25" strips to either side of black cardstock.
- Adhere the two 4" x .5" strips to the top and bottom of the black cardstock.
- Use VersaMark ink to stamp the Chicken Wire onto yellow cardstock.
- Add Detail Silver Embossing powder and heat set.
- Trim the yellow panel to 3" x 4.25" and adhere to the center of the black cardstock.
- Cut the remaining piece of blue woodgrain paper to 2.625" x 3.375" and use to mat the reserved image panel.
- Use a pokey tool to poke a hole in the top panel of the frame.
- Use chain die to cut the silver cardstock.
- Cut the chain in half and adhere to the reverse of the matted image panel.
- Bring the two parts of the chain together at the top and attach with a silver brad as shown.
Thanks for visiting today!
Hi Kathi, I was going through some older posts and saw a comment you left on my black sympathy cards. I'm not sure I ever popped over to thank you for your lovely comment or to share my tips on the bows. I wanted to share my tip for the bows with you today, if it's not too late. Which is simply to google the tutorial done by Jak Heath many many years ago. I make my bows this way ever since finding her tutorial. I've tried a few 'tools', but none are as easy or as consistent in their finish as Jak's simple 'use your fingers' approach. Sorry for the late reply and thank you so much for the visit to my blog. Gorgeous creation here, love the colouring on your sweet rooster. Hugs, Wends xoxo
ReplyDelete