Tuesday, December 31, 2019

Spring Garden WindowRama Calendar

Stampendous' new WindowRama Kits are so fabulously versatile. I love that the kits can be used alone or in combination with the WindowRama Die Set.

Here's my 2020 WindowRama calendar which uses the wonderful new Cling Spring Garden Rubber Stamp with the Circle Chipboard WindowRama Kit.

Front:


Back:


Products Used:
Stampendous Products Used:

Other Products Used:
Media® Gesso by DecoArt®
Media® Matte Medium by DecoArt®
Media® Fluid Acrylic Paints by DecoArt®: Translucent White, Cerulean Blue, Primary Yellow, Diarylide Yellow, Cadmium Orange, Primary Magenta, Pthalo Green/Yellow, Hansa Yellow Medium, Dioxazine Purple, Pthalo Blue 
Jet Black and Watering Can Archival™ Ink by Ranger Industries
Jet Black StazOn® Ink by Tsukineko®
Black Pitt Artist Brush Pen by Faber Castell
Triplus® Fineliner by Staedtler
Gaffer's Tape by 7 Gypsies
Black Cardstock
Small Number Die Set by All Occasions
Small Tear Off Calendar by Taylored Expressions

Instructions:
  1. Apply gesso to both sides of two squares and two rectangles from the Circle WindowRama Kit. 
  2. Mix Translucent White with Cerulean Blue MFA paint, then paint all the pieces. Heat set.
  3. Apply a coat of Matte Medium to all surfaces. Heat set.
  4. Sponge Watering Can Archival ink over the stencil from the Grunge Script Cling Rubber Stamp set onto painted background of the two squares. Heat set.
  5. Apply a coat of Matte Medium over the stenciled squares. Heat set.
  6. Stamp the Spring Garden Rubber with Jet Black Archival ink onto the two squares. Heat set.
  7. Apply a coat of Matte Medium over the stamped squares and heat set.
  8. Paint the flowers and the butterflies with MFA paints. Heat set.
  9. Seal both painted squares with Matte Medium and heat set.
  10. Use the dies to cut 2020 from black cardstock. Seal the cardstock with Matte Medium.
  11. Adhere the date as shown, then seal with Matte Medium.
  12. If necessary, touch up stamped images with the black Pitt Artist Brush pen.
  13. Use Jet Black StazOn to edge all the pieces.
  14. Follow the instructions to assemble the WindowRama using Gaffer's Tape.
  15. Adhere the calendar.
Thanks for visiting today!


Wednesday, December 25, 2019

Merry Christmas!

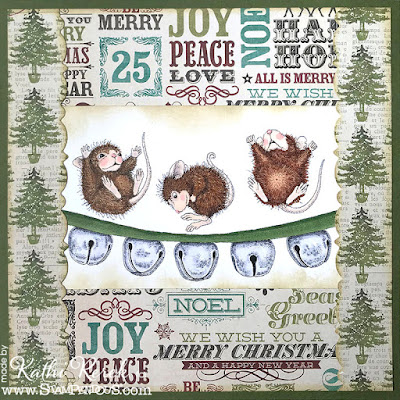
Here's Jingle Jolly, one of Stampendous' adorable new House-Mouse Designs® stamps.


Supplies Used:
Stampendous Supplies Used:
Other Supplies Used:
Solar White Classic Crest® Cardstock by Neenah Papers
Green Cardstock
Copic® Markers:
   Mice Skin: BV0000, E50, E51, R20, R21
   Mice Fur: E21 E23, E25, E31, E33, E35, E37, E44, E53, E57, E59
   Bells: C00, C1, C2, C4
   Ribbon: YG63, YG67
Lost and Found™ Christmas 6x6 Patterned Paper Pad by My Mind's Eye®
Tim Holtz® Antique Linen Distress® Ink by Ranger Industries

Instructions:
  1. Cut a piece of 12x12 green cardstock in half, score, and fold to form a 6" square card.
  2. Using Memento ink, stamp the image onto white cardstock, color with Copic markers, and sponge edges with Distress ink.
  3. Trim the word patterned paper to 5 3/4" square to create the card front.
  4. Using one of the dies from the Spring Borders, cut the tree patterned paper then trim the other side.
  5. Flip the die and cut the tree patterned paper again. You should end up with two pieces of tree patterned paper with the fancy edges opposite and two straight edges as shown.
  6. Trim both pieces to 5.75".
  7. Use Distress ink to sponge the edges.
  8. Adhere the image panel.
  9. Adhere the tree patterned paper over the image panel and the word paper as shown.
  10. Sponge Distress ink over all four edges of the card front, then adhere to the card.
Thanks for visiting today!

Monday, December 23, 2019

Gift List

Here's a card with the new House-Mouse Designs® Light Note stamp! Be sure to check out what Maxwell will get!


Supplies Used:
Stampendous Supplies Used:
House-Mouse Designs Light Note Rubber Stamp
Tuxedo Black Memento™ Ink by Tsukineko

Other Supplies Used:
Solar White Classic Crest® Cardstock by Neenah Papers
Green Cardstock
Copic® Markers Used:
   Mouse Skin: BV0000, E50, E51, E93, R20. R21
   Mouse Fur: E31, E33, E35, E44, E47
   Pencil: Y35, Y38, E00, E21, E41, R81, R93, RV95, C00, C0, C1, C2
   Christmas Lights: YG61, YG63, BG11, BG34, C00, C0, C1 C3
   Light Cord: E81, E84
Tim Holtz® Old Paper Distress® Ink by Ranger Industries
Jovial 6x6 Patterned Paper Pad by Basic Grey
Ledger Patterned Paper: Source Unknown

Instructions:
  1. Cut a piece of cardstock to 6.25" x 9", score in half, and fold to form an A6 card.
  2. Cut a piece of Ledger patterned paper to 4.25" x 6" wide.
  3. Cut the ornament paper to 2.5" x 4.25",  edge with Distress Ink, and adhere onto the ledger paper as shown. 
  4. Edge the card front with Distress ink and adhere to the card.
  5. Stamp the image onto white cardstock with Memento ink and color with Copic markers.
  6. Trim the image and mat onto green cardstock cut slightly larger than the image panel.
  7. Adhere the image panel to the card front to finish the card.

Saturday, December 21, 2019

Under the Mistletoe

Who do you want to meet under the mistletoe at the Ugly Sweater Holiday Party?


Supplies Used:
Stampendous Supplies Used:
Llama Sweaters Perfectly Clear™ Stamp Set (SSC1325)
Holiday Gnomes Perfectly Clear™ Stamp Set (SSC1324)
Tweet Birthday Wishes Quote Die(QD5018)
Tuxedo Black Memento™ Ink by Tsukineko®
Nocturne VersaFine Clair™ Ink by Tsukineko®

Other Supplies Used:
Solar White Classic Crest® Cardstock by Neenah Papers
Red Cardstock
Copic® Markers:
   Llama Fur: E21, E23, E30, E31, E33, E34, E35, E47
   Llama Tongue: RV42, RV93
   Scarf: R21, R22 R24 R35, R37
   Sweater: G03, G05, G17, G28, YR16
   Lights: G03, G17, R21, R22, R24, R27
Tea Cozy Knit Picky Patterned Paper from the Knit Picky Paper Collection by Lawn Fawn®
Knit Picky 6x6 Petite Paper Pack by Lawn Fawn®
Tim Holtz® hickory Smoke and Fired Brick Distress® Inks by Ranger Industries
White Gelly Roll® Gel Pen by Sakura
Clear Glaze® Glossy Gel Pen by Sakura
Stamp Platform
Stamp Positioner

Instructions:
  1. Cut 12x12 red cardstock in half, score, and fold to form a 6" square card. Set aside.
  2. Stamp both llamas onto white cardstock with Memento ink.
  3. Use magnets to secure the stamped cardstock onto the base of the stamping platform.
  4. Position the lights stamp face down onto the image panel, close the platform lid. 
  5. Lift the platform lid, ink the stamp with Memento ink, and stamp onto the image panel.
  6. Select the Mistletoe stamp from the Holiday Gnomes stamp set, put onto a stamp block, and use the stamp positioner to stamp it in place.
  7. Color the llamas, lights, and mistletoe with Copic markers.
  8. Cut red cardstock to 3.5" x 3.75"
  9. Cut the image panel to 3 5/8" x 3 7/8".
  10. Mat with red knit patterned paper cut to 3 7/8" x 4 1/8" and edged with Distress ink.
  11. Mat again with red cardstock cut to 4" x 4.25".
  12. Cut the multi-colored knit patterned paper to 5.75" square and edge with Hickory Smoke Distress ink to form the card front.
  13. Cut green patterned paper to 1.5" x 5.75". Edge with a green marker.
  14. Adhere the green patterned paper to the card front as shown.
  15. Adhere the matted image panel to the card front as shown.
  16. Using VersaFine Clair ink, stamp the sentiment onto polka dot paper, die-cut with the speech bubble die, then sponge the edges with Hickory Smoke Distress ink.
  17. Adhere the card front the red card.
  18. Adhere the sentiment speech bubble die to finish the card.
Thanks for visiting today!


Friday, December 20, 2019

Cardinal Bell

Today's card features Cardinal Bell, one of the fabulous new House-Mouse Designs® stamps released by Stampendous.


Supplies Used:
Stampendous Supplies Used:
House-Mouse Designs® Cardinal Bell (HMQ23)
Build a Wreath Die Set (DCP1007)
WindowRama Die Set (DCP1012)
Tuxedo Black Memento™ Ink by Ranger Industries

Other Supplies Used:
Solar White Classic Crest® Cardstock by Neenah Papers
Copic® Markers:
   Mouse Skin: BV0000, BV000, E50, E51, R20, R21
   Fur: E31: E33, E39, E47
   Cardinal's Mask: N6, N7, N8
   Cardinal's Feathers: R24, R27, R29, R39, R59
   Cardinal's Beak: R14, R27, YR18
   Cardinal's Feet: E71, E74
   Bell: Y21, Y23, Y26, Y28
Grey Cardstock
Gold Cardstock by Recollections®
Tim Holtz® Idea-ology® Christmas Paper Stash® by Advantus
Jovial 6x6 Patterned Paper Pad by Basic Grey
Tim Holtz® Hickory Smoke Distress® Ink

Instructions: 

  1. Cut dark green cardstock to 10" x 7". Score at 5" and fold to form a 5"x7" card. Set aside.
  2. Stamp the image onto white cardstock with Memento ink.
  3. Color with Copic markers.
  4. Use the smaller circle die to die-cut the image panel.
  5. Keep the image panel in the die and add a background using Copic markers.
  6. Die-cut gold cardstock with the larger circle die (from the WindowRama Die Set).
  7. Pop the image panel out of the circle die and mat onto the gold cardstock.
  8. Cut the holly-patterned paper to 4.75" x 6.75". 
  9. Cut the striped paper to 4.75" x 4.5" and sponge with Distress ink.
  10. Cute the light green yardstick to 4.75" x 4".
  11. Adhere the light green cardstock atop the striped paper.
  12. Adhere these two layers to the holly-patterned patterned paper.
  13. Sponge Distress inks on all edges and adhere the card front to the card.
  14. Adhere the image panel to finish the card.


Tuesday, December 17, 2019

Southwestern Merry Christmas Card


Supplies Used:
Stampendous Supplies Used:
Llama Sweaters Perfectly Clear™ Stamp Set (SSC1325)
WindowRama Die Set (DCP1012)
Build A Wreath Die Set (DCP1007)
Tuxedo Black Memento™ Ink by Tsukineko®

Other Supplies Used:
Solar White Classic Crest® Cardstock by Neenah Papers
Copic® Markers:
   Mountains: E04, E07, E13,E15, E17, E18, E29, YG93, YG95, YG97, C00, C0
   Desert: E13, E15, E41, E42, E43, E44, YG91, YG93
   Cactus: YG23, YG25,  YG91, YG93, YG95, YG97. R32 R43 B21, B23
   Gifts: YG21 YG23, YG93, YG95, R32, R35
   Sky: B21, R30
   Clouds: R30, C0, C1
Roxbury-Rockville Park Patterned Paper by Scenic Route Paper Company
Rockland-Knott Street Patterned Paper by Scenic Route Paper Company
Rain Forest Cardstock by Bazzill Basics Paper®
Tim Holtz® Black Soot Distress® Ink by Ranger Industries
Tim Holtz® Christmas Idea-ology® Remnant Rubs by Advantus
Eclipse Tape by Judikins

Instructions:
  1. Cut Rain Forest cardstock to 7" x 10", score, and fold to form a 7" X 5" card. Set aside.
  2. Cut Striped patterned paper to 5.75" x 4.75".
  3. Cut Dotted patterned paper to 5.75" x 4.75", sponge edges with Distress ink, and adhere to the striped cardstock to form the card front.
  4. Using the circle die from the WindowRama die set, cut a circle from the center of the card front. 
  5. Stamp the cactus onto white cardstock and onto the Eclipse Tape.
  6. Fussy-cut the Eclipse Tape version and adhere atop its counterpart on the image panel.
  7. Using a Stamp Positioner, stamp the gifts over the masked Cactus and onto Eclipse Tape.
  8. Fussy-cut the Gift images on the Eclipse Tape. and adhere atop their counterparts on the image panel.
  9. Using a Stamp Positioner, stamp the remaining gifts over the masked images on the image panel.
  10. Stamp the mountains onto the masked image panel and onto Eclipse Tape.
  11. Fussy-cut the mountains and adhere atop their counterparts on the image panel.
  12. Pull off all the masks and color the scene with Copic markers.
  13. Using the circle die from the Build a Wreath die set, cut a circle a square of green cardstock.
  14. Adhere the green circle behind the circular aperture in the card front.
  15. Position the green circle over the colored desert scene and adhere.
  16. Adhere the card front to the card.
  17. Cut a strip of 3/8" x 7" striped paper and edge with Distress ink.
  18. Adhere onto a strip of .5" x 7" green cardstock.
  19. Add the Remnant Rubs sentiment to the center of the striped matted strip.
  20. Adhere the sentiment to finish the card.
Thanks for visiting today!


Sunday, December 15, 2019

Journey!

I recently tried out for a design team and had to make a project specifically for the call. I got flushed, but it's all good because my project came out the way that I had pictured it in my mind's eye. I love, Love, LOVE when that happens, especially since most of my projects seem to take many left turns (maybe at Albuquerque) and/or take on a life of their own. OK. I admit it. My projects sometimes tell me what to do. I guess I really AM certifiable.

Here's my canvas.


Product List: 
Maritime 8x8 Patterned Paper Pad by 7 Gypsies
Media® Matte Medium by DecoArt®
Media® Black Gesso by DecoArt®
Media® White Gesso by DecoArt®
Burnished Brass Moon Shadow Mist by Lindy's Gang
Whale Watching, Tibetan Poppy Teal, Opal Sea Oats, Blue Hawaiian Blue Starburst Shimmer Sprays by Lindy's Gang®
Banff Blue, Polite People Purple, Beaver Tail Brown, Canadian Bacon Blush, Maple Syrup Bronze, and Oh Canada Crimson Squirts by Lindy's Gang®
Sidewalk Chalk Magicals by Lindy's Gang®
Tuxedo Black Memento™ Ink by Tsukineko®
Copic® Markers: 
Skin: BV0000, BV000, E00, E000, E11, E21, E50, R20, 
Lips: E04, RV93, RV95, R32
Eyes: BG45, BG53, BG57
Beard/Mustache: C3, C4, C5
Uniform and Cap: B39, B39, Y23, Y26, BG53
Fish: YR12, YR16, YR18
Pipe: E47, E49, E55, E57
Copic® Multiliners
Compass Chipboard by Creative Embellishments
Assorted Charms
Thinlits™ Alterations Dies by Tim Holtz® for Sizzix®
Finnabair Art Basics Heavy Body Gel by Prima Marketing
On-Point Glue™ by Imagine® Crafts
Jute Ribbon by American Crafts™
Stamping Platform
Sanding Block
Foam Brushes
Misc. Brushes

Instructions:
  1. Gather supplies.
  2. Trim patterned paper to 6” wide and adhere to canvas board using Media Matte Medium. Heat set.
  3. Spray canvas with Blue Hawaiian Blue, Whale Watching Blue, Tibetan Poppy Teal Starburst Sprays, heat setting between each color.
  4. Using a Stamp Positioner, stamp Old Salt image onto white cardstock. Color with Copic markers, fussy-cut, and edge with a black pen.
  5. Using the Journey die, cut grey cardboard, then spray the word with Burnished Brass Moonshadow Mist. Heat set, then set aside.
  6. Spray the chipboard compass with Burnished Brass Moonshadow Mist. Heat set, then set aside.
  7. Coat the anchor with white gesso, heat set, then paint with Maple Syrup Bronze Squirts, heat set, then spray with Burnished Brass Moonshadow Mist. Heat set.
  8. Coat the seashell charms with white gesso, heat set, then paint with the Squirts. Heat set.
  9. Adhere the image with Heavy Body Gel.
  10. Adhere the chipboard compass and the sentiment die cut with OnPoint glue.
  11. Using a palette knife, apply the Texture Sand Paste to the base of the image.
  12. Press the colored charms into the Texture Sand Paste.
  13. Add jute to the anchor charm, then adhere the charm with a glue dot. Secure the jute to the back of the image. 
  14. Let the Texture Sand Paste dry overnight. 
  15. Discover that the color from the Starburst Shimmer Sprays comes through the Texture Paste. Fix with a Sidewalk Chalk Magicals combined with Sea Oats Starburst Shimmer Spray, and a touch of Beaver Tail Brown Squirts.
Thanks for visiting today!

I shall enter this canvas into the following challenges:
Creative Artiste Mixed Media Challenge Blog: December 2019 Anything Goes
*Art*Journal*Journey Chalenges: Words and Numbers
More Than Words December Challenge: Rejoice and Anything Goes (I love the ocean and anything involved with it.)


Friday, December 13, 2019

It's a Special Day! Celebrate!

It's Friday the 13th and my daughter's 30th birthday (I had her when I was 9. I was precocious like that.) and my fairy stamp mother's birthday (She's 29...again) and National Cocoa Day (Who comes up with these holidays?), so I made a card with cocoa and mice (We have mice. ugh! Not as pets, as intruders.  And yes, we do have  two cats. Who think the mice are their new toys.) However, I digress. I made a card for National Cocoa Day. So did my lovely Stampendous teammates and other friends. Be sure to click on over to Stampendous' blog to get links and to see the prize that's up for grabs!


Products Used:
Stampendous Products Used:

Other Products Used:
Solar White Classic Crest® Cardstock by Neenah Papers
Copic® Markers: 
   Mouse Skin: BV0000, BV000, E50, E51, R01
   Mouse Cheeks: R20
   Mouse Noses: R21, R22
   Mouse Fur: E31, E33, E35, E47; E21, E23, E25, E37; E35, E47, E53, E57
   Mouse Hats: R24, R27, R39, C00, BV0000, RV0000, B0000
Scarlet Cardstock by My Colors
Tim Holtz® Christmas Paper Stash® by Idea-ology®
Gingham-Linen Rainbow Petite Prints 6x6 Patterned Paper Pad by Doodlebug Design Inc.™
Zen Collection 6x6 Patterned Paper Pad by Avery Elle
Jet Black Archival™ Ink by Ranger Industries
London Fog Memento™ Ink by Tsukineko®
Vixen Sparkle Blend by Doodles Paper Playground
Clear Star Starburst Gelly Roll® Pen by Sakura

Instructions:
  1. Cut scarlet cardstock to 7" x 10", score at 5", and fold to form a 7" x 5" card. 
  2. Cut a piece of music patterned paper from the Christmas Paper Stash to 6.75" x 4.75".
  3. Cut a piece of the white hatched paper to 3" x 4.25".
  4. Edge both pieces of patterned paper with London Fog Memento ink.
  5. Layer as shown and adhere to the red 7" x 5" card.
  6. Stamp image onto white cardstock with Tuxedo Black Memento ink.
  7. Color with Copic markers.
  8. Cut the image panel with one of the dies from the A2 Layers die set.
  9. Cut red linen patterned paper with the next largest die from the set. Edge with London Fog Memento ink.
  10. Apply Clear Star glitter gel pen to all edges of the image panel, then mat with the red linen die-cut.
  11. Stamp the sentiment with Jet Black Archival ink onto red linen paper.
  12. Cut the sentiment with one of the dies from the Fitted Frames B die set, then edge with London Fog ink.
  13. Adhere the matted image panel and sentiment to the card front.
  14. Adhere the sequins to finish the card.
Thanks for visiting today!

Sunday, December 8, 2019

Hockey! House-Mouse Style!

Here's a Season's Greetings card with Mice Hockey, an adorable House-Mouse Designs® Stamp and a sentiment from the new Poinsettia Greetings Cling Rubber Stamp Set.


Supplies Used:
Stampendous Supplies Used:

Other Supplies Used:
Solar White Classic Crest® Cardstock by Neenah Papers
Brown Cardstock
Copic® Markers:
   Shed: E21, E70, E71, E74, E77, E79
   Shed Floor: E40. E42, E44
   Logs: E23, C4
   Fire: Y13, Y19, YR18
   Mouse Faces, Ears, Hands, Feet, and Tails: BV000, BV000, E50, E51, R20, R21, RV43
   Mouse Fur: E21, E23, E27, E29, E31, E35, E37, E47, E53, E57, E59, T1. T3, T5, T7, W3. W5, W7
   Hockey Sticks: E44, E47
   Candy Wrapper: E81, E84
   Candy: R656, R59
   Outside Candy Wrapper: B41, B45
   Cattail Weeds: YG91, YG93, YG95
   Ice: C1, C2 B0000,
   Snow: C00, C0, C1 C2
Tim Holtz® Ground Espresso Distress® Ink by Ranger Industries
Tim Holtz® Ground Espresso Distress® Archival™ Ink by Ranger Industries
Figgy Pudding 6x6 Paper Pad by Basic Grey

Instructions:
  1. Cut a piece of 12x12 brown cardstock in half, score, and fold to form a 6" square card.
  2. Cut a piece of blue patterned paper to 5.75" square and edge with Ground Espresso Distress ink.
  3. Adhere the patterned paper to the front of the card.
  4. Stamp Mice Hockey onto white cardstock with Memento ink.
  5. Color the scene with Copic markers, trim, and mat with brown cardstock cut 1/4" larger.
  6. Adhere the matted image panel to the card front.
  7. Stamp the sentiment onto patterned paper with Ground Espresso Distress Archival ink.
  8. Cut the sentiment using one of the dies from the Fitted Frames A Die Set and edge with Ground Espresso Distress ink.
  9. Cut brown cardstock with the next largest die from the Fitted Frames A Die Set and use to mat the sentiment die-cut.
  10. Adhere the sentiment to finish the card.
Thanks for visiting today!


Thursday, December 5, 2019

Gnome for Christmas Gift

Gosh. I love gnomes and I love bad gnome puns. Stampendous' new Holiday Gnomes Perfectly Clear® Stamp set is so much fun that I had to create a little milk carton gift container.


Here's my little container! Be sure to read the entire post, including the excruciatingly boring instructions. Just sayin'.


Close-ups of the front and back


Supplies Used:
Stampendous Supplies Used:

Other Supplies Used:
Solar White Classic Crest® Cardstock by Neenah Papers
Red Cardstock
Milk Carton Die by Where Women Create™ by Sizzix®
Copic® Markers:
   Gnomes' Skin: BV0000, E000, E11, E21, E60, R000, R00, R01, R02, R20
   Gnomes' Beards: T0, T1, T2
   Wheelbarrow Gnome: YG23, YG25, B11, B13, R14, R17, R24, R37, E31, E33,  C2, C4, C6
   Sitting Gnome: YG23, YG25, BG11, BG13, R14, R17, R30, R32
   Girl Gnome: W1, W2, Y11 Y32 R31 R20, R21, R22, R30, R32, R35, B00, B12, YG23, YG25
   Bell Hat Gnome: R56, R59, E31, E33, B00, B12, Y11, Y23, Y26, Y28
   Pom-Poms and Cuffs: C00, C0, C1 B60, BV0000, RV000, 
   Background: BG1, C00, C1, C1, C2
Eskimo Kisses 6x6 Patterned Paper Pad by Basic Grey®
Tim Holtz® Fired Brick Distress® Ink by Ranger Industries
White Glaze™ 3D Glossy Gel Pen by Sakura
Washi Tape: Source Unknown
Tim Holtz® Tiny Bells Idea-ology® by Advantus
Small Brass Binder Clips
Quickie Glue™ Pen by Sakura
Eclipse Tape by Judikins
Post-it® Notes by 3M
Copic® Airbrush System
Ribbon: Source Unknown
Thread

Instructions:
  1. Cut the red cardstock twice with the Milk Carton Die.
  2. Score on the score lines, fold, and adhere to form the box per the instructions.
  3. Cut four pieces of the ornament patterned paper to be slightly smaller than the sides of the milk carton. Edge with Distress ink and adhere to the sides of the milk carton die cut.
  4. Die-cut the scraps of the same patterned paper two times with a large ticket die from the Build A Pop Up Die set. Edge with Distress ink, and set aside.
  5. Cut four pieces of white cardstock 1/2" smaller than the patterned paper.
  6. Stamp the gnomes onto white cardstock and onto Eclipse Tape
  7. Fussy-cut the Eclipse Tape versions and place the fussy-cut gnomes over their counterparts.
  8. Place Post-it Notes along the bottom of each piece of the image panel.
  9. Airbrush the top of each panel with a BG11 marker.
  10. Remove the Post-it Note and reposition so that each of the notes is covering the top of the image panel.
  11. Airbrush with a C0 marker.
  12. Lift all masks and color each of the four image panels with Copic markers.
  13. Sponge all edges lightly with Distress ink.
  14. Use the glue pen to add glue to the cuffs and pom-poms of the Gnomes' outfits. 
  15. Sprinkle Flock over the glue, press lightly, and let dry. Brush off the excess. 
  16. Adhere all four image panels over the patterned paper on the milk carton.
  17. Stamp the sentiments onto patterned paper, die-cut with one of the ticket dies from the Build a Pop Up Die Set, edge with Distress ink, and adhere to the larger tickets.
  18. Adhere the matted sentiments two the front and back of the milk carton.
  19. Add Washi Tape to the top of the milk carton.
  20. Thread ribbon through the tops of the bells and tie onto one of the binder clips.
  21. Add ribbon to the binder clips then use the binder clips to close the milk carton.
And Guess What??? YOU can win this set by commenting on this post? How cool is that?

Thanks for visiting today!


Sunday, December 1, 2019

Gnome for the Holidays

When you're in a hurry, you ride a unicorn, just like the Unicorn Gnome, one of the fabulous new stamps by Stampendous.


Supplies Used:
Stampendous Supplies Used:
Unicorn Gnome Rubber Stamp (P334)
Holiday Gnomes Perfectly Clear™ Stamp Set (SSC1324)
Tweet Birdie Die Set (QD5018)
Tuxedo Black Memento™ Ink by Tsukineko®
Nocturne VersaFine Clair™ Ink by Tsukineko®

Other Supplies Used:
Solar White Classic Crest® Cardstock by Neenah Papers
Green Cardstock
Copic® Markers:
   Unicorn: C00, C0, C1, BV0000, B0000, B000, B00, B01, RV0000, RV000, V000, Y11 Y21 Y23. Y26, Y28. E31, E33
   Gnome: G20 G30, G40, BV0000, E000, E11, E21, E50, R000, R01, R20
Tim Holtz® Idea-ology® Christmas Paper Stash® by Advantus
Tim Holtz® Bundled Sage Distress® Ink by RaNger Industries
Copic® Airbrush System
A2 Card Creator Die Set by Spellbinders®
Eclipse Tape by Judikins

Instructions:

  1. Cut green cardstock to 6.25" x 9", score in half, and fold to form a A6 card.
  2. Cut patterned paper to 6" x 4.25" and edge with Distress ink.
  3. Using Memento ink, stamp gnome onto white cardstock and onto Eclipse Tape.
  4. Fussy-cut Eclipse Tape version to create a mask.
  5. Place mask over the stamped image panel.
  6. Cut the image panel with one of the dies from the A2 Card Creator Set.
  7. Leave the card in the die, place a piece of removable tape over the base of the image, then airbrush the background using a B21 Copic marker. Airbrush a tiny big of RV000 to add some pink tones to the "sky".
  8. Lift the tape, cover the top part of the image, then airbrush the base with C00 and C0 Copic markers.
  9. Remove the image panel from the cutting die. Clean the cutting die immediately with either hand sanitizer or rubbing alcohol.
  10. Color the gnome and unicorn with Copic markers as listed above.
  11. Touch up the background if needed.
  12. Use Nocturne VersaFine Clair ink to stamp the sentiment, then die-cut with the speech bubble die.
  13. Assemble the card as shown.
Thanks for visiting today!

Thursday, November 28, 2019

Snowman Scene WindowRama Card

If you like to create Wintry Scenes, you're going to love the new Giving Snowman Cling Rubber Stamp and Stencil set. I've used it to create a WindowRama card!


Supplies Used:
Stampendous Supplies Used:
Giving Snowman Cling Rubber Stamps and Stencil Set (CRS5108)
WindowRama Die Set (DCP1012)
Decor Cling Snowflakes Stamp (DCR102)
Build A Pop Up Die Set (DCP1001)
Winter Wonderland Sparkly Embossing Powder (E171)
Tuxedo Black Memento® Ink by Tsukineko®
VersaMark™ Watermark Ink by Tsukineko

Other Products Used:
Solar White Classic Crest® Cardstock by Neenah Papers
Copic® Markers:
    Tree: E70, E71, E74, E77, E79, G85,  G99
    Bunnies: E31, E33, E47
    Snowman:     Basket: E21, E23, E27, E37
    Birds: E04, E70, E71
    Cardinal and Apple: R24, R27, R39
Grey/Blue Cardstock
Jet Black StazOn® Ink by Tsukineko®
Clear Glaze® 3D Glossy Gel Pen by Sakura
White Gelly Roll® Pen by Sakura
Stamping Platform
Eclipse Tape by Judikins
Vellum by Strathmore®
Sookwang Tape

Instructions:

  1. Use the WindowRama base plate to cut blue/grey cardstock twice.
  2. Fold the WindowRama die-cuts on the innermost scoreline. Fold the flaps forward for the back of the card and backward for the card front.
  3. Stamp the Decor Cling Snowflakes stamp onto the card front using VersaMark ink. Heat set with Winter Wonderland Embossing Powder. 
  4. Center the circle die onto the stamped embossed card front and cut. Set aside.
  5. Secure white cardstock to the base of the stamping platform and position both the snowman and the tree/bunnies stamps face down as desired.
  6. Close the platform to lift the stamps, ink them with Memento ink, then stamp the image.
  7. Color the scene with Copic markers, then die-cut with the WindowRama base plate.
  8. Use the Glaze pen to add dimension to the Snowman's eyes, nose, and buttons. 
  9. Use the White Gelly Roll pen to add highlights to the apple and the cardinal's eye.
  10. Use the Glaze pen to add dimension to the snow.
  11. Trim the image panel on the innermost score lines and adhere to the back of the card.
  12. Use Sookwang tape or liquid glue to adhere the front of the WindowRama card to the back.
  13. Adhere a strip of Sookwang tape the vellum, stamp the sentiment using StazOn ink. Let dry.
  14. Adhere the stamped vellum to a piece of blue/grey cardstock, then die-cut with one of the ticket dies from the Build A Pop Up Die Set.
  15. Adhere the sentiment ticket to the card as shown.
Thanks for visiting today!


Sunday, November 17, 2019

Doodles Paper Playground and Stampendous Blog Hop v2.0

Welcome to the final day of the Doodles Paper Playground and Stampendous Blog Hop. My Stampendous teammates and I have had the chance to play with the wonderful Sparkle Blends from Doodles Paper Playground. Be sure to visit Stampendous' blog to find out more information about prizes, get some inspiration, plus get links so that you can hop along and have the chance to win!

White Rose Crafts LLC., your online source for these Doodles Paper Playground Sparkle Blends, is offering a 30% discount promo off Sparkle Blends during the hop, which started Friday and runs through Sunday, November 17th! Use code: SPLURGE30 for your discount! They're also including a free gift with every order.

Here's my second shaker card with Cling Giving Snowmen Rubber Stamp Set and Vixen, Penguin Party, and Pixie Dust Sparkle Blends from Doodles Paper Playground. I must admit that I went a little overboard and probably overstuffed my shaker, but in my defense, they're sooooo pretty and sparkly!


Products Used:
Stampendous Products Used:

Cling Giving Snowmen Rubber Stamp Set
Tuxedo Black Memento™ Ink by Tsukineko®

Other Products Used:
Vixen, Penguin Party, and Pixie Dust Sparkle Blends from Doodles Paper Playground
Solar White Classic Crest® Cardstock by Neenah Papers
Copic® Markers:
   Snowman:    Scarf: R32, R30, R32,R56, R59
   Hat: C4, C6, C7, YG05, YG17, R35
   Snowman Arms: E74
   Carrot Nose: YR04, YR007
   Fawn: E31, E33, E35, E47
Glaze® 3D Glossy Gel Pen by Sakura
A2 Layers Card Maker Dies by The Stamp Doctor
Eskimo Kisses 6x6 Patterned Paper Pad by Basic Grey®
Pink and Red Cardstock by Bazzill Basics Paper®
Foam Tape by Craft Fancy
Eclipse Tape by Judikins

Instructions:
  1. Create a red A2 card. 
  2. Use Tuxedo Black Memento ink to stamp the Snowman image onto white cardstock and onto Eclipse Tape 
  3. Fussy-cut the Eclipse Tape version and place atop the one on the white cardstock. 
  4. Brush Summer Sky Memento ink over the masked image. 
  5. Brush Angel Pink Memento ink over the masked image. 
  6. Lift the mask and save for another use. 
  7. Color the image panel. 
  8. Add several layers of Clear Glaze pen to the Snowman's nose, mouth, eyes, and buttons. 
  9. Using temporary adhesive, adhere the patterned paper to a piece of red cardstock. 
  10. Using the third largest die from the A2 Layers Card Maker Die set, cut the cardstock/patterned paper combination. 
  11. Choose a die from the same set to become the shaker opening, position the die onto the cardstock/patterned paper combo, tape the die down, and cut. 
  12. Use the next smallest die and cut pink cardstock. 
  13. Separate the patterned paper from the red cardstock and die-cut the patterned paper so that it's slightly smaller than the red cardstock. 
  14. Adhere the pink cardstock to the back of the patterned paper, then adhere to the red cardstock. This is the card front. 
  15. Position acetate on the reverse of the card front over the opening. Adhere. 
  16. Apply foam tape around the openinge. I used two layers of foam tape. 
  17. Add a combination of the Vixen, Penguin Party, and Pixie Dust Sparkle Blends to the well created with the foam tape. Don't be like me and overfill. It's not easy to resist. Be strong. 
  18. Seal the well with the stamped, colored image panel. 
  19. Adhere the shaker card front to the red card. 
  20. Realize that you've overfilled the shaker and that your layers are a bit wonky. Perfection is overrated, so get over it. 
Thanks for visiting today! Don't forget to visit the other participants for inpiration!

Saturday, November 16, 2019

Doodles Paper Playground and Stampendous Blog Hop!


Welcome to the Doodles Paper Playground and Stampendous Blog Hop. My Stampendous teammates and I have had the chance to play with the wonderful Sparkle Blends from Doodles Paper Playground. Be sure to visit Stampendous' blog to find out more information about prizes, get some inspiration, plus get links so that you can hop along and have the chance to win!

White Rose Crafts LLC., your online source for these Doodles Paper Playground Sparkle Blends, is offering a 30% discount promo off Sparkle Blends during the hop, which started Friday and runs through Sunday, November 17th! Use code: SPLURGE30 for your discount! They're also including a free gift with every order.

Here's my card with Stampendous' fabulous Gnome Love Rubber Stamp and Doodles Paper Playground Celebrate Sparkle Blend!

Products Used:
Stampendous Products Used:
Tuxedo Black Memento™ Ink by Tsukineko®
Other Products Used:
Celebrate Sparkle Blend by Doodles Playground
Solar White Classic Crest® Cardstock by Neenah Papers
Copic® Markers:
Gnomes: 
Skin: BV000, E000, E11, E21, E50, R20
Braids, Mustache, and Beard: YR30, YR31, Y11, Y32, W1
Clothing: R02, R05, C0, C1, C2, C4, C6
Making Merry 6x6 Patterned Paper Pad by Title Yellow Bicycle
Scalloped Heart Nestabilities® Die Set by Spellbinders®
Scalloped Stitched Rectangles Die Set by Oops, I forgot to record the company. Not its real name.
Red Cardstock
Foam Tape by Craft Fancy
Clear Acetate
Instructions:
  1. Create a red A2 card.
  2. Use Tuxedo Black Memento ink to stamp the Gnome Love image onto white cardstock.
  3. Use a Scalloped Heart die to die-cut the scalloped heart within the stamped heart.
  4. Color the image panel.
  5. Position acetate on the reverse of the card front over the opening. Adhere.
  6. Apply foam tape around the heart shaped aperture. I used two layers of foam tape.
  7. Add the wonderful and festive Celebrate Sparkle Blend to the well created with the foam tape.
  8. Seal the well with patterned paper.
  9. Die-cut patterned paper with the largest Scalloped Stitched Rectangle die.
  10. Adhere the die-cut paper to the card.
  11. Adhere the shaker card front to the card.
Thanks for visiting today! Be sure to hop to see some fabulous eye candy and get a chance to win!


Sunday, November 3, 2019

Kat's Tales Mini Album

Last Tuesday was International Cat Day and I didn't get to celebrate in the style that I had wanted. Instead we got to spend quality time with our kitties at the Vet. Domino had a runny eye, a cut on his nose that wasn't healing, and an upset tummy. We were worried that the cut (inflicted by his sister, the aptly named Harley Quinn) had gotten infected. so we made an appointment, the kitties voluntarily hopped into their carriers, got loaded into the car, then meowed pitifully the whole ride. Turns out that Domino has allergies, which caused his runny eye, which ran into the cut on his nose. So I didn't get to post my mini album.

Here it is!

Front Cover

Inside Front Cover 


Side View 


Products used:
Worn Cover Tim Holtz® Idea-ology®
Small Alphabet Die Set by All Occasions
Media@ Gesso by DecoArt@
Media® Matte Medium by DecoArt®
SnowflakeSherbert,  Zesty Zing, Hey Pesto Squid Ink, Candy Floss, and Rose Fresco Finish Chalk Acrylic Paints by Paper Artsy
Cat Sentiments Clear Stamp Set by Frantic Stamper.
Jet Black StazOn™ Ink by Tsukineko®
Tuxedo Black Memento™ Ink by Tsukineko
Pink Peony, Shadow Grey, and Watering Can Archival™ Ink by Ranger Industries
Tissue Paper
Solar White Classic Crest® Cardstock by Neenah Papers
Copic® Markers:
   Mouse: C2, C4, RV91, R81, YG21, YG25
   Cats' Fur: BV0000, BV000, BV20, B32, B34, B60, C00, C0, C1, C2, C3, C4, C6, C6, C8, 
   Cats' Noses and Mouths: RV42, RV91, RV95, E04, YG21,YG23, YG25
Checkerboard Stencil by Carabelle Studios
Cat  Paw Stencil by KaiserCraft
Tim Holtz@ Distress@ Crazing Medium by Ranger Industries
Cat Print Patterned paper by Doodlebug Designs Inc.™
Ring Binders by Tim Holtz® Idea-ology®
Pink Glittery Brads: Source Unknown

Instructions:
  1. Using alphabet dies, cut black cardstock for the title. Brush the die-cut letters with Matte Medium to seal them.*
  2. Using Tuxedo Black Memento Ink, stamp the cats and the mouse, fussy-cut, color with Copic markers, and edge with a dark marker. 
  3. Brush the cats and the mouse with Matte Medium to seal them.* Set aside to let them play while the notebook is altered.
  4. Stamp the Curious Cat onto tissue paper with StazOn ink.
  5. Flip the tissue paper and paint the cat's eyes, nose, and mouth with Fresco Finish paints. Let dry.
  6. When dry, use Snowflake paint to cover the painted eyes, nose, and mouth. Set aside to dry.
  7. Place the Worn Cover flat and apply gesso. Let dry.
  8. Paint the cover with pink(ish) paints. Let dry.
  9. Sponge grey Archival inks over the checkerboard and paw print stencils onto the painted cover. Heat set. Repeat as desired.
  10. Sponge grey Archival ink over the border of the Word Series stencil onto the base of the painted cover. Heat set.
  11. Using the darker grey Archival ink, randomly stamp "Meow" onto the cover. Heat set.
  12. Apply Matte Medium to the cover.
  13. Tear around the painted cat face on the stamped tissue paper.
  14. Liberally apply Matte Medium to the top portion of the cover. 
  15. Apply Matte Medium to the reverse of the the cat face tissue paper.
  16. Place as desired onto the wet Matte Medium on the cover and smooth. Let dry.
  17. Apply Matte Medium over the cat face and let dry.
  18. Apply Matte Medium over the entire front cover and place the alphabet, the cats, and the mouse. Let dry.
  19. Apply another coat of Matte Medium over the entire cover to seal the entire shebang.
  20. Discover bumps and see the seam because you didn't do steps 14 and 15 properly.
  21. Get clever and try to camouflage the seams and bumps by apply Crazing Medium onto the cover. Let dry. 
  22. Discover Step #21 was an epic fail and try to fix by painting over the cracks Sherbert Fresco Finish paint. Wipe back with a baby wipe. It's better, but is NOT going to win prizes.
  23. Seal the entire cover again with Matte Medium.
  24. Cut patterned paper to size for inside covers and the spine. 
  25. Guess what you're going to apply to seal the paper so you can paint it. Good guess.
  26. Paint the sealed patterned papers with Sherbert Fresco Finish paints. Let dry.
  27. Apply Matte Medium to the inside covers and adhere the painted patterned papers. 
  28. Seal the inside covers with Matte Medium.
  29. Sponge grey ink over the Cat Stencil onto the inside front cover. 
  30. Apply Matte Medium to seal.
  31. Use the pink glittery brads to adhere the Ring Binders.
  32. Apply Matte Medium to the spine of the notebook.
  33. Adhere the painted, sealed patterned paper. Seal with Matte Medium.
If you've made it through this, go reward yourself with a leisure beverage.

*I seal cardstock die-cuts and Copic colored images with Matte Medium before adhering them to the project and then sealing them with Matte Medium because I discovered that the ink from the cardstock and/or Copic markers can run onto the project, which is highly annoying. 

Thanks for visiting today!

I shall enter this album into the following challenges:

Friday, November 1, 2019

Coffee Lovers Blog Hop


It's time for the Fall/Winter Coffee Lovers Blog Hop. Stampendous is a sponsor and I'm participating! Stampendous will be giving a grand prize of $25 in product the winner chooses from our website. U.S. Mailing Addresses only. 

You must make a project to win this prize. Stampendous will be offering the CLBH 3- Flash prizes of the House Mouse Designs® Cookie Crumbles Stamp. The winner may choose Cling or Wood mounted. PLUS, people who comment on the Stampendous DT's blogs, will have the chance to win this adorable stamp. For more information, visit Stampendous' Blog.


Here's a holiday card using Laurel Burch™ Feline Cup Rubber Stamp.


Products Used:
Stampendous Products Used:
Tuxedo Black Memento™ Ink by Tsukineko®

Other Products Used:
Solar White Classic Crest® Cardstock by Neenah Papers
Copic® Markers:
  Cat: B32, B41, *B43, B45, C5, C6, C6
  Collar, Ribbon, Floors: R23, R35, R37, R59, B41, YG25
  Tea Cup and Saucer: B41, *B43, B45, YG13, YG25, E40, E41, E42, E70
Desert Sand Memento™ Ink by Tsukineko
Yuletide™ Designer Mat Pad by K and Company 
Black Sparkle Starburst® Gelly Roll® Pen by Sakura
Pleated Lace Rectangles Die Set by Gina Marie Designs
Fired Brick Tim Holtz® Distress® Ink by Ranger Industries

Instructions:

  1. Create an A2 card from dark Kraft cardstock. Set aside.
  2. Using Tuxedo Black Memento ink, stamp the Feline Cup onto white cardstock.
  3. Color the image with Copic markers.
  4. Cut the image panel with the second largest die from the Pleated Lace Rectangles Die set.
  5. Keep the image panel in the die and sponge Desert Sand Memento ink over the die and the edges of the image.
  6. Remove the image panel die-cut from the die and sponge Desert Sand Memento ink over the lace edges as shown.
  7. Place a piece of scrap cardstock or tape horizontally over the base of the image and sponge Desert Sand Memento ink to ground the image.
  8. Lightly edge the image panel die with Fired Brick Distress ink.
  9. Cut a piece of patterned paper to 4" x 5.25". Edge with Fired Brick Distress ink.
  10. Adhere the image panel onto the patterned paper to create the card front.
  11. Adhere the card front to the A2 card.
Thanks for visiting today! 

Thursday, October 31, 2019

Happy Halloween!

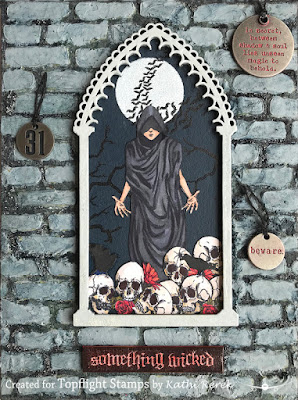
It's hard to believe that my time as Topflight Stamps' October Guest Designer has come to a end. At least I get to close out my month with a Halloween project! 

Here's my Halloween mixed media canvas!


Products Used:
Topflight Products used:
PeacoatBaltic Blue, Stone, London Bus, and Snowflake Fresco Finish Chalk Acrylics by PaperArtsy
Grey and White Brusho®  Crystal Colours  by Colourcraft®

Other Products Used:
Solar White Classic Crest® Paper by Neenah Papers
Tuxedo Black Memento™ Ink by Tsukineko®
Reliquary Arch Top by Gypsy Soul Laser Cuts
Canvas Panel
Copic® Markers: 
   Guardian Angel Skin:  E000, E00, E11, E21, E50, BV0000, BV000, BV20
   Guardian Angel Robe: BV23, BV25, BV29, N4, N5, N6
   Skulls: YR30, YR31, W00, W0, W1, W3, W9
   Roses: R02, R08, R22, R24, R27, R39, RV99, YG97, YG99
Black Media® Gesso by DecoArt®
Media® Sand Texture Paste by DecoArt®
Brick Stencil by The Crafter's Workshop
Media® Matte Medium by DecoArt®
Frost Dazzle VersaMark™ by Imagine Crafts®
Clear Detail Embossing Powder by Stampendous®
On Point Glue by Imagine Crafts®
Mini Art Stones by Prima Marketing Inc.
Tim Holtz® Halloween Quote Chips by Idea-ology®
Tim Holtz® Halloween Quote and Muse Tokens by Idea-ology®
Tim Holtz® Distress® Crazing Collage Medium by Ranger
Tim Holtz® Fired Brick Distress® Ink by Ranger
Black Jute Ribbon by American Crafts™
Small circle die or small circle punch
White Chalk pencil by General Pencil Company
Jet Black StazOn™ Ink by Tsukineko®

Instructions:
  1. Using Memento ink, stamp the angel from the Guardian Angel Clear Polymer Stamp Set and the skull border from the Skullduggery Border set onto Neenah cardstock.
  2. Fussy-cut the images, color with Copic markers, and edge with a black marker. Set aside.
  3. Using Peacoat and Baltic Blue Fresco Finish Chalk Acrylic paints, paint the base of the Reliquary. Heat set.
  4. Use a circle punch or a circle die to cut a circle from a plastic looseleaf divider. 
  5. Sponge Snowflake Fresco Finish Chalk Acrylic over the circle onto the top of the reliquary base to create a moon. Heat set.
  6. Using Onyx Black VersaFine ink, stamp the Bat Colony over the moon then stamp the Tree Branch onto both sides of the reliquary base. Heat set.
  7.  Cut the skull border, then glue the pieces to the bottom of the reliquary base as shown.
  8. Adhere the angel as shown. 
  9. Set aside the base of the reliquary.
  10. Paint the top of the reliquary with Stone Fresco Finish Chalk Acrylic paint.
  11. Press the painted reliquary top into the VersaMark ink pad. Sprinkle with clear Detail embossing powder, and heat set. Repeat.
  12. Glue the top to the bottom of the reliquary arch.
  13. Apply black gesso to the canvas panel. 
  14. Add Grey and White Brusho Crystal Color into the Texture Sand Paste, mix well, and spread over the canvas. 
  15. When dry, trace the arch was traced onto the canvas as desired with a chalk pencil.
  16. Add Grey and White Brusho Crystal Colors to Grunge Paste, mix well, and spread over a brick stencil onto the canvas avoiding the traced area. Let air dry.
  17. While the canvas dries, brush London Bus Fresco Finish Chalk Acrylic paint onto metal tokens, then wipe. 
  18. Back the  "31" token with black cardstock. 
  19. Thread Black jute through the holes in the metal tokens.
  20. Edge a Quote Chip with red marker, then apply a layer of matte medium, let dry,
  21. Brush a thick layer of Distress Crazing Medium overtop and let dry.
  22. Apply red Distress ink over the crackles, wipe, and repeat if necessary.
  23. When the Grunge Paste bricks on the canvas are dry, apply glue to selective areas of the "mortar", then shake Mini Art Stone into the glue. Let dry.
  24. Shake some Grey Brusho Crystals onto a craft mat. Spritz with water, mix, then brush onto the canvas to add color and depth to the bricks, the mortar, and to tint the stones.
  25. Adhere the arch, tokens and quote chip to the canvas.
  26. Edge with Jet Black StazOn ink to finish the piece.
TW, Some links in this post are affiliate links which do not affect the price you pay but allow me to earn a small percentage of a sale. Thanks! If you shop at Topflight Stamps, please use my coupon code, KATHIREREK855, for 10% off your order.

Have a great Halloween and stay safe!