Showing posts with label Stampers Anonymous. Show all posts

Monday, December 15, 2025

New Years Card


Here it is!


Products Used:
Mixed Media Paper by Strathmore
Textured Black and Blue Cardstocks by Bazzill Basics
Squeezed Lemonade, Picked Raspberry, Kitch Flamingo, Blueprint Sketch, and Lost Shadow Distress Inks by Tim Holtz for Ranger Ink
Rays Layering Stencil by Tim Holtz for Stampers Anonymous
Perspective Floor Stencil by Miss Ink Stamps
Mister
Occasions Small Talk Stickers by Tim Holtz for idea-ology
Black Pigma Pen by Sakura
Black Chalk Pencil by Generals
Low-tack Tape
Acetate
STAY-tion by Wendy Vecchi for Ranger Ink
Glassboard by Glassboard Studios
Stamping Platform

Please Note: Products marked with asterisks (*) are available at Topflight Stamps.

Instructions:
  1. Place a 4.5" x 6" piece of Mixed Media Paper on a magnetic surface and secure it with magnets and/or low-tack tape.
  2. Place a strip of low-tack tape horizontally across the bottom of the panel.
  3. Position the Rays Stencil over the panel.
  4. Use low-tack tape to hinge the top of the stencil to the top of the panel.
  5. Brush Squeezed Lemonade Distress Ink over the bottom of the Rays stencil onto the bottom of image panel.
  6. Lift the stencil and lightly brush Squeezed Lemon Distress Ink over the panel.
  7. Put the stencil back into place and brush Picked Raspberry Distress Ink over the Rays stencil.
  8. Lift the stencil and lightly brush Picked Raspberry Distress Ink over the panel.
  9. Put the stencil back over the image panel and brush Kitch Flamingo Distress Ink over the Rays stencil onto the panel.
  10. Lift the stencil and lightly brush Kitch Flamengo Distress Ink over the panel.
  11. Place the stencil back over the image panel and brush Blueprint Sketch Distress Ink over the Rays stencil onto the panel.
  12. Lift the stencil and lightly brush Blueprint Sketch over the panel.
  13. Remove the stencil.
  14. Lightly mist the inked stenciled panel with water.
  15. Remove the low-tack tape from the panel.
  16. Place a piece of acetate on the bottom of the inked portion of the panel so that it's covering the top portion. Secure with magnets.
  17. Brush Lost Shadow Distress Ink over the bottom of the image panel.
  18. Place the stones portion of the Perspective Floor Stencil onto the grey inked area and secure with magnets.
  19. Brush Lost Shadow Distress Ink over teh bottom of the image panel.
  20. Remove the acetate.
  21. Place the image panel onto the base of a stamping platform and secure with magnets.
  22. Position the Silhouette Man with Cane Rubber Stamp by Lost Coast Designs facedown on the image panel as shown.
  23. Press the platform's lid onto the back of the stamp and lift.
  24. Ink the stamp with Nocturne VersaFine Clair Ink and stamp.
  25. Re-ink and stamp again if needed to attain a good impression.
  26. Use the largest die from the Retro Numbers Die Set 92 to cut textured black cardstock.
  27. Position the second largest die facedown on the die-cut created in Step 26 and secure it in place with low-tack tape.
  28. Run the taped die/die-cut combination through the die-cut machine to create an aperture.
  29. Trim the image panel to fit and adhere it behind the die-cut frame.
  30. Use a black chalk pencil to add grounding and shading under the Silhouette Man.
  31. Select three appropriate sentiment stickers from the Occasions Small Talk Sticker book and edge them with a black Pigma pen.
  32. Adhere the three sentiment stickers to the image panel die-cut as shown.
  33. Adhere the framed die-cut to a blue card that is slightly larger than the black die-cut.
~ ~ ~

You should play along with us for Lost Coast Portal to Creativity's December Anything Goes Challenge 204 for the chance to win some Lo$t Coa$t Ca$h!


Thanks for visiting today

Saturday, October 18, 2025

31 Days of Halloween - Day 18

Greetings! I'm back with a Halloween card for Day 18 of Lost Coast Portal To Creativity's Challenge 202 - the 31 Days of Halloween..

Today's card is a bewitching scenic card created with the Witch 2 Rubber Stamp and the Small Cityscape Rubber Stamp by Lost Coast Designs.

Here it is!

Solar White Classic Crest Cardstock by Neenah Papers
Grey Cardstock by Bazzill Basics
Tuxedo Black, Blue Danube, and Paris Dusk Memento Inks by Imagine Crafts/Tsukineko
Lost Shadow Distress Ink by Tim Holtz for Ranger Ink
Copic Markers:
Cityscape: C5, C3, C2, C1, T5, T4, T3, T1, T0, N5, N4, N3, N2, N1, W6, W5, W4, W3, W2, W1, E57, E23, YR31, B26
Broomstick Handle: E47, E37, E25, E23, E21, W2
Broomstick Straw: E87, E84, E81, Y28, Y26, Y23, Y21
Witch's Skin: BV000, BV0000, E50, E21, E11, E00, E000, R20
Witch's Hair: YG45, YG23, YG21
Witch's Hat, Dress, and Shoes: BV25, BV23, BV17, BV13, BV11, BV08, N5, N3
Black Pigma Pen by Sakura
Acetate Circle Mask Set by Lavinia Stamps
Moon Layering Mask by Tim Holtz for Stampers Anonymous
Bleed Proof White Watercolor Paint by Dr. PH Martin
Pearlescent White Palette Chalk by Pebbles
Occasions Small Talk idea-ology Stickers by Tim Holtz for Advantus
Repositionable Sticker Paper
Clean toothbrush
STAY-tion by Wendy Vecchi for Ranger Ink
Glassboard by Glassboard Studios
Stamping Platform

Instructions:

  1. Make a 5" x 7" card from grey cardstock and set it aside.
  2. Use Tuxedo Black Ink to stamp the Small Cityscape  twice — once onto the bottom of a 5.5" x 7.5" piece of white cardstock and once onto repositionable sticker paper.
  3. Use Tuxedo Black Memento Ink to stamp Witch 2 above the cityscape. 
  4. Place the image panel onto a magnetic glass mat. 
  5. Color both images with Copic markers.
  6. Fussy-cut the sticker paper version of the Small Cityscape and place it over its counterpart on the image panel as a mask. 
  7. Place an acetate circle over the colored Witch 2 image and secure it with magnets. 
  8. Brush Blue Danube Memento Ink over the masked Small Cityscape and the acetate circle to create a night sky.
  9. Brush Paris Dusk Memento Ink around the edges of the image panel towards the center of the image panel to deepen the night sky.
  10. Thin the Bleedproof White Watercolor paint with water. 
  11. Dip a clean toothbrush into the white paint.
  12. Run your thumb over the bristles to splatter the white paint over the masked panel (and everything else in sight-including my new glasses. Oops!).
  13. Remove the sticker mask over the Small Cityscape and the acetate circle mask over the Witch.
  14. Clean the acetate circle mask, the glass mat, and the table with isopropyl alcohol on a clean washcloth. Clean your glasses with the appropriate glasses cleaner. 
  15. Place the moon mask over the Witch and secure with magnets. 
  16. Brush Lost Shadow Distress Ink over the stencil onto the circle area of the image panel to add some detail to the moon. 
  17. Remove the moon mask and brush more Lost Shadow Distress Ink  around the Witch to create her shadow on the moon.
  18. Brush white pearlescent palette chalk around the moon to add a magical lunar glow to the scene.
  19. Trim the image panel to 4.75" x 6.75", edge it with a black pen, and adhere it to the reserved 5" x 7" grey card. 
  20. Adhere the sentiment sticker as shown to finish the card.

You still have plenty of time to join us at the Lost Coast Portal To Creativity's Challenge 202 - the 31 Days of Halloween for a chance to win Lo$t Coa$t Ca$h!

Thanks for visiting today!

Thursday, August 29, 2024

Grumpy Cat Coffee Card with Memento Inks

I’m a heavily caffeinated cat lady who has an enormous collection of cat and/or coffee themed crafting products. Stenciling or stamping on patterned paper is a great way to extend their versatility. Memento or or other dye inks work perfectly for this technique as they are translucent.

Here it is!


Imagine Crafts Supplies:

Lulu Lavender, Summer Sky, Angel Pink, New Sprout and Dandelion Memento Dew Drop Ink

Tuxedo Black Memento Ink

Nocturne VersaFine Clair

Sponge Daubers

Tear It! Tape

Craft Mat


Other Supplies:

Solar White Classic Crest Cardstock by Neenah Papers

Grey and White Textured Cardstock by Bazzill Basics

Coffee Cat Clear Stamp Set by Funky Fossil Designs

Alice in Wonderland Tea Party Stencil by Visible Image Stamps

Floor Perspective Stencil by A Colorful Life Designs

Bubble Layering Stencils by Tim Holtz for Stampers Anonymous

Paw Print Patterned Paper from the Kitten Smitten 12x12 Collection by Doodlebug Designs

Copic Markers — C00, C0, C1, C2, C3, YG01, YG03, YG05, RV93, R81, B21, B23, E74, E77

Low-Tack Tape

Post-It Notes by 3M

Misti  Stamping Platform by My Sweet Petunia


Instructions:


Step 1: 

Use Tuxedo Black Memento Ink to stamp the Coffee Cat Clear Set twice — once onto a 3” x 5” panel of Classic Crest cardstock and once onto repositionable sticker paper. Use Copic markers to color the cat. Fussy-cut the repositionable sticker paper version of the cat and place it over its counterpart on the image panel.


Step 2:
Place a magnet sheet between folded paper. Use magnets to secure the image panel to the paper-covered magnet. Place low-tack tape horizontally .75” from the base of the image panel.


Use a Sponge Dauber to brush Lulu Lavender Memento ink over the tape onto the image panel to ground the cat image.


Step 3:

Use low-tack tape to secure the Floor Perspective Stencil over the magnet onto the paper-covered magnet. Use a Sponge Dauber to brush Tuxedo Black Memento ink over the stencil onto the image panel. Remove the tape and the stencil.


Step 4:

Use low-tack tape to secure the Bubbles Stencil to the image panel. Use Sponge Daubers to apply Angel Pink and Summer Sky Memento Inks over the stencil onto the image panel. Remove the tape and stencil. Set the image panel aside.


Step 5:

Place low-tack tape vertically 3.5” from the left edge of a 7” x 5” piece of paw-print patterned paper. Use magnets and tape to secure the Tea Party Stencil over the left side of the image panel. 


Use Sponge Daubers to apply Angel Pink, Summer Sky, and Lulu Lavender Memento ink over the stencil’s teacups onto the patterned paper. Wipe the stencil.


Step 6:

Use a Sponge Dauber to New Sprout and Dandelion Memento Ink over the stencil’s dots onto the patterned paper. 


Clean and dry the stencil, then repeat Steps #5 and 6 to stencil the right side of the patterned paper.


Step 7:

Use Tear It! Tape to adhere the layers of the card.


Step 8:

Place the finished card onto the base of the stamping platform. Position the sentiment from the Coffee Cat Stamp Set towards the top of the image panel. Use VersaFine Nocturne Ink stamp the sentiment.


Here's the finished card!


Thanks for visiting today!

Tuesday, January 4, 2022

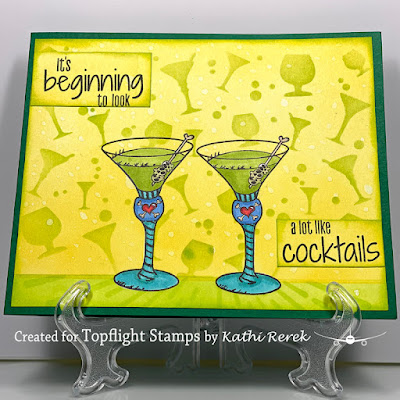
New Year = Cocktails?

Happy New Year! It's the first Tuesday of 2022, which means that it's my day to share a project created for Topflight Stamps. I've made a New Year's card with the wonderful cocktail stamp and a sentiment from the Nicci Battilana Eclectica ENB06 Rubber Cling Mounted Stamp Set by PaperArtsy on a background created with the Nicci Battilana Stencil PS291 by PaperArtsy and SundanceLime Punch, and Pine Elements Inks by Lavinia Stamps.

Here's the card.


Topflight Stamps Products Used:

Other Products Used:
Solar White Classic Crest® Cardstock by Neenah Papers
Classic Green Cardstock by Bazzill Basics Paper®
Tuxedo Black Memento™ Ink by Tsukineko®
Copic® Markers: YG21, YG25, BG53, BG57, B23, B26, R24 R39, E40, E41, E42, E43
Burst Layering Stencil by Tim Holtz® for Stampers Anonymous
Removable Label Paper by Avery®
STAY-tion™ by Wendy Vecchi for Ranger Ink
Stamping Platform

Instructions:
  1. Cut a piece of 12" x 12" Classic Green cardstock to 12" x 5". 
  2. Score the cardstock at 6" and fold to form a 6" x 5" card. Set aside.
  3. Use Tuxedo Black Memento ink to stamp the cocktail from the Nicci Battilana Eclectica ENB06 Rubber Cling Mounted Stamp Set twice onto a piece of 6" x 6" white cardstock and onto label paper.
  4. Use Copic markers to color the cocktails.
  5. Fussy-cut the label paper versions and place them over their counterparts on the image panel.
  6. Place a strip of label paper horizontally over the bottom of the cocktail glasses to ground the images.
  7. Use magnets to secure the image panel to the STAY-tion.
  8. Brush Sundance Elements Ink over the masked images to create a yellow background. 
  9. Lightly mist the image panel with water to create some white splotches and dots. 
  10. Use magnets to secure the cocktail portion of the Nicci Battilana Stencil PS291 over the image panel.
  11. Brush Lime Punch Elements Ink was brushed over the cocktails. 
  12. Lift the horizontal mask, cover the top of the image, and brush Lime Punch Elements Ink over the base of the image panel.
  13. Use magnets to secure the Burst Layering Stencil over the base of the image panel and brush Lime Punch Elements Ink over the base to create a tone on tone pattern.
  14. Trim the image panel to 6" x 4.75", which left a scrap of plain Sundance Yellow inked cardstock. 
  15. Stamp the sentiment onto the scrap, then cut between the sentences.
  16. Use  Lime Punch and Pine Elements Inks to edge the image panel and the sentiments
  17. Adhere the image panel and sentiments to the green card as shown.
All my wishes for a happy, healthy, serene, and prosperous New Year. Let's hope that 2022 doesn't require daily cocktails!


Thursday, September 28, 2017

Merry Christmas


I submitted a trio of cards using the Truck Tidings Cling Stamp and Die set (Stampendous). Unfortunately, they were not picked up for publication, though the cards themselves were then donated to charity by the publication. So, it's a win of sorts. That means that I can share the cards now, which is a good thing since I've been kept away from my craftroom because of  the renovation of my house and my mouth. Neither project has been much fun.

The truck and the tree from the Truck Tidings set were stamped with Tuxedo Black Memento ink (Imagine Crafts), colored with Copic markers, die-cut with their corresponding dies, then edged with a black marker. The ornaments on the tree were touched with a Clear Stardust marker (Sakura) to add a touch of bling to them. The ornaments, headlight, and the side mirror were all coated with several layers of Clear Gelly Glaze pen to add glassy dimension and shine.

Bundled Sage Distress ink (Ranger) was sponged over the fir tree on the Woodland Mini Layering Stencil (Stamper's Anonymous) onto patterned paper from a 6x6 pad in a repeating manner, varying the darkness of the ink. The patterned paper was edged with Bundled Sage and Hickory Smoke Distress inks. Road-patterned washi tape was adhered along the bottom of the patterned paper. The stenciled patterned paper was adhered to a card.

A small scrap of vellum was adhered behind the truck's open window and the tree was adhered slightly behind the truck's bed. The truck was adhered to the card front as shown.

Grey cardstock was die-cut with the Merry Christmas dies (All Occasions) and the sentiment was added to finish the card.

Thanks for visiting today!

Friday, August 18, 2017

Get Well Soon!

Frantic Stamper's August release of stamps and dies is called Fall Greetings and includes flowers, leaves, Halloween, etc. Be sure to hop over there to check out the new release, their wonderful line of precision cutting dies and clear stamps, and other crafting goodies.

Here's a get well card that features the new Adhesive Bandage (FRA-DIE-10285) and one the dies from the very useful Stitched Double Fishtails die set (FRA-DIE-09735)


Solar Crest White cardstock (Neenah) was die-cut with the Adhesive Bandage die then colored with Copic markers. 

Red cardstock (Bazzill) was die-cut with the little heart included with the Adhesive Bandage die, one of the dies from the Stitched Double Fishtails die set, and one of the dies from the Plain Heart Nestabilities die set (Spellbinders)

VersaMark ink (Imagine Crafts) was sponged over the Circuit stencil (Brett Weldele/Stampers Anonymous) onto the heart, then Ultra-Fine Detail Silver embossing powder (Ranger) was heat set. The Adhesive Bandage die-cut was adhered over the stenciled, embossed heart, and the small red heart die-cut was added.

The "Get Well Soon" sentiment from the Thank You Cards rub-on sheet (KaiserCraft) was added to the red Stitched Double Fishtails die-cut.

Patterned paper from two different 6x6 pads were layered and the edges distressed. The clocks along the right side were detailed with a R20 marker (Copic), then the bandaged heart and sentiment die-cuts were adhered.

The card front was adhered to a red A2 card and I called it done. BTW, this card was actually sent (shocking I know) to a friend recuperating from the installation of a pacemaker. 

Thanks for visiting today.

Tuesday, August 15, 2017

Steampunk Nautilus Journal Page

Another Tuesday, another IBFS Steampunk project! This one is a journal page featuring Steampunk Nautilus from the New Steampunk rubber stamp set by Carmen Medlin Designsavailable at I Brake for Stamps.


Steampunk Nautilus was stamped with Tuxedo Black Memento ink (Imagine Crafts) onto Neenah cardstock, then the image panel was die-cut with one of the dies from the Rectangles Nestabilities die set (Spellbinders).  Steampunk Nautilus was colored with Copic markers and the image panel was sponged with Vintage Photo Distress Oxide ink (Ranger). I used a q-tip dipped into water to wet the ink, then heat set the image panel, matted it onto metallic copper cardstock (Neenah) and set it aside.

140 lb. Mixed Media cardstock (Strathmore) was cut down to fit in my journal. Salty Ocean Distress Oxide ink was sponged onto the Gears Skinny Minny stencil/mask (Joggles) and spritzed with water. Once the water beaded, the journal page was placed over top and smoothed over the stencil.

Peacock Feathers Distress Oxide ink was smooshed onto my craft mat, misted with water, the journal page was dragged through the puddled ink, spritzed with more water, then heat set. This was repeated a few times until I was happy with the coverage. This process was repeated again with Cracked Pistachio Distress Oxide ink.

Vintage Photo Distress Oxide ink was sponged across the bottom of the journal page, spritzed with water, and heat set. Iced Spruce Distress Oxide ink was sponged over the Moving Vines stencil (The Crafter's Workshop) at the bottom of the page and over the Gears Mini Layering stencil (Stampers Anonymous) at the top of the page. The ink was misted with water, allowed to spread a bit, then heat set.

Strips of 140 lb. Mixed Media cardstock were sponged with Abandoned Coral Distress Oxide ink, misted with water, then heat set. These pieces were die-cut with the coral die from the Under Water Build-a-Scene die set (Taylored Expressions).

Other strips of Mixed Media cardstock were sponged with Peeled Paint, Twisted Citron, and Lucky Clover Distress Oxide inks, then die-cut with the Seaweed Stalks die set (Memory Box).

The Seaweed Stalks and coral die-cuts were adhered along the bottom of the journal page, then Media Texture Sand Paste (DecoArt) was spread over the Vintage Photo Distress Oxide ink and the die-cuts. Some tiny pewter, brass, and copper  metal gears were pressed into the Media Texture Sand Paste. The page was set aside while I made and ate dinner. When I returned, the Texture Sand Paste was mostly dry, so it was heat set to totally dry it out. I did use my Vintage Photo Distress marker (Ranger) to add some depth and detail to the "sand".

Metallic copper cardstock was die-cut with the Small Alphabet Word Upper and Lower Case dies (All Occasion) and adhered to the top of the journal page.

A Remnant Rub (Idea-ology) was used to add the caption to the Steampunk Nautilus image panel, which was then adhered to the journal page using Black Photo Corners (3L Scrapbook Adhesives).

I Brake for Stamps has a huge and varied collection of rubber stamps that you ought to check out right now. Just so you know, I Brake for Stamps ships internationally!

Click HERE to be whisked I Brake for Stamps to check out all of the goodies! Best of all, if you buy something, you can get a 10% discount off of your purchase if you use this code: SAVE10KATHI .


Thanks for visiting today!