Showing posts with label SCACD. Show all posts

Tuesday, April 4, 2017

Beautiful Tea Pot

It's time for tea with this gorgeous teapot from a fabulous rubber stamp sheet (MS78) from Merry Stamper, available at I Brake for Stamps! The tea set has four tea gorgeous teapots with four matching tea cups, two sentiments, and a tiny little teapot, which will be perfect for making backgrounds!


The Teapot was stamped with London Fog Memento ink (Imagine Crafts) onto cardstock and onto mask paper. The mask paper version was fussy-cut. The cardstock version of the teapot was colored with Copic markers in mostly grey scale with a bit of light blue and aqua here and there. The color palette was chosen to match old patterned paper from a 6x6 pad.

The Teapot image panel was die-cut with one of the dies from the Sunray Venus Layering Basics die set (Tonic Studios) and kept in the die. The fussy-cut mask was adhered over the teapot image and Copic markers were airbrushed over the die and the mask.

Grey cardstock was die-cut with one of the bead chain dies from the Chains die set (Elizabeth Craft Designs) and a corner die (SCACD).

The patterned paper was layered, the chain die was adhered over the seam of the papers and the teapot image die-cut was adhered to the card front. The edges of the card front were sponged with London Fog Memento ink, then adhered to a grey card. The corner dies were added to finish the card.

I Brake for Stamps has a huge and varied collection of rubber stamps that you ought to check out right now. Click on my badge below to be whisked over to I Brake for Stamps to check out all of the goodies! Best of all, if you buy something, you can get a 10% discount off of your purchase if you use this code: SAVE10KATHI!


Thanks for visiting today!

Tuesday, March 14, 2017

Steampunk Encouragement Card

Here's an encouragement card featuring the Butterfly Chrysalis Change rubber stamp from the Eclectic Collection 2 by Carmen Medlin Designs for I Brake for Stamps. By the way, IBFS ships internationally!


The Butterfly Chrysalis Change was stamped with Tuxedo Black Memento ink (ImagineCrafts), colored with Copic markers, fussy-cut, and edged with a black marker.

Shimmery white cardstock was die-cut with the Winterberry Sprig die (Memory Box), colored with Copic markers, and detailed with a fine tip pen to make the branches look pipe-like and the berries look like screws. Gold metallic cardstock was die-cut with the Alice's Clock Statement Corner die (SCACD). Black metallic cardstock was die-cut with the Geared Butterfly die (Frantic Stamper). White cardstock was die-cut with the matching Solid Butterfly die (Frantic Stamper), then colored with the same colors used on the Butterfly Chrysalis Change image. The metallic Geared Butterfly was adhered atop the colored Solid Butterfly die-cut.

Green cardstock was embossed with the Clockworks die (Cuttlebug/ProvoCraft). The sprig, corner, and butterfly dies were adhered to the embossed cardstock. was adhered over the sprig, then several sentiments rub-ons from the Life Quotes Remnant Rubs (Idea-ology) were added. The embossed panel was matted with black metallic cardstock, then adhered to a green card.

I Brake for Stamps has a huge and varied collection of rubber stamps that you ought to check out right now. Click on my badge below to be whisked over to I Brake for Stamps to check out all of the goodies! Best of all, if you buy something, you can get a 10% discount off of your purchase if you use this code: SAVE10KATHI!

Monday, January 11, 2016

Steampunk Penguin Journal Page

Have you ever had a project that kept coming out wrong, but you had to keep going, if only to get the idea out of your head? This journal page is that project. The version you see below is actually "Plan D" after the preceding three didn't work out the way I wanted.

I should tell you that I have started a series of Steampunk Journals. Steampunk Journal, Volume 1 -- The Aviary was recently published in Just Steampunk 7. The journal's base is a Worn Journal (Ideaology)that I decorated with paint, stamps, ink, die-cuts, flashing tape, and a mess of other things. The journal measures 5" x 7" and holds two-hole punched pages that measure 4.75" x 6.75". I will be adding journal pages that showcase my rather large collection of steampunk bird images.

This project is the first page of The Aviary and features Steampunk Penguin, one of SCACD's fabulous digital stamps. If you are not in the USA, you can purchase SCACD's great digis HERE.


Steampunk Penguin was resized in PhotoElements, printed out onto Neenah cardstock, colored with Copic markers, fussy-cut, then edged with a Black Pitt Artist pen (Faber Castell). Several layers of Clear Gelly Glaze pen (Sakura) were added to Steampunk Penguin's beak, goggle lenses, and feet. Liquid Glass (DecoArt) was added to the light bulbs on his hat. Steampunk Penguin was then put safely away from curious fingers (I always like to see if the glue has set, which of course ruins everything) while the Liquid Glass set.

A scrap of 140 lb. Mixed Media cardstock was sponged with a wash of Cerulean Blue Media Fluid Acrylic paint (DecoArt)Jonathan Alphabet rub-ons (Maya Road) were applied to the cardstock. A nameplate from a Grungeboard set (Idealogy) was brushed with Metallic Gold MFA paint. Quinacridone Gold MFA paint was stippled over top, then allowed to dry. The edges of the name plate were darkened with Black Pitt Artist pen. The nameplate was adhered over the sentiment. One-Step Crackle Glaze (DecoArt) was applied inside the name plate over the sentiment and allowed to dry.

140 lb. Mixed Media cardstock (Strathmore) was cut to size. Americana Short Circuit stencil (DecoArt) was placed over the top of the cardstock. VersaMark (Imagine Crafts/Tsukineko) was sponged over the stencil, the stencil was lifted, and Polysparkle embossing powder (Ranger) was heat set. A wash of Cerulean Blue MFA paint was sponged over the embossing powder. A baby wipe was used to wipe the paint from the embossed circuit.

The top pattern from the Rock Wall stencil (The Crafter's Workshop) was placed over the bottom part of the cardstock, VersaMark was sponged over the stencil, and Polysparkle embossing powder was heat set. Pthalo Turquoise and Pthalo Blue MFA paints were sponged over the stenciled embossed cardstock.

140 lb. Mixed Media cardstock was was die-cut with all four dies of the dies from the Stitched Scene Builder Edgers die set (Frantic Stamper). The die-cuts took a ride through the Big Kick inside the Gears Texture Fades embossing folder (Sizzix) and then were painted with a mixture of Cerulean Blue and Translucent White MFA paint. When dry, a wash of Quinicridone Magenta MFA paint was sponged onto each die-cut. Another layer of Cerulean Blue MFA paint followed, allowed to dry, then Translucent White MFA paint was sponged again. When all the die-cuts were dry, Iridescent Medium (Winsor and Newton) was brushed across each to add a touch of sparkle. The die-cuts were adhered to the stenciled painted journal page. The page was then punched with my Binder Punch (Idea-ology)

The Mixed Media cardstock was was die-cut with Medium Steampunk Pipes (Memory Box) several times. The pipes were adhered to each other to form a four-ply stack, which was then painted with Silver Metallic MFA paint. A faucet and bent pipe from the PipeWorks chipboard set (Creative Embellishments) were sponged with Silver Metallic MFA paint. Translucent White MFA paint was brushed onto the face of the pressure gauge and a gold gel pen was used to add a bit of detail. Silver Metallic MFA paint was dry brushed onto the rest of the gauge. Black Pitt Artist pen was used to add a bit of detail to all the pipes and the faucet and to give them a black edge as well. A clear plastic circle was adhered over the face of the pressure gauge.

A scrap of transparency was painted with Pthalo Turquoise MFA paint. When dry, 1/4" Wonder Tape (Ranger) was applied to the non-painted side. The red liner was pulled off and micro-beads were pressed into the tape. This strip was then adhered to the reverse of the faucet.

The four-ply pipe was adhered over the embossed die-cuts on the journal page and the faucet was added. The bent pipe was adhered to the left side of the page and the pressure gauge was adhered over it.

Quinacridone Gold, Quinacridone Burnt Orange, Payne's Grey, Metallic Silver, and a touch of Metallic Gold MFA paints were mixed with Ultra Matte Varnish (DecoArt), then dry brushed over parts of the pipes, pressure gauge, and faucet to add some rust.

Steampunk Penguin was adhered atop the pipe and some Remnant Rubs (Ideaology) were added around him. Two metal gears were adhered around the binder holes. A third was added around one of the rub-on graphics.

The Crackle Glaze inside the name plate had dried and crackled and the nameplate was adhered to the journal page using screw-top brads (Idealogy).

If you've read all the above, pat yourself on the shoulder and get a glass or cup of your favorite beverage. You deserve it!

I shall enter this journal page into the following challenges:
Just Us Girls Challenges: Trend Week - Metal/Metallics
Creative Artiste Challenge: Anything Goes -- Twist-Use Chipboard
Die Cut Divas Challenges: New Technique, Stamp, Color, Die
Happy Little Stampers Mixed Media Challenges: Stencils
SanDee and amelie's Steampunk Challenges: Anything Goes

Thursday, December 17, 2015

Happy Chanucat! A Belated Card

Here's yet another project which shows you how my mind works. Or doesn't. I'll leave decision up to you!

This card holds a check and will be mailed to my nephew's home, where it will await his triumphant return from his first semester in college. I did mean to send it to him while he was actually at the college, but the best plans of mice and Kathi sometimes are thwarted by mundane stuff.

So, without more twaddle, here's my card which features two SCACD digital stamps, namely Kathi's Menorah Unlit and Kitten Stack. If you are outside of the U.S., you can find these and the other fantastic SCACD digis here.


I opened Kathi's Menorah Unlit in PhotoElements and added candles to eight of the the candle-holders. If you want to know how to add candles to Kathi's Menorah Unlit, I wrote a tutorial last year, brilliantly titled Kathi's Menorah - A Tutorial.

I erased the flame from the candle on the furthest right, which would be the last candle lit, as they are lit from left to right.

Next I opened Kitten Stack, erased the butterfly that comes with the image, then added a candle to the topmost kitten's paw. I had to rotate the Kitten Stack a bit to make it look as though the kitten were holding the candle because that would really happen in real life. Then I moved the rotated Kitten Stack over so that the flame from the kitten's candle was lighting the last candle. I saved the scene and then reduced it and printed it out onto cardstock using my laser printer.

The scene of Kitten Stack and Kathi's Menorah Unlit was colored with Copic markers. You will note that I made one cat a calico and the other a marmalade tabby. Kitten Stack is so much fun to customize! When I was done, I edged the image panel with Hickory Smoke Distress ink (Ranger).

The patterned paper, from some 6x6 pads by My Mind's Eye, was chosen to match the colored Kitten Stack. The striped sheet, chosen to bring all the colors together, was die-cut with one of the dies from the Stax Jumbo Fishtail Banner (Die-namics). All edges of the patterned paper were sponged with Hickory Smoke Distress ink.

Very old Doodlebug RubOns were used to add the ever-so-clever sentiment to a strip of patterned paper.

I should mention that we have two cats who help us celebrate Chanukah. They watch the entire candle-lighting ceremony each and every night, then keep guard over the menorah. Each year, one of them manages to singe fur or a whisker by getting a bit too close to the open flame. You do know what they say about cats and curiosity, don't you? And the bit about the nine lives, that's for real too.

Thanks for visiting today.
 
I shall enter this card into the following challenges:
Scrapy Land Challenges: Holidays
Simon Says Stamp Wednesday Challenges: Die Crazy
Show Us Your Pussies: Krimbo Kitties

Friday, December 4, 2015

White Christmas/Let It Snow

This week's the challenge at The Outlawz Coloring Challenges is "Let It Snow". My Outlawz Coloring Challenge teammates, Carla, Penny, Vannessa, and I challenge you to create a project for this challenge. You should check out their blogs to see their gorgeous artwork. 

Here's my card with Foxy, one of the fabulous new digital stamps at SCACD. If you're overseas, you can purchase Foxy and the SCACD's other digi stamps HERE.


Foxy was resized in PhotoElements, printed out onto Solar Crest White cardstock (Neenah) using my laser printer, colored with WG Copic markers, fussy-cut, then edged with a dark WG marker. I must note that Foxy has a flower in his mouth in the digital image, which I omitted when I fussy-cut the image. I also opted to make him into an Arctic Fox instead of a Red Fox.

White cardstock was die-cut with three of the dies from the Stitched Scene Builder Edgers die set (Frantic Stamper). These die-cuts were layered atop a piece of patterned paper from the Figgy Pudding 6x6 pad (Basic Grey), the sheet was cut down, then edged with Broken China Distress ink (Ranger). This was matted with a sheet of grey patterned paper from the same pad. The leftover strip was die-cut with one of the dies from the Stitched Speech Bubble Edges, edged with Broken China Distress ink, then adhered to the top of the panel. The sentiment and some snowflakes from the Christmastime Remnant Rubs (Idea-ology) were added to the Stitched Speech Bubble Edge. 

Clear Stardust Glitter pen (Sakura) was used to trace between the stitches on the top and bottom die-cuts. Foxy was added to the scene I created, then the image panel was adhered to a white card.

Thanks for visiting today!

I shall enter this card into the following challenges:
Scrapy Land Challenges: Anything Goes
Simon Says Stamp Wednesday Challenges: Let It Snow
Crafty Sentiments Designs Challenges: Winter
Tuesday Throwdown Challenges: Cute and Cuddly

Thursday, November 5, 2015

SCACD and Friends New Release Blog Hop

SCACD is celebrating ten newly released exclusive digital stamps. SCACD Artist Carmen Medlin and Susana collaborated on the images and we are happy to be showcasing them to you now. There are some new cute animal stacks — stacks of kittens, puppies, and birds, as well as some Steampunk additions and more!!!

So go check out the collection since SCACD's digital stamps are really cute, fun and unique. These digital stamps are now available for purchase in the USA HERE .

All Our EU International Friends can purchase them HERE .

If you are from a none EU country, you can purchase direct from SCACD HERE.

You should have arrived at my blog from Donna's blog, where I'm sure she wowed you with some fabulous artwork.

Here's my card with the fabulous new Cupcake Owl.


Cupcake Owl was resized in PhotoElements, printed out onto Classic Solar Crest cardstock (Neenah), colored with Copic markers, fussy-cut, and edged with my Black Pitt Artist Brush marker (Faber Castell). Cupcake Owl's eyes, beak, and talon received several layers of Clear Gelly Glaze pen (Sakura) to make them dimensional and shiny.

One of the dies from the A2 Card Creator Nestabilities die set (Spellbinders) was positioned on a piece of patterned paper from the old retired Phoebe 6x6 pad (Basic Grey) and die-cut to form a frame. Pink patterned paper from the same pad was die-cut with the next smallest die from the set, then lined up and adhered under the aperture in the patterned paper.

Brown paper from Phoebe pad was die-cut with SCACD's Breezy Branches Statement Corner die, cut apart, and positioned along the framed opening. Dimension foam adhesive was used to adhere the framed piece of patterned paper to the same piece of patterned paper.  Cupcake Owl was positioned on the branches in the recessed area.

Pink patterned paper from the Phoebe 6x6 pad was die-cut with the one of the Nested Sentiment dies (Spellbinders for Just-Rite) and "for you" from the Handwritten die set (Little B). Brown cardstock from the same pad was die-cut with one of the dies from the Framed Fancy Tags Two die set (Spellbinders).  The sentiment die-cut was assembled and adhered to the card front.

Flower and plain pink rhinestones (KaiserCraft) were used to finish the card.

Thanks for visiting today! Your next stop in the hop is Susan's blog and I'm quite sure she has some special eye candy! If you want to make sure you saw all the Designers showcasing the stamps then head back to the SCACD Store Blog HERE for the complete blog list.

Please note SCACD is having a SALE so check it out HERE!

Friday, October 2, 2015

Mad Hatter for Mad Hatter Day (October 6th)!

This week's challenge at The Outlawz Coloring Challenges is anything "Alice in Wonderland" in honor of Mad Hatter Day on October 6th. Carla, Penny, Karen, Vannessa, and I challenge you to create a project for this challenge. You should check out their blogs to see their gorgeous artwork.

Here's my card with SCACD's The HatterIf you like this digital stamp and are an International friend, you can now buy it HERE.


The Hatter was resized in PhotoElements, then printed out onto Neenah cardstock with my laser printer. It was then colored with Copic markers and set aside while I created a background for it.

A 4.75" x 6.75" piece of 140 lb. Mixed Media cardstock (Strathmore) took a ride through my Big Kick (Sizzix) inside the Cuttlebug Clockworks embossing folder (ProvoCraft). Black cardstock was die-cut with the hat, hatband, and cane die from an old QuicKutz Snowman set. The hat band was adhered to the hat, then all the hats were adhered the embossed cardstock using Media Matte Medium (DecoArt)

When the piece was dry, it was painted with a layer of Carbon Black Media Fluid Acrylic (MFA) paint (DecoArt), then sponged with Ultramarine Blue, Pthalo Blue, and Metallic Gold MFA paints. I finished the painting by stippling Quinacridone Magenta and Transparent Red Iron Oxide MFA paint over top of the other layers of paint.

Sometimes I don't feel like fussing endless to lay out a card, so I visit various websites to find sketches to use. Lazy I am. Yep. This time, I found one that would work at the paper players challenges.  

So, according to the sketch (shown below) I matted the image panel with black metallic cardstock. I found some shiny shimmery blue metallic paper that was embossed with the Clocks embossing plate (Cherry Lynn Designs). This layer was matted with the black metallic paper that had been punched with a Lattice Border punch (Martha Stewart). 

Silver metallic cardstock was die-cut with the chain die from the Rope and Chain die set (All Occasions), adhered to a strip of black metallic cardstock, and adhered per the sketch. The image panel was adhered over these layers.

Gold metallic cardstock was die-cut with an old Pocketwatch die set (QuicKutz), which oddly didn't have a a watch face, though it had watch hands. Never fear! I found the correct size watch face from the Retro Mod Clocks Shapeabilities die set (Spellbinders), which I used to cut and emboss the clock face from green cardstock. I used a gold gel pen to highlight the dots. Gold metallic cardstock was also die-cut with one of the dies from the Decorative Border die set (All Occasions). The clock and the chain were adhered. The card front was adhered to a 5" x 7" black card.

Here's the sketch so you can see how I did!


Thanks for visiting today!

I shall enter this card into the following challenges:

Wednesday, September 30, 2015

Steampunk Moth Tag

Bwa ha ha. Got this done "under the wire" for a challenge that I've been wanting to do all month long, especially once I found the Short Circuit stencil (DecoArt) at my local Michael's, which I knew would be be perfect with SCACD's Radiant Moth, which is part of the Mechanimals Collection.


Radiant Moth was stamped with Onyx Black VersaFine ink (Tsukineko/Imagine Crafts) and heat embossed with Clear Filigree Detail embossing powder (Stewart Superior). The image was colored with Copic markers, fussy-cut, and outlined with a Black Pitt Artist marker (Faber Castell). Lemon Spica Glitter (Copic)pen was added to the area around the wire of Radiant Moth's light bulb, then  Liquid Glass DecoArt) was applied over the light bulb and set aside to dry. 

While it was drying, a piece of black chipboard was die-cut with the Alterations Tag die (Sizzix), then dry embossed with the Clockworks Cuttlebug embossing folder (ProvoCraft). Pewter, Rose Quartz, Onyxite, and Florentine Gold Treasure Gold Wax Paste (PaperArtsy) was brushed over the embossed tag to add some color, shimmer, and shine to the matte black.

Primary Yellow MFA and Primary Cyan Media Fluid Acrylic (MFA) paint (DecoArt) were mixed, then painted onto 140 lb. Mixed Media cardstock (Strathmore).  Pthalo Green Blue and Viridian MFA paint were dry brushed over top until I was happy with the coverage. 

A few drops of Metallic Silver MFA paint was mixed into a splodge of Black Modeling Paste (DecoArt), then scraped over the Americana Short Circuit stencil (DecoArt) onto the painted panel and allowed to dry. Once dry, the silver didn't really show, so I used a really fine brush with Metallic Silver MFA paint to go over the circuitry.

Steampunk (defunct company) was stamped with Onyx Black VersaFine ink (Tsukineko/Imagine Crafts) and heat embossed with Clear Filigree Detail embossing powder (Stewart Superior) and cut to size. Pthalo Green Blue and Viridian MFA paint were sponged over this piece, then the paint was wiped away from the embossed area with a baby wipe. When the paint was dry, the piece was coated with a thick layer of Media Crackle Glaze and set aside to dry.

The circuit board piece was adhered to the tag then screw-top brads were added to the four corners. The crackled Steampunk sentiment was adhered, then a Ceiling Light Bulb and Switches and Outlets Junkyard Findings (Prima Marketing) were adhered using 3D Transparent Matte Gel (Prima Marketing). 

T-pins were cut to size, then used to replace Radiant Moth's antennae and connect them to her antennae tops. 3D Transparent Matte Gel was used to adhere Radiant Moth over the circuit board panel.

A Hitch Fastener, a Swivel Clasp, and a Jump Ring (all Idea-ology) were used to attach the Dream Typed Token (Idea-ology) to the tag. It was hanging where I didn't want it hanging, so I stole a few beady-looking transistor wire gizmos from my husband, who builds audio equipment for fun and relaxation. The transistor wire gizmos were added here and there to add some color and visual interest to the piece and to hold the hanging tag where I wanted it to hang.

Some seam binding was smooshed in some inks, squished, heat set, and tied to the tag's opening to finish the tag.

Tah dah. If you made it through all the above, pat yourself on the back!

Thanks for visiting today!
I shall enter this tag into the following challenges:
SanDee and amelie's Steampunk Challenges: Tag It!
Sisterhood of Snarky Stampers Challenges: P is for Steampunk!
Fantasy Stampers Challenges: Steampunk
Crafty Gal's Corner Challenges: Things with Wings 
Simon Says Wednesday Challenges: Anything Goes

Wednesday, September 23, 2015

Sk8R Grrl


I call her Sk8R Grrl, but her real name is Be Fearless and she's part of SCACD's Brave Hearts stamp collection. Not only that, but she and her other friends are available as digital stamps. Lastly, if you're an international pal, you can get her and all the other SCACD digital stamps HERE.

Be Fearless, aka Sk8R Grrl, was stamped with Tuxedo Black Memento ink (Tsukineko/Imagine Crafts) and colored with Copic markers. A bit of pink blush was added to her cheeks with a chalk pencil.The image panel was die-cut with one of the dies from the Card Creator 5x7 Nestabilities die set (Spellbinders). Her earring received a glittery touch thanks to the Clear Stardust Glitter pen (Sakura). Both the earring and the skull in her hair were coated with several coats of Clear Gelly Glaze pen (Sakura) to add dimension and shine.

In a departure from my usual way of doing things, I colored her first then chose patterned papers. I had a wee bit of difficulty finding a good lavender in my plethora of 6x6 patterned paper pads, so I had to go digging in the 12x12 files. I finally found the perfect match in two older patterned papers by Doodlebug. The reverse of the paper had a 2001 copyright sign! The stripey patterned paper is by KI Memories and is probably almost as old. Way back then, during my scrapbooking days, I'd buy multiples of any paper that I liked because I had some strange fear of running out of my favorites. That rarely happened and left me with a sizable collection of really old paper.

I also had collected some matching Doodelbug cardstock and was delighted to find one last piece of the light lavender color which sacrificed itself for the card. The lighter lavender was die-cut with a larger die from the Card Creator 5x7 Nestabilities die set. The striped paper was die-cut with a scalloped border die from the Blueprints 4 die set (Die-namics). Both the plaid and striped paper were die-cut with the pierced strip die from the Blueprints 3 die set (Die-namics).

Since is a bit edgy, I wanted to add some edgy accents. Silver metallic cardstock was die-cut with the Barbed Wire die (Cherry Lynn Designs) and with the small circles from the Blueprints 3 die set (Die-namics). Off white cardstock was punched with a tiny skull punch (Studio G).

As usual, I didn't know who would get this card for what occasion, so a sentiment was intentionally omitted.

Thanks for visiting today!

I shall enter this card into the following challenges:
Card Mania Challenges: Pastel Colors
Craft Your Passion Challenges: Anything Goes
Cuttlebug Mania Challenges: Wheels


Monday, August 31, 2015

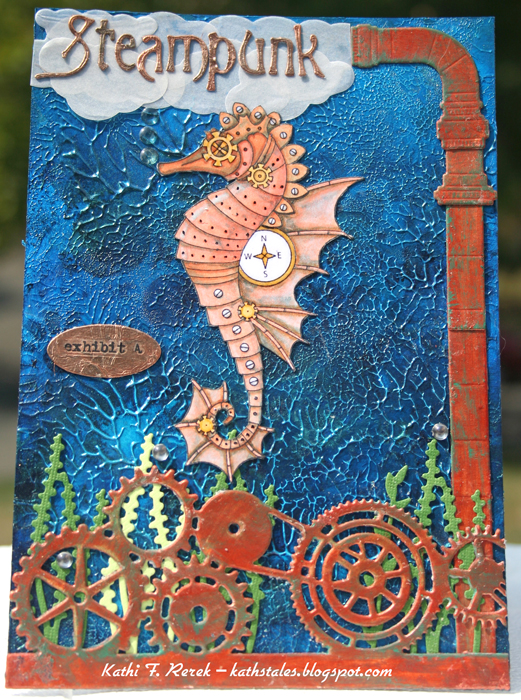
Steampunk Seahorse - Journal Page

If you've been here before, you know that I love Steampunk. A while back, I decided that I was going to create a series of Steampunk Journals. I'd have one for  creatures of the sky, creatures of the sea, machines, people, fashion, etc. Then I'd fill each journal with pages. Being me, I've created Steampunk Journals, Volume One - The Aviary. But I can't share it with you now. I'm such a tease.

I will be working on the other covers soon, but meanwhile, I'm making journal pages. I apparently like to do things backwards.

Here's the first one. It features a Steampunk Seahorse, SCACD's Nancy's Seahorse.


FYI, SCACD has loads of marvelous Steampunk stamps, in both rubber and digital format! If you're a Steampunk afficionado, you owe yourself to check 'em out. Just sayin'. 

Nancy's Seahorse is available as a rubber stamp, which is what I used for this page. The Steampunk Seahorse is also available as a digital stamp, Nancy's Mechanical Seahorse. If you're an international visitor, you can purchase this digi and others, HERE.

Nancy's Seahorse was stamped with Tuxedo Black Memento ink (Tsukineko/Imagine Crafts), colored with Copic markers, fussy-cut, and edged with a Black Pitt Artist Brush pen (Faber Castell). Several layers of Clear Gelly Glaze pen (Sakura) was used to add dimension and shine to the compass, screws, rivets, and gears.  Nancy's Seahorse was set aside while I worked on the background. True confession. He sat for awhile as my mojo disappeared and was replaced by sudden sleepiness. That went on for several days.

I cut two pieces of 140 lb. Mixed Media cardstock (Strathmore) to 4.75" x 6.75". White Media Gesso (DecoArt) was liberally spread with a palette knife onto one of the pieces. The second piece was pressed against the be-Gessoed cardstock, squished a bit, then the two pieces were pulled apart and left to dry for an hour or so.

When I returned, the two sheets were covered with a totally lovely texture. Cobalt Blue Hue, Cobalt Turquoise Hue, Ultramarine blue, Pthalo Blue, and Pthalo Turquoise Media Fluid Acrylic (MFA) paints (DecoArt) were sponged over the background using Mini Ink Blending Tools and Replacement Foams (Ranger). The foam applicators are great for this because they're pliable enough to make sure that the paint gets into all those nooks and crannies.

Prussian Blue MFA paint was thinned a bit with water and sponged over the Gears Skinny Minny Mask/Stencil (Joggles). When the paint was dry, I decided to lighten things up a bit by lightly sponging Interference Turquoise and Interference Blue MFA paints over the textured background, so that the top bits received the paint.

140 lb. Mixed Media cardstock was die-cut with the Medium Steampunk Pipes dies (Memory Box) and the Edge Gears die (Joy Craft). These die-cuts were painted with Copper Dazzling Metallic Acrylic paint (DecoArt). When the Copper paint was dry, Blue Green Light MFA paint was randlomly sponged the pipes and gears.

Green cardstock was die-cut with a few dies from the dies from the Build a Scene: Underwater die set (Taylored Expressions). This greenery was adhered to the bottom of journal page with Media Matte Medium (Deco Art). The painted Medium Steampunk Pipes die-cuts were adhered, then the Edge Gears die-cut was added. 

Vellum was die-cut with my Puffy Clouds (Memory Box), run through a Xyron machine, then adhered to the top of the journal page.

Copper Foil tape, purchased at a gardening center*, was adhered to black cardstock. These strips were airbrushed with BG72, BG75, and BG 78 Copic markers to add an aged patina look to them. The strips took a run through a Xyron machine to add adhesive to the cardstock, then were die-cut with Eliza Mini font dies (QuicKutz). The Copper Foil word was adhered over the clouds at the top ofthe page.

An extra piece of foil was die-cut with an old oval label die (QuicKutz). Apothecary Remnant Rubs (Idea-ology) was used to add "Exhibit A" to the foil, which was then adhered to the page.

Clear pearls were added here and there to finish the page.

I also created this card for SanDee and amelie's Steampunk Challenges. They've had a TicTacToe summer challenge all summer. Being a master procrastinator, I waited til the very last moment. No lie. 

Here's the TicTacToe board. I chose the left vertical row. (words, stencils, the (deep) sea).


*Copper Foil Tape is in one's garden (not mine) to ward off snails. Go know.

I shall enter this in the following challenges:

Thursday, July 23, 2015

Birthday Fishes!

SCACD's new rubber stamp release included a gorgeous set of tropical fish called The Angelfish Trio, which is available as an unmounted sheet of deeply edged rubber.

Here's my first card using the largest fish of the Angelfish Trio.


The large angelfish was stamped onto Neenah cardstock and onto Eclipse Tape (Judikins) with Tuxedo Black Memento ink (Tsukineko/Imagine Crafts). The Eclipse Tape angelfish was fussy-cut and set aside. The angelfish on the image panel was colored with Copic markers, which were chosen based on an angelfish I found on a Google image search. Who knew there were so many beautiful and distinctive colorations for angelfish?

When I was done coloring the angelfish on the image panel, the Eclipse Tape version was adhered over it then airbrushed with the Copic airbrush system using a variety of BG markers. When I was happy with the background, the Kelp Forest stencil (The Crafter's Workshop) was placed over the background, secured with Washi tape at top and bottom, then airbrushed with a few YG markers.

The image panel was cut to size and set aside while I started die-cutting flora and fauna to enhance the scene.

White cardstock was die-cut with the Oceana Corner die (Memory Box) and Build a Scene Underwater dies Taylored Expressions).The white die-cuts were colored with Copic markers, enhanced with the Uni-Ball White Impact Gel pen, and adhered to the image panel.

Clear pearls and some Clear Gelly Glaze pen (Sakura) air bubbles were added to the background.

The "Hello Friend" from the In'Spire Celebrate 2 die (Spellbinders), "Best Wishes" die (Elizabeth Craft Designs), and "Happy Birthday" die (Elizabeth Craft Designs) were used to die-cut greenish cardstock. "Friend" and "Wishes"  underwent some transplant surgery, then were adhered to the card front.

The image panel was matted with greenish cardstock and mounted onto a green card.

Thanks for visiting today!

I shall enter this card into the following challenges:
Craft Gals Corner Challenges: To Die For
Crafty Cardmakers and More Challenges: Water
AAA Card Challenges: Waterworld and Dies

Thursday, July 2, 2015

Ocean Flowers

If you've visited my blog, you've no doubt noticed that I like to create underwater scenes. I love the ocean and the beach, though I don't visit either very often. Maybe that's why the underwater world holds my fascination and captures my imagination.

Here's my latest scene with SCACD's Coral Sunflowers rubber stamp set, from their new Eclectic Sea collection.


I started this wall hanging by creating a sea background by brushing Blue Green Light, Cerulean Blue, Cobalt Turquoise Hue, and Cobalt Teal Hue Media Fluid Acrylic (MFA) paints (DecoArt) onto 140 lb. Mixed Media cardstock (Strathmore). When the paint was dry, Fern Green Archival ink (Ranger) was sponged over the Kelp Forest stencil (The Crafter's Workshop) on the bottom of the piece. Rays Layering Stencil (Stampers Anonymous/Tim Holtz) was placed over the painted cardstock and Translucent White MFA paint) was sponged over the stencil, then wiped back with a baby wipe.

Both flowers from SCACD's Coral Sunflowers rubber stamp set were stamped onto white tissue paper with Jet Black StazOn ink (Tsukineko/Imagine Crafts). I marked the stamped side with a pencil before flipping the tissue paper over. I painted the reverse of the flowers using Quinacridone Burnt Orange, Diarylide Yellow, Hansa Yellow Light, Hansa Yellow Medium, and Cadmium Orange Hue MFA paints. When the paint was dry, I carefully cut around the Coral Sunflowers.

White cardstock was die-cut with Weeping Willow Branches die (Poppy Stamps),  Swimming Seahorses die (Memory Box), Build a Scene Underwater (Taylored Expressions), and the Mini Shell die set (Impression Obsession). I also used a very old unlabeled fish punch and a crab punch to punch white cardstock. The punchies and die-cuts were all colored with Copic markers.

The painted ocean and the painted side of the Coral Sunflowers were brushed with Media Matte Medium (DecoArts) and all three painted tissue-paper Coral Sunflowers were adhered to the sea background. Another layer of Media Matte Medium was brushed over top of the tissue paper images.

The coral, ocean plant, Seahorses die-cuts and the fish punchies were adhered to the ocean scene using Media Matte Medium and another layer of Media Matte Medium was applied over top of the die-cuts and punchies.

The entire piece was then adhered to chipboard, so that the piece would not buckle during the next step. Texture Sand Paste (DecoArt) was applied to the base of the piece with a palette knife. This was allowed to dry overnight.

The next day the Texture Sand Paste was dry-brushed with Titan Buff, Burnt Umber, Burnt Sienna, and Raw Sienna MFA paints. When the paint was dry, the various shell and starfish die-cuts and the crab punchies were adhered to the piece using Diamond Glaze (Judikins). The piece was finished with some clear pearls.

Thanks for visiting today!

I shall enter this piece into the following challenges:
Not Just Cards Challenges: Anything Goes
2 Creative Chicks Challenges: Anything Goes
Altered Eclectics Challenges: Anything Goes
Papertake Weekly Challenges: Take Your Pick (pearls and covering chipboard).
Scrapy Land Challenges: Anything Goes

Friday, June 26, 2015

Anything Goes and/or Christmas.

I'm back again today with my creation for this week's Outlawz Coloring Challenges, which is "Anything Goes and/or Christmas". I opted for "Anything Goes".

Here's my card using SCACD's Steampunk Siren's Call, one of the new rubber stamps from new Eclectic Sea Collection.  


Steampunk Siren's Call was stamped with Tuxedo Black Memento ink (Tsukineko/Imagine Crafts) and colored with Copic markers. When I was done coloring her, I placed a stencil from Memory Box over it and used my Copic markers to create a background, then matted with silver metallic cardstock (Recollections). Clear Gelly Glaze pen was used on the screws and rivets on Steampunk Siren's Call to add dimension and shine. Pink pastel pencil was used to add a touch too much blush to her cheeks. 

The silver cardstock was die-cut with SCACD's Contempo Compass Statement Corner die and the Steampunk Corner die (Memory Box). My beloved Mini Gears die (Memory Box) was used to die-cut gold metallic cardstock (Recollections) The Contempo Compass Statement Corner die-cut was altered and the Steampunk Corner die-cut was trimmed. Both die-cuts were adhered and the little gears were added atop some of the gears.

The image panel was adhered to seriously old patterned paper by Sonnets and then mounted to a white card.
 
My Outlawz Coloring Challenge teammates, Carla, Penny, Karen, Vannessa, and I challenge you to create a project using at least three of the colors in the photo below. Share it with us at The Outlawz Coloring Challenges and visit my teammies' blogs for some eye candy.

Thanks for visiting today! 

Friday, June 19, 2015

SCACD Eclectic Sea Rubber Stamp Release Blog Hop!!!

Today SCACD is holding a blog hop to celebrate a newly released exclusive rubber stamp set Eclectic Sea Collection, which has nine rubber stamps all together. Eclectic Sea Collection is a twist on how something land-bound might be seen in the ocean; for example a Sunflower on land becomes a Coral Sea Flower in the ocean and vice versa.

Check out the Eclectic Sea Collection as these are really unique and elegant stamps. SCACD Artist Carmen Medlin and Susana collaborated on the images and we are so happy to be showcasing them to you. This collection is now available for purchase in the USA HERE for the Eclectic Seascollection.

If our International Friends are interested in purchasing these stamps, they can email Susana.

You should have arrived here from Donna's blog, where you definitely saw something amazing!

Here's my card featuring Humminghorse*.


Humminghorse, from the Eclectic Sea Collection was stamped with Tuxedo Black Memento ink (Tsukineko/Imagine Crafts)  onto Neenah cardstock and onto Eclipse Tape (Judikins). The Eclipse Tape version was fussy-cut and set aside to be used as a mask. The Humminghorse stamped onto cardstock was colored with Copic markers, masked, and airbrushed using the Copic Airbrush System. I used my Colorless Blender (Copic) to remove the background, which created whiteawater bubbles, which I then highlighted using Clear and White Gelly Glaze pens (Sakura).

White metallic cardstock (Recollections) was die-cut with the Oceana Corner die (Memory Box) and colored with Copic markers. When you color or ink white metallic cardstock, you end up with a lovely shimmer. Sadly, you can not see the shimmer since it was raining and overcast when I took the photo.

The image panel was matted onto black cardstock, which was mounted onto very old patterned paper, then onto the card front.

Now that I'm done blathering, you can hop along to Roni's blog, where she will delight you with her creativity! If you get lost along the way, you can always find your way by visiting SCACD's store blog, Heart and Hugs.

Thanks for visiting today!

* Please note: There is a digital stamp that is very similar to Humminghorse. It's called Hoverfly.

Friday, May 22, 2015

Music!

This week's challenge at The Outlawz Coloring Challenges is Music. Use an image of a musical instrument, sheet music, musical die-cuts, or song lyrics. My Outlawz Coloring Challenge teammates, Carla, Penny, Karen, Vannessa, and I challenge you to use create a project for this challenge. You can use any coloring medium you like, just as long as you color! 

Our May sponsor at The Outlawz Coloring Challenges is Sweet Pea Stamps, who is offering our lucky winner three digis of his/her choice from the Sweet Pea Digi Stamp Store.  Play along with us for your chance to win!


Here's my card with Sweet Pea/Karen Middleton's Musical Pixie.

 
Musical Pixie was resized in PhotoElements, printed onto Neenah cardstock with my laser printer, then colored with Copic markers. I also printed a copy of Musical Pixie onto Eclipse Tape with my inkjet printer. That version was fussy-cut and placed over the colored image. Removable Scotch Tape (3M) was placed across the image to form the horizon. The sky was airbrushed with my B21 marker and Copic Airbrush System. The tape was lifted and YG markers were used to create a grassy lawn. 

The image panel was die-cut using one of the dies from the 5x7 Card Creator Nestabilities die set (Spellbinders). Music patterned paper from the Paddington 6x6 pad (7 Gypsies) was die-cut using a larger die from the same Nestabilities set. The image panel was matted with the music panel and set aside.

I originally planned to use patterned paper for my other layers, but then decided to re-create the airbrushed/drawn background on a larger piece of cardstock to be used as the card front. So I die-cut another sheet of white cardstock, taped a horizon line, and airbrushed the sky, lifted the tape, and drew in the grass. 

Musical Pixie reminded me of the Pied Piper, so I decided that I should create a little audience for Musical Pixie's music. The Breezy Branches Statement Corner die (SCACD), Birds retired die (Poppy Stamps), and the Peace Doves die(Memory Box) were die-cut from white cardstock and colored with Copic markers. The Sitting Cat (Poppy Stamps) and two walking cats from the Cat Set (Impression Obsession) were die-cut from black cardstock. Shimmery vellum was die-cut with one of the dies from the Flags die set (Impression Obsession). Happy Birthday (Savvy Stamps) was stamped onto the Flag die with Jet Black StazOn ink. 

The image panel was adhered to the card front. The colored Breezy Branches Statement Corner die-cut was added to the upper left hand corner. Three little birds were added to the branches. Gold thread was  added to the hole in the stamped vellum flag, which was then adhered over the branches. The thread was adhered under the dove's beak. The card front was adhered to a white card and I called it done!

Thanks for visiting today! 

I shall enter this card into the following challenges.
Scrapy Land Challenges: Birthdays/Celebrations (plus using any brand of die sold at Scrapy Land)
One Sweet Challenge: Things with Wings
The Cheerful Stamp Pad Challenges: Fairies
Crafting for all Seasons Challenges: Birthday with Four of Something (I've got four birds)

Tuesday, May 19, 2015

Under the Sea

SCACD's Steampunk Sea Turtle was stamped with Tuxedo Black Memento ink (Imagine Crafts/Tsukineko), colored with Copic markers, fussy-cut, and edged with black marker. His eyes, periscope lenses, rivets, and cogs were coated with several layers of Clear Gelly Glaze pen (Sakura) to make them shiny and dimensional. He was set aside while I created a suitable environment for him.

The Oceana Corner die (Memory Box) was used to die-cut 140 lb. Mixed Media cardstock (Strathmore). I used the heavier cardstock because I wasn't sure how I wanted to color the elements in the die. I ended up coloring them with Copic markers and used Black Gelly Glaze pen (Sakura) to add the fishes' eyes.

Green metallic Bling specialty paper (FiberMark) was die-cut with Weeping Willow Corner die (Memory Box). . 

A perfectly-sized scrap of very old blue patterned paper (Prima) was stenciled with the Gears stencil (The Crafter's Workshop) using Broken China Distress ink, which was also used to edge the paper. The Oceana Corner die (Memory Box) die-cut and the Weeping Willow Corner die (Memory Box) die cut were adhered to the stenciled blue patterned paper. Don't you think the Weeping Willow Corner die (Memory Box) die-cut makes a great sea plant?

My often-used Mini Gear die (Memory Box) was used to die-cut bronze and copper metallic cardstock which were layered and added to the both the corner die-cuts. Clear epoxy circle stickers were adhered along both of the die-cuts as water bubbles.

Kraft cardstock was torn and the edges were further distressed with a distress tool. My trusty VersaMarker was used to darken the edges and add some detail to the kraft cardstock. The torn strips were then layered over the stenciled blue patterned paper. "Steampunk" from the Steampunk stamp set (Hampton Arts for Graphic 45) was stamped with  VersaMark ink  onto the kraft cardstock, then immediately brushed with brown palette chalk to darken it.

Steampunk Sea Turtle was placed into the scene, which was adhered to a kraft card.

Thanks for visiting today!

I shall enter this card into the following challenges:
Left of Center Challenges: Distress It
• Top Tip Tuesday Challenges: Animals
Cards for Guys Challenges: World Wildlife