Sunday, October 30, 2022

Meowy Halloween

Here's the last Halloween card created this year for Topflight Stamps! Yesterday, September 29th was International Cat Day and I missed it! As a certified crazy cat lady, I'm hanging my head in shame. I hope that this card makes up for my lapse as it's a cat-themed Halloween card that was made using Lavinia Stamps' gorgeous Noof Clear Polymer Stamp with their fabulous Witch's Hat Clear Polymer Stamp. I used the Feather Leaves Stencil with Lime Punch Elements Ink to add some interest to the background. One of the sentiments from Heffy Doodle's A Purrfect Day Clear Stamp Set was used with the "Halloween" from their Classic Sentiments Clear Stamp Set.

Here it is!


Topflight Stamps Products Used:

Other Products Used:
Solar White Classic Crest® Cardstock by Neenah Papers
Tuxedo Black Memento™ Ink by Tsukineko®
Black Cardstock by Bazzill Basics Paper Company
Copic® Markers: 
Cat: <B41, B60, RV000, C00, C0, C1, BV000, BB20, BV23, BV25, N3, N4, N5, N6, N7, N8, RV000, RV52, RV93, YG21, YG23, YG25
Witch Hat: BV13, BV17, YG23, YG25
Me and Dad Paisley/Periwinkle Patterned Paper from the Kaleidoscope™ Collection by My Mind's Eye™
Flag Die-cut: Source Unknown (bad me)
Repositionable Label Paper by Avery®
STAY-tion™ by Wendy Vecchi for Ranger Ink
Stamping Platform

Instructions:
  1. Cut a piece of black cardstock to 10" x 7", score at 5", and fold to form a 5" x 7" card. Set aside.
  2. Using a stamping platform and  Tuxedo Black Memento Ink, stamp the Witch's Hat Clear Polymer Stamp onto white cardstock and onto repositionable label paper.
  3. Fussy-cut the label paper version and place atop its counterpart on the image panel as a mask.
  4. Position the Noof Clear Polymer Stamp facedown on the witch's hat mask so that the brim of the hat is covering the top part of Noof's head but revealing the ears.
  5. Press the platform's lid onto the back of the stamp and lift.
  6. Ink the stamp with Tuxedo Black Memento ink and stamp.
  7. Remove the witch hat mask and reserve it for another day. 
  8. Use Copic markers to color Noof and her hat.
  9. Use Copic markers to ground Noof's paws and add a dotty image around the cat and the hat.
  10. Remove the image panel from the stamping platform.
  11. Use magnets to secure the image panel to the STAY-tion.
  12. Randomly brush Lime Punch Elements Ink over the Feather Leaves Stencil to add a bit of interest to the background around the witch cat.
  13. Trim the image panel and edge the top part of the panel with Lime Punch Elements Ink
  14. Use a black pen to edge the entire image panel.
  15. Trim patterned paper to 5" x 7", edge it with Nocturne VersaFine Clair Ink, and adhere it to the front panel of the reserved black 5" x 7" card.
  16. Flip a piece of the patterned paper to show the periwinkle side.
  17. Use magnets to secure the paper piece to the base of the stamping platform.
  18. Position the "Happy Halloween" sentiment from the Classic Sentiments Clear Stamp Set facedown along the right side of the paper. 
  19. Press the platform's lid onto the back of the stamp and lift.
  20. Cover the word "Happy" with a piece of scrap paper or a Post-It Note.
  21. Ink the stamp with Nocturne VersaFine Clair Ink, remove the scrap of paper, and stamp the word "Halloween" onto the paper.
  22. Repeat Steps 20 and 21 if needed for a good impression.
  23. Remove the stamp from the stamping platform and clean.
  24. Place the word "Meow" and the "y" from the A Purrfect Day Clear Stamp Set facedown to the left of the stamped word "Halloween".
  25. Press the platform's lid onto the back of the stamp and lift.
  26. Cover the "ou" and "doing" with a scrap of paper or a Post-It Note.
  27. Ink the stamp with Nocturne VersaFine Clair Ink, remove the scrap of paper, and stamp the word "Meow y" onto the paper.
  28. Repeat the Steps 26 and 27 if necessary for a good impression.
  29. Use the flag die-cut to cut the sentiment.
  30. Edge the flag with a black pen.
  31. Adhere the image panel to the card as shown.
  32. Adhere the sentiment die-cut to finish the card.
Thanks for visiting today!

I shall enter this card into the following challenges:

Tuesday, October 25, 2022

Merry Christmas from some Hedgehogs!

It's Tuesday which is my day to share a project created for Topflight Stamps! This week the TFS team's theme is Winter or Christmas.

Here's my Christmas card created with both of the adorable hedgehogs from the Hedgy 4 Clear Polymer Stamp Set by Craft Emotionsa sentiment from the Holiday Sentiment Duos Clear Stamp Set by Heffy Doodle, and patterned paper from the Tartan Essential Craft Papers 6x6 Pad by Craft Consortium.


Topflight Stamp Products Used: 

Other Products Used:
Solar White Classic Crest® Cardstock by Neenah Papers
Mustard Yellow Cardstock by Bazzill Basics Paper®
Tuxedo Black Memento™ Ink by Tsukineko®
Copic® Markers:
Hedgehogs' Faces, Hands, Feet, and Bellies: BV0000, BV000, E50, E21, E11, R00, E00, R000, E000
Hedgehogs' Noses: R20, R22
Hedgehogs' Fur: E37, E39, E44
Santa Hat: R24, R27, R39, R59
Santa Hat Brim/Pompom: RV0000, RV000, B0000, B000, B60, BV0000, Y0000, C00, C)
Lights: T1, T2, R24, R39; G20, G21,,G43; B12, B14, B26; Y11, Y15, Y21
Gift: G18, G24: Y23, Y26, Y35
Ground: C1, C2
Outline: C0
White Gelly Roll® Gel Pen by Sakura® of America
Nameplate by Spellbinders®
Stamping Platform

Instructions:
  1. Cut a piece of mustard yellow cardstock to 5.5". Score at 5.5" and fold to form a 5.5" square card. Set aside.
  2. Use Tuxedo Black Memento ink to stamp both hedgehogs from the Hedgy 4 Clear Polymer Stamp Set onto a white cardstock panel.
  3. Color the hedgehogs with Copic markers. 
  4. Use white gel pen to add highlights to the Christmas light bulbs.
  5. Trim the other half of the mustard yellow cardstock to 5.25" x 3.5".
  6. Edge the mustard yellow cardstock panel with Sahara Elements Ink.
  7. Adhere this panel to a 5.25" square panel of plaid patterned paper from the Tartan Essential Craft Papers 6x6 Pad.
  8. Use Nocturne VersaFine Clair Ink to edge the layered background panel. Heat set.
  9. Adhere the layered background panel to the reserved 5.5" square card.
  10. Use the stamping platform and Nocturne VersaFine Clair Ink to stamp the sentiment onto another  leftover piece of the mustard yellow cardstock. Repeat inking and stamping if necessary to attain a deep black sentiment. 
  11. Heat set the sentiment.
  12. Use the nameplate die to cut the sentiment.
  13. Edge the sentiment die-cut with Sahara Elements Ink.
  14. Adhere the image panel and sentiment die-cut as shown. 
  15. Add the red rhinestones from the Festive Selection - Diamond Sparkle Gemstones to the sentiment die-cut to finish the card.
Thanks for visiting today!

Tuesday, October 18, 2022

What's Brewing? A Halloween Card

It's Tuesday which is my day to share a project created for Topflight Stamps! This week's theme is  "Anything Goes", but it's still October, so I've made another Halloween card. This time I've used the The Biters - Jab Collection Unmounted Red Rubber Stamp Set and The Funny Accessories Unmounted Red Rubber Stamp Set by Katzelkraft with the Three Woodland Mice Clear Polymer Stamps and Bats Clear Polymer Stamps by Lavinia Stamps.

Here's the card!


Topflight Stamps Products Used:
Gelly Roll Bold Line Stardust® Clear Glittering Ink by Sakura®

Other Products Used:

Solar White Classic Crest® Cardstock by Neenah Papers
Lime, Grey, and Raven Cardstock by Bazzill Basics Paper®
Tuxedo Black and Desert Sand Memento™ Inks by Tsukineko®
Pawsome Clear Polymer Stamp Set by Polkadoodles
Copic® Markers:
Cat: BV23, BV25, BV29, N4, N6, N7; YG21, YG23, YG25, YG45; YR31
Witch Hat Band and Collar: YR16, YR18
Buckle: Y21, Y23, Y26, Y28
Hat: B96, C6
Mouse: E31, E33, E35, E44
Fish Skulls and Fish Skeleton: E43, T0
Flames: YR16, YR18, Y06
Cauldron Die: Source Unknown
Circle Nestabilities® by Spellbinders®
Flame Dies by Memory Box I think
Purple Glitter Uni-Posca Marker by Mitsubishi Pencil
Removable Label Paper by Avery®
Post-It® Notes by 3M
STAY-tion™ by Wendy Vecchi for Ranger Ink
Stamping Platform

Note:
As you can see, the cat from The Biters - Jab Collection Unmounted Red Rubber Stamps has become a witch, courtesy of the witch hat from The Funny Accessories Unmounted Red Rubber Stamp Set. She's either hungry or needs to make a special potion. Being a cat, she's partial to fish, so she already has some fish heads simmering and is stirring the pot with the fish skeleton.  She's about to add a mouse from the Three Woodland Mice Clear Polymer Stamps to her magic stew. Yum!

Instructions:
  1. Use Tuxedo Black Memento ink to stamp the witch hat from The Funny Accessories Unmounted Red Rubber Stamp Set onto the image panel and onto repositionable label paper.
  2. Fussy-cut the label paper version and place it over its counterpart as a mask. 
  3. Position the cat from The Biters - Jab Collection Unmounted Red Rubber Stamps facedown onto the mask so that the cat's ears are protruding from either side of the hat mask.
  4. Press the platform lid onto the back of the stamp and lift the lid.
  5. Ink the stamp with Tuxedo Black Memento ink and stamp the cat onto the image panel, onto a second piece of white cardstock, and onto label paper. 
  6. Fussy-cut the label paper version and adhere it over its counterpart on the image panel. 
  7. Fussy-cut the front legs and paws from the second and set aside for now.
  8. Use a small circle die or a punch to cut repositionable label paper and place it on the upper left of the image panel.
  9. Brush Della Blue and Violet Chalk Elements Inks over the image panel to create a night sky.
  10. Lift and retain all the masks. 
  11. Use Copic markers to color the cat, her hat, and her second set of front legs and paws.
  12. Use the cauldron die to cut black and white cardstock. 
  13. Take the black die-cut and poke out the black bits from the opening at the top of the cauldron, the accent on the left, the accent on the right, and the flames.
  14. Flip the black cauldron die-cut and place tape over the apertures.
  15. Repeat Step #13 with the white die-cut. Keep track of these as you will be coloring them.
  16. Press the white oval interior part of the cauldron onto the Lime Punch Elements Ink pad to create a nice green stew/potion color. 
  17. Use a yellow-green marker to add dots to the potion/stew.
  18. Use purple glitter pen was used to color the white accent on the right side of the cauldron. 
  19. Use Copic markers to color the flames on the cauldron. 
  20. When all the bits are colored, inlay them into the apertures on the black die-cut.
  21. Use the flames dies to cut white cardstock.
  22. Use Copic markers to color the flames.
  23. Use Tuxedo Black Memento ink to stamp the fish skeleton from the Pawsome Clear Polymer Stamp Set three times.
  24. Decapitate the fish skulls from the skeleton and fussy-cut them.
  25. Fussy-cut one of the skeletons.
  26. Use Copic markers to color the fish skulls and the fish skeleton.
  27. Use a red pen to add an eye to the mouse.
  28. Use Desert Sand Memento ink to stamp the mouse.
  29. Fussy-cut the mouse.
  30. Color the mouse with Copic markers.
  31. Trim the image panel and mat with grey cardstock.
  32. Adhere the cauldron to the image panel over the colored cat image.
  33. Adhere the mouse to the fussy-cut left paw.
  34. Adhere the second set of front legs and paws over their counterparts as shown.
  35. Adhere the fish skulls to the stew part of the cauldron. 
  36. Adhere the colored flames behind and over the cauldron as shown.
  37. Use Nocturne VersaFine Clair Ink to stamp the Bats Clear Polymer Stamps over the moon as shown.
  38. Use Gelly Roll Bold Line Stardust® Clear Glittering Inkto accent the outside edge of the moon.
  39. Mat the image panel with lime cardstock.
  40. Adhere the matted image panel to a black card.
Thanks for visiting today.

I shall enter this card into the following challenges:

Tuesday, October 11, 2022

Halloween: Making Spirits Bright

It's Tuesday which is my day to share a project created for Topflight Stamps! This week my teammates and I are showcasing Fresco Finish Chalk Acrylic Paints by PaperArtsy. Not surprisingly, I've created another Halloween card, this time with several stamps from the Eclectica ENB02 Rubber Cling Mounted Stamp Set by Nicci Battilana, the cocktail stamp from the Eclectica ENB06 Rubber Cling Mounted Set Set by Nicci Battilana, the tree branch from the Jofy 15 Rubber Cling Mounted Rubber Stamp Set by Jo Firth-Young, the sun from the Zini Mini 55 Rubber Cling Mounted  Stamp Set by Elena Zinski , and thirty-two (32) colors of Fresco Finish Chalk Acrylic Paints.

Here's the card!


Topflight Stamps Products Used:
Eclectica ENB02 Rubber Cling Mounted Stamp Set by Nicci Battilana for PaperArtsy

Other Products Used:
Solar White Classic Crest® Cardstock by Neenah Papers
140 Lb. Mixed Media Paper by Strathmore®
Avalanche and Raven Cardstock by Bazzill Basics Papers®
Tuxedo Black Memento™ Ink by Tsukineko®
Sky, Rose, Blush, Amethyst, Limelight, Mocha Mousse, Tikka, and French Roast Fresco Finish Chalk Acrylic Paints by PaperArtsy
Cut 'N' Dry Inkssentials Foam by Ranger Ink
Copic® Markers:
Cocktail: RV17, RV19, V06, V09, BV04, BV13, BV17, YR16, YR18, YG21, YG23, YG252, T0, t1, E40, E41, E42, YR31
Lamp Post Bat: BV20, BV23, BV25, N3, N4, N6, 
Lamp Post: RV02, RV17, RV95, V06, V09, BV13, BV17, YR16, YR18, Y17, Y32, C00, C0, C1, YG21, YG23Pale Rose, Warm Grey 3, Warm Grey 5, Grey, and Ochre Zig® Clear Color Markers by Kuretake
Dark Sepia and Black Pitt Artist Pens by Faber Castell
Black and White UniPosca Paint Pens by Mitsubishi Pencil Company
Spider Dies by Memory Box
Grass Die: Source Unknown
Red Sparkle Stickers by Stampendous!®
STAY-tion™ by Wendy Vecchi for Ranger Ink
Stamping Platform

Note:
When I started to think about this project, I took a look at the Eclectica ENB02 Rubber Cling Mounted Stamp Set by Nicci Battilana set as it's perfect for Halloween. I thought that it would be fun to make the ghosts really bright colors rather than white. The sentiment jumped into my head and I decided to add the cocktail from the Eclectica ENB06 Rubber Cling Mounted Set Set by Nicci Battilana set because cocktails contain spirits and add to the festive spirit!

Instructions:

My first steps were to create five pieces of brightly painted mixed media paper by adding drops of Fresco Finish Chalk Acrylic Paint onto pieces of Cut 'N' Dry Foam, smooshing the foam onto a craft mat, then randomly smooshing and sponging the paint onto Mixed Media paper.
  1. Yellow piece: drops of HaystackYellow Submarine, and Zesty Zing Fresco Finish Chalk Acrylic Paint 
  2. Orange piece:  drops of Peach Nectar, Tikka, Tango, and Brown Shed Fresco Finish Chalk Acrylic Paint.
  3. Pink piece: drops of Bubble Gum,  Prawn, Rose, and Bougainvillea Fresco Finish Chalk Acrylic Paint.
  4. Purple piece: drops of Amethyst, EggplantLavender, and Moonlight Fresco Finish Chalk Acrylic Paint.
  5. Green piece: drops of LawnGuacamole, Limelight,and Chartreuse Fresco Finish Chalk Acrylic Paint.
  6. Brown piece (for tree branch): drops of  Brown ShedMahagonyToffee, and French Roast Fresco Finish Chalk Acrylic 
  7. Grey piece (for tombstone): drops of SageStoneSnowflakeMoonlight, and Vintage Lace Fresco Finish Chalk Acrylic Paint.
  8. Set all the pieces aside for now.
  9. Trim the 9" x 12" piece of Mixed Media paper to 5.5" x 8.5".
  10. Brayer Summer Sky, Sky, Periwinkle, and Cloudy Fresco Finish Chalk Acrylic Paints horizontally across the paper to create the background. 
  11. Lightly brayer Vintage Lace and Rose Fresco Finish Chalk Acrylic Paints over the blue sky to add a touch of pink. 
  12. Heat set the painted background.
  13. Trim the painted background to 5.25" x 8.25".
  14. Use a stamping platform and Nocturne VersaFine Clair Ink to stamp the ghosts, tombstone, branch, and sun onto the painted pieces. 
  15. Heat set all the images.
  16. Fussy-cut all the images and use a black Pitt Artist pen to edge them.
  17. Use Zig Watercolor pens to add details to the stamped painted images. Heat set.
  18. Use Tuxedo Black Memento ink to stamp the cocktail from the Eclectica ENB06 Rubber Cling Mounted Set Set and the lamp post from the Eclectica ENB02 Rubber Cling Mounted Stamp Set onto Neenah cardstock. 
  19. Fussy-cut the images.
  20. Color the images with Copic markers.
  21. Edge the images with black markers.
  22. Use the grass die to cut the green painted piece three times.
  23. Trim the grass die-cuts to 5.25" wide.
  24. Adhere the three grass die-cuts to the base of the background panel.
  25. Adhere the lamp post, the cocktail, the tombstone, the tree branch, the ghostly spirits, and the sun to the image panel. 
  26. Use the spider dies to cut black cardstock.
  27. Use two round sparkle stickers to transform the large hanging spider into a Black Widow.
  28. Adhere the spiders as shown. 
  29. Use your computer or a label maker to generate the sentiment.
  30. Trim the sentiment into strips and adhere to the background. 
  31. Use Nocturne VersaFine Clair Ink to edge the image panel.
  32. Heat set the ink.
  33. Adhere the image panel to the reserved white 5.5" x 8.5" card.
Thanks for visiting today!

Being me, I forgot to add the challenges I was doing:
Lost Coast Portal To Creativity Challenge #153: 31 Days of Halloween
This is Halloween Challenges: Gothic or Halloween
Country View Challenges: Halloween or Harvest

Sunday, October 9, 2022

Another Halloween Card!

Here's yet another Halloween card created for Topflight Stamps! I guess I'm on a roll. I've been especially inspired by my latest Pink Ink Designs® Halloween stamp sets. This card was created with their Bewitched and Harvest Moon Clear Photopolymer Stamp Sets. I've used the Happy Halloween sentiment from the ever useful Classic Sentiments Clear Stamp Set by Heffy Doodle.


Topflight Stamps Products Used:

Other Products Used:
Solar White Classic Crest® Cardstock by Neenah Papers
Tuxedo Black Memento™ Ink by Tsukineko®
Blueish/Purpleish Cardstock by Bazzill Basics Paper®
Copic® Markers:
Witch's Skin: BV0000, BV000, E50, E21, E11, E00, E000, R20, R00, R000
Witch's Dress and Hat: BV08, BV17, YR23,  YR65, YR68
Apples: YG21, YG23, YG93; R22, R24, R37, R39; R05, YG23, YR21
Leaves: G20, G21, G24: YG21, YG23
Oak Leaves: YG03, YR21, YR23, R05
Mushrooms: R22, R24, R37, E42, E43, E44, E47; E70, E71, E74, E93
Stars: Y04
Pumpkins: YR27, YR65, YR68; YR04, YR07, YR18: YR61, YR82, E43, E44
Pumpkin Leaves: YG25, YG45
Cat: BV23, BV25, N3, N4, N5, N7, YG23, YR27
Black Small Brush Pen by Copic®
White Gelly Roll® Gel Pen by Sakura® of America
Pink Chalk Pencil by General's®
Scalloped Frame Die Set by GinaMarie Designs
Nameplate by Spellbinders®
Orange Rhinestone: Source Unknown
Stamping Platform

Instructions:
  1. Cut a piece of blueish/purpleish cardstock to 10" x 7". Score at 5" and fold to form a 5" x 7" card. Set aside.
  2. Use a stamping platform and Tuxedo Black Memento Ink to stamp the beautiful witch from the Bewitched Clear Photopolymer Stamp Set by Pink Ink Designs®  onto white cardstock panel.
  3. Color the image with Copic markers. 
  4. Use the white gel pen to add the white spots back onto the mushroom and to add a highlight to the red apple on Witch's hat. 
  5. Use pink chalk pencil to add additional blush to her cheeks.
  6. Use the stamping platform and Tuxedo Black Memento Ink to stamp the oak leaf cluster from the Harvest Moon Clear Photopolymer Stamp Set on the upper left side and the small leaf cluster from the Bewitched Clear Photopolymer Stamp Set on the right side. 
  7. Use Copic markers to color both sets of leaves.
  8. Use the stamping platform and Tuxedo Black Memento Ink to stamp the pumpkin, the pumpkin leaves, and the cat from the Harvest Moon Clear Photopolymer Stamp Set onto white cardstock.
  9. Fussy-cut all the images, color them with Copic markers, and use a black pen to edge them.
  10. Use the largest die from the Scalloped Frame Die Set to cut bluish/purplish cardstock.
  11. Trim the image panel and adhere the frame overtop. 
  12. Adhere the framed image panel to the reserved card. 
  13. Adhere the colored fussy-cut pumpkins, pumpkin leaf, and cat as shown.
  14. Use a small tag die to cut a scrap of white cardstock.
  15. Secure the die-cut to the stamping platform.
  16. Position the "Happy Halloween" sentiment from the Classic Sentiments Clear Stamp Set facedown on the the die-cut.
  17. Press the platform's lid onto the back of the stamp, lift the platform, ink the stamp with Fantasia VersaFine Clair Ink, stamp, and heat set.
  18. Adhere the sentiment die-cut as shown
  19. Add the orange gemstone to finish the card.
Thank you for visiting today!

I shall enter this card into the following challenges:

Tuesday, October 4, 2022

Halloween Diorama Card

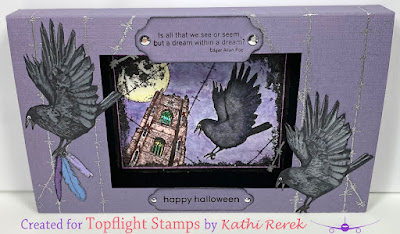
It's Tuesday which is my day to share a project created for Topflight Stamps! I've created a 7" x 5" Halloween Diorama card, which can stand on its own, yet folds to fit in a 7" x 5" envelope. I've used The Crow Unmounted Rubber Stamp Sheet 319 and The Crow Plate Unmounted Rubber Stamp Sheet 361 by Crafty Individuals with a sentiment from the versatile Classic Sentiments Clear Stamp Set by Heffy Doodle

Here's a front view of the card.


Here's a photo that shows that it's 3D and stands up!


Topflight Stamps Products Used:
The Crow Unmounted Rubber Stamp Sheet 319 by Crafty Individuals
Gold and Silver Diamond Sparkle Gemstones by Hunkydory Crafts 
Gelly Roll Bold Line Stardust® Clear Glittering Ink by Sakura®

Other Products Used:
Solar White Classic Crest® Cardstock by Neenah Papers
140 Lb. Mixed Media Paper by Strathmore®
Lavender and Black Cardstock by Bazzill Basics Papers®
Tuxedo Black Memento™ Ink by Tsukineko®
Black Soot Distress® Ink by Tim Holtz® for Ranger Ink
Copic® Markers: BV20 BV23, BV25, N4, N5, N6, T5, T7
Purplish Grey, Brown Grey, Warm Grey 3, Warm Grey 5, Warm Grey 6, Blue Grey, Cobalt, Lemon Yellow, and Green Zig® Clean Color Watercolor Pens by Kuretake
Black and Silver UniPosca Paint Pensby Mitsubishi Pencil Company
Silver Detail Embossing Powder by Stampendous!®
Nameplates by Spellbinders®
STAY-tion™ by Wendy Vecchi for Ranger Ink
Stamping Platform

Instructions:
1. Use Onyx Black VersaFine Ink to stamp The Crow Unmounted Rubber Stamp 319 onto Mixed Media paper.

2. Smoosh Della BlueViolet ChalkGraphiteSundance, and Henna Elements Ink onto a craft mat, spritz with water, and use a paintbrush to watercolor the sky, the church, and the moon. 

3. Use Zig Clean Color pens to color the crow. 

4. Use Uni Posca Silver Paint pen to color the barbed wire on the edges of the scene.

5. Use the Gelly Roll Bold Line Stardust® Clear Glittering Ink by Sakura to add a touch of glitter to the moon. 

6. Use a black Uni Posca pen to extend the image panel and to edge it.

7. Use Tuxedo Black Memento ink to stamp the crow from the The Crow Plate Unmounted Rubber Stamp Sheet 361 two times.

8. Fussy-cut the crows, color them with Copic markers, and edge them with a black pen.

9. Use  Della Blue and Violet Chalk Elements Inks to stamp the three feathers. 

10. Fussy-cut the feathers and edge them with a grey or black marker.

11. Use Onyx Black VersaFine Ink to stamp the Poe sentiment from the The Crow Plate Unmounted Rubber Stamp Sheet 361 onto lavender cardstock and heat set it.

12. Cut the Poe sentiment with a nameplate die and edge with Black Soot Distress ink.

13. Use Onyx Black VersaFine Ink to stamp the "Happy Halloween" sentiment from the Classic Sentiments Clear Stamp Set onto lavender cardstock and heat set it.

12. Cut the Halloween sentiment with a nameplate die and edge with Black Soot Distress ink.

13. Cut black and lavender cardstock to 7" x 5.75".

14. Score .75" from the top and bottom as shown below.


15. Adhere the scene from the The Crow Unmounted Rubber Stamp 319 to the center of the black back panel of the card.

16. Use Onyx Black VersaFine Ink to stamp the barbed wire from the The Crow Plate Unmounted Rubber Stamp Sheet 361 onto the lavender front diorama panel.

17. Add Detail Silver Embossing powder to the panel, dump off the excess, and heat set.

18. Adhere the two crows, the feathers, and the sentiments were adhered to the front of the diorama as shown. 

19. Use two-sided tape or liquid glue to adhere the front panel to the back panel.

20. Add Silver Diamond Sparkle Gemstones to the nameplates to finish the card.

Thanks for visiting today!

I shall enter this card into the following challenges:
Lost Coast Portal To Creativity Challenge #153: 31 Days of Halloween
This is Halloween Challenges: Gothic or Halloween