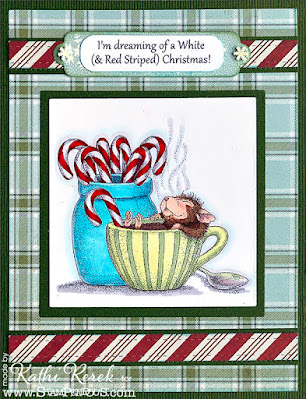
It's the last day of July so I'm sharing one last Christmas card for now. It's a shaker card featuring the wonderful new Peppermint Hair House-Mouse Designs® Rubber Stamp by Stampendous!®
Stampendous!® Products Used:
Mixed Media White PaperTuxedo Black Memento™ Ink by Tsukineko®
Other Products Used:
Classic Green and Grey Mono Cardstock by Bazzill Basics Paper®
Copic® Markers:
Mouse Skin: BV0000, BV000, E51, E50, R00, R01, R20 (Cheeks), R20 (Noses)
Mouse Skin: BV0000, BV000, E51, E50, R00, R01, R20 (Cheeks), R20 (Noses)
Fur: E34, E37, E44; E23, E25, E37, T1, T3, T5
Candy Canes and Snowman Mouth Candy: R24, R37, N0, N1
Snowman Eyes Candy: Y67, G07
Snowman Nose: B00, B12,YG67, G07
Snowman; B0000, B60, RV0000, C00, C0, C1, C2, B0000, B000,
Scraps of Patterned Paper by My Mind's Eye
Acetate from packaging
Rectangle Dies
Black Crafty Foam Tape by Scrapbook Adhesives® by 3L
Used Dryer Sheet
Christmas Candy and White Snowflake Sprinkles by Kat Scrappiness
Instructions:
Black Crafty Foam Tape by Scrapbook Adhesives® by 3L
Used Dryer Sheet
Christmas Candy and White Snowflake Sprinkles by Kat Scrappiness
Instructions:
- Cut a piece of 8.5" x 11" green cardstock to 7" x 10", score at 5", and fold to form a 7" x 5" card. Set aside.
- Use Tuxedo Black Memento ink to stamp the image onto mixed media paper.
- Color the images with Copic markers.
- Trim the image panel to 3.75" x 3".
- Cut green cardstock to 3.875" x 3.125".
- Mat the image panel with green cardstock. Set aside.
- Cut grey cardstock to 6.75" x 4.75"
- Use a rectangle die to cut two openings in the grey cardstock as shown.
- Use the Merry and Christmas dies from the Truck Load Die set to cut green cardstock.
- Adhere the matted image panel and the sentiments to the grey cardstock as shown.
- Flip the card over and adhere the acetate pieces over the apertures.
- Rub the acetate sheets with the dryer sheet.
- Add a double layer of Black Crafty Foam Tape around the perimeter of both apertures to form wells for the shaker contents.
- Add the shaker contents to both wells.
- Cut a piece of patterned paper large enough to cover both openings.
- Remove the backing from the foam tape and place the patterned paper face-down onto the tape, covering the shaker contents.
- Add pieces of doubled Black Craft Foam Tape to the edges of the back of the cardfront.
- Adhere the cardfront to the green card.
Thanks for visiting today!


