Friday, August 31, 2012

A Smile for Labor Day Weekend!

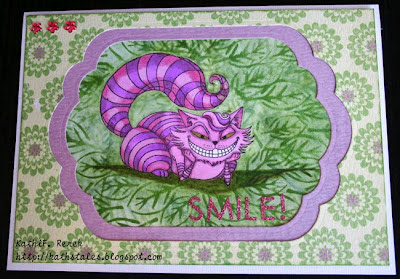
Here's the Cheshire Cat by Kraftin' Kimmie stamps.


He was colored with Copic markers in the Disney-esque color combination of purple and hot pink. I did use some Spica glitter pen coated with Glaze pen for his eyes.

Cheshire Cat is nestled into the leaves created by airbrushing Copic markers and sponging Mowed Lawn Distress ink through the Leaf Frame stencil from The Crafters Workshop.

Patterned papers are by My Mind's Eye. Glitter stickers were added for the sentiment and three hot pink rhinestone flowers were added to finish up the card. (Note: For some reason, the pink flower rhinestones came out reddish in the photo.)

Thanks for visiting today.

I shall be entering this card into the following challenges!
Kraftin Kimmie's Blog Challenge 143 - Make a SCENE!!
Simon Says Stamp & Show "Inspired by Summer Distress" Challenge
Outlawz Copic/Promarker Friday: "Anything Goes"


Wednesday, August 29, 2012

Bombshell's Fifth Anniversary Hump Day Hop!

Welcome to the last stop of our Fifth Anniversary Blog Hop. I hope you've gotten here from Kas's blog, but if not, you can always check the list below and start at the beginning!

Alison, our gorgeous and talented Hump Day Hop Captain, has decreed that August's blog hop theme is "Let's Hear it for the Boys!".

Here's what she had to say about the theme!
This month's theme is "Let's Hear it for the Boys." You can interpret that as you like, but I can assure you that you will be singing that oh-so-popular 80's song from Deniece Williams for the next week. You're welcome.

I used my August sketch for Bombshell:


Here's my challenge card, which enlarges if you click it:
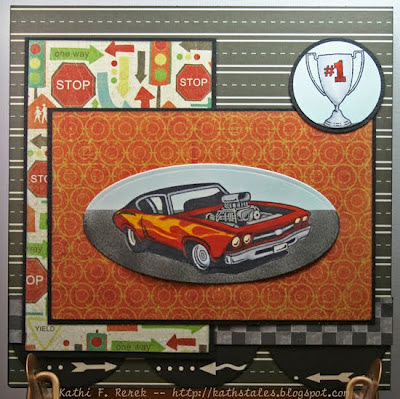

The card features the Fastback Muscle Car and Trophy from the Vintage Raceway set with a flame from the Hearts on Fire set.

The Fastback Muscle Car was stamped and masked with Post-its. The flame was stamped with Wild Honey Distress ink. The car and flame were then colored with Copic markers. It was masked again, this time with Winsor & Newton masking fluid and then the sky and road were airbrushed using the Copic airbrush system. When I lifted the dried masking fluid, I found that it had discolored the silvery/Cool Grey areas (engine parts, bumpers, and other chrome bits), so I had to go over them with darker Cool Grays. Oh well. That's the first time that the masking fluid had done that!

The road sign and orange & yellow patterned papers are by MME, the arrow patterned paper for the scallops on the bottom is old Scenic Route, and the checkerboard paper is ancient KMA patterned paper!

Since I'm the last stop on the hop, I thought I'd tell you that you still have a few days to participate in Bombshell's August Challenges, which can be found in The Casino area of Bombshell's forum. You do NOT have to use Bombshell stamps for the challenges this month, though you'll receive an extra chance to win your choice of a free Bombshell set if you do.

I also would like to encourage you to try out to become a Bombshell Pin-up, which is what we call our guest designers. The deadline for the application is September 14th and you can find more information HERE on Bombshell's blog!


Here's the blog list in case you got lost!
Bombshell Blog: http://bombshellstamps.blogspot.com/
Alison: http://alisonsrandomthoughts.blogspot.com/
Alex: http://www.paperandstring.blogspot.com/
Rachael: http://rachaelshandmadedesigns.blogspot.com/
Alaine: http://missalaineousmosaics.blogspot.com/
Kelli: http://www.cajunstampingqueen.blogspot.com
Jodi: http://www.elamdesign33.blogspot.com/
Laura: http://craftylittlewoman.blogspot.com/
Sparkly Mary: http://sparkly-train.blogspot.com/
Terra: http://www.moresmearedink.blogspot.com
Kim: www.craftypinkanchor.blogspot.com
Stempelientje: http://stempelientje.blogspot.com
Nicole: http://madebynicole.blogspot.com
Glittery Katie: http://ferrishyn-frontier.blogspot.com
Kas: http://www.artloveschaos.blogspot.com
Kathi: http://kathstales.blogspot.com
Monday, August 27, 2012

Beary Sweet Pals!

Susana, of SCACD fame, offers amazing service! Not only does she ship quickly, she's accurate and includes great goodies that are not fattening. Gotta love that.

My "Beary Sweet Pals" card is based on sketch by Pals Paper Arts challenge blog.

Here's the sketch:


Here's my card:


The stamp is called The Secret and is by Elizabeth Bell for SCACD. I really love the bear's facial expression! She looks downright shocked, though I can't imagine what could be so shocking and/or scandalous coming from that adorable little girl!

I colored the image with Copic markers and tried to add cast shadows. However, I think I managed to completely mess up the light source and hence the shadows. Oh well. It's still kinda cute and I'm moderately happy with it. Plus, it reminds me of an outfit my daughter used to wear when she was a cute little girl and liked pink! I don't think she'd be caught wearing pink these days unless it was pink with skulls on it! Oh yeah. I put Glaze pen accents on the bear's nose, eyes, and buttons.

The patterned papers are all from the Bittersweet 6x6 pad by Basic Grey. I love using older stuff, so I can get newer stuff. I'm now over getting multiples of paper and paper pads. There's always something new and better out there. It took me 12 years of paper crafting to figure that one out. Oh well. The papers are kind of busy together, but I think that the focus remains on the sweet stamped image. Or at least I hope so! :D

Thanks for visiting today.

I shall enter this card in the following challenge(s).
Pals Paper Art Challenge Blog: Sketch Challenge

Sunday, August 26, 2012

From card to wall-hanging!

Last December, I created a card that I truly loved. It was for the December "Steampunk Challenge". However, it was a bit fragile so I had put it somewhere safe. When I went to retrieve it, I discovered that the adhesive that held the card front to the card had failed, so I decided to pull it up and create a wall-hanging with it.

Here it is:


Here's the description from the original posting. I had to take down the photo because the card had been subsequently picked up by Scrapbook News & Review magazine.

I stamped the biggest butterfly from the Butterfly Dreams set onto the reverse of a piece of patterned kraft paper from the Tim Holtz' Kraft Resist Ideology Paper Stack using Onyx VersaFine ink. I then heat embossed the image with clear embossing powder and colored it with Copic markers. The Copics blended fine on the cardstock, though the kraft color influenced their color. When I was pleased with the butterfly, I "fussy cut" the wings and edged them with black marker because I can't abide contrasting edges. Must be the Virgo in me.

I took a piece of butterfly patterned paper from the same pad, embossed it using Clockworks Cuttlebug folder, inked it with Chipped Sapphire, Broken China, and Worn Lipstick Distress Inks, distressed the edges, then edged with Black Soot Distress Ink. Three metal coins from EK Success were colored with Copic markers and ribbon was used to position them following the sketch.

I found a piece of cloudy blue vellum in my stash which was die cut with a Spellbinders die. The butterfly's wings were adhered with different levels of dimensional adhesive. Watch parts became the butterfly's body and antenna and were adhered with Matte Accents. I actually learned from past mistakes and set the piece aside overnight.

When I was assured that everything was dry and secure, I adhered the vellum/butterfly piece to the card's front, added some Ideology Game Spinners, used some rhinestone brads to add some bling, then stamped the sentiment and die cut it.

To make it into a wall hanging, I grabbed a piece of Kraft Resist Ideology Paper and a Butterfly stencil by The Crafters Workshop. I sponged Distress inks through the stencil onto the Kraft Resist cardstock, then mounted it onto really seriously thick black cardstock.

I adhered a key to a butterfly charm and added some tiny watch parts to the top of the key and coated them with Matte Accents.

The two charms on either side of the butterfly were created from EK Success metal coins, gears, Ideology Game Spinners, and rhinestone brads.

All three dangles were adhered to ribbon and hung from old, Old, OLD Karen Foster brads that had hooks on 'em. Very useful indeed.

Here's a close-up view of the three dangles. Click on it to see a larger version!


Thanks for visiting today.

This piece shall be entered into the following challenges:
Simon Says Stamp & Show: No Rules challenge

Craft Your Passions Challenge Blog #124: Power of Three

Saturday, August 25, 2012

Gone missing!

My mojo disappeared a while back, so I kept busy by reorganizing my unmounted stamps into labeled binders. My bookcase looks marvelous and this system will make things easier for me to find, since I tend to forget where I put stuff.

I discovered some treasures while organizing, including Woman Looking stamp by River City Rubber Works. So I made this card.


She was colored with Copic markers. The patterned papers are from a Bazzill Basics Wayfarer 6x6 padand have a lovely texture. I used an Ideology Compass mask with Distress Ink over the map paper to add an additional design element to reinforce my "missing" theme.

The sentiment strip was computer generated onto MME Lost & Found patterned paper (somehow fitting, don'tchathink?), then punched, then inked with Distress inks. Three Rain Dots were added to the top left to finish off the card.

Thanks for visiting today.

I shall enter this card in the following challenge(s):
Simon Says Stamp & Show: No Rules challenge

Craft Your Passions Challenge Blog #124: Power of Three

Friday, August 24, 2012

Dominos v2.0

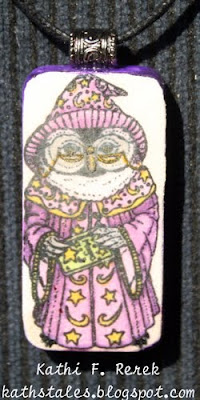
I told you last week that I'd be back with more altered dominoes for the domino challenge over at Third Coast Creative Coterie Challenge Blog, so here they are.


This time I stamped the images onto cardstock, colored them with Copic markerss, adhered the stamped, colored cardstock to the dominoes with gel medium. When it was dry, I sanded off the excess paper from the edges of the dominos. They were heat emboss with clear embossing powder and a layer of Glossy Accents was added to them. Then they were left overnight to cure completely.

When that was done, I colored the edges of the dominoes with Pentel Metallic pen. Ultra-stinky E6000 was used to adhere large pewter beads to the top of the dominoes to act as bales.

The dominoes were left in the garage for a few days to become dry and less stinky. When I could deal with them, I added leather cording and took the photos of the necklaces posed on a black office chair. If you look closely, you can see the cat fur on the chair. How exciting!

I should mention that I used a rub-on from Wordsworth/Rubber Soul for "dance" on the dancer domino. I also used metallic pens by Pentel on the sides of the dominoes.

The stamps that I used were Wise Old Wizard Small (DT-114-D) from Third Coast's Early Spring '07 supplement and Chile Ristra (AP-184-G) from Third Coast's Summer '05 supplement.

Thanks for visiting today!

Thursday, August 23, 2012

Steampunk Kitty!

Behold the Steampunk Kitty, who is master of all he surveys! His watch keeps him on schedule, his goggles keep the UV rays to a minimum, and his breathing apparatus enables him to breathe while flying about in the upper atmosphere. He's one cool cat!


Steam Kitty (KG-050-L) lives on page 28 of the Spring '12 Supplement. He was colored with Copic markers. Glossy Accents was added to his eyes, goggle lenses, and watch face. I also used Solid Gears Border Large (CO-277-I) can be found on page 15 of the Spring '12 Supplement, Gear Corner Narrow (CO-278-G) can be found on page 16., and Steampunk Grunge (WS-185-D) is on page 18.

The patterned papers are from the 6x6 Timepiece pad by Bo-Bunny!

This card shall be entered in the following challenge(s)!
Simon Says Stamp & Show: No Rules challenge

Sunday, August 19, 2012

Late for one, on time for another.

Bwa ha ha. I've gotten really good at procrastinating.

In fact, this is the second card that I started this week and didn't finish in time for the challenge deadline. Bad, bad ADHD me.

I started to create this card for Kenny K's Krafty Krew's Challenge 106, "Sun, Sea, and Sand", but didn't finish it time for the deadline. However, since it was 95% done before we went out to dinner, I finished it when we got home. BTW, dinner was delish and we had a really great time with friends.

Thankfully, the card will work for one challenge, namely Outlawz Copic/Promarker Friday's "Splash" challenge.

I must warn you it's a bit demented. That's what happens:
a) when you're me.
b) when you're me in a really odd mood.
b) when you create during "Shark Week".

So, without further ado:


So, the image is Inner Tube Girl and was a freebie from Kenny K Downloads. The sharks are from a google image that I adapted to my use. The scene was colored with Copic markers. Clear Glaze pen was added to the tube, her hair (to make it look wet), and her eyes. Pearl Paint Dabber was added to the water drops.

I punched a circle in scrap paper, sponged Mustard Seed Distress ink over it onto light blue cardstock to become the sun. Then I sponged Wild Honey over a circle burst stencil by The Crafters Workshop to become the sun rays.

The "sentiment" was created from very old ribbon and Doodlebug rub-ons on an equally old QuicKutz tag. The patterned paper is also very old, from the late, lamented Flair Designs.

Thanks for visiting today!

I shall be entering the following challenge(s)
Kenny K's Krafty Krew's Challenge 106, "Sun, Sea, and Sand"
Outlawz Copic/Promarker Friday's "Splash" challenge.

Friday, August 17, 2012

Third Coast Creative Coterie Challenge!

Uh-oh Domino! That's right, Third Coast Creative Coterie Challenge Blog is holding an Altered Domino challenge! Leigh, who is in charge of the Challenge Blog, is also known as the Sharpie Domino Queen, so it's only fitting that she challenged us to use our Third Coast stamps to create altered dominos! You should participate for a chance to win a fabulous prize!!!

These are the dominos that were part of my Fubar run last week. I had initially stamped with Adirondack ink, heat set, then colored them with Prismacolor markers. I heat set them again. Then when I went to test them, the ink got all smeared. Bummer. So I put them aside and called the project a failure.

The next day, I decided that I would stamp on cardstock, color with my beloved Copics, then adhere them to the domino, heat emboss, the coat with Glossy Accents. But being a frugal me, I thought that I should recycle the Fubarred dominos by cleaning them off with rubbing alcohol.

I was shocked and delighted to see that the smears disappeared with some of the ink, leaving subdued pastel images behind. Here they are!

Eastern Dancer (VB-123-C) from Third Coast's Early Spring 07 supplement


Wise Old Wizard Small (DT-114-D) from Third Coast's Early Spring 07 supplement


Chile Ristra (AP-184-G) from Third Coast's Summer '05 supplement.


Once I saw that these were so cool, I went ahead and altered an additional three dominos using the same stamps as above. I'll share those next week!

Meanwhile, go hop on over to the Third Coast Creative Coterie Challenge Blog and see what the other gals have created.

Thanks for visiting today!

Saturday, August 11, 2012

Favorite Ice Cream Flavor Challenge!

Last week, Kenny K's Krafty Krew challenged us to create a project inspired by our favorite ice cream flavor. I'm not a big fan of ice cream, but I do like Mint Chocolate Chip ice cream.

I also used this week's sketch (#220/1) from Sketch Saturday's challenge blog.


Here's my card using Captain Locke!


Captain Locke was colored using Copic markers, which were chosen to represent Mint Chocolate Chip ice cream and to go with Graphic 45's Steampunk Debutante 8x8 pad. I've used the heck out of this pad, so I clearly will need to get another. But back to the project. . .

I colored her using some of the new stuff I learned last Saturday. I have a light source. I chose colors using the 10 + 2 rule to give more contrast. And I have a few cast shadows. I couldn't figure out the floor shadow, but such is life. Black Glaze pen was added to the buttons and silver/grey Glaze pen was added to the nailhead/studs on the bag. The shoes and goggle lenses were coated with clear Glaze pen.

Here's a close-up.


The sentiment was created using Maya Road rub-ons. Gosh. I wish more companies made alphabet rub-ons in cool fonts and smaller point sizes. The sentiment piece was matted with some leather-look specialty paper by FiberMark. I used strips of that same paper for the the horizontal elements. Staples from my ever-so-useful Tiny Attacher added a bit of visual interest.

Thanks for visiting today!

I shall enter this card in the following challenges.
Sketch Saturday's challenge blog
Kenny K's Krafty Krew's Favourite Ice Cream Colours Challenge

Friday, August 10, 2012

Oops! Or time flies...

Greetings earthlings! I bet you were wondering what had happened to me, that is all three of you who visit my blog. Ha!

I haven't stopped crafting. I was just busy getting stuff submitted and trying my hand at some new stuff. If you look down at the sidebar on the right, you'll notice that my blog is sporting a spiffy new item.

Yep. I attended an Intermediate Copic class last week and am newly certified. The class was taught my the enthusiastic, entertaining, and super-talented Colleen Schaan with an able assist by the lovely and also-seriously talented Lori Craig.

It was a long class, but I was sitting with some fabulous people and I learned a lot. I'm embracing "the dark side" with my color choices and am trying to use what I've learned. I'm still processing a lot of the information, which will no doubt result in some total failures. That's cool because I do learn from my mistakes. It's odd for me to plan light sources and such like. I guess I'm not used to thinking while I create. :D

Here's one of my experiments.


The stamp is Hailey's Heart (AB-007-V) from Third Coast's Spring 2012 supplement. She and her sister live on page 53.

I was trying to get away from "Vampire" coloring, which is totally out of my comfort zone. I was really happy using very light colors with subtle shading for the skin of my people. This one uses E000, E02, and E4. Yikes. Really, really scary. I went with some fairly strong contrast on her face because she's on the edgier side.

I also learned that people really do have halos, especially me. *snicker* So, I put a halo into her hair. I also added two cast shadows. Brave me.

The patterned papers are ancient Daisy Bucket papers that had hearts and dots and worked well with my plan, so I matched the BG colors and R colors to the paper. I cut the sentiment pinked circle from the patterned paper and added a few gemstones to finish it. I used one of my tried and true "go to" designs, because I was feeling lazy.

Why was I feeling lazy? Well, I colored her once, then a C3 marker ran dry, so I refilled it and it dripped directy into the center of her face. FUBAR#1. So I stamped it and colored it again. The eyes came out blotchy, so I made them the last thing to do. I fixed the pupils with black, then proceeded to color the irises. Except, I colored the white of the left eye, after coloring the right eye correctly. *sigh. FUBAR#2. So I went for the hat trick, but didn't screw it up. Woot! Yay me.

In addition to those two epic fails, I also have been trying to stamp and color on dominos with totally ghastly results. Twice. Sigh.

Anyways, thanks for visiting today!

Monday, August 6, 2012

Bombshell Stamps Sale!!!

Bombshell Stamps is celebrating their Fifth Anniversary with a sale!

25% off everything in the store, but you need to hurry over there right now because the sale ends tomorrow, August 7th at 11:59 p.m. PDT!

Use coupon code "BDAY5"

Hurry! Hurry! Hurry!!!

Friday, August 3, 2012

Welcome to Happy Town!

You can probably tell that I was in a whimsical mood when I created this card.


I was in the mood to create a scene, so I pulled out my Happy Town stamp by Victoria Case for SCACD. Since I sometimes like to create back stories for my stamps, I tried to figure out who might live in this cute village and remembered all the Chicklet stamps by the late lamented Odd Bird Planet.

So I stamped the lady & gentleman chicklets, masked them with Cansor & Newton masking fluid, then stamped Happy Town. I decided that the scene was missing a little something, so I added the little something fairy chicklet atop one of the houses and a trio of hearts.

I lifted the mask, colored the scene with Copic markers, masked again with masking fluid, airbrushed the background, lifted the mask, added glitter and Glaze pen accents to the windows, a lovely glittery skirt to the fairy chicklet, and then wrote a huge run-on sentence to describe my process. BTW, I colored first, then chose papers, which is a deviation from my norm. Oddly freeing.

We know a lot of folks (including ourselves) who celebrate anniversaries this month, so I added a Paper Trey Mixed Messages sentiment to a die cut.

The striped pattered paper is by Basic Grey and I'm not sure who makes the paper with the big dots.

Thanks for visiting today!

Wednesday, August 1, 2012

Queen of everything...

Simon Says Stamp & Show "What do you say?" challenge has inspired me to create this card. Actually, the challenge made me go through my stickers and rub-ons to organize them. While going through those drawers, I found some great cat-themed stuff.

Hence, this card...


which is based on this sketch from Craft Your Passions challenge blog:


I flipped the sketch and used crowns instead of flowers.

Pretty Kitty (VB-108-J) by Third Coast Rubber Stamps reminds me of my familiar, Duchess, who is a fluffy tabby ragdoll/American shorthair mix. However, there is no way that Duchess would deign to wear a frilly collar like that. She's way too regal. This Pretty Kitty stamp lives on page 17 of the New Year '07 supplement.

Anyways, I was so happy with the trees in the Painted Ladies card (below) that I decided to use the same dot technique, using the W series of Copic markers. I dotted the lightest color, dotted the darker colors, blended them out, added some shading,tabby striping, and suchlike. I got a bit heavy-handed with the blending and the blender wasn't pushing the color back into the lines, so I opted to outline the kitty with a darker color and chose a BV marker. I wanted to use some papers from my stash that had crown designs and came up with MME Bohemia and Imaginisce cardstock and matched custom less-than-R81, R81, R83, and R85 for the collar and ribbons.

The sticker on the upper right is from 7 Gypsies and the rub-on on the bottom left is from Junkitz (Remember them?).

The crowns were cut from shimmery white cardstock using a QuicKutz die. I adorned the crown with purple and lavender gems.

I'm sewing impaired and this apparently applies to faux-stitching too. I used an EK Success rolling poker gizmo tool with a scoring board, then used Spica Lavender glitter pen to add the faux stitching. Poorly.

So there you have it.

Thanks for visiting today!

I shall be entering this card in these challenges:
Simon Says Stamp & Show "What do you say?" challenge
Outlawz Copic/Promarker Friday: "Anything Goes"
Craft Your Passion # 121: Sketch