Thursday, October 31, 2019

Happy Halloween!

It's hard to believe that my time as Topflight Stamps' October Guest Designer has come to a end. At least I get to close out my month with a Halloween project! 

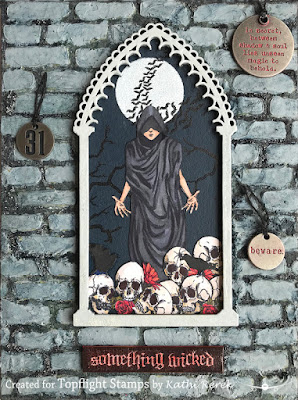
Here's my Halloween mixed media canvas!


Products Used:
Topflight Products used:
PeacoatBaltic Blue, Stone, London Bus, and Snowflake Fresco Finish Chalk Acrylics by PaperArtsy
Grey and White Brusho®  Crystal Colours  by Colourcraft®

Other Products Used:
Solar White Classic Crest® Paper by Neenah Papers
Tuxedo Black Memento™ Ink by Tsukineko®
Reliquary Arch Top by Gypsy Soul Laser Cuts
Canvas Panel
Copic® Markers: 
   Guardian Angel Skin:  E000, E00, E11, E21, E50, BV0000, BV000, BV20
   Guardian Angel Robe: BV23, BV25, BV29, N4, N5, N6
   Skulls: YR30, YR31, W00, W0, W1, W3, W9
   Roses: R02, R08, R22, R24, R27, R39, RV99, YG97, YG99
Black Media® Gesso by DecoArt®
Media® Sand Texture Paste by DecoArt®
Brick Stencil by The Crafter's Workshop
Media® Matte Medium by DecoArt®
Frost Dazzle VersaMark™ by Imagine Crafts®
Clear Detail Embossing Powder by Stampendous®
On Point Glue by Imagine Crafts®
Mini Art Stones by Prima Marketing Inc.
Tim Holtz® Halloween Quote Chips by Idea-ology®
Tim Holtz® Halloween Quote and Muse Tokens by Idea-ology®
Tim Holtz® Distress® Crazing Collage Medium by Ranger
Tim Holtz® Fired Brick Distress® Ink by Ranger
Black Jute Ribbon by American Crafts™
Small circle die or small circle punch
White Chalk pencil by General Pencil Company
Jet Black StazOn™ Ink by Tsukineko®

Instructions:
  1. Using Memento ink, stamp the angel from the Guardian Angel Clear Polymer Stamp Set and the skull border from the Skullduggery Border set onto Neenah cardstock.
  2. Fussy-cut the images, color with Copic markers, and edge with a black marker. Set aside.
  3. Using Peacoat and Baltic Blue Fresco Finish Chalk Acrylic paints, paint the base of the Reliquary. Heat set.
  4. Use a circle punch or a circle die to cut a circle from a plastic looseleaf divider. 
  5. Sponge Snowflake Fresco Finish Chalk Acrylic over the circle onto the top of the reliquary base to create a moon. Heat set.
  6. Using Onyx Black VersaFine ink, stamp the Bat Colony over the moon then stamp the Tree Branch onto both sides of the reliquary base. Heat set.
  7.  Cut the skull border, then glue the pieces to the bottom of the reliquary base as shown.
  8. Adhere the angel as shown. 
  9. Set aside the base of the reliquary.
  10. Paint the top of the reliquary with Stone Fresco Finish Chalk Acrylic paint.
  11. Press the painted reliquary top into the VersaMark ink pad. Sprinkle with clear Detail embossing powder, and heat set. Repeat.
  12. Glue the top to the bottom of the reliquary arch.
  13. Apply black gesso to the canvas panel. 
  14. Add Grey and White Brusho Crystal Color into the Texture Sand Paste, mix well, and spread over the canvas. 
  15. When dry, trace the arch was traced onto the canvas as desired with a chalk pencil.
  16. Add Grey and White Brusho Crystal Colors to Grunge Paste, mix well, and spread over a brick stencil onto the canvas avoiding the traced area. Let air dry.
  17. While the canvas dries, brush London Bus Fresco Finish Chalk Acrylic paint onto metal tokens, then wipe. 
  18. Back the  "31" token with black cardstock. 
  19. Thread Black jute through the holes in the metal tokens.
  20. Edge a Quote Chip with red marker, then apply a layer of matte medium, let dry,
  21. Brush a thick layer of Distress Crazing Medium overtop and let dry.
  22. Apply red Distress ink over the crackles, wipe, and repeat if necessary.
  23. When the Grunge Paste bricks on the canvas are dry, apply glue to selective areas of the "mortar", then shake Mini Art Stone into the glue. Let dry.
  24. Shake some Grey Brusho Crystals onto a craft mat. Spritz with water, mix, then brush onto the canvas to add color and depth to the bricks, the mortar, and to tint the stones.
  25. Adhere the arch, tokens and quote chip to the canvas.
  26. Edge with Jet Black StazOn ink to finish the piece.
TW, Some links in this post are affiliate links which do not affect the price you pay but allow me to earn a small percentage of a sale. Thanks! If you shop at Topflight Stamps, please use my coupon code, KATHIREREK855, for 10% off your order.

Have a great Halloween and stay safe!
Thursday, October 24, 2019

Rock On!

It's my fourth week as October's Guest Designer over at Topflight StampsToday's cards feature the Rock Out Clear Polymer Stamp Set by Visible Image and Brusho Crystal Color by Colourcraft, which were used to create the background for both cards.


Here's my first card with the Rock Out Clear Polymer Stamp Set and the Play Guitar Stencil.


Here's my second card with the Rock Out Clear Polymer Stamp Set and the Time Tunnel Stencil. I must note that my mad photographic skillz made this card a different size, when in reality both cards are standard A2s. *shrug* 


Products Used:
Rock Out Clear Polymer Stamp Set by Visible Image
Time Tunnel Stencil by Visible Image
Brusho® Crystal Color by Colourcraft
Sea GreenLeaf GreenEmerald GreenYellowSunburst YellowTurquoise Cobalt BlueUltramarine, and Crimson  Brusho Crystal Color by Colourcraft
Onyx Black VersaFine™ Ink by Tsukineko®
140 lb. Watercolor Paper by Strathmore®
Blueprint Sketch, Salty Ocean, and Black Soot Tim Holtz® Distress® Ink by Ranger
Play Guitar Stencil by Visible Image
Music Stencil by Newton's Nook Designs
Happy Birthday Sentiment from one of the House-Mouse Designs® Mini Clear Stamp set by Stampendous
You Rock Rubber Stamp by A Muse Studio® Stamps
Sentiment Banners Honey Cuts Dies by Honey Bee Stamps
Framed Oval Die, Source Unknown

Brusho Crystal Colors are such fun to use to create a painted background quickly. There are many ways to use them, but I went for my tried and true method.

To create the background paper for both cards:
  1. A piece of 9" x 12" piece of watercolor paper was spritzed with water, then sprinkled with Sea Green, Leaf Green, Emerald Green, Yellow, Sunburst Yellow, Turquoise, Cobalt Blue, and Ultramarine Brusho Crystal Color powders. 
  2. Water was lightly spritzed and left for a few moments to let the colors spread, then the paper was heat dried. 
  3. This process was repeated until I was happy with the color combination. 
  4. I decided it needed a pop of red, so Crimson Brusho Crystal Color was sprinkled sparingly and spritzed with water. 
  5. The paper was heat set until it was absolutely bone dry. 
  6. The background paper was cut in half, then run through my Big Shot to flatten it. 
  7. An oval frame die was used to die-cut the colored paper and black cardstock two times. All edges were sponged with Salty Ocean and Black Soot Distress inks. One set was set aside for my second card. 
To create the guitar card:
  1. The watercolor oval and the black oval frame were taped together on the back,  
  2. Blueprint Sketch Distress ink was sponged over the Play Guitar stencil, then heat set. 
  3. This was temporarily adhered to scrap paper and secured to the base of a stamping platform with magnets.
  4. The guitar stamp fwas positioned face down onto the oval, the lid of the stamping platform was pressed onto the stamp, and lifted.
  5. The stamp was inked with Onyx Black VersaFine ink, then stamped onto the oval. 
  6. This step was repeated until I got the coverage I wanted.
  7. The panel was removed from the platform then adhered to a black A2 card.
To create the birthday card:

  1. For this card, I separated the oval and the oval frame before stenciling and stamping. 
  2. Salty Ocean Distress ink was sponged over a music stencil onto the rectangular frame.
  3. Salty Ocean Distress ink was sponged  the the Time Tunnel Stencil onto the oval. 
  4. The guitarist stamp was positioned face down onto the oval, the lid of the stamping platform was pressed onto the stamp, and lifted.
  5. The stamp was inked with Onyx Black VersaFine ink, then stamped onto the oval. 
  6. This step was repeated until I got the coverage I wanted.
  7. A banner die was used to cut leftover scraps from the half the was die-cut. 
  8. Using Salty Ocean Distress ink, the two banners were stamped with the Grungy Stars border from the set. 
  9. The sentiments were stamped overtop with Onyx Black VersaFine ink.
  10.  The oval frame card front was adhered to a blue A2 card, then the black oval border, guitarist image panel, and sentiments were adhered to finish the card.
BTW, Some links in this post are affiliate links which do not affect the price you pay but allow me to earn a small percentage of a sale. Thanks! If you shop at Topflight Stamps, please use my coupon code, KATHIREREK855, for 10% off your order.

Thank you for visiting today!

Tuesday, October 22, 2019

Cat Lovers Blog Hop!


I recently found out about a CATegorically fabulous blog hop and decided to participate. The 2019 Cat Lovers Hop is sponsored by Her Peaceful Garden and a plethora of wonderful companies! Join us as we celebrate all things cat, right before International Cat Day, which is October 29th. There will be prizes! In fact, Stampendous will be one of them! Check the Stampendous blog for more info!

Here's my card with Stampendous' fabulous new Autumn Truck Rubber Stamp.


Products Used:
Stampendous Products Used:
Autumn Truck Rubber Stamp
Decor Cling Music Rubber Stamp
Tuxedo Black Memento™ Ink by Tsukineko®
Onyx Black VersaFine™ Ink by Tsukineko®

Other Products Used:
Solar White Classic Crest® Cardstock by Neenah Papers
Copic® Markers Used:
   Car: RV52, RV63, RV91, RV93, RV95
   Car Bumper, Grills, Wing Mirrors: C00, C0, C1, C2, C3, C4, C6
   Car Headlights: Y0000, Y00, YR30, YR31
   Car Windscreen: BG0000
   Cat Fur: C00, C0, C1, C2, C3, C4, C6,
   Cat Eyes: YG03, Y19
   Pumpkins: YR04, YR18,; YR12, YR14, YR27;E55, E57, E59
   Sunflowers:  E04, E07,Y13, Y15, Y19; Y13, Y15, Y19, Y26: YG03, YG05, YG07
   Grass: YG11, YG13, YG17, YG95, YG97, YG99
   Sky: B0000, B000
Triplus® Fineliner Pens by Staedtler
Hickory Smoke and Black Soot Tim Holtz® Distress® Ink by Ranger Industries
Perfectly Plaid Spring 6x6 Petite Paper Pack by Lawn Fawn®
Pink Glitter Alphabet Stickers by Recollections™
Grey cardstock by Bazzill Basics Paper®
Music Ribbon Precision Die by Frantic Stamper Inc.
Tim Holtz® Stamping Platform by Tonic Studios

Instructions:
  1. Cut a piece of 12x12 cardstock to 5.5" x 11", score at 5.5", and fold to create a 5.5" square card.
  2. Using Memento ink, stamp the image onto white cardstock.
  3. Color with Copic markers and trim image panel to 4 5/8" x 3 5/8". Edge lightly with Black Soot Distress Ink.
  4. Cut the other half of grey cardstock to 4.75" x 3.75" and 5 1/8" x 4 1/8".
  5. Cut plaid paper to 5" x 4" and edge with Hickory Smoke Distress Ink.
  6. Triple mat the image panel as shown. Set aside.
  7. Adhere grey cardstock to the base of the stamping platform. Position the stamp as desired atop the grey cardstock. Press the platform's lid onto the stamp, lift, and ink the stamp with VersaFine ink, and stamp. If needed, re-ink and stamp until you're happy with the coverage. 
  8. Trim the music-stamped grey cardstock to 5.25" square,  edge with Black Soot Distress ink, and adhere to the 5.5" grey card.
  9. Adhere the triple matted image panel to the card front as shown.
  10. Die-cut the music staff from grey cardstock.
  11. Add the sentiment and the two asterisks to the card front, while humming Pink CATillac.
*The Decor Cling Music stamp is 8" square and fits perfectly onto the stamping platform.
** I was going to make the cats look like ours, but my C4 dripped badly. I was able to mostly fix it. But that nixed the white cats with black/grey spots color scheme. Here's a challenge, find where the blob landed. The winner will get this card. Woo-hoo!

Here are Harley Quinn (left) and Domino (right)


Thanks for visiting today!

I shall be entering this card into the following challenges and/or blog hops.


Monday, October 21, 2019

Steampunk Owl Box

My dad used to smoke cigars. I didn't much like the way they smelled, but I did love the wooden boxes that packaged them.

Here's an upcycled box with the second of Stampendous' fabulous new Steampunk Owl rubber stamps. This one is called Metallic Owl.

Owl Box

Close-Up of the Top of the Owl Box


Supplies Used:
Stampendous Supplies Used:

Other Supplies Used:
Solar White Classic Crest® Cardstock by Neenah Papers
140 lb. Mixed Media Paper by Strathmore®
Black Cardstock by My Colors
Copic® Markers: 
   Owl Feathers: E40, E41, E42, E43, E44
   Owl Beak: N4, N5, N6, N8
   Gears: C0, C1, C2, C3, C4, C6
   Helmet: Y21, Y23, Y26, Y28, BG75, BG78
Silver and Quinacridone Gold Media® Fluid Acrylic Paints by DecoArt®
Black Media® Gesso by DecoArt®
Media® Matte Medium by DecoArt®
Clockworks Cuttlebug® Embossing Folder by ProvoCraft®
Gearbox Border Cuttlebug® Embossing Folder by ProvoCraft®
Tim Holtz® Riveted Metal Texture Fades™by Sizzix®
Tree Branch Cutting Die: Source Unknown (oops)
Olive Green and Rusty Brown StazOn™ Ink by Tsukineko
Wooden Cigar Box (Mine are special because they were my Dad's. He'd smoke all the cigars, then store odds and ends inside them.)

Instructions:
  1. Sand and clean the wooden cigar box.
  2. Brush Black Media Gesso over the top and sides of the box. Let dry.
  3. Open the box and brush Black Media Gesso onto the bottom, top, and sides of the box. Let dry.
  4. Paint several sheets of mixed media cardstock with Silver Media Fluid Acrylic paint. Let dry.
  5. Trim one of the painted sheets to fit the top of the box then cut out the center using the circle die from the WindowRama Die set.
  6. Use the Riveted Metal Texture Fades embossing folder to emboss the painted mixed media cardstock. I had to reposition the cardstock in the folder so that the entire surface would be embossed.
  7. Measure the sides of the box and cut four pieces of silver-painted mixed ,media cardstock accordingly.
  8. Use the Gearbox Border embossing folder to dry emboss all four pieces.
  9. Use the Clockworks embossing folder to emboss black cardstock.
  10. Using the branch die, cut the plain (unembossed) silver cardstock two times.
  11. Sponge StazOn ink over the silver branches to create brown branches with green leaves.
  12. Set aside all the die-cuts and embossed pieces.
  13. Using Memento ink stamp the Metallic Owl onto white cardstock.
  14. Color with Copic markers, fussy-cut. and edge with a dark marker.
  15. Use Media Matte Medium to adhere the four embossed silver-painted side panels to the sides of the box. Let dry, then brush a coat of Media Matte Medium overtop.
  16. Brush the fussy-cut, colored Metallic Owl with Media Matte Medium. Let dry.
  17. When the owl is dry, use the Media Matte Medium to adhere the owl to the center of the black embossed circle. Let dry, then brush a coat of Media Matte Medium overtop.
  18. Use Media Matte Medium to adhere the owl-in-the-circle to the center of the top of the box. Let dry, then brush a coat of Media Matte Medium overtop.
  19. Use the Media Matte Medium to adhere the Riveted Metal embossed, die-cut, silver-painted to the top of the box. Let dry, then brush a coat of Media Matte Medium overtop.
  20. Add a small amount of Quinacridone Gold Media Fluid Acrylic paint to a palette or craft sheet. 
  21. Spritz the paint with water to thin it slightly, then use a fine brush to paint rust spots onto the Riveted Metal-embossed box top and the Gearbox Border-embossed sides. 
  22. Use the Media Matte Medium to adhere the two branches as shown. 
  23. Let dry, then brush the entire box with several coats of Media Matte Medium.
Thanks for visiting today!


Friday, October 18, 2019

Beauty ISO Brains!

Meet
Zombie Girl! She's a beauty in search of brains!


Supplies Used:
Stampendous Supplies Used:
Zombie Girl Cling Rubber Stamp (Q244)
Aged Silver Frantage Embossing Enamel (FREG023)
Tuxedo Black Memento™ Ink by Tsukineko®
VersaMark™ Watermark Ink by Tsukineko®

Other Supplies Used:
Solar White Classic Crest® Cardstock by Neenah Paper
Purple Cardstock by My Colors
Black Chipboard
Copic® Markers:
   Skin: BV0000, BV23, BV25, RV93, E21, G0000, BG90, BG93
   Scar: R56, RV93
   Lips: BV23, BV25, RV91, RV93, RV95
   Hair: E43, E44, E47
Black Soot Tim Holtz® Distress® Ink by Ranger Industries
Midnight Magic Halloween by Recollections®
Ornate Frame Tim Holtz® Alterations Bigz® Die by Sizzix®
Big Chat Tim Holtz® Idea-ology® Stickers by Advantus
Label Letters Tim Holtz® Idea-ology® Stickers by Advantus
Tea Leaves
Instant Coffee

Instructions:

  1. Cut a piece of 12"x12" purple cardstock in half, score, and fold to create a 6" square card.
  2. Cut a piece of patterned paper to 5.75" square, edge with Black Soot Distress Ink, and adhere to the card.
  3. Use Memento ink to stamp the Zombie Girl onto white cardstock.
  4. Color with Copic markers.
  5. Fussy-cut the image and edge with a black marker.
  6. Use the Ornate Frame die to cut black chipboard and purple cardstock.
  7. Press the chipboard frame die-cut into the VersaMark pad and emboss with Aged Silver Frantage Embossing Enamel.
  8. Repeat step 7 to get complete coverage and a little dimension.
  9. Adhere the fussy-cut Zombie Girl die-cut to the purple oval die-cut, then adhere to the card front.
  10. Adhere the embossed chipboard frame over the image panel using liquid glue. Let dry. 
  11. Add glue to the base of the image inside the frame, then shake some instant coffee granules over the glue to look like grave dirt. Let dry.
  12. Add some glue drops to Zombie Girl's hair and add some tea leaves. Let dry.
  13. Add the sentiments as shown using the Label Letters and Big Chat Idea-ology stickers.
Thanks for visiting today!


Thursday, October 17, 2019

Sheepish Cards

It's my third week as October's Guest Designer over at Topflight Stamps and I used the Baa Humbug Clear Polymer Stamp set by Hobby Arts . The set is very versatile as it includes three sheep, accessories to dress up the sheep, and two sentiments. I decided to make two cards.

For Halloween!
I decided that this sheep would be dressed as a proper gentleman for Halloween with a bowler hat and a monocle, plus the appropriate "Boo" and "Baa" sentiments.


For Christmas!
A Santa hat transforms this sheep into Santa, albeit a grumpy one.


Products used:
From Topflight Stamps:

Other Products Used:
Solar White Classic Crest® Cardstock by Neenah Papers
Kraft, red, Navel Cardstock by Bazzill Basics Paper®
Marrakesh 6x6 Patterned Paper pad by Basic Grey®
Joy to the World 8x8 Patterned Paper pad by Graphic 45®
Tuxedo Black Memento™ Ink by Tsukineko®
Barn Door and Black Soot Tim Holtz® Distress® Ink by Ranger Industries
Copic® Markers:
   Halloween Gentleman Sheep:
      Hat: B24, B26, B39
      Hatband YR04, YR16, YR18
      Sheep: B60, BV0000, C00, C0, C1, C2, C3, C4, C5
      Eyes: B21, B34
      Lips: R00, R01, RV91
      Background: C0, C1, B0000
   Santa Sheep:
      Hat: R24, R27, R39
      Hat Brim and Pompom: N0, N1, B000, B60, RV0000, RV000, BV0000
      Sheep: N0, N1, N2, E0000, E00, E40, E50, E51, RV0000, RV000, RV91, B60, BV0000, Y0000
      Sheep Eyes: YG01, YG03
Gin x Express-ons by Imagination Project
Simply Sweet Rub-ons by Doodlebug Designs Inc.™
Happy Halloween Rubber Stamp (Retired)
Nameplate Die Set by Spellbinders®
Speech Bubble Die Set
Clear Glaze® 3D Glossy Gel Pen by Sakura
Silver Metallic Pen 
    
Instructions for both cards:
  1. For both cards I first stamped the bowler and Santa hats from the Baa Humbug Clear Polymer Stamp Set onto white cardstock, then onto masking paper. 
  2. The masking paper versions were fussy-cut and placed atop their counterparts. 
  3. Using a stamp positioner, I stamped the sheep in place, then stamped the monocle. For the Christmas card. I used Onyx Black VersaFine ink to stamp the sentiment. The lights were stamped with Memento ink and a stamp positioner.
  4. The masks were removed and I colored the sheep and hats with Copic markers. Several layers of Clear Glaze pen were added to the monocle and the lights to add dimension and shine.
For the Halloween card:
  1. Blue patterned paper from the Marrakesh 6x6 pad was cut to 5.25" square and edged with Black Soot Distress ink.
  2. The image panel was matted with orange cardstock and checkerboard patterned paper from the Marrakesh 6x6 pad, edged with Black Soot Distress ink, then matted with orange cardstock cut slightly larger.
  3. The triple matted image panel was adhered to the card front.
  4. Orange cardstock was cut with speech bubble and nameplate dies. 
  5. Large Gin-X eXpress-ons rub-ons were used to add "BOO" to the speech bubble die, then Simply Sweet rub-ons were used to add two "a"s inside the "OO" to become "Baa"
  6. Onyx Black VersaFine ink was used to stamp the Happy Halloween sentiment onto the nameplate die-cut. 
  7. A thin strip of the checkerboard patterned paper was adhered to the card front as shown, then the speech bubble and sentiment were added. 
  8. Two blue brads were added to the sentiment nameplate.
  9. The card front was edged with Black Soot Distress ink, and the card front was adhered to a 5.5" square orange card.
For the Christmas card:
  1. The image panel was cut with a rounded rectangle die and matted with red cardstock that had been die-cut with a slightly larger rounded rectangle die. 
  2. Patterned paper from the Joy to the World 8x8 pad was cut, edged with Barn Door Distress ink, matted on Kraft cardstock, then adhered onto a red A2 card. 
  3. Red cardstock was cut with a scalloped border die and a thin strip of coordinating patterned paper from the same pad was adhered to it. 
  4. The border die was adhered across the patterned paper panel as shown to finish the card.
BTW, Some links in this post are affiliate links which do not affect the price you pay but allow me to earn a small percentage of a sale. Thanks! If you shop at Topflight Stamps, please use my coupon code, KATHIREREK855, for 10% off your order.

Thank you for visiting today!

Tuesday, October 15, 2019

The Black Cat Attacks!

People say that black cats are scary but I disagree. I love them. But then again, I love most all cats. Stampendous' new Cat Attack Cling Rubber Stamp is almost too cute to be scary... Almost. If you make his eyes red and fiery orange, maybe, just maybe he becomes a bit more frightening. If he's leaping from flaming circle, he becomes even more evil. Or not. 


Supplies Used:
Stampendous Supplies Used:

Other Supplies Used:
Solar White Classic Crest® Cardstock by Neenah Paper
Navel (Orange) Cardstock by Bazzill Basics
Banana Pepper (Yellow) Cardstock by My Colors
Orange Citrus Vintage Double-Dot Designs by BoBunny Press®
Copic® Markers: C3, C4, C5, C6, C7, C8, C10, Y17, Y38, R05, RV42, RV91, RV93
Tim Holtz® Wild Honey, Spiced Marmalade, Carved Pumpkin, Fossilized Amber, and Black Soot Distress® Inks by Ranger Industries
Flames Stencil by The Crafter's Workshop
Stamping Platform

Instructions:
  1. Cut a piece of 8.5" x 11" orange cardstock in half, score, and fold to create an A2 card.
  2. Place the Pumpkin Spooks stamp face down onto the base of a stamping platform, press the lid to the stamp, lift the lid, and use magnets to secure a 6.5" square piece of patterned paper onto the platform.
  3. Ink the stamp with Nocturne VersaFine Clair™ ink and stamp onto the patterned paper. Repeat this step as needed to achieve a complete impression. Heat set.
  4. Trim the stamped patterned paper to 3 7/8" x 5 1/8" and edge with Black Soot Distress Ink.
  5. Use the circle die included in the WindowRama Die set to cut a circular aperture in the card front. Edge the aperture with Black Soot Distress ink. Set aside.
  6. Stamp Cat Attack onto white cardstock and color with Copic markers.
  7. Stamp the Cat Attack onto mask paper and fussy cut.
  8. Adhere the fussy-cut mask atop the colored cat on the image panel.
  9. Sponge Distress inks over the Flames stencil to create a background behind the cat. Lift the stencil.
  10. Position the image panel behind the aperture on the stamped patterned paper and adhere.
  11. Stamp the sentiment onto patterned paper using Nocturne VersaFine Clair ink. 
  12. Using one of the dies from the Fitted Frames A Cutting Dies set, cut the sentiment, then ink the edges with Black Soot Distress ink.
  13. Adhere the sentiment as shown.
  14. Cut a piece of yellow cardstock to 4" x 5.25"
  15. Mat the image panel card front onto the yellow cardstock.
  16. Adhere the matted image panel to the card.
Thanks for visiting today!


Thursday, October 10, 2019

CongRats - A Retirement Card

It's Thursday, which means it's time to post the second card that I created as October's Guest Designer for Topflight Stamps! It's a retirement card for my husband, who retired last week. When I first saw Katzelkraft's Les Rats des Villes - City Rats Unmounted Red Rubber Stamp Set, I knew that eventually I'd be making this card.


Topflight Stamps Products Used:
Katzelkraft's Les Rats des Villes - City Rat Unmounted Red Rubber Stamp set
Les Drôles Accessoires-Funny Accessories Unmounted Red Rubber Stamp set
Onyx Black VersaFine™ ink by Tsukineko®

Other Products Used:
Solar White Classic Crest® Cardstock by Neenah Papers
Tuxedo Black Memento™ ink by Tsukineko®
Copic® Markers:
   Rat Fur: E30, E31, N0, N1, N2, N3. N4, N5, BV000, BV20, C3, C4, C6, C6, C7
   Rat Ears, Paws, and Tails: BV000, BV20, R00, R11
   Rat Eyes: B21, B23. YG01, YG03, Y13, Y19
   Podium: W00, W1. Y000, E21. E23, E37
   Track: E13, E15
   Stands: B60, N1, N3
   Crowd: Y11, Y13, Y19, YG07, R24 ,R59, B04, B06
   Trees: G24, G85
   Sky: C4, B21
Clear Glaze® 3D Glossy Gel Pen by Sakura
Black and blue cardstock by Bazzill Basics Paper®
Black Soot Tim Holtz®Distress® ink by Ranger Industries
Speech Bubble Die set by Spellbinders®
Mixed Messages Clear Stamp Set by Paper Trey Ink
Banner Stamp by Stampotique
Glitter Alphabet Stickers by Making Memories

Instructions:
  1. Three rats from the Les Rats des Villes - City Rats Unmounted Red Rubber Stamp Set were stamped with Tuxedo Black Memento ink onto white cardstock, fussy-cut, colored with Copic markers, then edged with a dark marker to get rid of those nasty white edges. The rats' eyes and teeth were coated with several layers of Clear Glaze® 3D Glossy Gel Pen to add dimension and shine. 
  2. The winners' podium from Katzelkraft's Les Drôles Accessoires-Funny Accessories Red Rubber Stamp set was stamped with Tuxedo Black Memento ink onto white cardstock. It also was fussy cut, colored with Copic markers, and edged with a dark marker.
  3. The rats and the podium were set aside while I worked on the background. They kept each other amused while I toiled. 
  4. I googled track and field race tracks, found a suitable free photo, downloaded it, then used PhotoElements to change it from color to a black and white charcoal background, which was lightened quite a bit before being printed onto Copic friendly cardstock using my laser printer. The background image was colored with Copic markers, softened even more with the colorless blender, then trimmed to be used as the card front.
  5. The banner was stamped with Memento ink, colored, fussy-cut, edged, then adhered to the background card front. 
  6. Glittery letter stickers were added to spell out "CongRats".
  7. The card front was edged with Black Soot Distress ink, then matted with black cardstock.
  8. Light blue cardstock was die-cut with a small speech bubble die twice and the tiny sentiments were stamped with Onyx Black VersaFine ink onto them. VersaFine ink always gives a wonderful clean impression when stamping small and/or detailed stamps.
  9. The winners podium and the rats were adhered to the card front and the tiny speech bubbles were added. 
  10. The card front was then mounted onto a 5x7 blue card.
BTW, Some links in this post are affiliate links which do not affect the price you pay but allow me to earn a small percentage of a sale. Thanks! If you shop at Topflight Stamps, please use my coupon code, KATHIREREK855, for 10% off your order.

Thanks for visiting today!

Tuesday, October 8, 2019

Halloween Decor Skellie Style!

When I first saw Stampendous' new Seated Skeleton stamp, I knew that I had to use it to create some home decor. Once I got started, this project took on a life of its own!


Supplies Used:
Stampendous Supplies Used:
Seated Skeleton (W211) Rubber Stamp
Beware Witch (QS5038) Stamp Set
Pumpkin People (SSC1321) Perfectly Clear™ Stamp Set
Moroccan Mesh Stencil (FM44086)
Aged Bronze Frantage Embossing Enamel (FREG042)
Mixed Media White Paper
Tuxedo Black Memento™ Ink by Tsukineko®
VersaMark™ Watermark Ink by Tsukineko®

Other Supplies Used:
5" x 7" Canvas Board
Black Media® Black Gesso by DecoArt®
Media® Matte Medium by DecoArt®
Media® Liquid Glass by DecoArt®
Tim Holtz® Regions Beyond Paper Stash® by Idea-ology
Shadow Grey Archival™ Ink
Fall Words Die Set by Frantic Stamper
White Chipboard Frames by Technique Tuesday
Tim Holtz® Occasions Small Talk Stickers by Idea-ology®
Copic® Markers:
   Floor: E21, E23, E25, W1
   Chair: E23, E25, E27, E29, E49, V17, BV09
   Tabl: E23, E25, E29, E29
   Candlelabra: Y21, Y23, Y26, Y28
   Candles: V15, V17
   Cat: N4, N6, N7, N8, RV42, RV95
   Book Covers: V17, BV09, YR04, E35, E39, R56, R59, G85, YR04, YR27
   Book Pages: E81, E84
   Skeleton: T00, T0, T1, E40, YR31
   Hat: N6, N7, N8, YR04, YR07
Copic® Airbrush System
Eclipse Tape by JudiKins

Instructions:
  1. Cover canvas board with black gesso, let dry, and set aside.
  2. Cut Mixed Media paper to 4.75" x 5.75".
  3. Stamp Skeleton scene onto white cardstock and onto Eclipse Tape.
  4. Fussy-cut the Eclipse Tape version and place its counterpart on the white cardstock.
  5. Using repositionable adhesive, adhere scrap paper horizontally over the image panel.
  6. Airbrush RV91 over the image panel.
  7. Brush Shadow Grey Archival ink over the Moroccan Mesh stencil to add visual interest to the "walls". The popular make-up brushes work fabulously with inks and metal stencils.
  8. Remove the horizontal strip of paper and make sure all the adhesive is gone before creating a wooden floor with Copic markers.
  9. Edge the image panel with Archival Ink.
  10. Remove and reserve the mask over the rest of the image then continue to color the image with Copic markers.
  11. Stamp the cat from the Beware Witch Cling set onto white cardstock. 
  12. Stamp the female pumpkinhead from the Pumpkin People Perfectly Clear Stamp set onto white cardstock.
  13. Color both images with Copic markers.
  14. Trim the Poe image from the patterned paper and color with Copic markers.
  15. Brush all three frames with Media Black Gesso and heat set. 
  16. Press all three frames into a VersaMark ink pad, add Aged Bronze Embossing Enamel, and heat set.
  17. Repeat step 13 until the desired finish is achieved.
  18. Adhere the frames over the cat, pumpkin head, and Poe portrait.
  19. Using the Halloween die from the Fall Words Die Set, cut black cardstock.
  20. Use Matte Medium to adhere the image panel to the canvas board. Let dry.
  21. Brush Matte Medium over the image panel. Let dry.
  22. Use the Matte Medium to adhere the title, the framed images, and the Chit-chat sticker strip. Let dry.
  23. Brush Matte Medium over the entire piece. Let dry. Repeat.
  24. Fill the frames with Liquid Glass and let dry overnight.


Saturday, October 5, 2019

Jack O'Lantern People

It's World Cardmaking Day. Since it's October, I'll likely be celebrating Halloween most of the month!

Don't you love the great costumes on Stampendous' super-cute new Pumpkin People? This clear stamp set also comes with a skeleton dog and a skeleton cat! Such fun!


Supplies Used:
Stampendous Supplies Used:
Pumpkin People Perfectly Clear™ Stamp Set
Tuxedo Black Memento™ Ink by Tsukineko®
Nocturne VersaFine Clair™ Ink by Tsukineko®

Other Supplies Used:
Solar White Classic Crest® Cardstock by Neenah Papers
Grey Cardstock by Bazzill Basics Paper®
Pumpkin Party 6x6 Patterned Paper Pad by Doodlebug Designs Inc.™
Dot-Stripe Rainbow Petite Prints 6x6 Patterned Paper Pad by Doodlebug Designs Inc.™
Copic® Markers:
   Pumpkin Heads and hands: YR04, YR07, YR18, YG13, YG25, BG32, BG45
   Outfits: V09, V17, N4, N6, N8 BG45, BG49, BG57, E37
   Cat: C4, C6, C7
   Skellie Dog: T00, T0, T1, T3
   Background: Y32, Y35
   Ground: Oops. Forgot to record markers used. Sorry!
Jumbo Fishtail Banner Flags Stax Dies by Die-namics
Tim Holtz® Black Soot Distress® Ink by Ranger Industries
Stamp Positioner
Eclipse Tape by Judikins

Instructions:
  1. Cut a piece of grey 12x12 cardstock in half, score, and fold to create a 6x6 carad.
  2. Cut the house-patterned paper from the Pumpkin Party pad to 5.75" square and edge with Black Soot Distress ink.
  3. Position the Pumpkin Couple image side down onto the base of the stamping platform. Press the lid into the stamps and lift lid.
  4. Use magnets to secure a piece of cardstock to the stamping platform.
  5. Ink the stamps with Memento ink and stamp the image. Re-ink the stamp and re-stamp if necessary.
  6. Stamp the feet and legs of the male pumpkin person onto Eclipse Tape, fussy-cut, and adhere over its counterpart on the image panel
  7. Use an acrylic block to stamp the skeleton dog. 
  8. Remove the mask and color the image with Copic markers.
  9. Trim image panel and edge with Black Soot Distress inks.
  10. Cut a piece of striped patterned paper 1/4" larger than the image panel. Edge with a YR04 Copic marker.
  11. Using one of the dies from the die set, die-cut purple polka-dotted patterned paper. 
  12. Cut the die-cut in half and edge with Black Soot Distress ink.
  13. Use VersaFine Clair ink to stamp the sentiments as shown.
  14. Adhere the banners and the image panel to the card front, edge with Black Soot Distress ink. and adhere to the card.
Thanks for visiting today!

Thursday, October 3, 2019

Three Cheers for Autumn, October, and Me!

Guess what! I was selected to be the October Guest Designer at Topflight Stamps. I was so over-the-top excited that I made two fall themed cards that both feature Lavinia Stamps to start my reign as Miss October!

Here's my Green Man card!


Products Used:
Topflight Stamps Products Used:
Small Green Man Stamp by Lavinia Stamps

Other Products Used:
Watercolor Paper by Strathmore®
Acorn and Pinecone Versa Fine Clair™ by Tsukineko®
Tea Dye, Frayed Burlap, Brushed Corduroy, Vintage Photo, Gathered Twigs, Bundled Sage, Crushed Olive, and Forest Moss Tim Holtz® Distress® Inks by Ranger Industries
Brown and Olive Green Le Plume II™ Markers by Marvy® Uchida
Brick/Wood Embossabilities™ Set by Spellbinders®
Autumn from the Fall Words Die Set by Frantic Stamper
Green and brown cardstock by Bazzill Basics Paper®
Blender Pen
Stamp Platform

Instructions:
  1. Cut brown cardstock to 6.25" x 9", score, and fold to form an A6 card.
  2. Cut a piece of watercolor paper to 5.75" x 4".
  3. Position the Green Man onto the Stamping platform, secure the watercolor paper, ink the stamp with Acorn VersaFine ink, and stamp. Re-ink the stamp with Pinecone VersaFine ink, and stamp again. Repeat if needed. Heat set.
  4. Brush Distress inks, in the order listed above (mostly light to dark), to both sides of the watercolor panel, concentrating the darkest colors at the edges. Heat set.
  5. Use Marvy markers (or other watercolor markers) to color the face of the Green Man image. 
  6. Place the image panel into the embossing folder and let it take a ride through the die-cut machine. Wheeee! 
  7. Position the "Autumn" die as desired. I used a magnetic platform, but you can always secure the die  in place with repositionable tape. Run it through the machine. 
  8. Die-cut the word again with brown cardstock.
  9. Edge the image panel with the darkest ink, then adhere it to green cardstock cut to 6" x 4.25".
  10. Inlay the brown Autumn word into the image panel, then glue the inked watercolor paper over it.
  11. Adhere the matted image panel onto the brown A6 card.
Here's my second card with the Oak Leaf Branch and Oak Leaf Branch stamps.


Products Used:
Topflight Products Used:

Other Products Used:
Solar White Classic Crest® Cardstock by Neenah Papers
Brown Cardstock by Bazzill Basics®
Eclipse Tape by Judikins
Copic® Markers:
  Skin:  E000, E11, E21, E50, BV000, R20
  Hair: W1, W2, Y00, Y11, Y13
  Boots/Hat: E33, E35, E47
  Dress: BG70, BG72, BG90
  Stockings and Wings: BG70, B72, BG90, BV000, BV00
  Buckle: Y21, Y26, Y28
  Mushroom: R24, R37, E40, E42, E40
  Tree Branch: 374, E77
  Leaves: Y15, YR12, YR, 14, YR16, YR18, YR24, YR27, R24, YG01, YG03
  Grass: YG03, YG11, YG13
Summer Sky, Angel Pink, New Sprout, and Tuxedo Black Memento™ Ink by Tsukineko®
White Deco Marker by Pébéo
White Gelly Roll® Gel Pen by Sakura
Brown Triplus® Fineliner by Staedtler
Scalloped Stitched Rectangles Dies by Gina Marie Designs

Instructions:
  1. Cut a sheet of brown cardstock to 5.5" x 8.5", then score and fold to form an A2 card.
  2. Die-cut the other half of the cardstock with the larger Scalloped Stitched Rectangles die. Set aside.
  3. Using Tuxedo Black Memento ink, stamp Hop Skip Jump Stamp  onto white cardstock and onto Eclipse Tape.
  4. Fussy-cut the Eclipse tape version, then adhere it over top of the image stamped onto white cardstock. 
  5. Tear a piece of paper and sponge or brush Sky Blue ink horizontally over the image to create a cloudy sky.
  6. Repeat this step with Angel Pink ink.
  7. Flip the torn paper and sponge or brush New Sprout ink to create the grass around the mushroom.
  8. Using New Sprout ink, stamp the Oak Leaf Branch onto the upper right hand corner.
  9. Lift the mask and color the branch, leaves, fairy, and mushroom with Copic markers.
  10. Use the green Copic marker to add grass over top of the sponged green background.
  11. Use Copic markers to add some leaves into the grass.
  12. Use the White Deco Marker to add white spots to the mushroom if needed. I needed as my reds bled a bit lot and turned my white dots pink.
  13. Then discover that the red Copic markers bleed through the acrylic paint in the White Deco Marker. Get irritated. 
  14. Use the White Gelly Roll Gel Pen to rescue the pink dots and make them white again. Say "Yahoo!" really loudly.
  15. Trim the image panel so that it will fit behind the brown die-cut scalloped frame.
  16. Adhere the scalloped frame over the image panel, then adhere the whole shebang to the brown A2 card.
BTW, Some links in this post are affiliate links which do not affect the price you pay but allow me to earn a small percentage of a sale. Thanks! If you shop at Topflight Stamps, please use my coupon code, KATHIREREK855, for 10% off your order.

Thanks for visiting today!

Tuesday, October 1, 2019

Skeleton Steps Out!

 Here's a card featuring the fabulous Cling Pumpkin Spooks 6x6 Rubber Stamp. I think it's "all together ooky." Don't you?


Supplies Used:
Cling Pumpkin Spooks 6x6 Rubber Stamp
Tuxedo Black Memento™ Ink by Tsukineko®
Nocturne VersaFine Clair™ Ink by Tsukineko®

Other Supplies Used:
Navel (Orange) Cardstock by Bazzill Basics Paper®
140 lb. Mixed Media Paper by Strathmore®
Tim Holtz® Dried Marigold, Carved Pumpkin, and Ripe Persimmon Distress® Oxide Inks by Ranger  Industries
Tim Holtz® Spiced Marmalade and Carved Pumpkin Distress®  Inks by Ranger Industries
Tim Holtz® Spiced Marmalade, Rusty Hinge, and Frayed Burlap Distress® Markers by Ranger Industries
Copic® Markers: W00, W0, W1, E40
Grab a Guy Gold Starburst Spray by Lindy's Gang®
Tim Holtz® Occasions Chitchat Idea-ology® Stickers by Advantus
Stamp Platform
Distressing Tool
Liquid Glue

Instructions:
  1. Cut a piece of 12x12 orange cardstock to 6x12, score, and fold in half to form a 6" square card.
  2. Cut a piece of Mixed Media paper to 6" x 8".
  3. Smoosh Distress Oxide inks onto a craft mat, spritz with water, and press a piece of mixed media cardstock into the puddles of lovely color. Heat set.Spritz with water, dab with a paper towel, and heat set.
  4. Repeat steps #2 and #3 until you're happy with the result.
  5. Heat set the mixed media cardstock until absolutely totally dry. Then heat a bit more just because. 
  6. Position the Pumpkin Spooks 6x6 stamp stamping side down onto the base of a stamping platform then lift.
  7. Use magnets to secure the inked cardstock in place on the base of the platform.
  8. Ink the stamp with Nocturne VersaFine Clair ink and stamp.
  9. Repeat step #8 until you are happy with the stamped image.
  10. Heat set. 
  11. Lightly spray the image panel with Starburst Spray and heat set.
  12. Trim to 5.75" square then use a scissor blade and/or distressing tool to rough up the edges. I like to use both.
  13. Use Distress ink to sponge the edges to add a bit of color to the frayed bits.
  14. Color the jack o'lanterns' stems, mouths, eyes, and hat with Distress markers.
  15. Adhere the image panel to the orange card.
  16. Re-ink the Pumpkin Spooks stamp with Memento ink, then stamp the image onto Mixed Media cardstock.
  17. Fussy-cut the skeleton and color with Copic markers. Edge lightly with the W1 marker.
  18. Adhere the fussy-cut colored skeleton over his counterpart on the card.
  19. Add the sentiment stickers to finish the piece.
Thanks for visiting!