Showing posts with label Joggles. Show all posts

Tuesday, August 15, 2017

Steampunk Nautilus Journal Page

Another Tuesday, another IBFS Steampunk project! This one is a journal page featuring Steampunk Nautilus from the New Steampunk rubber stamp set by Carmen Medlin Designsavailable at I Brake for Stamps.


Steampunk Nautilus was stamped with Tuxedo Black Memento ink (Imagine Crafts) onto Neenah cardstock, then the image panel was die-cut with one of the dies from the Rectangles Nestabilities die set (Spellbinders).  Steampunk Nautilus was colored with Copic markers and the image panel was sponged with Vintage Photo Distress Oxide ink (Ranger). I used a q-tip dipped into water to wet the ink, then heat set the image panel, matted it onto metallic copper cardstock (Neenah) and set it aside.

140 lb. Mixed Media cardstock (Strathmore) was cut down to fit in my journal. Salty Ocean Distress Oxide ink was sponged onto the Gears Skinny Minny stencil/mask (Joggles) and spritzed with water. Once the water beaded, the journal page was placed over top and smoothed over the stencil.

Peacock Feathers Distress Oxide ink was smooshed onto my craft mat, misted with water, the journal page was dragged through the puddled ink, spritzed with more water, then heat set. This was repeated a few times until I was happy with the coverage. This process was repeated again with Cracked Pistachio Distress Oxide ink.

Vintage Photo Distress Oxide ink was sponged across the bottom of the journal page, spritzed with water, and heat set. Iced Spruce Distress Oxide ink was sponged over the Moving Vines stencil (The Crafter's Workshop) at the bottom of the page and over the Gears Mini Layering stencil (Stampers Anonymous) at the top of the page. The ink was misted with water, allowed to spread a bit, then heat set.

Strips of 140 lb. Mixed Media cardstock were sponged with Abandoned Coral Distress Oxide ink, misted with water, then heat set. These pieces were die-cut with the coral die from the Under Water Build-a-Scene die set (Taylored Expressions).

Other strips of Mixed Media cardstock were sponged with Peeled Paint, Twisted Citron, and Lucky Clover Distress Oxide inks, then die-cut with the Seaweed Stalks die set (Memory Box).

The Seaweed Stalks and coral die-cuts were adhered along the bottom of the journal page, then Media Texture Sand Paste (DecoArt) was spread over the Vintage Photo Distress Oxide ink and the die-cuts. Some tiny pewter, brass, and copper  metal gears were pressed into the Media Texture Sand Paste. The page was set aside while I made and ate dinner. When I returned, the Texture Sand Paste was mostly dry, so it was heat set to totally dry it out. I did use my Vintage Photo Distress marker (Ranger) to add some depth and detail to the "sand".

Metallic copper cardstock was die-cut with the Small Alphabet Word Upper and Lower Case dies (All Occasion) and adhered to the top of the journal page.

A Remnant Rub (Idea-ology) was used to add the caption to the Steampunk Nautilus image panel, which was then adhered to the journal page using Black Photo Corners (3L Scrapbook Adhesives).

I Brake for Stamps has a huge and varied collection of rubber stamps that you ought to check out right now. Just so you know, I Brake for Stamps ships internationally!

Click HERE to be whisked I Brake for Stamps to check out all of the goodies! Best of all, if you buy something, you can get a 10% discount off of your purchase if you use this code: SAVE10KATHI .


Thanks for visiting today!

Wednesday, March 8, 2017

Another Day, Another Steampunk Tag!

I'm the hostess this month at ART-EXchange, which is a Facebook group that swaps hand made projects. My theme is Steampunk Tags!

My second tag features the man with the monkey from the Music Man stamp set (Stampers Anonymous), the cityscape from the NK Studio Urban Scribble Foam and Cling Stamp (Stampendous),  and the schematic from the AS Cling Steampunk Set (Stampendous)

Here it is!


The Music Man was stamped with Tuxedo Black Memento ink (Imagine Crafts), colored with Copic markers, fussy-cut, and edged with a black marker. The Music Man and his monkey were set aside while I created a background for them. I should mention that prior to coloring the monkey, I did a Google image search and was enchanted by the Golden Snub Nosed Monkey, aka the Blue Faced Monkey, who lives in China.

140 lb. Mixed Media cardstock and black chipboard were die-cut with the Alterations Tag die (Sizzix). The black chipboard tag was set aside with the Music Man and his monkey and the cardstock tag was trimmed down.

The cardstock was stamped with the cityscape from the NK Studio Urban Scribble stamp set using Onyx Black VersaFine ink, then heat embossed with Clear Detail Embossing powder (Ranger). The cityscape was also stamped onto Eclipse Tape (Judikins), then fussy-cut to create a mask. The cityscape image was covered with the mask and Media Modeling Paste (DecoArt) was scraped across the smallest compass on the Rosettes stencil (Joggles). This was allowed air dry, while we ate dinner (and did the dishes).

A dilute wash of Pthalo Blue Media Fluid Acrylic (MFA) paint (DecoArt) was brushed over the tag and allowed to dry. When dry, the tag was brushed with Media Matte Medium (DecoArt) to seal the layer. The mask was lifted and the embossed cityscape was painted with varying mixtures and washes of Medium Grey Value 6, Translucent White, Payne's Grey, Burnt Sienna, and Hansa Yellow Light MFA paints. The tag was heat set and brushed again with Media Matte Medium. 

Titanium White MFA paint was used to highlight the raised texture of the compass. I decided the tag needed a bit more steampunk imagery, so I pulled out my AS Steampunk stamp set, selected the diagram, and stamped it twice (once unintentionally wonky) using the very last bit of my Titanium White MFA paint! The tag was again coated with a layer of Media Matte Medium.

I figured out where the Music Man and his monkey would be placed and used Jet Black Archival ink to blacken the bottom right corner. A rather thick layer of the Distress Collage Crazing Medium (Ranger) was brushed over the tag and left to dry and craze.

When I returned to my craft room, the tag was dry and crackly, which meant it was time to adhere Music Man and his monkey. Once this lovely couple was secure, some tiny watch gears and a watch thingamabob were adhered to the their lapels and the Music Man's hat. The image panel was adhered to the black chipboard tag and some hand-dyed, crinkled seam binding was used to finish it.

Thanks for visiting today!

P.S. I found two coloring errors. Oopsy, perfection is overrated. Can you find them?


I shall enter this tag into the following challenges:
• Creative Artiste Mixed Media Challenges: Anything Goes
• SanDee-and-amelie's Steampunk Challenges: Anything Goes
• The Male Room Challenges: Steampunk
Simon Says Monday Challenges: Make Your Own Background


Wednesday, February 17, 2016

Dots and Stripes Birthday Card

Samantha Read is hosting this week's challenge over at Stampotique Designer's Challenges. Her challenge theme is Dots and Stripes.  Here's what she has to say about her challenge:
"I love anything spotty or with polka dots and I also love stripes but they can be difficult to combine. So my challenge for you this week is to use Spots and Stripes in your creations. Have fun! "
If you'd like the chance to win your choice of $30 worth of Stampotique stamps, you should play along with this challenge. Visit Stampotique Designers Challenge blog and be sure to read the rules so that you'll have the chance to win that great prize!!! Remember to check to see the deadline for all of this month's Stampotique Designers Challenges!


Newton (Daniel Torrente) and Banner were stamped with Tuxedo Black Memento ink, fussy-cut, colored with Copic markers, and edged with a black pen. They were set aside while I created a background for them.

140 lb. Mixed Media cardstock (Strathmore) was painted with Titan Buff and Medium Grey Value 6  Media Fluid Acrylic (MFA) paints (DecoArt). When it was dry, 3mm Washi tape and Removable Scotch Tape (3M) were placed horizontally across the painted cardstock to create masked stripes. Pthalo Turquoise and Pthalo Blue MFA paints were painted over the tape. The paint was lifted and the piece was heat set.

Blazing Red StazOn ink (Imagine Crafts) was sponged over the Punchinella Quintet stencil (Joggles). Midnight Blue StazOn ink was sponged over Polka Dotty stencil (Wendy Vecchi/Studio 490). Titanium White MFA paint was sponged over the Layered Bead stencil (The Crafters Workshop) to add yet another size of dots. Then I realized that the dots were overtaking the stripes so I sponged Titanium White MFA paint over the Dots and Stripes Borders Wendy Vecchi/Studio 490).

Tenticurl was stamped with Jet Black StazOn ink, then the entire panel was sponged with a few layers of Multi-Matte Medium (Ranger) to seal it. Newton (Daniel Torrente) and Banner were adhered to the image panel.

White cardstock was die-cut with the Happy, Birthday, Merry, Christmas Small Words die set (All Occasions), which was then adhered to the image panel. The panel was coated with a few more layers of Multi-Matte Medium. 

Blue Stardust Glitter pen (Sakura) was used to add a glittery touch to Newton's nails, then his nails, eyes,teeth, and Tenticurl  were coated with several layers of Clear Gelly Glaze pen (Sakura) to add shine and dimension. A red and white polka dot brad was added to Newton's ear as a finishing touch.

Here's a close-up photo (taken at an odd angle) so you can see Newton's nails and Tenticurl shiny dimension.


I know it's a bit busy and I'm not sure whether I like it, but it's done. Done is good!

Thanks for visiting today!

I shall enter this card into the following challenges:
Challenge Up Your Life Challenges: No Designer Paper
Creative Artiste Challenges: Anything Goes with Mixed Media
Country View Challenges: Make Your Own Background
Happy Little Stampers Mixed Media Challenges: Paint

Tuesday, February 9, 2016

Mardi Gras Cheers!

Happy Mardi Gras! Let the good times roll! To that end, here's a card with Cocktail Parade, a Rubber Romance stamp available at I Brake for Stamps.


White Copic-friendly cardstock was randomly sponged with Milled Lavender and Antique Linen Distress inks (Ranger). Milled Lavender Distress ink was sponged over the Harlequin stencil (The Crafter's Workshop). Cocktail Parade was stamped with Tuxedo Black Memento ink (Imagine Crafts). Post-it notes were used as a mask to cover the stamped image and background then Antique Linen Distress ink was sponged over the base area to ground the image. Milled Lavender Distress ink was sponged over the hearts portion of the Punchinella Quintet stencil (Joggles). The Cocktail Parade was then colored with Copic markers. White gel pen was added to the reflection area of each cocktail glass.

The image panel was die-cut with one of the dies from the Classic Rectangles Nestabilities die set (Spellbinders). All of the patterned paper is from the Antique Library 6x6 pad (Wild Rose Studios). One of the dies from the Fishtail Flags die set (Die-namics) was used to die-cut a polka-dot flag. The Cheers die (Elizabeth Craft Designs) was used to die-cut a relatively solid piece of patterned paper. Some of the edges were sponged with Milled Lavender Distress ink, while other edges were distressed with the Paper Distresser tool (Tonic Studios).

I Brake for Stamps has a great selection from several different stamp companies and also has their own brand of stamps. Be sure to check out all the great images by Rubber Romance while you're there! Click on my badge below to be whisked over there to check out all of the goodies! Best of all, if you buy something, you can get a 10% discount off of your purchase if you use this code: SAVE10KATHI!


Thanks for visiting today!

I shall enter this card into the following challenges:
Craft Your Passion Challenges: Anything Goes
Addicted to Stamps Challenges: Anything Goes
Stamping Sensations Challenges: Anything Goes
Cut It Up Challenges: Mardi Gras/Masking

Monday, November 16, 2015

Mr. Meow Meow

This one had been picked up for publication, but as sometimes happens, didn't make the cut, so I figured I'd share it now, especially since I've been remiss in my crafting and posting. A week and a half later and I still am getting dizzy spells when I change position or put my head down. Makes it difficult to function normally and is putting a big damper on my crafting. Oh well.

So, without further ado, here's Mr. Meow from the Meow & Tweets rubber stamp set (Brett Weldele/Stampers Anonymous).


Mister Meow Meow was stamped onto white cardstock using Tuxedo Black Memento ink (Tsukineko/Imagine Crafts) and onto Eclipse Tape (Judikins). The Eclipse Tape version was fussy-cut. Mr. Meow Meow was colored with Copic markers. Mister Meow Meow's monocle was outlined with silver gel pen, which was also used to dot along the monocle fob with silver gel pen to create a chain-like appearance. Silver gel pen accents were also added to his cufflinks and a tie tack. Several layers off Clear Gelly Glaze pen (Sakura) to the monocle's lens, letting it dry between layers.

The Eclipse Tape cat was adhered over its counterpart on the image panel to form a mask. A strip of Removable Scotch Tape was adhered horizontally along the bottom to ground the cat. The Cobblestones stencil (Green Pepper Press) was placed over the image and London Fog Memento ink (Ranger) was sponged over it. The stencil was lifted and details were added to the cobblestones using Copic markers.

The cobblestones were masked with Removable Scotch Tape. The Gears Skinny Mini mask (Joggles) was taped over the image panel and airbrushed with a light blue Copic marker. The stencil, tape, and Eclipse Tape mask were lifted and the image panel was matted with red cardstock.

"Meow" from the Meow & Tweets rubber stamp set was stamped onto light blue cardstock with Tuxedo Black Memento ink. The sentiment was die-cut sing one of the die-cuts from the Talk Bubbles 2 die set,

Using the Steampunk Corner die (Memory Box), die-cut silver metallic cardstock twice. The corners were placed into opposite corners of a blue card. The image panel and sentiment were adhered to the card.

Thanks for visiting today!

I shall enter this card into the following challenges:
SanDee and amelie's Steampunk Challenges: Anything Goes
Scrapy Land Challenges: Anything Goes 

Monday, August 31, 2015

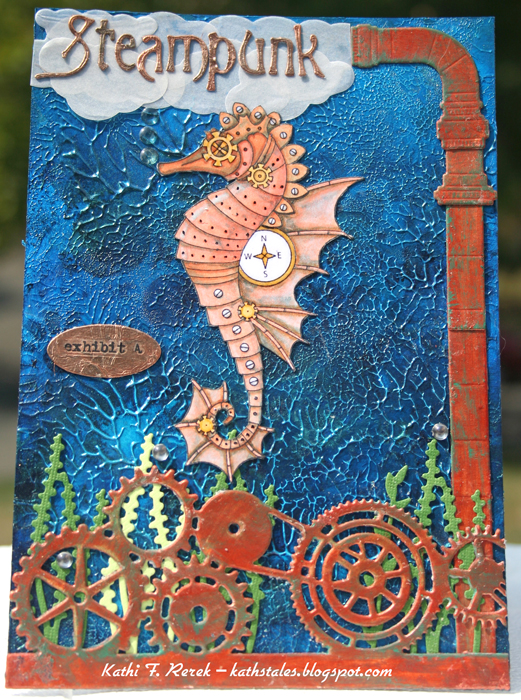
Steampunk Seahorse - Journal Page

If you've been here before, you know that I love Steampunk. A while back, I decided that I was going to create a series of Steampunk Journals. I'd have one for  creatures of the sky, creatures of the sea, machines, people, fashion, etc. Then I'd fill each journal with pages. Being me, I've created Steampunk Journals, Volume One - The Aviary. But I can't share it with you now. I'm such a tease.

I will be working on the other covers soon, but meanwhile, I'm making journal pages. I apparently like to do things backwards.

Here's the first one. It features a Steampunk Seahorse, SCACD's Nancy's Seahorse.


FYI, SCACD has loads of marvelous Steampunk stamps, in both rubber and digital format! If you're a Steampunk afficionado, you owe yourself to check 'em out. Just sayin'. 

Nancy's Seahorse is available as a rubber stamp, which is what I used for this page. The Steampunk Seahorse is also available as a digital stamp, Nancy's Mechanical Seahorse. If you're an international visitor, you can purchase this digi and others, HERE.

Nancy's Seahorse was stamped with Tuxedo Black Memento ink (Tsukineko/Imagine Crafts), colored with Copic markers, fussy-cut, and edged with a Black Pitt Artist Brush pen (Faber Castell). Several layers of Clear Gelly Glaze pen (Sakura) was used to add dimension and shine to the compass, screws, rivets, and gears.  Nancy's Seahorse was set aside while I worked on the background. True confession. He sat for awhile as my mojo disappeared and was replaced by sudden sleepiness. That went on for several days.

I cut two pieces of 140 lb. Mixed Media cardstock (Strathmore) to 4.75" x 6.75". White Media Gesso (DecoArt) was liberally spread with a palette knife onto one of the pieces. The second piece was pressed against the be-Gessoed cardstock, squished a bit, then the two pieces were pulled apart and left to dry for an hour or so.

When I returned, the two sheets were covered with a totally lovely texture. Cobalt Blue Hue, Cobalt Turquoise Hue, Ultramarine blue, Pthalo Blue, and Pthalo Turquoise Media Fluid Acrylic (MFA) paints (DecoArt) were sponged over the background using Mini Ink Blending Tools and Replacement Foams (Ranger). The foam applicators are great for this because they're pliable enough to make sure that the paint gets into all those nooks and crannies.

Prussian Blue MFA paint was thinned a bit with water and sponged over the Gears Skinny Minny Mask/Stencil (Joggles). When the paint was dry, I decided to lighten things up a bit by lightly sponging Interference Turquoise and Interference Blue MFA paints over the textured background, so that the top bits received the paint.

140 lb. Mixed Media cardstock was die-cut with the Medium Steampunk Pipes dies (Memory Box) and the Edge Gears die (Joy Craft). These die-cuts were painted with Copper Dazzling Metallic Acrylic paint (DecoArt). When the Copper paint was dry, Blue Green Light MFA paint was randlomly sponged the pipes and gears.

Green cardstock was die-cut with a few dies from the dies from the Build a Scene: Underwater die set (Taylored Expressions). This greenery was adhered to the bottom of journal page with Media Matte Medium (Deco Art). The painted Medium Steampunk Pipes die-cuts were adhered, then the Edge Gears die-cut was added. 

Vellum was die-cut with my Puffy Clouds (Memory Box), run through a Xyron machine, then adhered to the top of the journal page.

Copper Foil tape, purchased at a gardening center*, was adhered to black cardstock. These strips were airbrushed with BG72, BG75, and BG 78 Copic markers to add an aged patina look to them. The strips took a run through a Xyron machine to add adhesive to the cardstock, then were die-cut with Eliza Mini font dies (QuicKutz). The Copper Foil word was adhered over the clouds at the top ofthe page.

An extra piece of foil was die-cut with an old oval label die (QuicKutz). Apothecary Remnant Rubs (Idea-ology) was used to add "Exhibit A" to the foil, which was then adhered to the page.

Clear pearls were added here and there to finish the page.

I also created this card for SanDee and amelie's Steampunk Challenges. They've had a TicTacToe summer challenge all summer. Being a master procrastinator, I waited til the very last moment. No lie. 

Here's the TicTacToe board. I chose the left vertical row. (words, stencils, the (deep) sea).


*Copper Foil Tape is in one's garden (not mine) to ward off snails. Go know.

I shall enter this in the following challenges: