Sunday, December 30, 2018

Happy Purrthday!

This card was made for my daughter for her birthday. The cats were colored to look like our pair of kittens, Domino and Harley Quinn.


The kitties: Harley Quinn on the left, Domino on the right


Supplies Used:
Newton's Antics Stamp Set by Newton's Nook Designs
Cat Sentiments Clear Stamp Set by Frantic Stamper
Tag Builder Die Set by Frantic Stamper
Stitched Speech Bubble Die Set by Die-namics
Tuxedo Black Memento™ Ink by Tsukineko
Solar White Classic Crest® Cardstock by Neenah
Copic Markers: C00, C0, C1, C2, C3, C4, 6 C7, C8, Kitten Smitten 6x6 pad by Doodlebug Designs Inc™
Floral-Graph Rainbow Petite Prints 6x6 pad by Doodlebug Designs Inc™
Dot-Stripe Rainbow Petite Prints 6x6 pad by Doodlebug Designs Inc™

Instructions:

  1. Create an A2 card from white cardstock.
  2. Layer patterned paper as shown.
  3. Die-cut grey pattered paper with one of the Stitched Speech Bubble dies.
  4. Stamp sentiment and paw prints on the Stitched Speech Bubble border, then adhere to the card front.
  5. Stamp and color the cats.
  6. Die-cut the image panel with the rectangle die from the Tag Builder Die Set.
  7. Mat with grey cardstock, cut slightly larger than the image panel.
  8. Adhere the image panel to the card front.
  9. Adhere the card front to the card.
Thanks for visiting today!

I shall enter this card into the following challenges:


Wednesday, December 26, 2018

Merry Christmas! (A Day Late!)

My Christmas card was created (and actually mailed) to a friend as part of a Secret Santa gift exchange. She opened the package yesterday, which means that I can share the card today! BTW, the inside of the card was decorated as well, but I had to rush the card and package to the post office, so I didn't get photos. Bad me!

Supplies Used:
A2 Layers Die Set by The Stamp Doctor
Whatcha Saying Now Die Set by Heffy Doodle
The Russian Cats Rubber Stamp Set  by Katzelkraft
Funny Accessories Rubber Stamp Set by Katzelkraft
Solar White Classic Crest® Cardstock by Neenah papers
Grey and green cardstock by Bazzill Basics
Christmas Wish and Holly Jolly 6x6 Pads by My Mind's Eye
Tuxedo Black Memento™ Ink by Tsukineko
Copic Markers: C00, C0, C1,  C3, C4, C5, C6, C7, C8, YG23, YG25, YG63, R24, R27, R39, R59, B0000,
Christmas Remnant Rubs by Tim Holtz® Idea-ology® by Advantus
Tim Holtz® Barn Door Distress® Ink by Ranger
Clear Glaze™ 3D Glossy Gel Pen by Sakura of America
Post-it® Notes by 3M
Stamp-a-ma-jig® Stamp Positioner by EK Success

Instructions:
  1. Die-cut the card base from grey cardstock using the Center Step Card Die. Score and fold.
  2. Die-cut the layers for the front, sides, and inside using the Super Combo Center Step Card Die set. 
  3. Edge all pieces with Distress ink and adhere to the the card base.
  4. Stamp the Santa hat from the Funny Accessories set onto white cardstock and onto a Post-it Note. 
  5. Fussy-cut the Post-it note and adhere over its counterpart.
  6. Using the stamp positioner, stamp the cat.
  7. Lift off the Post-it Note mask and color the image with Copic markers.
  8. Die-cut the image and the grey cardstock with two of the dies from the A2 Layers Die set.
  9. Mat the image panel onto the grey cardstock
  10. Apply several layers of Clear Glaze 3D Glossy Gel Pen to the cat's eyes, letting each layer dry before adding another. 
  11. Die-cut the sentiment from green cardstock.
  12. Adhere the matted image panel and the sentiment to the card card base.
  13. Die-cut the thought bubble from green cardstock.
  14. Add the rub-on sentiment and adhere the thought bubble as shown.
Thanks for visiting today!

Friday, December 21, 2018

Stampendous Sneak Peek #2: Head Shots

I couldn't resist sharing a second Stampendous Sneak Peek!

This time I'm sharing a card featuring the fabulous new Head Shots Perfectly Clear™ Stamp set, which features fantastic head shots and wonderful sentiments.


Supplies Used:
Stampendous Supplies Used:
Head Shots Perfectly Clear™ Stamps
Fitted Frames B Cutting Dies Set
Memento™ Tuxedo Black Ink Pad by Tsukineko


Other Supplies Used:
Copic Markers: E13, E15, R22, B04, B41, C6, C7, C8, BG000, B00, Y17
Banana Pepper My Colors Cardstock by My Mind's Eye
Solar White Classic Crest® Cardstock by Neenah Papers
Blue Cardstock: Bazzill Basics
Washi Tape: Source Unknown

Instructions:
  1. Create an A2 card from blue cardstock.
  2. Using Tuxedo Black ink, stamp one of the Head Shot girls onto white cardstock.
  3. Color with Copic markers.
  4. Die-cut with one of the dies from the Fitted Frames B Die Cutting Set.
  5. Die-cut Banana Yellow cardstock with the slightly larger die from the same die set.
  6. Adhere the image panel to the yellow die-cut. Set aside
  7. Cut the Banana Yellow cardstock to 4" x 5.25" and .75" x 5.25".
  8. Cut the blue cardstock to 3.5" x 4.75". 
  9. Adhere the washi tape to the top and bottom of the blue cardstock.
  10. Adhere the washi tape over the strip of Banana Yellow cardstock.
  11. Stamp the sentiment from the Head Shots set onto blue cardstock, then die-cut with one of the smaller dies from the same die set used previously.
  12. Assemble the card as shown.
Thanks for visiting today.

Wednesday, December 19, 2018

Stampendous Sneak Peek! Asleep on a Cotton Ball

It's a most wonderful time of the year again — a new Stampendous Catalog release!

Here's  a sneak peek with a card featuring the adorable new House-Mouse Designs® Cotton Ball.


Supplies Used:
Stampendous Supplies Used:
House-Mouse Designs® Cotton Ball
Fitted Frames A Cutting Dies Set
Moroccan Mesh Metal Stencil
Memento™ Tuxedo Black Ink by Tsukineko

Other Supplies Used:
Copic Markers:
   Mouse Skin: BV0000, E50, E51, E93, R20
   Mouse Fur: T1, T3, T5
   Cotton Ball:    Background: V0000, Bv0000, RV0000, Solar White Classic Crest® Cardstock by Neenah Papers
Pink and Lavender Cardstock
Tim Holtz® Blueprint Sketch, Spun Sugar, Picked Raspberry Distress® Ink by Ranger Industries
Tim Holtz® Crinkle Ribbon idea-ology® by Advantus
Pop-Pom Trim: Source Unknown

Instructions:

  1. Cut a piece of pale pink cardstock in half, score, and fold to create an A2 card.
  2. Cut a piece of lavender cardstock to 4" x 5.25" and set aside.
  3. Cut a piece of pale pink cardstock to 4" x 5.25" and temporarily adhere to a piece of scrap paper.
  4. Tape the stencil in place over the pale pink cardstock, then brush Distress inks over the stencil diagonally, blending the inks between colors.
  5. Lift up the stencil and the pink cardstock. 
  6. Trim the pink cardstock to 3.75" x 5" and sponge the edges with the inks used.
  7. Stamp the mouse onto white cardstock and color with Copic markers. Die-cut using one of the dies from the Fitted Frames A Cutting Dies Set.
  8. Cut a piece of lavender cardstock to .5" x 4".
  9. Adhere pom-pom trim to the strip of lavender cardstock.
  10. Adhere the die-cut image panel onto the stenciled background cardstock, then mat with the lavender cardstock
  11. Adhere the pom-pom trim bedecked lavender cardstock to the card front.
  12. Adhere the card front to the card.
Thanks for visiting today!

Monday, December 10, 2018

A Holiday Gift For You!

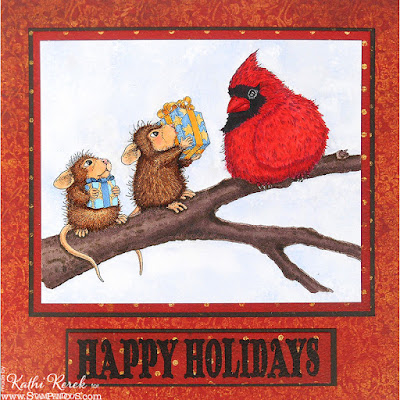
Here's a holiday card using Stampendous' new House-Mouse Designs™ Birdie Gifts and Holiday Wishes Perfectly Clear Stamp Set.


This stamp is very versatile because it can be used for other occasions than just Christmas. Just change the color of the gifts and you're set. Not only that, but the Cardinal can easily become a Blue Jay or a Tufted Titmouse. Heck! You can even add leaves and flowers to the tree branches to give you a change of seasons!  I'll be revisiting this set to show you just that, so stay tuned.

Supplies Used:
Stampendous Supplies Used:
House-Mouse Designs™ Birdie Gifts
Holiday Wishes Perfectly Clear Stamp Set
Tuxedo Black Memento™ Ink by Tsukineko®

Other Supplies Used:
Copic Markers:
 Cardinal: R05, R08, R22, R24, R27, R39, R56, R59, C4, C6, C10
 Branch: E71, E74, E77, E89
 Mouse skin: E50, E51, E93, BG0000, BV0000, R20, BV20
 Mouse noses: R12, R22
 Mouse Fur: E31, E33, E35, E47, E53, E57, E49
 Gifts: B32, B34, Y21, Y23, Y35, Y38, W3
 Sky: B60
Solar White Classic Crest® cardstock by Neenah
Red cardstock by Bazzill Basics
Wild Berry Very Vintage Double Dot Designs paper by BoBunny®
Coffee Very Vintage Double Dot Designs paper by BoBunny®
Jet Black Archival¢ Ink by Ranger
A2 Card Creator Nestabilities® Die Set by Spellbinders®
Copic Airbrush System

Instructions:
  1. Fold a piece of 12" x 6" paper in half to create a 6" square card.
  2. Cut a piece of Wild Berry Very Vintage paper to 6" square. Edge with the R27 marker. Set aside.
  3. Using Tuxedo Back Memento ink, stamp the image onto white cardstock and onto thin paper.
  4. Color the cardstock version with Copic Markers.
  5. Fussy-cut the thin paper stamped image and adhere over its counterpart with removable adhesive.
  6. Airbrush the background with a B60 Copic marker.
  7. Pull up the mask and carefully remove adhesive from the image panel.
  8. Die-cut the image panel with a Nestabilities die. 
  9. Die-cut the remaining Wild Berry Very Vintage paper with the next largest die and edge with the R27 marker
  10. Cut a piece of the Coffee Very Vintage Double Dot Designs paper 1/8" larger than the red die-cut and edge with the E47 marker.
  11. Mat the image panel with the matching die-cut, then mat with the brown paper.
  12. Using Archival Ink, stamp the sentiment onto a scrap of the Wild Berry Very Vintage paper.
  13. Die-cut the paper with one of the dies from the Card Creator Nestabilities set and edge with the R27 marker.
  14. Trim a scrap of the Coffee Very Vintage paper 1/8" larger than the sentiment die-cut and edge with the E47 marker.
  15. Mat the sentiment with the brown paper.
  16. Adhere the image and sentiment panels to the card front, then adhere the card front to the card.

Thanks for visiting today!

Tuesday, December 4, 2018

Dear Cherub Deer

As I've mentioned before, I love cherubs. In fact, I have a small collection of them that includes ceramic cherubs, some cherub earrings, a cherub necklace, and a few cherub stamps. So when I saw that Stampendous' July release included several cherubs, I knew I had to add them to my collection.

Here's a card with the adorable new Deer Cherub


Supplies used:
Stampendous Supplies Used:
Deer Cherub
Fitted Frames B Die Cut Set
Tuxedo Black Memento™ Ink by Tsukineko®

Other Supplies used:
Copic Markers:
 Skin: E50, BG0000, BV0000, E93 R11, R000, R00, R01, BV00
 Hair: E51, E53, W2, YR30, YR31
 Robe: B41, B43*, B60, C1, C3
 Wings and Star: Y11, Y21, Y23, Y26, Y28
 Fawn: E30, E31, E33, E35, E37, E49,
 Fawn's Hooves: E44, E59
 Ground: C00, C0, C1
 Sky: B21, RV00
Copic Airbrush System
Solar White Classic Crest® cardstock by Neenah Papers
Gingerbread and Powder Blue Very Vintage Double Dot Designs paper by BoBunny®
Pink Chalk Pencil by General Pencils
Tim Holtz® Vintage Photo Distress® ink by Ranger
* B43 = 1/2 B41 + 1/2 B43

Instructions:
  1. Create an A2 card from light blue cardstock and set aside.
  2. Using Tuxedo Black ink, stamp Cherub Deer onto white cardstock and onto thin paper.
  3. Color Cherub.
  4. Fussy-cut the cherub stamped onto thin paper and adhere overtop the colored image using temporary adhesive.
  5. Airbrush the background sky using a B21 marker.
  6. Lift the mask and remove the adhesive completely.
  7. Die-cut the image panel and the Gingerbread patterned paper using a set of dies from the fitted Frames B Die Cut Set.
  8. Mat the image die-cut with the Gingerbread die-cut and set aside.
  9. Trim a piece of Powder Blue patterned paper to 4" x 5.25", edge with Distress ink, then adhere it to the card.
  10. Adhere the image panel to finish the card.
Thanks for visiting today!