Showing posts with label Unity Stamps. Show all posts

Thursday, February 27, 2025

LCD/CV Challenge #194 - Fruit, Flowers, and Foliage

Greetings!  Here's a card created for the Lost Coast Design/Carmen's Veranda Portal to Creativity February's February Fruit, Flowers, and Foliage Challenge #194 on an odd day! I'm an absent minded crazy cat lady and didn't post on my scheduled day. Bad me.

Here's my card created with the gorgeous Grunge Cat Rubber Stamp which is one of the beautiful silhouette rubber stamps available at Lost Coast Designs!


Products Used:
Solar White Classic Crest Cardstock by Neenah Papers
Raven (Black) Textured Cardstock by Bazzill Basics
Obsidian Black Amalgam Ink by Gina K Designs
Copic Markers: G43, G40, G24, G21, B32, R83, R81, Y18
Tumbled Glass and Shabby Shutters Distress Ink by Tim Holtz for Ranger Ink
Deckle and Stitches Nesting Die Set by Unity Stamps
Sky Blue and White Uni-Posca Acrylic Paint Pens by Mitsubishi Pencil
Pigma BB Black Pen by Sakura 
Clear Glaze Dimensional Gel Pen by Sakura
Very Old Patterned Paper by Memory Box
Repositionable Sticker Paper by Avery
Repositionable Scotch Tape by 3M
STAY-tion by Wendy Vecchi for Ranger Ink
Glassboard by Glassboard Studios
Stamping Platform

Instructions:
  1. Cut black cardstock to 9" x 6.25". Score at 4.5" and fold to form an A6 card. Set aside.
  2. Use Obsidian Black Amalgam Ink to stamp the Grunge Cat Rubber Stamp twice — once onto a panel of white cardstock and once onto repositionable sticker paper. 
  3. Use Copic markers to color the Grunge Cat.
  4. Fussy-cut the stamped sticker paper version and place it over its counterpart on the image panel as a mask.
  5. Place the image panel onto the STAY-tion secured with magnets and tape.
  6. Place a piece of tape horizontally across the bottom part of the image panel.
  7. Brush Tumbled Glass Distress Ink over the tape and the masked Grunge Cat to add color to the background of the top part of the image panel. 
  8. Move the tape to cover the top part of the image panel. 
  9. Brush Shabby Shutters Distress Ink over the tape to cover the bottom part of the image panel and ground the Grunge Cat. Brush the ink more heavily right under the tape and under Grunge Cat's paws and tail to create shadows. 
  10. Cut the image panel with a deckled rectangle cutting die.
  11. Mat the image panel die-cut with a slightly larger piece of black cardstock.
  12. Remove Grunge Cat's mask.
  13. Use a White paint pen to add an eye to Grunge Cat's face. 
  14. When dry, use The Sky Blue paint pen was used to color the eye. 
  15. When that layer of paint was dry, the pupil was drawn onto the cat's eye.
  16. Add several layers of Glaze pen to add dimension and shine to the Grunge Cat's blue eye.
  17. Use the R81 Copic marker to darken the pink flowers on the green patterned paper. 
  18. Use the B32 Copic marker to color the center of the flowers.
  19. Use a smaller deckled rectangle die to cut the green patterned paper twice with the same deckled rectangle die.
  20. Use Shabby Shutters Distress Ink to edge both green patterned paper die-cuts. 
  21. Trim a piece of floral patterned paper to 4.25" x 6" and edge with a black pen to create the background layer. 
  22. Adhere the two small deckled were adhered to the background panel.
  23. Adhere the the matted image panel die-cut over the deckled rectangle die-cuts as shown.
  24. Adhere the card front was adhered to the reserved black card.
Note:
  • Copic markers can be used to color patterned paper to match your project IF the patterned paper is cardstock weight. The inks will likely run if the paper is thinner.
  • The flowers on the green patterned paper were originally light pink with a white center, so I used a Copic markers to alter their colors so that they matched the flowers on the stamped Grunge Cat

You still have time to create a project for the Lost Coast Design/Carmen's Veranda Portal to Creativity February's February Fruit, Flowers, and Foliage Challenge #194, but you best hurry! I hope you share a project for a chance to win Lost Coast Cash!


Thanks for visiting today!

Thursday, December 19, 2024

Snarky Christmas Card

Here’s a snarky and fun Christmas card created for Imagine Crafts that shows how well VersaFine Clair Inks work on Kraft Cardstock!


Imagine Crafts Supplies:

Tuxedo Black Memento Ink *

Grass GreenGreen Oasis, and Strawberry VersaFine Clair Inks *

Cloud White VersaMagic Inker

Sponge Daubers

Tear It! Tape

Craft Mat


Other Supplies:

Desert Storm Classic Crest Cardstock by Neenah Papers

Ho Ho No Pissy Kitty Stamp Set by Unity Stamps

Copic Markers: N7, N6, N5, N4, N3, YG17, YG05, YG03, R39 R27, R24, R22, R01 Copic Markers

White Gelly Roll Gel Pen by Sakura of America

Grunge Notes Stencil by Studio Light *

Holly Background Stencil by Funky Fossil 

Speech Bubble Die Set by Whimsy Stamps

Repositionable Sticker Paper by Avery

Small Curved Tip Craft Scissors by Fiskars

Clear Ruler

Low-Tack Tape

Magnetic Glass Craft Mat by Glassboard Studio

Misti Stamping Platform by My Sweet Petunia

Big Shot by Sizzix


Please Note: Products marked with an asterisk (*) can be purchased at Topflight Stamps!


Instructions:


Step 1:

Use Tuxedo Black Memento Ink to stamp the Pissy Kitty twice — once onto Kraft cardstock and once onto repositionable sticker paper.


Step 2:

Use Copic markers to color the kitty. Use white gel pen to add highlights to his eyes.


Step 3:

Fussy-cut the sticker paper version of the kitty and place it over its counterpart as a mask.


Step 4: 

Place a ruler horizontally across the image panel, right below the masked cat. Use a Sponge Dauber to apply Grass Green VersaFine Clair Ink over the ruler onto the bottom of the image panel.


Step 5: 

Use low tack tape to secure the image panel to the back of the Grunge Notes Stencil. Secure the stencil to the craft mat with magnets. Use a Sponge Dauber to apply Strawberry VersaFine Clair Ink over the stencil onto the image panel. Remove the stencil and the masks, edge the panel using both Strawberry and VersaFine Clair Inks, then heat set the image panel.


Step 6:

Squeeze a few dollops of Cloud White VersaMagic Ink into a little dish. Use a paint brush to apply white paint to the pom-pom and brim of the Santa hat. Use both Strawberry and VersaFine Clair Inks to edge the image panel.


Steps 7:

Cut a 4” x 5.25” panel from Desert Storm Cardstock to create your own patterned background. Use low tack tape to secure the image panel to the back of the Holly Background Stencil. Secure the stencil to the craft mat with magnets.


Use a Sponge Dauber to apply Grass Green VersaFine Clair Ink over the holly leaves of the stencil onto the background panel (7A). Use a small brush to apply Green Oasis VersaFine Ink, which is a slightly darker green, to the outside of the holly leaves on the stencil to add a touch of shading (Sorry. No photo). 


Use a Sponge Dauber to apply Strawberry VersaFine Clair Ink over the stencil’s holly berries onto the background panel (7B). Remove the stencil, edge with Grass Green VersaFine Ink, and heat set.


Step 8:

Use Grass Green VersaFine Clair Ink to stamp the “Fa La La” sentiment onto a scrap of Kraft cardstock. Remove the stamped scrap from the stamping platform. Heat set.


Use a speech bubble die to cut the sentiment. Edge the die-cut with Strawberry VersaFine Clair Ink. 


Step 9:

Use Tear It! Tape to adhere the sentiment, image panel, and background panel to an A2 Kraft card.


Finished A2 Card


Thanks for visiting today!


Wednesday, December 13, 2023

Have a Holly Jolly Christmas Card


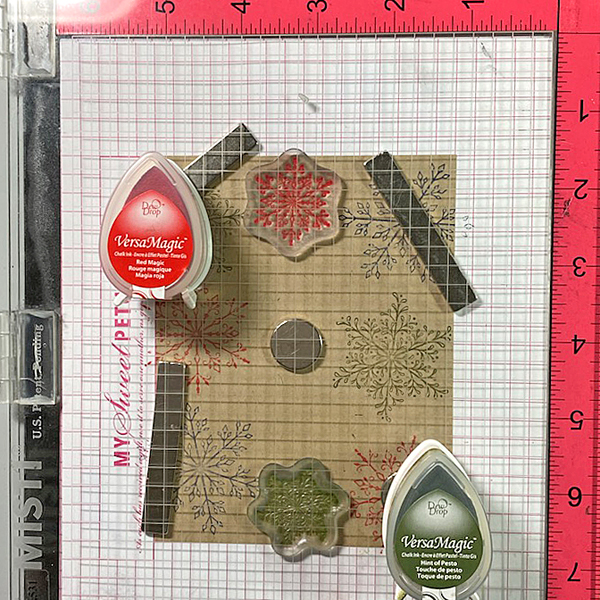
I recently saw a video on Unity Stamps’ Instagram that showed how to use colored inks to stamp snowflakes onto Kraft cardstock. I thought that it would be interesting to try chalk-finish VersaMagic Inks with my new Snowflake Clear Polymer Stamp Sets to see how it would work.


Imagine Crafts Supplies:

Hint of Pesto, Red Magic, and Night Sky VersaMagic Dew Drop Inks

Sponge Daubers

Fantastix

Tear It! Tape

Craft Mat


Other Supplies:

Kraft Cardstock by Bazzill Basics

Snowflakes Clear Polymer Stamp Set by Lavinia Stamps *

Snowflakes Large Clear Polymer Stamp Set by Lavinia Stamps *

Snowflakes Small Clear Polymer Stamp Set by Lavinia Stamps *

Holiday Spruce Make a Tag Cling Rubber Stamp by Unity Stamps

Scalloped Rectangles Nestabilities by Spellbinders

Low-Tack Tape

Post-It Notes

Heat Gun by EK Success

Misti Stamping Platform by My Pretty Petunia

Big Shot by Sizzix


Please Note: Topflight Stamps carries stamps, stencils, and other products by Lavinia Stamps


*The Snowflakes Small Clear Polymer Stamp set is comprised of smaller versions of the snowflakes included in the Snowflakes Large Clear Polymer Stamp set.


Instructions:


Step 1:

Use magnets to secure a 4” x 5.25” piece of Kraft cardstock onto the base of a stamping platform. 


Use Hint of Pesto to stamp the leafy snowflake from the Snowflakes Large Clear Polymer Stamp Set on the top left. Re-ink and stamp again if necessary to create good impression.


Position the spiky snowflake from the same stamp set facedown on the image panel below green-stamped snowflake. Use Red Magic VersaMagic ink to stamp the snowflake (image not shown). Re-ink and stamp again if necessary to create good images. Clean and dry both stamps.


Step 2:

Position the third snowflake stamp from the same stamp set facedown on the bottom left of the image panel. Ink the stamp with Night Sky VersaMagic Ink and stamp. Re-ink and stamp again if necessary to create a good impression. Clean and dry the stamp.


Repeat Steps 1 and 2 along the right edge of the image panel as shown in the card photo above.


Step 3:

Position one of the snowflake stamps from the Snowflakes Small Clear Polymer Stamp Set * facedown in the center top of the image panel. Ink the stamp with Red Magic VersaMagic Ink and stamp. Re-ink and stamp again if necessary to create a good impression. Clean and dry the stamp. 


Continue the process of stamping snowflakes from the Snowflakes Small Stamp set with all three colors of VersaMagic Inks  taking care to clean and dry the stamps between colors. Remove the image panel from the stamping panel and heat set.


Step 4:

Secure a piece of Kraft cardstock to the base of the image panel. Position the Holiday Spruce Rubber Stamp face-down on the image panel. Press the platform’s lid onto the back of the stamp and lift.


Use Post-It Notes to cover all elements of the stamp except for the Christmas Tree. With the Post-It Notes in place, ink the stamp with Hint of Pesto VersaMagic Ink. Remove the Post-It Notes and stamp twice — once onto the image panel and once onto repositionable sticker paper. Fussy-cut the sticker paper version and place over the stamped tree on the image panel.


Use Post-It Notes to cover each element of the Holiday Spruce Rubber Stamp, ink with one of the the VersaMagic Inks, remove the Post-It Notes, and stamp. 


Heat set when the image is completely stamped.


Step 5:

Use low-tack tape to secure a scalloped rectangle die to the sentiment panel. Run the sentiment panel through a die-cutting machine.


Step 6:

Use a sponge dauber and Night Sky VersaMagic Ink to edge both the image panel and the sentiment die-cut. Use a Fantastix to reach between the scallops. Heat set both panels.


Step 7:

Use Tear It! Tape to adhere the image panel to a Kraft A2 Card. Use Tear-It Tape to adhere the sentiment die-cut to finish the card.


Thanks for visiting today!