Tuesday, April 30, 2013

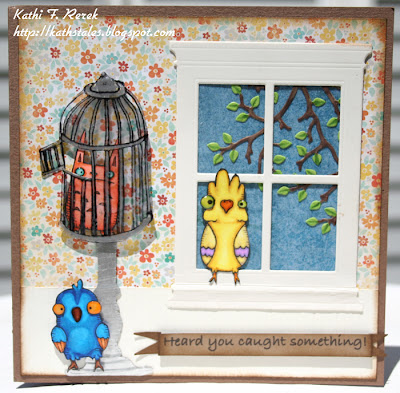
Caught something?

OK. This is a revisit of one of my previous cards, this time with different images. I need to search my archives for the older one, but here is the new one.


The critter images are from Stampotique Originals and are Birdy Up and Line Up. The cage is by justjohanna/odd bird stamps. The critter images were stamped with Tuxedo Black Memento ink onto Neenah paper. They were colored with Copic markers and "fussy cut". Their eyes were touched up with Glossy Accents to make 'em bug eyed. The birdy beaks and birdy feet were touched with Clear Glaze pen. The cage was stamped with Jet Black StazOn ink onto leftover acetate packaging. It was colored (poorly) on the reverse with a silver Krylon leafing pen. It too was fussy cut.

The bird cage's stand is actually the Dressform Alterations that was decapitated, then colored with Krylon leafing pen. The window scene was created with Poppy Stamps Grand Madison Window and Breezy Branches Statement Corner dies. The window is thin chipboard, a layer of clear acetate, then the Copic-colored Breezy Branches Statement Corner which was adhered to a scrap of blue cardstock by Basic Grey.

The patterned paper is from the Collection: Remarkable 6x6 pad by My Mind's Eye.

The sentiment was computer generated, made into a banner, and popped up onto dimensional adhesive.

There are a lot of shadows on my photo, so I might try for a better one later. I had no idea that clear acetate could cast a shadow. Go know.

BTW, I just found two old justjohanna/odd bird planet ones, so here they are, though it really is quite different, the caged kitty concept is there.


Thanks for visiting today!

I shall enter this card in the following challenges:
Stampotique Designers Challenge SDC97: Trimmed Stamped Images -- Darn! Missed it by 45 minutes!
The Crafty Bloggers Network: Anything Goes
Love to Create #63: Punches & Dies
Make It Monday #138: Anything Goes
Challenges for Everybody #19: Anything GOes
Jellypark Challenges: Make us Laugh and Smile
Outlawz Greetings: Anything Goes!

Saturday, April 27, 2013

Time Flies!

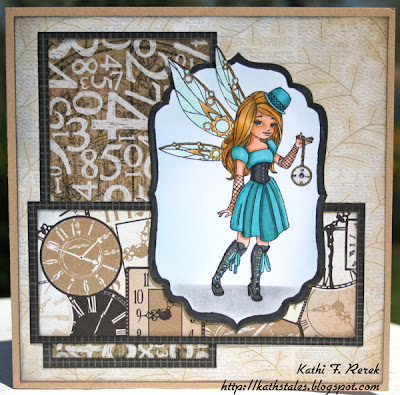
Here's Time Flys, another of the gorgeous new fairy stamps from Elisabeth Bell for SCACD's Fairy Dust collection. This fairy is cute, yet a bit edgy and steampunky, which makes her just about perfect!

I used Sketch #8 from Sketch N Stamp Challenge Blog.


Here's my card:


Time Flys was stamped with Tuxedo Black Memento ink, then colored with Copic markers, which I'll list below. I will mention that apparently I'm in a BG phase. The image panel was die cut using the "out of the box" technique, kept in the die, and Black Soot Distress ink and Summer Sky Memento ink were sponged around the image. When that was done, I liberated the image from its die cut prison, added Gold Spica Glitter pen to her wings and watch fob. Glossy Accents was added to her watch, then the piece was set aside to dry and I otherwise occupied myself because Glossy Accents does not dry when it's watched. It's like water. Yeah.

OK. So fast forward to shiny, dimensional, and DRY Glossy Accents. I went to die cut the next larger Nestabilities and it was freakin' huge and looked totally stupid. So I tried to trace and cut one that was more in keeping with my vision. Yes. I have visions. And I hear voices in my head. Singing or telling me to buy more papercrafting stuff. Really. Um. Yeah. Back to it...Focus! So cutting the next size smoothly using an exacto and/or scissors was an epic fail. But it still needed something, so I tried sticking it into a rectangle. Blech. Yech. Ptoooie. So I got a Copic marker and started to edge it. Keep in mind that my window was open, it's allergy season, and my allergies are always horrific. I bet you can guess what happened. Yep. You got it. I freakin' sneezed and the frackin' marker went skidding across the bottom. So I went with "Plan F" and just used the marker around the inked edges. Not well, but perfection is totally overrated. I'm living proof of that as is this card. But the black was kinda flat, so I added Gold Spica Glitter pen over the black. Much better.

Then I started cutting, edging, and layering the patterned papers. The branchy words and the clock papers are from the Timeless 6x6 pad by Bazzill Basics, which has a lovely texture and has patterns on both sides. I love, Love, LOVE two-sided patterned paper. Makes me feel like I'm getting real bang for my buck, which makes me feel thrifty, so I can listen to those voices in my head that say, "Kathi, go buy more craftin' stuff. You know you need it. You know you want it. You're thrifty, so go for it." But I digress yet again. The numbers patterned paper is from the Engraver 6x6 pad by Prima. It's not two-sided, but I love it anyway. Lastly, I used a sheet of Origins 6x6 paper by Basic Grey because it had a grid pattern that reminded me of her net gloves.

I tried a mess of different embellishments in the upper right corner and none of them spoke to me. Or else I would have listened (even if the voice wasn't in my head). So I decided that less is more and left it be.

The end.

Thanks for visiting today!

Copic markers used:
Skin: E000, E00, E21, E11, BV00
Lips: RV11
Hair: Y21, Y23, Y26, YR21, YR30, E84
Dress: BG53, BG57, BG75, N4, N5, N7 N8
Wings: BG000, BG10
Boots: B5, N7, N4, BG53, BG57

I shall enter this card in the following challenges:
Sketch N Stamp Challenge #112: Sketch challenge
Alphabet Challenge: F is for Fantasy --Fairies are fanciful, right?
Crafts 4 Eternity #121: Perfect Papers
Copic Markers Europe: Girls Aloud
Simon Says Stamp: Anything Goes
Sisterhood of Crafters: Free for all
Outlawz Copic/Promarker Friday: Anything Goes

Wednesday, April 24, 2013

Bombshell's Hump Day Hop!

It's the last Wednesday of April, which means it's time for Bombshell's Hump Day Hop!

Alison has challenged us with a color challenge this month.

Here's the color palette:


You should have gotten here from the talented and lovely Glittery Katie's blog.

I decided to get clever and double up by taking the Bombshell Sketch challenge too!

Here's the sketch. Feel free to use it. If you use your Bombshell stamps, share it with us on Bombshell's blog and/or Bombshell's forum for chances to win your choice of a free set!


Here's my card, which should enlarge if you click it. But it might not. It does for me. *shrug*


The Sheriff Pin-Up from Bombshell's Retro Cowgirls set was colored with Copic markers, which I would have listed below had I not misplaced the scrap of paper where I wrote the markers used. I usually keep the markers out until the card is done, but for some reason, I didn't. And then I misplaced the scrawled note. *sigh* One of those days I guess. In any case, most of the hard work of matching the Copic markers to the color challenge was done by the lovely and talented Alaine, who is also very generous as she gave me the list, which I did modify a bit. FYI, her (the Sheriff's, not Alaine's) kerchief and the stars/diamonds on her boot are deep red. Her boots and her gloves are deep teal. The colors aren't really coming up well since there's no midnight sun here in these parts. :D

The image panel was die cut and Pumice Stone Distress Ink was sponged around her while the cardstock was still in the die.

The patterned papers are from the Figgy Pudding (it's not just for Christmas!) collection by Basic Grey. Deep red waxy flax was criss-crossed per the sketch. Red VersaFine ink was used to stamp the sentiment, which is popped up on dimensional adhesive. Cute little sheriff star die cut charms by My Favorite Things were included to reinforce the western theme.

Thanks for visiting today! Now hop off to Susie's blog. I'm quite sure she'll have something that will inspire you!

Here's the hop list in case you got lost or want to hop again!
Bombshell Blog: http://bombshellstamps.blogspot.com/
Alison: http://alisonsrandomthoughts.blogspot.com/
Kim: http://www.craftypinkanchor.blogspot.com
Kelli: http://www.cajunstampingqueen.blogspot.com
Jodi: http://www.elamdesign33.blogspot.com/
Marnie: http://www.papertivity.blogspot.com
Kapree: http://kc-consultant.blogspot.com/
Monika: http://paperchrome.blogspot.com/
Alaine: http://missalaineousmosaics.blogspot.com/
Glittery Katie: http://ferrishyn-frontier.blogspot.com/
Kathi: http://kathstales.blogspot.com
Susie: http://whiteribboncards.blogspot.co.uk/

Friday, April 19, 2013

Blog Hop Celebrating SCACD's New Stamp Release!

Welcome to your first stop in the blog hop!

Today SCACD is introducing the Fairy Dust Collection!!! These six sweet and sassy fairies will make you smile and brighten anyone's day. Elisabeth Bell sprinkled just the right amount of cute, whimsy, and magic onto these special little fairies. These stamps are great for right now and will doubtless become classics in the future!

The Fairy Dust Collection is available right now SCACD. International friends can get them at Quixotic Paperie.

I'd be remiss if I didn't mention the gorgeous new additions to the SCACD Die collection. These dies are amazing and cut their intricate details with ease. Click HERE to take a look. If you're overseas, click HERE!

So without further ado, here's my first card, which features Key to My Heart, together with the Contempo Compass Statement Corner.
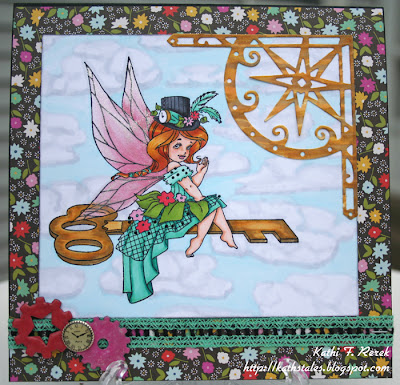


Key to My Heart was stamped with Tuxedo Black Memento ink, then colored with Copic markers, which I'll list below. Clear Gelly Roll Glaze Pen was used on the clock face and on various other spots to add dimension and shine. Her wings were painted with a layer of Winsor & Canson Iridescent Medium to make 'em glittery. The cloudy sky sky was colored with Copic markers as was the Contempo Compass Statement Corner..

I chose the KTMY Fairy's colors based on the patterned paper from the Soho Gardens 6x6 pad by American Crafts.

Lace ribbon from my stash was colored with a BG23 Copic marker to be all matchy matchy. I'm cool like that.

Two Cogworks chipboard gears by Make It Crafty were painted with Ranger Distress paint. Then the two cogs were pressed into the Champagne Dazzle VersaMark pad and heat set with Fine Detail Clear embossing powder. Twice. So that they would be really shiny to appeal to my inner magpie. A small watch charm was added to finish the card.

Here's my second card featuring the Little Acorns, Big Dreams fairy together with SCACD's Breezy Branches Statement Corner die cuts on each corner.


The Little Acorns, Big Dreams fairy was stamped with Tuxedo Black Memento ink, then colored with Copic markers, which I'll list below. I painted two layers of Winsor & Canson's Iridescent Medium onto her wings. Ice White Viva Pearl Pen was used to accent the white dots on her toadstool.

The cloudy sky, both SCACD's Breezy Branches Statement Corners, and the Resting Birds Memory Box die cuts were colored with Copic markers. The colored branches were adhered to the top corners and the birds were added.

I wanted to keep the emphasis on the lovely spring scene, so I punched yellow cardstock, added a ribbon, a triple-loop bow, and called it done!

Now that you've seen two of the stamps from SCACD's great new the Fairy Dust Collection hop along to Elaine's blog where you will be awed by her fabulous creation and see more of SCACD's new Fairy Dust stamp collection! She will guide you to the next stop on the hop. If you do get lost along the way, you can always check in at Hearts and Hugs, SCACD's store blog!

Copic markers used:
Key to My Heart card:
Skin: E000, E00, E11, E21, R20, BV00
Hair: Y11, Y21, Y23, YR23, YR24, E97, E99
Wings: Custom less than R81, R81, R83 (and Iridescent Medium)
Clothing: BG11, BG23, BG34, BG45; YG21, YG25, YG67
Flowers: R35, R81
Key: Y21, Y23, Y26, Y28, E84
Clock on hat: Y23, Y26, Y28
Sky: B0000, B000, C00, C0, C1

Little Acorn, Big Dreams card:
Skin: E000, E00, E11, E21, R20, BV00
Hair: E70, E71, E74, E77, E79
Wings: Y11, Y35, YR15, Y30 (and Iridescent Medium)
Dress: Y000, Y00, Y26, Y32, YR30, E81, E84
Mushroom: R20, R21, R22, R24; E41, E43, E44
Pail: C00, C0, C1, C3
Leaves (Pail): YG11, YG13, YG17
Acorns: E74, E77, E79 (Glaze pen on acorns' shiny bits)
Bow: YR14, Y32
Grass: YG3, YG11, YG13 YG17
Sky: Custom less than B21, C00, C0, C1
Branches: E74, E77, E79
Leaves: YG05, YG7, YG9

I shall enter these projects in the following challenges:
Copic Marker Europe #16: Girls Aloud (only female images)
Forever Friends #59: Diecuts & punches!
Moving Along With The Times: Fantasy and Fairies
Addicted to Stamps and More #41: Anything Goes
Divas by Design: Butterflies and Birds: I've got fairies and birds :D
Paper Take Weekly Challenge: One Paper Taker
The Crafty Bloggers #10: Anything Goes
Thursday, April 11, 2013

A Leap into Art Journaling!

If you visit here every now and then, you probably have watched me slowly slide down that slippery slope into Mixed Media. Since there isn't all that much free wall space in my house, I decided that it was time for me to start an art journal. What you might not have known is that I love to collect cool quotations and keep them on my computer. So, I said to myself, "Self, why not combine an art journal and use it to house favorite quotes?"

So I hied to Michael's with my coupon and purchased a spiral bound Strathmore Mixed Media journal that has 140 lb. cardstock and created this:


Actually, truth be told, the first time I saw Solid Blank Canvas and Woman of Essence the images were part of large sheet of unmounted rubber. I looked at the sheet and thought that the woman was leaping, rather than sitting. I started to think of ways I could convey that. Then I remembered the Chalk Popping Technique and gave it a go. Eureeka! It worked.

I inked up the solid stamp with Frost Dazzle VersaMark ink and stamped it onto blue cardstock. I quickly chalked the image using Pastel Shimmer Pebbles palette chalk, then lightly outlined and shaded the image with chalk pencils. The water was sponged over a handmade wavy paper template using a combination of the Pastel Shimmer and Basic Metallic Shimmer Pebbles palette chalk. This piece was set aside while I worked on the rest of the journal's cover.

I cut two SCACD's Breezy Branches Statement Corners from a scrap of cardstock. I also die cut the words "Art Journal" using a retired Bosskut alphabet and a Spellbinders Ironworks Accents. I adhered the diecuts to a sheet of 140 lb. Strathmore Mixed Media cardstock, brushed gesso over the diecuts, and heat set. Broken China, Salty Ocean, Spun Sugar, and Picket Fence Distress Paints were pounced and sponged over the entire surface and heat set. I repeated this process several times, adding in touches of Chipped Sapphire and Picked Raspberry Distress Paints as desired. Then this piece was set aside to fully dry.

Two more SCACDBreezy Branches Statement Corners were cut from a scrap of black cardstock and painted with Silkz Acrylic Glazes and set aside to dry while I die cut two flocks of Memory Box's Resting Birds from a scrap of shimmery metallic white cardstock. The birds were colored with Copic markers and detailed with Sharpies. Black cardstock was die cut several times using the Ironworks Accents die and painted with Black Leather Jacket Gelate/Sorbet by Art Anthology. "Quotes" was die cut from that same shimmery metallic white cardstock using a retired QuicKutz alphabet. When all the die cuts were cut and the paint was dry, the corners, border, and title were adhered. Then the birds were positioned in the branches and letters.

It still felt a little "blah" to me, so I decided to add some stenciling. Picket Fence Distress Paint was sponged through the Damask stencil by the Crafter's Workshop on the top, left, and right sides. The same paint was used to sponge parts of the Art is... stencil, but for some reason it faded in a bit too much for me, so I sponged Chipped Sapphire Distress Paint over the "Art is" words in three places. I realized that the words "Art Journal", while still raised, had faded into the background a bit too much, so I used a fine brush to paint white Picket Fence over it.

Back when I had this idea, I had gathered several "Leap" quotes and added them to my "Quotes" folder. I used my beloved old AppleWorks drawing module to manipulate them into a border with the word "Leap" over them. I printed the borders out, used my Copics to color the open letters of "Leap", then sponged Distress inks over them. I fussy cut the right side of the quote border and put it aside while I dug the stamped and chalked Blank Canvas Woman of Essence out from under a pile of scraps and such. This was then mounted onto black cardstock, Ironworks borders were adhered, and the type border was added. It still was missing a little something, so I found a very old Mrs. Grossman's Lace border sticker, colored it black, and added it to the left edge. Much better.

Both pieces then went into my garage to be sprayed with two layers of sealant. When they were dry and no longer sticky or stinky, I adhered the stamped piece onto what would soon become my cover. That's when I realized that I screwed up and forgot to trim the width of the cardstock to allow for the spiral coils. Oh no! Fortunately I had a Fiskar's square punch that came to the rescue! I did have to hand cut some of the squares because the punch wouldn't go through the layers and the squares are not perfect, but at least it fixed the problem! Whew!!!

The front and back chipboard covers of the journal were removed by gently separating the metal coils and sliding the covers off the coils. I set aside the back cover and adhered the decorated cardstock cover to the chipboard cover using Scrap Perfect's Best Glue Ever.

Here are a few close ups of the journal!

Upper Left Corner:


Upper Right Cornerish:


Stamped and Chalked Solid Canvas Woman of Essence


Bottom:


Thanks for visiting today!

I shall enter this into the following challenges:
Chalk N Stock: Anything Goes
Forever Friends Challenge #59: Diecuts & Punches
Bearly Mine Challenge #81: Anything Goes
Party Time Tuesdays #115: Anything but a card!
Craft Your Passion Challenge #157: Water, Water Everywhere
The Artistic Stamper Creative Team: Texture challenge


Monday, April 8, 2013

Bombshell Stamps: Muse Monday, featuring the Harley Bikes set!

Over on Bombshell's Blog, we're taking one set per month and showcasing it. Since the Bombshell Girls represent a myriad of styles, there's a great variety of inspiration to be had!

This month, we're featuring the Harley Bikes set.

Here's a look at the set


Here's what I created with it!


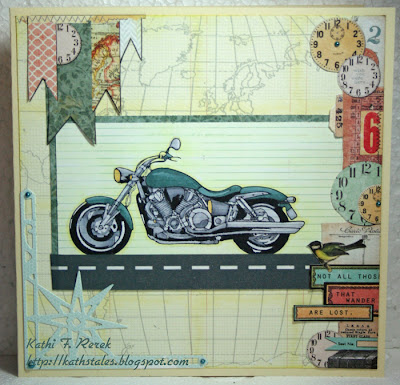
I stamped one of the two motorcycles from this set onto a piece of lined patterned paper from the White Basics 6x6 pad by Basic Grey using Tuxedo Black Memento ink then colored it with my Copic markers using mainly cool greys, BG70, 72, 75, Y21 & 23 for the headlights, and Y000 & Y11 for the background. I still am not good at coloring metal to achieve that shine, but I'll keep practicing! I'm also not very familiar with motorcycles, which probably shows...

I chose my motorcycle's color to match The Wayfarer 6x6 pad by Bazzill Basics. I matted the motorcycle piece onto the teal patterned sheet, then added Street patterned Washi tape. I chose some more patterns from the Wayfarer pad and fussy cut the side border from one and the banners from another. I layered all the pieces together, added part of SCACD's beautiful new Contempo Compass Statement Corner, then added a few teal pearls to finish the piece!

I did not use a sentiment because I really love the quote on the patterned paper which reads "Not all who wander are lost." I can always go back and add one later.

Thanks for visiting today!

Thursday, April 4, 2013

No stamping involved!

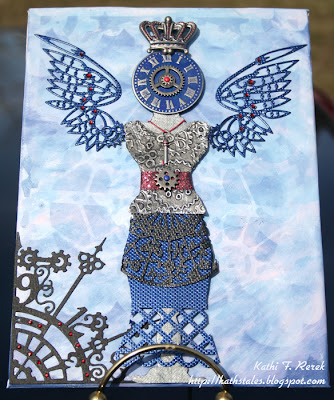
Shocking, but true! Here's a wall hanging that I just completed that does NOT have any stamping whatsoever! Nor does it have any Copic coloring! What it DOES have it lots of layers of paper, paint, ink, plus die cuts. Oh Yeah. There's a bit of stenciling involved too!


So here goes. This wall hanging started out as a flat canvas that I had messed up previously. I brushed Claudine Hellmuth Studio Black Gesso over it so that I'd have a cleanish background. I heat set that, then brushed on a layer of Claudine Hellmuth Studio Gloss Multi Medium to adhere some very old 7 Gyspies map paper over the canvas.

White Linen Dylusions Spray was sprayed over the patterned paper to whitewash it. That layer of paint was heat set, but the tan color was still a bit too strong, so I used my brand-new-to-me Picket Fence Distress Paint to make the background even whiter, yet retain the look of map paper. Now I must admit I was really on the fence about this paint because I really was not happy with the first generation of Paint Dabbers. My plan was to let the product shake out, read the reviews, etc. etc. Me being me, I caved in and got a few colors of the Distress Paints to try out. And I love them. Yay!

So I dabbed on some Picket Fence Distress Paint, spread it out with a cosmetic sponge, then heat set it. Then I grabbed a very old, yet much beloved Clouds stencil by Fairy Tale Creations and started to dab and sponge on Chipped Sapphire, Broken China, Picket Fence, and a tad of Spun Sugar Distress paints over it to create a cloudy background. When I was done I heat set the paint. I went back and added a bit of color here and there as necessary and heat set those as well.

The next step was to grab my Steampunk Lace 6x6 Stencil by Artistcellar, sponge Chipped Sapphire and Spun Sugar Distress inks over it, and heat set. This step was repeated a few times to add a bit more gears and such around the image. Then I set the piece aside for a while.

SCACD's Alice's Clock Statement Corner
was diecut from black textured cardstock and added to the lower left hand corner of the canvas.

Plain Grungeboard was die cut using an Alterations Sewing Room die. I rubbed it with Frost Dazzle VersaMark ink, then dumped on some clear embossing powder. This was done several times to add a nice thick shiny layer to the dressform. I also used the dressform die to die cut Inkssentials Metal Foil Tape and an Inkssentials™ Sticky Back White Canvas ATC. The Foil Tape took a ride through my Big Kick in an Vintaj Steampunk Parts Sizzix DecoEmboss Folder, was adhered onto the Sticky Canvas dress form, and trimmed. Some Black Soot Distress Paint was dabbed onto the embossed tin tape, then rubbed off, leaving the tin with a nice aged look.

I traced the dressform onto a scrap of hoarded blue Bling specialty paper by FiberMark (sadly no longer in the paper crafting biz) and cut it out. A border punch was used on the hem of this part of the skirt. I die cut the black Bling overskirt using SCACD's Nature's Tapestry Fan die, then adhered it over the blue Bling skirt. The outfit was then assembled on the dressform, a glittery ribbon was added for a belt, and an Idea-Ology Mini Metal Gear was added with a blue mini-brad for the belt buckle. A tiny key was colored with a red Sharpie marker, then strung with Red Scrapper's Floss. The dressed dress form was then adhered to the canvas.

SCACD's Steampunk Wings Pair was used to die cut Blue Bling specialty paper. The wings were positioned and adhered to the dress form and the background.

An Ideology Time Piece clock face was painted with Smidge of Blue Claudine Helmuth Studio Paint, allowed to dry, then sanded to reveal the raised metal numbers and details. Another Ideology gear was added to the center of the clock with a red mini-brad. The Regal Adornments Crown by Ideology was highlighted with Sharpie markers, then adhered over the clock with dimensional foam adhesives.

Red Rhinestones were added to the Steampunk Wings Pair and the Alice's Statement Corner die cuts to finish the piece.'

Thanks for visiting today and for reading all of this!

I shall enter this in the following challenges:
Simon Says Stamp & Show: "Anything Goes"
4 Crafty Chicks: #136: Charms
CCEE1314 Things With Wings
Creative Moments: Challenge #14: "Things with Wings"
PaperTake Weekly: Anything Goes
Shopping Our Stash #96: Not Your Ordinary Paper (I used my beloved stash of FiberMark Bling paper)
Through The CraftRoom Door: Anything Goes
• The Crafty Bloggers Network #10: Anything Goes
Inspiration Journal: Marvelous Masks and Spectacular Stencils

Wednesday, April 3, 2013

Bombshell's Ms. April's Challenge: Monochromatic Tag!

Teresa Abajo, who is Bombshell's Ms. April, has issued a challenge to create a monochromatic tag using Bombshell Stamps. Remember to visit Bombshell's Blog and forum so that you can enter your tag in this challenge for a chance to win a great prize (free stamps).

Here's my tag! Click on it to enlarge it!


My tag features the mermaid stamp from Bombshell's Mermaid Treasure set. She was stamped on Neenah white cardstock, using Tuxedo Black Memento ink, and colored with Copic markers which I'll list below. I went over her tail using a Gelly Roll Clear Glaze pen to add dimension and shine to it.

Then I went about creating my scene.

The shipwreck is actually the ship from the Homeward Bound set, which was stamped onto Neenah white cardstock, using Tuxedo Black Memento ink, and colored with Copic markers. I fussy cut the body of the ship and the bow mast thingy (the prow?) and set it aside. The treasure chest was also stamped, colored, and fussy cut.

I colored the sand portion of the scene with Copic markers and then colored over it with a VersaMarker, dumped on Desert Tapestry by PSX, and dumped off the excess. I adhered both the shipwreck and the treasure chest from the Mermaid Anchor set to the sand area of the tag, and repeated the Versamarker/ep process again twice until I was happy with how it looked. I was aiming to make it look like the shipwreck and the treasure chest were partially buried in the sand. I should mention that I've been hoarding this embossing powder for a long time since it creates the perfect sandy look.

Anyway, when that was done, I used my trusty Quicky Glue pen over the gold in the treasure chest, then added gold glitter to look like treasure!

I was delighted to find that I had saved a mermaid mask, so when the glue had dried, I added the mask over the stamped, colored mermaid, and repeatedly stamped the seaweed and the fish stamp, both from the Mermaid Anchor set, over the scene.

The next step was to airbrush the entire tag using my Copic Airbrush system and two colors of BG markers. When that was done, I went over the seaweed and fish to darken 'em up a bit, then added Gelly Roll Clear Glaze pen to all the fish and all the air bubbles.

The tag was finished with some Waxy Flax and a gold anchor charm.

Thanks for visiting today!

Copic Markers used:
Skin: E00, E11, E21, E50, R21
Hair: YR30, Y21, T1, T3
Tail: BG11, BG23, BG34
Starfish: E30, E31, E34
Treasure Chest & Shipwreck: E30, E31, E33, E34
Sand: E30, E34
Airbrushed "sea": BG11, BG32, BG45

I shall enter this tag in the following challenges:
Dragons Dream: Tag It On #138: Blue, Sea, and Stencils
Cards Und More: Add Some Metal
PaperTake Weekly: Anything Goes
Through The CraftRoom Door: Anything Goes