Friday, August 31, 2018

Shall We Dance?

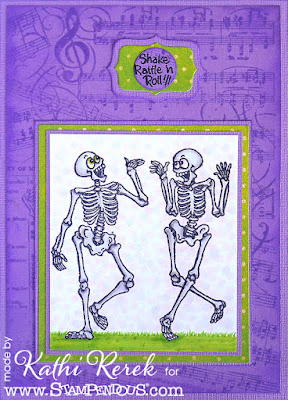
When I saw Stampendous' new Skeleton Humor Perfectly Clear™Stamp set, I immediately thought the skeleton couple should dance. Hence this card. And dancing skeletons would definitely be shaking, rattling, and rolling.  Hence the Skeleton Humor set had the perfect sentiment!


Supplies:
Stampendous Products Used:
Skeleton Humor Perfectly Clear™Stamp set
Decor Cling Music Stamp
Fitted Frames B Die Cut Set
Small Circle from the Build A Wreath Die Set
Mixed Media White Paper
Tuxedo Black Memento™ Ink by Tsukineko

Other Supplies:
Copic Markers: T0, T1, T3, E40, E41, YG01, G21, V01
Tim Holtz® Wilted Violet Distress® Ink by Ranger
Kiwi Very Vintage Double Dot Designs by BoBunny®
Wildflower cardstock by My Colors
Solar White Classic Crest® Cardstock by Neenah Papers

Instructions:
  1. Stamp skeletons with Tuxedo Black Memento ink onto white cardstock.
  2. Color skeletons, grass, and background with Copic markers.
  3. Triple mat image panel with cardstock and patterned paper.
  4. Stamp the Decor Cling Music onto the smooth side of the Wildflower cardstock using Tim Holtz® Wilted Violet Distress ink. Trim and edge the panel with the Distress ink. Adhere to a card made from the Wildflower cardstock.
  5. Using Tuxedo Black Memento ink, stamp the sentiment onto a scrap of the leftover violet cardstock. Die-cut with one of the circles from the Build A Wreath Die Set, then edge with the Distress ink.
  6. Die-cut a scrap of the patterned paper and a scrap of the violet cardstock with two of the small dies from the Fitted Frames B Die Cut Set
  7. Adhere the patterned paper frame die-cut onto the Wilted Violet Frame die-cut, then edge the violet layer with Distress ink. 
  8. Layer the sentiment circle onto the matted frame die-cut.
  9. Adhere the image panel and the sentiment to the card.
Thanks for visiting today!

Monday, August 27, 2018

Fairy Tale Box Card

Interactive cards seem to be all the rage these days and I wanted to join the trend. However, I'm really bad horrible at math and 3D space relations, so I was delighted to discover The Stamp Doctor and all of her terrific dies. She also has quite a few really wonderful stamps, so be sure to check them out when you visit her site.

Here's a box card using the A2 Card in a Box Die Set, several of the stamps from the Fairy Stamps Set(the Whole Set)*, and a tag die from the Tags #1 Die Set.

Front view:

Close Up of the Large Thistle Fairy (in flight)

Close Up of the Iris Fairy (sitting)

Close-up of the Cornflower Fairy (looking down)


The Outside of the Envelope with the Small Peaseblossom Fairy Pair

*Just so you know, the Fairy Stamp Set is huge and is mounted on cling for you, which is a time and money saver. There are four decent sized fairies, a pair of butterfly wings, four small pairs of each of the large fairies (each pair contains a tiny fairy and its mirror image), five mini-Fairy phrases, and three larger sentiments. You can be like me and get the whole set, or you can use the pull-down menu to pick and choose which stamp(s) you'd like.

Supplies used:
A2 Card in a Box Die Set by The Stamp Doctor
Tags #1 Die Set by The Stamp Doctor
Sun Die Set by The Stamp Doctor
Fairy Stamps Set (the Whole Set) by The Stamp Doctor
Tuxedo Black Memento™ Ink Pad by Tsukineko®
Jet Black Archival™ Ink Pad by Ranger
Tim Holtz® Black Soot Distress® Ink by Ranger
Tim Holtz® Old Paper Distress® Ink by Ranger
Solar White Classic Crest® Cardstock by Neenah Paper
Floral/Dot patterned paper from the Sweet Sentiments 8x8 pad by Graphic 45
Green patterned paper from the French Countryside 6x6 pad by Graphic 45
Copic Markers used:
 Skin: E000, E00, E11, E21, BV000, BV00, R20
 Hair: E51, E53, W1, W2, YR30, YR31;  E07, E15, E17, E18; B34, B37, C6, C7, C8
 Dresses: YG61, YG63, YG67; Y32, Y35: BG11, BG23, V22, V25, V29
 Wings: Oops. Forgot to right 'em down. So sorry. 
 Clouds: C0, C00
Clear Sparkle Spectrum Noir Glitter pen by Crafter's Companion
Black Multiliner by Copic
Cloud Punch by Carl Creations
Tiny Clear self-adhesive rhinestones by Recollections
Nuvo® Smooth Precision Glue Pens by Tonic Studios
A2 Invitation Envelope by Staples

Instructions:
  1. Following the instructions that come with the A2 Card in a Box Die Set, die-cut the floral and polka-dotted patterned paper and the green patterned paper with the A2 Card in a Box Die Set
  2. Sponge all the edges with Old Paper Distress ink.
  3. Using wet glue as your adhesive, assemble the box according to the instructions. I chose to have the floral pattern of the two-sided paper on the outside of the box card with the polka-dotted patterned paper showing on the interior and the flaps.
  4. Measure the sides of the box flaps, then cut three panels of the same floral paper and three panels of the green patterned paper to fit. Sponge all edges of the cut patterned paper with Old Paper Distress ink.
  5. Using Jet Black Archival™ ink, stamp the sentiment from the Fairy Stamps Set onto a small scrap of the green patterned paper, then die-cut using one of the the three tags from the Tags #1 Die Set. Edge the die-cut with Black Soot Distress Ink.
  6. Mat the floral patterned paper with the solid green paper, then adhere to the three flaps.
  7. Using Tuxedo Black Memento™ Ink, stamp the Large Cornflower Fairy, The Large Thistle Fairy, and the Large Iris Fairy from the Fairy Stamps Set onto white Copic-friendly cardstock. 
  8. Fussy-cut all three fairies, color with Copic markers, edge with a black Multi-Liner, and add glitter pen to their wings. Set aside to let the glitter dry completely.
  9. Punch white cardstock three times with the cloud punch and color with Copic markers.
  10. Die-cut yellow patterned paper with one of the three suns from the Sun Die Set.
  11. Adhere the sun and the clouds on the back panel of the box (the one without the score).
  12. Cut a thin strip of clear packing plastic, add rhinestones to it, adhere the Thistle Fairy to the thin strip of plastic, and adhere to the back most strip of green patterned paper.
  13. Adhere the Cornflower Fairy to the left of the middle strip.
  14. Adhere the Iris Fairy to the front-most strip.
  15. Using Tuxedo Black Memento™ ink, stamp the two Small Peaseblossom Fairies onto the front of the envelope. Slip a piece of scrap paper into the inside of the envelope, then color the fairies with Copic markers.
Thanks for visiting today!

I shall enter my Box Card into the following challenges:
Friday, August 17, 2018

Balloon Flight

Whimsy Stamps is the sponsor this week at Passionate Paper Creations and Friends. I had also received the Penguin Flies Digi Stamp, so I decided to use it along with my new Center Step Card Die and my Center Step Card Super Set Die Set by The Stamp Doctor.

You may or may not know that I'm really bad at math and also really, really bad at 3D space relations. When I found the Center Step Card Dies by The Stamp Doctor, I had to get the complete package. This set has dies for everything you might need to create a multi-layered Center Step Card, without hurting your brain trying to figure everything out! Best of all, it's on sale now!

So without further ado, here's my card.


Supplies used:
Penguin Flies Digi Stamp by Whimsy Stamps
Center Step Card Die by The Stamp Doctor
Center Step Card Super Set Die Set by The Stamp Doctor
Copic Markers:
 Penguin: N5, N6, N7, YR20, YR21, YR23, RV0000, RV000, B0000, B0000, C00, C0, C1
 Balloons: R05, R17, Y04, Y11, Y13, Y19
 Sky: Solar White Classic Crest® Cardstock by Neenah Paper
Yellow Cardstocks by Bazzill Basics
Ancient and Hoarded Chicken Little Patterned Paper by Cosmo Cricket (the sky paper)
Balloon Patterned Paper from the Cupcake 6x6 Pad by Basic Grey
White Gelly Roll®  Gel Pen by Sakura of America
.005 Pigma® Micron® Pen by Sakura of America

Instructions: 

  1. Resize the Penguin Flies Digi Stamp and print onto white cardstock with a laser printer.
  2. Die-cut the image panel using one of the Tall Layers dies from the Center Step Card Dies.
  3. Color in the sky background first using the
  4. Finish coloring the penguin and the balloons. Use a white gel pen to add white highlights to the balloons. Set aside.
  5. Create your card base with the Center Step Card Base Die from the sky-patterned paper.
  6. Use the other dies to die-cut two shades of yellow cardstock, the sky-patterned paper, and the balloon-patterned paper. 
  7. Assemble all the layers as shown.
  8. Using the Pigma® Micron® pen add some balloon strings to the balloon-patterned paper and trace over the existing ones. 
  9. Adhere the image panel and admire your card.
I didn't add a sentiment because I haven't decided who will get this card for what occasion. That is if I ever send it. I'm big on making cards. Sending them? Not so much.

Thanks for visiting today!

Wednesday, August 15, 2018

Purrfect Friends!

Whimsy Stamps is the sponsor this week at Passionate Paper Creations and Friends. If you've been here before, you know that I do love me some penguins. I also adore cats, so when I went to select a digi stamp to use, I chose Penguin Loves His Kittens.

Here's the card that I created with this fabulous digital stamp!


Supplies Used:
Penguin Loves His Kittens Digital Stamp by Whimsy Stamps
Copic Markers:
 Penguin: B32, B34, N5, N6, N7, Y11, Y13, Y17, Y19, Y26, RV000, RV00,
 Kittens: C00, C0, C1, C2, C3, C4, RV00, RV91
 Kittens' Bows: RV32, RV91, Y11, Y13, Y26
 Grass: YG03, YG05, YG11, YG17
 Sky: BG0000, BG000
Solar White Classic Crest® Cardstock by Neenah Paper
Pink Cardstock by Bazzill Basics
Two Scoops 6x6 patterned paper pad by Basic Grey
Jet Black Archival™ Black Ink by Ranger
Tim Holtz® Black Soot Distress® Ink by Ranger

Instructions:
  1. Fold a piece of 6.25" x 10" pink cardstock in half.
  2. Resize the digital stamp and print out onto white cardstock with a laser printer.
  3. Using Copic markers, color the penguin and kittens as desired and add a background.
  4. Trim the image panel to 3.25" x 4".
  5. Trim pink patterned paper, plaid patterned paper, and pink cardstock as shown. 
  6. Sponge the edges of the patterned paper with Distress® Ink, layer them, and adhere the image panel.
  7. Stamp the sentiment onto pink patterned paper with Archival™ Ink, die-cut with one of the dies, and edge with Distress® Ink.
  8. Cut a 1" wide strip of plaid patterned paper and edge it with Distress® Ink. Mat the strip with pink cardstock.
  9. Cut a piece of polka-dotted patterned paper to 4.75" wide and sponge all edges with Distress® Ink.
  10. Adhere the image panel on the right hand side as shown.
  11. Adhere the strip of plaid patterned paper to the card front and adhere the sentiment.
  12. Mount the card front onto the card.
Thanks for visiting today!

Monday, August 13, 2018

Believe in the Magic!

There's nothing more magical than a unicorn, except perhaps the holiday season. Hence my card with Stampendous' fantastic new Unicorn Christmas and Merry Words Perfectly Clear™ Stamp Set.


Supplies Used:
Stampendous Supplies Used:
Unicorn Christmas
Merry Words Perfectly Clear™ Stamp Set
Fitted Frames A Die Cut Set
Tuxedo Black Memento™ Ink by Tsukineko®
Onyx Black VersaFine Ink by Tsukineko®

Other Supplies used:
Copic Markers:
 Unicorn's Skin: N0, N1, N3, N4, R30, B60
 Unicorn's Mane: BG13, BG32, BG45, YG01, YG03, Y63, YG67
 Unicorn's Horn: Y23, Y26
 Unicorn's Eyes: YG03, YG63, YG67
 Hat: R24, R27, R39, R59, B60, RV0000, RV000, BV0000, BV000, V0000, B0000, B000
 Plants: R12, R14, R24, R27, YG03, YG63
Golden Glitz  Delicata® Ink by Tsukineko®
Black Shimmer Delicata® Ink by Tsukineko®
White Gelly Roll Glaze Pen by Sakura
Solar White Classic Crest® cardstock by Neenah
Wasabi Very Vintage Double Dots paper by BoBunny®
Green and red cardstock
Misti® Stamp Positioner by My Sweet Petunia™

Instructions:
  1. Fold a panel of 8.5" x 5.5" green cardstock in half to form an A2 card.
  2. Cut a piece of red cardstock to 4" x 5.25" and adhere to the green card.
  3. Stamp the Unicorn onto white cardstock and color with Copic markers.
  4. Use the white gel pen to add dots to the red berries.
  5. Die-cut the image panel and red cardstock using one of the pairs of dies from the Fitted Frames A set.
  6. Adhere the image die-cut to the red die-cut.
  7. Using the stamp positioner, place the "Believe" stamp where you'd like it. Stamp onto the card front using Onyx Black VersaFine ink. Keeping the card front and the stamp in place, re-ink the stamp with Golden Glitz Delicata ink, then stamp the gold over the black ink. Repeat this step, using the Black Shimmer Delicata ink. Repeat this step until you are happy with the coverage and shimmer of the sentiment.
  8. Remove the stamp from the positioner.
  9. Keeping the card front in place, position the rest of the sentiment as desired, ink the stamp with Onyx Black VersaFine ink, and stamp.
  10. Adhere the matted image panel to the card front.
  11. Adhere the card front to the green card.
Thanks for visiting today!

Monday, August 6, 2018

Arriba! Fiesta!

As much as I'd like to take credit for the idea behind this tag, I can't. The fabulous Laura Weed gave me the idea and I ran with it! The fabulous new Skeleton Humor Perfectly™ Clear Stamp set includes the two skeletons and fun accessories so you can create some really fun scenes that are perfect year round!

Without further ado, here's the tag!


Stampendous Supplies:
Skeleton Humor Perfectly™ Clear Stamp set
The banner from the Paris Bonjour Cling Rubber set
The banner from the Paris Bonjour Die set
Tiny Alphabet Perfectly Clear™ Stamp set
Mixed Media White Paper
Tuxedo Black Memento™ Ink by Tsukineko


Other Supplies:
Copic Markers:
 Skeletons: E40, E41, E81, E84, T0, T1
 Eyes: YG63, YG67
 Sombrero: E53, E55, R14 R17, R27
 Grass: YG03, YG05,  YG13, YG17
 Background: B0000, B21, B60, BG0000, RV0000, RV000, C00
Desert Sand Memento™ Ink by Tsukineko®
Golden Glitz Delicata™ Ink by Tsukineko®
Kraft and orange cardstock
Solar White Classic Crest® Cardstock by Neenah Papers
Duo Corner Punch by Tonic Studios®
Stamp-A-Ma-Jig® Stamp Positioner by EK Success™
Post-It® Notes by 3M
Copic Multiliner Black pen

Instructions:
  1. Using a piece of Post-It® Note, cover the back part of the skeleton's head and part of his upraised hand, ink with Tuxedo Black Memento ink, remove the masks, and stamp the image onto white cardstock.
  2. Cover part of the other skeleton's head, wrist, and ankle with scraps of Post-It® Notes, ink stamp, remove the scraps, and stamp onto the translucent plastic sheet from the Stamp-A-Ma-Jig®. 
  3. Using the Stamp-A-Ma-Jig®, position the skeleton where you want it on the hand of the other skeleton, replace the scraps of Post-It® Note paper, ink the stamp again, remove the scraps, and stamp.
  4. Using the stamp positioner, stamp the sombrero and the flowers onto the skeletons' heads.
  5. Color both images, the grass, and the background with Copic markers.
  6. Fix any gaps in the images with a fine black pen.
  7. Use the stamp positioner to position the bracelet/anklet and stamp with Golden Glitz Delicata™Ink.
  8. Trim the image panel and mat with orange cardstock. Set aside.
  9. Cut Kraft cardstock and use the corner punch to create the slanted sides, then punch a hole in the top of the tag.
  10. Stamp the banner from the Paris Bonjour Cling Rubber set, then die-cut with the banner die.
  11. Stamp the sentiments as shown.
  12. Adhere the matted image panel and adhere the sentiment banner.
Thanks for visiting today!

Thanks for visiting today!

Sunday, August 5, 2018

Fragile!

It feels like forever since I've gotten out my paints and had a play. It felt great!

Here's my mixed media Steampunk tag using Stampendous' new Wings Die Set with the Cling Clock Collage 6x6 Rubber Stamp, the Music Score Rubber Stamp, the Handle with Care Cling Rubber Stamp Set, and the Quest Texture Cube Stamp.


Supplies Used:
Stampendous Supplies Used:

Other Supplies Used:
Large Chipboard Tags by Prima Marketing
Black Media® Gesso by DecoArt®
Silver Metallic, Quinacridone Gold, Quinacridone Red, Cobalt Turquoise Hue, Cerulean Blue, Translucent White, and Carbon Black Media® Fluid Acrylic Paints by DecoArt®
3D Foam Squares Black Mix by Scrapbook Adhesives by 3L
Jet Black Archival™ by Ranger Industries
Tim Holtz® Timepieces by Idea-ology/Advantus
Vintage Clock Face Mechanicals by Prima
Small Metal Gear
Screw Top Brad
Ribbon Tag Die by Spellbinders®
Classic Crest®  Epic Black Thick Cardstock by Neenah Paper®
Black Specialty Paper by FibreMark
Embossing Styluses of different widths
Baby Wipes
Cosmetic Sponges
Old dead credit card


Directions:
  1. Using a palette knife and a credit card, apply black gesso to the chipboard tag. 
  2. Stamp into the wet gesso with one of the stamps on the Quest Texture Cube. Set aside the tag to air dry.
  3. The Wings die-cut set includes several pairs of wing  heart dies in different sizes. Each size wing die set has an outline die and an inner die that embosses while it cuts the inner section.
  4. Die-cut thick black cardstock with once with one of the hearts and twice with one set of wing dies. 
  5. Take all four wing die-cuts and place them between folded scrap paper on top of your cutting platform. Place both cutting plates over top, and run this sandwich through your die-cut machine at least twice to flatten the die-cuts so that they can be used as mirror image dies.
  6. Sponge Metallic Silver Media® Fluid Acrylic paint onto all four of the wings. Heat set, then dry brush Quinacridone Gold MFA paint over the wings, spread the paint with your fingers, and wipe back as needed with a baby wipe. Heat set, then use the baby wipe to add a tiny bit of Cobalt Turquoise Hue MFA paint to the wings. Wipe back and heat set. Set wings aside.
  7. Sponge Metallic Silver Media® Fluid Acrylic paint onto the heart die-cut. Heat set, dry brush Quinacridone Red MFA onto the heart, and wipe back with a baby wipe. Heat set the heart.
  8. Using Jet Black Archival ink, stamp the heart with the Music Score Stamp and heat set.
  9. Flip the four wings and the heart over and use embossing styluses to add dimension to the heart and the wings.
  10. Adhere inner part of each wing die-cut to the corresponding outline die-cut.
  11. Apply Metallic Silver MFA paint directly to the tag and randomly spread the paint with a credit card until you're happy with the coverage. Heat set.
  12. Mix Translucent White and Cerulean Blue MFA paints and sponge over the silver painted tag. Heat set.
  13. Using Jet Black Archival ink, stamp the Clock Collage over the tag. Heat set. 
  14. Apply Metallic Silver MFA paint to a craft sheet. Add a drop of Carbon Black MFA paint, then spread the paint with a brayer. Immediate press the swirly design of the Quest Texture Cube into the paint, and stamp onto the tag. Spread the paint with the brayer again, press the diamond plate stamp design of the Quest Texture Cube into the paint, and stamp onto the tag. 
  15. Repeat Step 14 until you're happy with the result. Heat set.
  16. Edge the entire tag with Jet Black Archival Ink and heat set.
  17. Sponge Metallic Silver Media® Fluid Acrylic paint onto a scrap of black cardstock.  Heat set, then dry brush Quinacridone Gold MFA paint over top, and spread with your fingers. Heat set.
  18. Using Onyx Black VersaFine ink, stamp the sentiment onto the scrap of cardstock. Immediately  pour on Detail Clear Embossing Powder, dump off the excess, and heat set. 
  19. Die-cut the sentiment with a Ribbon Tag Die, then edge with Jet Black Archival Ink.
  20. Cut two small strips of textured specialty paper. 
  21. Adhere the sentiment tag, add the two strips, fold around the the tag, adhering the strips to the reverse of the tag.
  22. Using dimensional foam adhesive, adhere the heart and wings to the tag as shown.
  23. Using your fingertip, apply Quinacridone Gold MFA paint to the Timepiece, then wipe back with a soft cloth. Use an emery board to sand the paint off of the numbers.
  24. Adhere the Timepiece to the Mechanical with wet glue. Let dry. 
  25. Use the brad to adhere the small gear to the Timepiece/Mechanical combination. Place foam adhesive into the recess between the Mechanical and the Timepiece. Adhere to the top of the tag as shown.
Thanks for visiting today.

I shall enter this tag into the following challenges: