Showing posts with label Taylored Expressions. Show all posts

Sunday, October 18, 2020

Fa-Boo-Lous!

I don't know about you, but I get tired of seeing crone-haggy witches, probably because they look like me. So when I first saw Sassy and Crafty's new Sassy Girls Spooky Clear Stamp Set, I thought it was Fa-Boo-Lous. 

Here's my first card using this set.


Products Used:
Halloween Mini-Strips Cling Rubber Stamp by Taylored Expressions
Solar White Classic Crest® Cardstock by Neenah Papers
Black and Orange Cardstock by Bazzill Basics®
Tuxedo Black Memento™ Ink by Tsukineko®
Blueprint Sketch, Chipped Sapphire, Mowed Lawn, Forest Moss, and Black Soot Distress® Inks by Tim Holtz® for Ranger Industries
Nocturne VersaFine Clair™ Ink by Tsukineko
Fresh Snow Hybrid Ink by Paper Trey Ink
Copic® Markers:
   Skin: BV0000, BV000, E50, E21, E11, E00, 
   Lips: E04, R32, R56
   Cheeks: R20
   Hair: E08, E19
   Dress, Hat, and Shoes:  C6, C7, C8, V15, V17, V28, B24, B45, BV000
   Pumpkin: Y02, Y06, Y13, YR16, YR18, YR21, YR24, YR27, E09, E19, E44, E47, E49
Mini Strips Die by Taylored Expressions
Circles Nestabilities® Die Set by Spellbinders®
Removable ID Labels by Avery®
STAY-tion by Wendy Vecchi for Ranger Industries
Stamping Platform

*PSA: There are lots of fantastic new products at Topflight Stamps, so you should definitely click on over there after reading my instructions! BTW, if you'd like to get 12% off your order at Topflight Stamps use THIS LINK!

Instructions:
  1. Cut a piece of black cardstock to 8.25" x 9.25", score at 4 1/8", and fold to form a slimline-ish card that will fit in a #10 envelope. Set aside.
  2. Cut a piece of white card in half horizontally.
  3. Place a piece into the stamping platform and secure with magnets.
  4. Position the witch and pumpkin stamp towards the bottom of the paper, press the lid onto the stamp, and lift.
  5. Use Memento ink to stamp the image onto the paper to create the image panel..
  6. Repeat #5, this time stamping onto a piece of Removable Label paper to create a mask.
  7. Fussy-cut the label version and place it atop its counterpart on the image panel.
  8. Use one of the circle dies to cut a scrap of the label paper.
  9. Adhere the circle onto the image panel as shown to create a moon.
  10. Remove the image panel from the stamping platform. Remove stamps and clean 'em. Or not. Whatever floats your boat.
  11. Place the image panel onto the STAY-tion and secure with magnets.
  12. Place the ruler that comes with the STAY-tion horizontally across the image panel where you think the ground should be.
  13. Sponge** Blueprint Sketch Distress ink over the panel starting at the ruler and working your way up.
  14. Sponge Chipped Sapphire Distress ink over the panel, concentrating the ink towards the top, along the edges, and on the right side of the witch and pumpkin.
  15. I should have heat set, but I didn't. Luckily there were no huge mishaps.
  16. Lift the ruler and tear a scrap of cardstock that is wide enough to use as a mask-ish piece, and place it where the ruler was, so that the torn part is facing downwards.
  17. Sponge Forest Moss Distress ink over the torn edge of the cardstock at the border between the blue and the uninked part of the image panel. 
  18. Move the torn piece slightly down and continue to sponge Forest Moss Distress ink over the torn edge.
  19. Flip the torn edge and repeat step #18.
  20. Repeat steps #17 and #18, this time using Mown Lawn Distress ink until the "grass" part of the image panel is completely inked.
  21. Replace the strip of torn cardstock at the horizon with the torn edge facing down and lightly sponge Black Soot Distress ink to add dimension to the area where the sky meets the grass.
  22. Move the strip of torn cardstock downwards and randomly sponge Black Soot Distress ink to add more shadow to the grass.
  23. Wipe the image panel with a tissue or soft cloth to remove any wet ink.
  24. Remove all the masks.
  25. Color the image with Copic markers.
  26. Place the image panel back into the stamping platform and secure with magnets.
  27. Position the Bat Colony stamp as desired, press the platform's lid onto the stamp, and lift.
  28. Ink the stamp with Nocturne VersaFine Clair, which works well when stamping over other inks and/or stamping fine line images or sentiments.
  29. Stamp the image, repeat if necessary.
  30. Lift the image panel and clean the stamp.
  31. Trim the image panel to 3 7/8" x 8 7/8" and edge with Black Soot Distress ink.
  32. Trim orange cardstock to 4" x 9" and use to mat the image panel
  33. Adhere the matted image panel to the card.
  34. Use white ink to stamp the sentiments onto black cardstock.
  35.  Use the corresponding die to cut the sentiments and adhere the desired sentiment to the card to finish it.
**I now mostly use make-up brushes or the like to do my ink blending. However, old habits die hard. Hence "sponge".

Thanks for visiting today!

Tuesday, October 13, 2020

Merry Christmas

It's Tuesday, which means it's time to share a project created for Topflight Stamps! This week my teammates and I are sharing Christmas-themed projects, albeit during Halloween season! Oh! The Horror!

I chose to create both cards using the whimsical and wonderful Zinski Art 17 Rubber Cling Mounted Stamp Set by PaperArtsy. I also used the Snowflakes Background Rubber Cling Stamp by Darkroom Door and the Classic Sentiments Clear Stamps by Heffy Doodle.

Here's the first card, which uses two of the elves and the sentiment from the Zinski Art 17 Rubber Cling Mounted Stamp Set.


Topflight products used for both cards:

Other products Used for both cards:
Solar White Classic Crest® Cardstock by Neenah Papers
Red Cardstock by Bazzill Basics Papers
Tuxedo Black, Summer Sky, Lulu Lavender, London Fog, and Memento™ Inks by Tsukineko®
Fresh Snow Hybrid Ink by PaperTrey Ink
Brick Red and Aged Mahogany Distress® Ink by Tim Holtz® for Ranger Industries
Copic® Markers:
   Elves' Skin: BV0000, BV000, E50, E21, E11, E00, E000, R20, R81
   Girl Ef's Lips: E04, R30, R32
   Elves' Eyes: C1, B21
   Girl's Braids: E44, E47, YR31
   Clothing: G12, G20, G21, G24, G28, R37, R39, R56
   Big Bird: Y13, Y26, Y28, R32, E44, B21
   Small Bird: YG13, YG17, R24, R27, R37, 
   Ground: C0, C1, C3
Shapeabilities Dies by Spellbinders®
Simple Strips Dies by Taylored Expressions
Scalloped Frame Die Set by Gina Marie Designs
Clear Stardust® Glitter Pen by Sakura
Cotton Ball White Fun Flock by Stampendous!®
Knit Picky 6x6 Patterned Paper Pad by Lawn Fawn
Merry Days of Christmas 6x6 Patterned Paper Pad by My Mind's Eye™
Quickie™ Glue Pen by Sakura
Removable ID Labels by Avery®
STAY-tion by Wendy Vecchi for Ranger Industries
Stamping Platform

PSA: There are lots of fantastic new products at Topflight Stamps, so you should definitely click on over there after reading my instructions! BTW, if you'd like to get 12% off your order at Topflight Stamps use THIS LINK!

Instructions for the Elves Card:
  1. Cut red 12x12 cardstock in half, reserve half.
  2. Score at 6" and fold to form a 6" square card. Set aside.
  3. Use Tuxedo Black Memento ink to stamp the boy elf from the Zinski Art 17 Rubber Cling Mounted Set onto white cardstock and onto repositionable label paper to use as a mask. 
  4. Fussy-cut repositionable label paper image and place atop the elf on the cardstock.
  5. Position the girl elf on the image panel then stamp her onto cardstock and onto repositionable label paper
  6. Fussy-cut the girl elf and place her over her counterpart.
  7. Place the image panel on the STAY-tion and secure with magnets.
  8.  Cover the base of the image panel with a piece of torn paper and sponge Summer Sky, Lulu Lavender, and London Fog Memento ink over the masked images.
  9. Remove image panel from STAY-tion.
  10. Position the image panel onto the base of the stamping platform and secure with magnets.
  11. Position the Snowflakes Background Rubber Cling Stamp onto the image panel as desired. Press the lid of the stamping platform onto the stamp, then lift.
  12. Ink the stamp with white hybrid ink and stamp over the masked elves and the inked background onto the image panel. 
  13. Repeat Step #12 until you're happy with the snowflakes. :D
  14. Remove the image panel from the platform.
  15. Lift the masks and color the images and the snowy ground with Copic markers. 
  16. Add clear glitter pen to the ground and center of each snowflake to add a touch of glitter.
  17. Stamp the sentiment was stamped onto patterned paper from the MME pad, then die-cut. 
  18. Layer the patterned paper from the same pad to create a card front. 
  19. Trim to 5.75" square and edge with Distress ink.
  20. Adhere the image panel and the sentiment as shown.
  21. Adhere the card front to finish the card.
Here's the second card using the large and small birds from the Zinski Art 17 Rubber Cling Mounted Set, which also includes a super-cute penguin and a stack of gifts with elves hiding in it! I didn't use them, but I will!


Instructions for the Merry Christmas Bird Card:
  1. Cut a piece of red cardstock to 8.5" x 5.5", score at 4.25", and fold to form an A2 card. Set aside.
  2. Stamp the little Santa bird with Tuxedo Black Memento ink onto white cardstock, fussy-cut, color with Copic markers, edge with a black pen, and set aside.
  3. Stamp the big bird onto white carstock with Tuxedo Black Memento ink.
  4. He reminded me of Big Bird so he was colored with yellow markers. His scarf and boots were colored with red and green markers and he got pink cheeks. 
  5. Red-knit patterned paper  from the Knit Picky pad was cut with a scalloped frame die.
  6. The image panel was trimmed and adhered behind the frame die-cut.
  7. Once the image panel was secure in its frame, the green bird was adhered as shown. 
  8. Both the green and yellow birds' eyes received some Glossy Accents to make them a dimensional. 
  9. A dot of Quickie glue was used added to the pom-pom on the Santa hat and Fun Flock was sprinkled over the wet glue, and allowed to dry.
  10. The excess was blown off and step #8 was repeated.
  11. Grey knit-patterned paper and red cardstock were die-cut with the Simple Strips dies.
  12. The sentiment, from the wonderfully useful Classic Sentiments Clear Stamp Set, was stamped onto one of the strips of the grey-knit patterned paper then matted with a red cardstock die-cut.
  13. Patterned paper from the same patterned paper pad was layered to create the card front, the framed image panel was secured, and the sentiment adhered to finish the card.
Thanks for visiting today!

Saturday, May 9, 2020

A Rockin' 60th Birthday Card!

My favorite brother-in-law turned 60 last week. He loves Classic Rock, especially The Rolling Stones, Beatles, and The Grateful Dead, so I decided to make him a music-themed birthday card.

Alas, I could not find any stamps featuring iconic musicians, so I resorted to a Google search, where I found a fabulous caricature, which I promptly purchased along with a Keith Richards caricature. I created the card, mailed it, and it arrived on time. My brother-in-law loved it and gave his permission to share it with you all.

Here's the card.

Products Used:
Mick Caricature from GraphicsFactory.com
Solar White Classic Crest® Cardstock by Neenah Paper
Black and Red cardstock by Bazzill Basics
Patterned Paper: Source Unknown
Copic Markers:
    Skin: BV0000, BV000, E50, E21, E11, E00, R20
    Lips: 04, R30, R32, RV42
    Mouth: RV93, R95, RV99
    Tongue: RV42, RV93, R30, R32
    Teeth: T0, YR0000, YR30
    Hair: E44, E47, E49
    Clothes: B26, B39, R27, R39
    Microphone: C4, C6, C8
Silver Stardust® Glitter Gel Pen by Sakura
White Gelly Roll® Gel Pen by Sakura.
Pale Ochre and Jet Black Archival™ Ink by Ranger Industries
London Fog Memento™ Ink by Tsukineko®
Barn Door and Blueprint Sketch Distress® Ink by Tim Holtz®/Ranger Industries
Play Guitar Stencil by Visible Image *
Super Hero Rays Stencil by Paper Rose *
Simple Strips Birthday Stamp by Taylored Expressions
Simple Strips Die by Taylored Expressions
A Hint of Lime Die by Die-Versions
Sun Die by The Stamp Doctor
STAY-tion™ by Wendy Vecchi/Ranger Industries
Sun Die by The Stamp Doctor
Removable ID Labels by Avery®

* Please Note: You can purchase products by Visible Image and Paper Rose at Topflight Stamps, where you'd can get 12% off your order at Topflight Stamps by using THIS LINK.

Instructions: 
  1. Cut, score, and fold red cardstock to create an A2 card.
  2. Find a piece of music notation patterned paper.
  3. Secure the music notation paper to the STAY-tion using magnets and sponge the entire piece with Pale Ochre ink.
  4. Lift the magnets, position the Play Guitar stencil over the patterned paper, and secure with magnets.
  5. Sponge Barn Door and Blueprint Sketch Distress ink over the stencil as shown.
  6. Lift stencil, trim the patterned paper, and edge with the same colors of Distress inks.
  7. Adhere the stenciled, trimmed, and edged patterned paper to the red card. Set aside for now.
  8. Download clipart image, resize using photo editing software (I use PhotoElements), and print onto Copic friendly cardstock and onto label paper using a laser printer.
  9. Fussy-cut the label paper image and place over its counterpart on the white cardstock.
  10. Secure the white cardstock image panel to the STAY-tion with magnets. 
  11. Place the magnetic ruler horizontally across the image where you want the stage floor to be.
  12. Sponge Ochre Archival Ink over the masked image.
  13. Position the Super Hero Rays stencil over the image as desired. Secure the stencil with magnets. 
  14. Sponge Pale Ochre over the Super Hero Rays stencil.
  15. Reposition the magnetic ruler to cover the top part of the image panel.
  16. Sponge London Fog Memento ink over the masked image on the image panel.
  17. Lift the mask and reserve for another occasion.
  18. Color the image with Copic markers. Use the glitter pen to add sparkle to the microphone. Add white gel pen to the shoes.
  19. Sponge Pale Ochre ink over a piece white cardstock, then cut with the sun die. Reserve the rest of  sponged yellow cardstock.
  20. Mat the image panel with black cardstock.
  21. Use the alphabet (which has numbers) die to cut black cardstock.
  22. Adhere the number 60 onto the sun. 
  23. Adhere the sun to the image panel as shown.
  24. Using Jet Black Archival ink, stamp Simple Strips Birthday onto the reserved piece of sponged Yellow Ochre cardstock, the use the Simple Strips die, to cut the strips.
  25. Adhere the strips as shown to finish the card.
**Another Note: I did finish the inside of the card with additional Simple Strips and personalized commentary. 

Tuesday, August 15, 2017

Steampunk Nautilus Journal Page

Another Tuesday, another IBFS Steampunk project! This one is a journal page featuring Steampunk Nautilus from the New Steampunk rubber stamp set by Carmen Medlin Designsavailable at I Brake for Stamps.


Steampunk Nautilus was stamped with Tuxedo Black Memento ink (Imagine Crafts) onto Neenah cardstock, then the image panel was die-cut with one of the dies from the Rectangles Nestabilities die set (Spellbinders).  Steampunk Nautilus was colored with Copic markers and the image panel was sponged with Vintage Photo Distress Oxide ink (Ranger). I used a q-tip dipped into water to wet the ink, then heat set the image panel, matted it onto metallic copper cardstock (Neenah) and set it aside.

140 lb. Mixed Media cardstock (Strathmore) was cut down to fit in my journal. Salty Ocean Distress Oxide ink was sponged onto the Gears Skinny Minny stencil/mask (Joggles) and spritzed with water. Once the water beaded, the journal page was placed over top and smoothed over the stencil.

Peacock Feathers Distress Oxide ink was smooshed onto my craft mat, misted with water, the journal page was dragged through the puddled ink, spritzed with more water, then heat set. This was repeated a few times until I was happy with the coverage. This process was repeated again with Cracked Pistachio Distress Oxide ink.

Vintage Photo Distress Oxide ink was sponged across the bottom of the journal page, spritzed with water, and heat set. Iced Spruce Distress Oxide ink was sponged over the Moving Vines stencil (The Crafter's Workshop) at the bottom of the page and over the Gears Mini Layering stencil (Stampers Anonymous) at the top of the page. The ink was misted with water, allowed to spread a bit, then heat set.

Strips of 140 lb. Mixed Media cardstock were sponged with Abandoned Coral Distress Oxide ink, misted with water, then heat set. These pieces were die-cut with the coral die from the Under Water Build-a-Scene die set (Taylored Expressions).

Other strips of Mixed Media cardstock were sponged with Peeled Paint, Twisted Citron, and Lucky Clover Distress Oxide inks, then die-cut with the Seaweed Stalks die set (Memory Box).

The Seaweed Stalks and coral die-cuts were adhered along the bottom of the journal page, then Media Texture Sand Paste (DecoArt) was spread over the Vintage Photo Distress Oxide ink and the die-cuts. Some tiny pewter, brass, and copper  metal gears were pressed into the Media Texture Sand Paste. The page was set aside while I made and ate dinner. When I returned, the Texture Sand Paste was mostly dry, so it was heat set to totally dry it out. I did use my Vintage Photo Distress marker (Ranger) to add some depth and detail to the "sand".

Metallic copper cardstock was die-cut with the Small Alphabet Word Upper and Lower Case dies (All Occasion) and adhered to the top of the journal page.

A Remnant Rub (Idea-ology) was used to add the caption to the Steampunk Nautilus image panel, which was then adhered to the journal page using Black Photo Corners (3L Scrapbook Adhesives).

I Brake for Stamps has a huge and varied collection of rubber stamps that you ought to check out right now. Just so you know, I Brake for Stamps ships internationally!

Click HERE to be whisked I Brake for Stamps to check out all of the goodies! Best of all, if you buy something, you can get a 10% discount off of your purchase if you use this code: SAVE10KATHI .


Thanks for visiting today!

Tuesday, August 16, 2016

A Gnome Gnote Pad

Gnomes make me giggle. Bad gnome puns totally amuse me. I needed a new notepad to carry around since I lost mine recently.
This is what happened. 


Whenever I see small plain note pads (especially pads with an attached pen), I usually purchase several because I'm at the stage of life that if I don't write something down, I forget it. By extension, I lose the darned note pads all.the.freaking.time. Plain note pads are fun to decorate and  also make great gifts. Let me know if you want one and maybe you'll actually get one. That is if I remember.

This pad Gnote pad features the Digging Gnome from the Gnome Sheet (I Brake for Stamps). The Digging Gnome is one of NINE (9) gnomes and a mess of mushrooms on that sheet. It's a Gnoteworthy bargain indeed.

The Digging Gnome was stamped with Tuxedo Black Memento ink (Imagine Crafts), fussy-cut, colored with Copic markers, and edged with a black marker. He was set aside while I decorated his Gnote pad.

Media Black Gesso (DecoArt) was carefully applied to the covers on both the outside and the inside. A piece of 140 lb. Mixed Media cardstock was cut to size, the top and bottom corners on the right side were rounded with a Corner Rounder punch, run through my Big Kick inside a Sheet Music embossing folder, painted with Media Fluid Acrylic paints (DecoArt), and allowed to dry. When the paint was dry, it was coated with a layer of Media Multi Medium (DecoArt) to seal it.

Two colors of green Archival ink were sponged over the foliage on a mushroom stencil onto the painted corner-rounded panel. Brown MFA paints were used to add the ground to the scene.

White cardstock was die-cut with some mushroom dies and the font was cut as well. The mushroom dies were colored with Copic markers, but Titanium White MFA paint was used to add white dots to them. The title letters were painted with MFA paint to match the ground.

The mushrooms, the Digging Gnome, and the title letters were adhered to the painted, stenciled panel with Media Multi-Medium. The same brown MFA paint was used to add some dirt to the Digging Gnome's shovel. The image panel was adhered to the note pad, the edges were sponged with Jet Black StazOn ink (Imagine Crafts), and several layers of Media Ultra Matte Varnish (DecoArt) were brushed over the entire Gnote pad to seal and protect it.

I Brake for Stamps has a huge and varied collection of rubber stamps that you ought to check out right now. Click on my badge below to be whisked over to I Brake for Stamps to check out all of the goodies! Best of all, if you buy something, you can get a 10% discount off of your purchase if you use this code: SAVE10KATHI!


Thanks for visiting today!

Thursday, April 14, 2016

Decisions at the 5:00 Bar!

I'm the hostess this week at Stampotique Designer's Challenges. My challenge is called "Crack Me Up"! Here's what I said about it.
"Create a humorous project that also has crackled texture!"
If you'd like the chance to win your choice of $30 worth of Stampotique stamps, you should play along with this challenge. Visit Stampotique Designers Challenge blog and be sure to read the rules so that you'll have the chance to win that great prize!!! Remember to check to see the deadline for all of this month's Stampotique Designers Challenges!

Here's my second card for my challenge, which I hope is funnier than my first. I used Stampotique's  Moody (Daniel Torrente) and Banner (France Papillon).


Moody was stamped with Tuxedo Black Memento ink (Imagine Crafts), colored with Copic markers, fussy-cut, then edged with a Black Pitt Artist pen (Faber Castell). Just Moody's hands were stamped, colored, fussy-cut, and edged with marker. Both Moody and her spare pair of hands was set aside while I created a background scene for her.

A piece of 140 lb. Mixed Media cardstock (Strathmore) was sponged with White Media Gesso (Deco Art) and allowed to dry. It was then painted with  Vermillion Media Fluid Acrylic (MFA) paint (DecoArt) that had been mixed with Titan Buff MFA paint. When dry, it was coated with a layer of Media Matte Medium (Deco Art) and allowed to dry.

After an hour of wrestling with my mad arithmetic skillz and proving my genius on Facebook, I mixed four parts of Media Crackle Paint (DecoArt)* with one part Raw Sienna MFA paint, stirred it really well, then painted a thick layer of this combo over the piece. I crossed my fingers, set the piece aside, and hoped that I hadn't diluted the Media Crackle Paint too much so that the cracking miracle would occur!

The next step was to die-cut white cardstock with the Cocktail Party die (Taylored Expressions)*, color the drinks with Copic markers, add a touch of Clear Stardust Glitter Gel pen (Sakura)* to drinks with festive rims, then coat all the glasses/bottles with several layers of Clear Gelly Glaze pen (Sakura)*.

Three layers of cardstock were cut to 5/8" x 5" wide, stacked, then adhered together, colored with Copic markers, then coated with a layer of Media Crackle Glaze (DecoArt), then set aside to crackle.
Fence post dies (source unknown - oops) received the same treatment. When all the pieces were dry, the Cocktail Party die was adhered to the 5/8" x 5" wide painted, crackled strip with 1/8" wide red-liner tape.

The Banner was stamped with Jet Black Archival ink (Ranger) onto white canvas specialty paper, then painted with translucent colors of Media Fluid Acrylic paint to match Moody. The Banner was fussy-cut, then touched up with my Black Pitt Artist pen. Very, very old rub-on letters were used to add the bar's name to the Banner, which was then coated with a layer of Media Matte Medium to seal it.


It was time to check to see if my colored Crackle Paint had crackled. Lo and behold, it had! It was time to start to build my scene. The crackled painted cardstock was die-cut with the largest die from the 5 x 7 Card Creator die set (Spellbinders). Wood-patterned washi tape was added to the base. Moody was adhered to the card front. The Cocktail Party bar was adhered over Moody with little foam dimensional adhesive squares behind each drink. Moody's spare hands were adhered to their counterparts with Moody's hands holding two drinks. The crackled bar legs were attached, then Dymo tape, spelling out the card's sentiment, was added!

A variety of rub-ons from my hoarded Steampunk Collection and the Whimsy Elements sheets (7 Gypsy) were added to the crackled background, the card front was edged with Jet Black Archival ink, then adhered to a pre-made 5x7 card. The painted, lettered, sealed Banner was adhered to the card with dimensional foam adhesive. Flowers and a gemstone were added to Moody's hair to finish the card.

* = on sale at SCACD!

Thanks for visiting today and reading all my blather!

I shall enter this card into the following challenges:
Through The Purple Haze Challenges: Layers
Crafty Gals Corner Challenges: Die-cuts or Punches
Scrapy Land Challenges: Die-cuts/Anything Goes

Wednesday, December 9, 2015

Alphabets

Claudine Criner is the hostess at Stampotique Designers Challenge Blog and her theme is "Alphabets". Here's what she had to say about her challenge.
 "Use your alphabet stamps or images to create a letter of the alphabet."
If you'd like the chance to win your choice of $30 worth of Stampotique stamps, you should play along with this challenge. Visit Stampotique Designers Challenge blog and be sure to read the rules so that you'll have the chance to win that great prize!!!  Remember to check to see the deadline for all of this month's Stampotique Designers Challenges!


Here's my card with Eric (Daniel Torrente) and the paint tube from Containers Cubed #2 (Amy Wilson Wellenstein).


With the help of my Stampa-Ma-Jig stamp positioner (EK Success), Eric was stamped twice with Tuxedo Black Memento ink (Imagine Crafts/Tsukineko) and colored with Copic markers. The paint tube from Containers Cubed #2 was stamped with Angel Pink Memento ink between them to become the cross bar of an "H", but the impression was too faint, so I restamped it again, colored it with Copic markers, and fussy-cut it. The "H" formed by the Eric and the paint tube from Containers Cubed #2 was fussy-cut and edged with a Black Pitt Artist pen (Faber Castell). The paint tube was adhered in place over its counterpart. They were set aside while I created a background for them.

Retrospectively, it would have been much easier to stamp Eric twice, color them, and fussy-cut them. Live and learn.

White cardstock was die-cut with the Arched Window die (Taylored Expressions) and the house-patterned paper from the Eskimo Kisses 6x6 pad (Basic Grey) was put behind the windows. Other papers from the same pad were used for the wall and floor. 

The Alphabet Plain Upper Case die (Impression Obsession) was used to die-cut red cardstock for the rest of the letters in the "Happy Holidays".

The layers were assembled, the Erics added, and the balance of the sentiment was adhered. The card front was adhered to a red card base and I called it done!

Thanks for visiting today!

I shall enter this card into the following challenges:
Country View Challenges: Make a Scene
Simon Says Stamp Monday Challenges: Holly Jolly Stamping

Wednesday, September 16, 2015

Milestone Birthdays, Anniversaries, and/or Celebrations

I am the hostess this week at Stampotique Designers Challenge Blog and my challenge is Milestone birthdays, anniversaries, or other celebrations.

This is what I've got to say about my challenge:
"Whether it's a 21st, 25, 50, 60th birthday or 10th, 25, 50th anniversary, it's time to celebrate. Let's see a project that celebrates those sometimes scary milestones of life!"
If you'd like the chance to win your choice of $30 worth of Stampotique stamps, you should play along with this challenge. Visit Stampotique Designers Challenge blog and be sure to read the rules so that you'll have the chance to win that great prize!!!  Remember to check to see the deadline for all of this month's Stampotique Designers Challenges!

Here's my project for the challenge with three of the birds from Birdy Up, two of the birds from Birdy Bonnets, one bird from Stack of Birds, one of the hats from Happy Head Appliances, Owl with Wings, Skull Balloons, and Happy, Happy


Two of the birds from Birdy Up, two of the birds from Birdy Bonnets, one bird from Stack of Birds, one of the hats from Happy Head Appliances, and Owl with Wings were stamped with Tuxedo Black Memento ink (Tsukineko/Imagine Crafts), colored with Copic markers, fussy-cut, and edged with a Black Pitt Artist pen (Faber Castell). Diamond Glaze (Judikins) was added to all of the birds' eyes and the birds were banished to a drawer in a closet overnight so I would not be tempted to touch them to see if the Glossy Accents had set. 

The closed-eye happy looking bird from Birdy Up became the birthday bird-of-honor courtesy of the hat from the Happy Head Appliances and placed away from the maelstrom of my craft table. Skull Balloons was stamped with London Fog Memento ink because I wanted a more subtle look. The balloons were colored with Copic markers and fussy-cut. Happy, Happy was stamped over two of the balloons using Tuxedo Black Memento ink and my Stamp-a-ma-jig stamp positioner (EK Success). Happy, Happy joined Skull Balloons out of harms' way. 

The Blossom Grand font set (QuicKutz) was used to die-cut black glitter paper for the 60. WHOOO was die-cut from the same glitter paper with the Blossom font set (QuicKutz). A Hint of Lime die (Die-Versions) was used to die-cut is. Pale green vellum was die-cut with the Big Word Pop Curve die (Memory Box). A scrap of white cardstock was die-cut with the Cocktail Party die (Taylored Expressions), which was then colored with Copic markers.  

The patterned paper is from the Baby Boy collection (Basic Grey) and was edged with both Peeled Paint and Black Soot Distress inks (Ranger). Danger-striped Washi tape was added to the base of the card front and the Big Word Pop Curve die-cut was added to the upper left corner, then outlined with Black Spica Glitter pen (Copic).

The glittery 60 number dies were positioned on the patterned paper and Owl with Wings was perched on the 6. All the birds from Birdy Up (pinky-orange and blue/green)Birdy Bonnets (red-winged blackbird crown and fedora), and Stack of Birds (red-winged blackbird on the right) were adhered atop the striped Washi tape. The birthday-bird was placed over the 0 atop a second layer of Washi tape. The Skull Balloons were placed over the red-winged blackbird on the right.

Black Glaze pen (Sakura) was used to draw legs onto the black birds and strings attaching the
Skull Balloons to the blackbird on the right. Whooo is was adhered to the vellum Big Word Pop Curve die-cut. The colored Cocktail Party die was adhered over the Washi tape to the base of the image panel, which was then adhered to a 5x7 white card.

By the way, if you're wondering what prompted this theme, I recently celebrated two milestones. In August, my husband and I celebrated our 35 Wedding Anniversary and I just turned 60, which mildly freaked me out. However, I figure that whereas I might be a bit of an old bird, I'm still on this astral plain, moderately healthy (too fat, too caffeinated, too winy), enjoying family and friends, and my hobbies. All in all it beats the heck out of the alternative, don'tchaknow?

Thanks for visiting today!

I shall enter this card into the following challenges:
Left of Center Challenges: Dies or Punches
My Time To Craft Challenges: Owls
Aurora Wings Challenges: Anything Goes with Wings
Papertake Weekly Challenges: Animals
Simon Says Stamp Wednesday Challenges: Die Crazy 

Monday, August 31, 2015

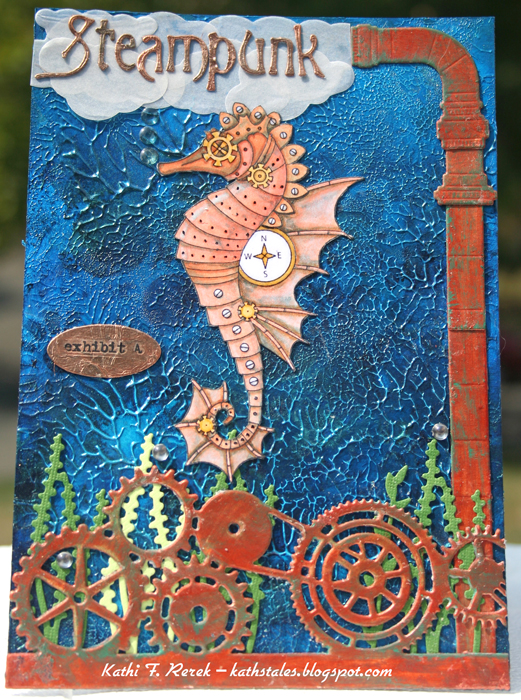
Steampunk Seahorse - Journal Page

If you've been here before, you know that I love Steampunk. A while back, I decided that I was going to create a series of Steampunk Journals. I'd have one for  creatures of the sky, creatures of the sea, machines, people, fashion, etc. Then I'd fill each journal with pages. Being me, I've created Steampunk Journals, Volume One - The Aviary. But I can't share it with you now. I'm such a tease.

I will be working on the other covers soon, but meanwhile, I'm making journal pages. I apparently like to do things backwards.

Here's the first one. It features a Steampunk Seahorse, SCACD's Nancy's Seahorse.


FYI, SCACD has loads of marvelous Steampunk stamps, in both rubber and digital format! If you're a Steampunk afficionado, you owe yourself to check 'em out. Just sayin'. 

Nancy's Seahorse is available as a rubber stamp, which is what I used for this page. The Steampunk Seahorse is also available as a digital stamp, Nancy's Mechanical Seahorse. If you're an international visitor, you can purchase this digi and others, HERE.

Nancy's Seahorse was stamped with Tuxedo Black Memento ink (Tsukineko/Imagine Crafts), colored with Copic markers, fussy-cut, and edged with a Black Pitt Artist Brush pen (Faber Castell). Several layers of Clear Gelly Glaze pen (Sakura) was used to add dimension and shine to the compass, screws, rivets, and gears.  Nancy's Seahorse was set aside while I worked on the background. True confession. He sat for awhile as my mojo disappeared and was replaced by sudden sleepiness. That went on for several days.

I cut two pieces of 140 lb. Mixed Media cardstock (Strathmore) to 4.75" x 6.75". White Media Gesso (DecoArt) was liberally spread with a palette knife onto one of the pieces. The second piece was pressed against the be-Gessoed cardstock, squished a bit, then the two pieces were pulled apart and left to dry for an hour or so.

When I returned, the two sheets were covered with a totally lovely texture. Cobalt Blue Hue, Cobalt Turquoise Hue, Ultramarine blue, Pthalo Blue, and Pthalo Turquoise Media Fluid Acrylic (MFA) paints (DecoArt) were sponged over the background using Mini Ink Blending Tools and Replacement Foams (Ranger). The foam applicators are great for this because they're pliable enough to make sure that the paint gets into all those nooks and crannies.

Prussian Blue MFA paint was thinned a bit with water and sponged over the Gears Skinny Minny Mask/Stencil (Joggles). When the paint was dry, I decided to lighten things up a bit by lightly sponging Interference Turquoise and Interference Blue MFA paints over the textured background, so that the top bits received the paint.

140 lb. Mixed Media cardstock was die-cut with the Medium Steampunk Pipes dies (Memory Box) and the Edge Gears die (Joy Craft). These die-cuts were painted with Copper Dazzling Metallic Acrylic paint (DecoArt). When the Copper paint was dry, Blue Green Light MFA paint was randlomly sponged the pipes and gears.

Green cardstock was die-cut with a few dies from the dies from the Build a Scene: Underwater die set (Taylored Expressions). This greenery was adhered to the bottom of journal page with Media Matte Medium (Deco Art). The painted Medium Steampunk Pipes die-cuts were adhered, then the Edge Gears die-cut was added. 

Vellum was die-cut with my Puffy Clouds (Memory Box), run through a Xyron machine, then adhered to the top of the journal page.

Copper Foil tape, purchased at a gardening center*, was adhered to black cardstock. These strips were airbrushed with BG72, BG75, and BG 78 Copic markers to add an aged patina look to them. The strips took a run through a Xyron machine to add adhesive to the cardstock, then were die-cut with Eliza Mini font dies (QuicKutz). The Copper Foil word was adhered over the clouds at the top ofthe page.

An extra piece of foil was die-cut with an old oval label die (QuicKutz). Apothecary Remnant Rubs (Idea-ology) was used to add "Exhibit A" to the foil, which was then adhered to the page.

Clear pearls were added here and there to finish the page.

I also created this card for SanDee and amelie's Steampunk Challenges. They've had a TicTacToe summer challenge all summer. Being a master procrastinator, I waited til the very last moment. No lie. 

Here's the TicTacToe board. I chose the left vertical row. (words, stencils, the (deep) sea).


*Copper Foil Tape is in one's garden (not mine) to ward off snails. Go know.

I shall enter this in the following challenges:

Wednesday, August 19, 2015

I'm a tardy space-shot -- Under The Sea challenge!


I'm a bad, forgetful me. I was running late, finished this project, then forgot that I hadn't posted it or shared it.

Kristen Catalano was the hostess for this challenge and this is what she had to say about it.

"The ocean is my happy place. It is calm and soothing and I love the sound of the waves. So this week, I challenge you to create an ocean themed project. I can't wait to see what you come up with."
If you'd like the chance to win your choice of $30 worth of Stampotique stamps, you should play along with our challenge at the Stampotique Designers Challenge blog. Be sure to read the rules so that you'll have the chance to win that great prize!!! 

As often happens, this card was inspired by music, specifically Octopus' Garden which was written by Ringo Starr and performed by The Beatles. The role of the octopus is played by Octopet (Daniel Torrente).

Octopet was stamped with Tuxedo Black Memento ink (Tsukineko/Imagine Crafts), colored with Copic markers, fussy-cut, then edged with a Black Pitt Artist Brush pen (Faber Castell). Octopet was set aside while I created his garden in the sea.

A variety of blues and green Brusho Crystal Colours were sprinkled onto 140 lb. Mixed Media cardstock, sprayed with water, and spread with a paintbrush. Various colors of cardstock were die-cut with the dies from the Build a Scene: Underwater die set (Taylored Expressions). The Garden Tools die set (Memory Box) was used to die-cut white cardstock, which were then colored with Copic markers.

The die-cuts were adhered and ancient Jolie flower stickers (EK Success) were added for more color.

Texture Sand Paste (DecoArt) was scraped along the bottom of the panel with a palette knife. The panel then was left to dry for a bit. When it was dry, the Texture Sand Paste was painted with Titan Buff, Burnt Umber, Raw Sienna, and Transparent Yellow Oxide Media Fluid Acrylic paints (DecoArt). 

The underwater scene was matted with black cardstock then adhered to a blue card. The card was finished with a Dymo Tape sentiment.

Thanks for visiting today.

Wednesday, July 22, 2015

Use Household Objects!

Arwen McCullen is the hostess this week at Stampotique Designers Challenge Blog and her challenge is to use a household object to stamp your background. Here's what she had to say about her challenge:

"Stamp a background with things from the budget. For example, sponges, foil,
cutlery."
If you'd like the chance to win your choice of $30 worth of Stampotique stamps, you should play along with this challenge. Visit Stampotique Designers Challenge blog and be sure to read the rules so that you'll have the chance to win that great prize!!!

Here's my card with Stampotique's Amazon (Kylie DiOrio).


Amazon was stamped with Tuxedo Black Memento ink (Tsukineko/Imagine Crafts), colored with Copic markers, fussy-cut, then edged with a black marker.  Amazon's eyes, beak, and talons were coated with several layers of Clear Gelly Glaze pen (Sakura) to give them dimension and shine).
Amazon was set aside while I created a suitable background for him.

Since we do a lot of online shopping, we have quite a supply of bubblewrap with bubbles of varying sizes. I found a piece of bubblewrap with large bubbles, which I painted with Titanium White Media Fluid Acrylic paint (DecoArt). The bubblewrap was immediately inverted onto a piece of 140 lb. Mixed Media cardstock (Strathmore) and pressed into the surface using both my hands and a brayer. The brayer seemed to be the more efficient of the two paint transfer methods.

The cardstock was peeled away and the bubblewrap was set aside. I thought that the bubblewrap impressions might look like clouds and was pleased that I was right. 

Forget-Me-Not and Cornflower Blue Archival inks (/Ranger) were sponged onto the cardstock over the stamped bubblewrap to create a blue sky. I like my skies to have a touch of pink in them so Spun Sugar and Picked Raspberry Distress inks (Ranger) were randomly sponged here and there. Since acrylic paints resist inks, a baby wipe was used to sponge the ink off of the bubblewrap-stamped clouds.

The bubblewrap-stamped ink-sponged cardstock was trimmed to the size of a card front and set aside.

Mesh from a fruit bag was taped over a scrap of kraft cardstock and Gathered Twigs Distress ink (Ranger) was sponged over the fruit bag. This was die-cut with the Birds and Branch die (Taylored Expressions). Green cardstock was also die-cut with this die. The kraft version was edged with
Gathered Twigs Distress ink. The leaves were cut off the green version and detailed with a Green Sharpy pen (Sanford), then edged with a Copic marker. They were adhered over their brown counterparts.

The branch was adhered to the bubblewrap-stamped ink-sponged cardstock and Amazon was positioned atop the branch. Since Amazon looks as though he's about to say something, so Happy Bird-Day (Carol's Collection) was stamped onto a scrap of the painted/inked cardstock with Jet Black StazOn ink (Tsukineko/Imagine Crafts), cut apart, and placed onto a Conversation Bubble vellum die-cut (Spellbinders).

Thanks for visiting today! 

I shall enter this card into the following challenges:
Corrosive Challenges: To Die For 
A Gem of a Challenge: Birthday Wishes
Let's Craft and Create Challenges: Butterflies or Birds