Saturday, October 31, 2020

My Last Halloween Card for 2020!

I've really enjoyed celebrating Halloween 2020 with lots of cards, probably because I knew that there wouldn't be any local festivities. Sadly, I've run out of time, so here's my last card for this season, which somewhat appropriately for this year, features a skull moon and a plague doctor.

The stamp I used for my moon is the Grunge Steampunk Skull by Katzelkraft. The Plague Doctor stamp is by Andy Skinner for Creative Expressions, which was one of my "must have" stamps for 2020 because I'm weird like that. I was going to use the the Redemption stencil and do a tone on tone thing, but I didn't. Instead, I decided that bats were where it's at and used my much used Bat Colony Stamp by Lavinia Stamps. 

Enough blather for now, here's the card.


For what it's worth, I also purchased a Plague Doctor mask that I was planning to wear to hand out candy to trick or treaters. Alas. 


Products Used:
Grunge Steampunk Skull by Katzelkraft
The Plague Doctor stamp is by Andy Skinner for Creative Expressions
Bat Colony Stamp by Lavinia Stamps
Solar White Classic Crest® Cardstock by Neenah Papers
Blue and Black Cardstock by Bazzill Basics Paper®
Tuxedo Black Memento™ Ink by Tsukineko®
Copic® Markers: BV000, BV20, E00, E11, E21, E40, E1, B39, B99, C6, C7, C8, C10, Y0000, Y23, Y26, Y28, R08, YR30, YR31
Blending Brushes by Time For Tea Designs
Black Soot and Chipped Sapphire Distress® Ink by Tim Holtz® for Ranger Ink
STAY-tion by Wendy Vecchi for Ranger InkStamping Platform
Removable ID Labels by Avery®
Red Stardust® Glitter Gel Pen by Sakura®
Occasions Chit-Chat Idea-ology Stickers by Tim Holtz® for Advantus

Instructions:
  1. Cut a piece of 8.5" x 11" black cardstock to 7" X 10".
  2. Score at 5" and fold to form a 5" x 7" card.
  3. Cut a piece of blue cardstock to 4.75" x 6.75" and adhere to the black card. Set aside.
  4. Cut a piece of white cardstock to 5" x 7" to create an image panel.
  5. Use magnets to secure the image panel to the base of the stamping platform.
  6. Position the Plague Doctor on the lower right and the Grunge Steampunk Skull towards the upper left as shown.
  7. Press the platform's lid onto the back of the stamps, lift the lid, ink the stamps, and stamp onto the image panel.
  8. Ink the stamp again, then stamp a second time onto a piece of Removable Label paper.
  9. Fussy-cut both images to create masks.
  10. Place masks atop their counterparts. 
  11. Move the image panel onto the STAY-tion and secure with magnets.
  12. Brush or sponge Black Soot, then Chipped Sapphire Distress inks over the masked images on the image panel.
  13. Lift the masks and reserve for later.
  14. Color both of the images with Copic markers. 
  15. Use the Red Stardust Glitter pen to add glitter to the skull's eye socket, nose socket, one of his teeth, and the Plague Doctor's eye.
  16. Trim the image panel to 4.5" x 6.5".
  17. Edge the image panel with Black Soot Distress ink.
  18. Choose three stickers (I didn't have a Happy Halloween sticker left. Oh the horror!) and edge them with a black marker.
  19. Adhere the image panel to the card.
  20. Adhere the sentiments as shown to finish the card.
Thank you for visiting today!


Thursday, October 29, 2020

Tweet Tweet...Nevermore!

Awhile back I created a card using the fabulous JOFY #15 Cling Rubber Stamp Set set by PaperArtsy. My friend Laura saw the card and thought that the little crazy birds would look great inside the cages of the Uncaged Raven Rubber Stamp by Stampendous!®

Here's the card.


Products Used:
Tuxedo Black Memento™ Ink by Tsukineko®
Copic® Markers: Y35, Y38, B24, E43, N6, N7, W3
Mini Slate Layering Stencil by Tim Holtz® for Stampers Anonymous
Old Paper, Pumice Stone, Gathered Twigs, Black Soot Distress® Ink by Tim Holtz® for Ranger Ink
Essential Speech Bubbles Die-namics Die Set by My Favorite Things
STAY-tion by Wendy Vecchi for Ranger Industries
Stamping Platform
Removable ID Labels by Avery®
Stamp-A-Ma-Jig® Stamp Positioner by EK Success, which is now owned by someone else
Grey cardstock by Bazzill Basics Paper®
White Gelly Roll® Gel Pen by Sakura
Red Stardust® Glitter Pen by Sakura

Instructions:
  1. Cut a piece of grey cardstock to 8.5" x 5.5". Set one half aside for another use.
  2. Score at 4.25" and fold to form an A2 card.
  3. Place a piece of mixed media paper onto the base of the stamping platform and secure with magnets.
  4. Place the Uncaged Raven stamp face down onto the white cardstock and press the lid of the stamping platform onto the stamp.
  5. Lift the lid, ink the stamp with Memento ink, and stamp onto cardstock.
  6. Slip a piece of label paper onto the platform and stamp a second time, making sure that you get a good impression of the raven.
  7. Fussy-cut the label paper raven and place atop its counterpart on the image panel.
  8. Remove the stamp from platform and clean.
  9. Position the tiniest bird facedown onto one of the two cages of the stamped image and press the lid into the back of the stamp.
  10. Lift the lid, ink the stamp with Memento ink, and stamp.
  11. Remove the stamp and clean thoroughly.
  12. Position the same bird as desired onto the other cage of the stamped image and press the lid into the back of the stamp.
  13. Repeat Steps #8 and #9.
  14. Mount the little bird stamp onto a clear stamping block and stamp twice onto labels to create masks. 
  15. Fussy-cut both birds and place the masks over their counterparts.
  16. Remove the image panel from the stamping platform.
  17. Secure the image panel onto the STAY-tion with magnets.
  18. Place the STAY-tion ruler horizontally across the image panel towards the bottom of the image panel.
  19. Lightly sponge or brush Gathered Twigs Distress ink over the bottom part of the image panel.
  20. Flip the ruler so that it's now covering the bottom (inked) part of the image panel.
  21. Sponge or brush Old Paper Distress ink over the image panel.
  22. Place the Mini Slate Layering Stencil over the image panel and secure with magnets.*
  23. Sponge or brush Pumice Stone Distress ink over the stencil onto the image panel.
  24. Remove the image panel from the STAY-tion.
  25. Color all three birds with Copic markers.
  26. Add white dots to the yellow birds' eyes with the gel pen.
  27. Use the red glitter pen to make the raven's eye red.
  28. Use the Stamp-a-Ma-Jig positioner to stamp "Tweet Tweet" from the JOFY set three times using Jet Black Archival ink.
  29. Trim the image panel to 4" x 5.25" and edge with Black Soot Distress ink.
  30. Sponge/brush some Black Soot Distress ink around to make the scene look eerie.
  31. Look futilely through your entire stamp collection, stickers, and rub-ons for the word "Nevermore". 
  32. Computer generate the word "Nevermore", but not in the typeface you wanted because apparently your not-so-new computer and/or version of PhotoElements doesn't have that font. 
  33. Use the smallest die from the Essential Speech Bubbles Die-namics Die set to cut out the word.
  34. Realize the word and die-cut are too big and trim slightly.
  35. Color the word with Copic markers.
  36. Adhere the image panel to the grey card.
  37. Adhere the sentiment to finish the card.
*I didn't secure the stencil to the image panel with magnets and therefore my stenciling is a bit wonkier than I'd like. Bummer.

Thank you for visiting today.

Wednesday, October 28, 2020

BeWitched Kitten!


 Hi there! As stated yesterday, I'm participating in the 2020 Cat Lovers Blog Hop (#2020CatLoversHop). After all, as a crazy cat lady, I totally qualify. And as an avid collector of cat stamps, dies, and stencils, I certainly have the supplies at hand! Plus Stampendous!® is a sponsor of the hop and is giving away the set I used in today's card!!!

Today I'm sharing a Halloween card made with the freaking adorable Kitten Hugs Cling Stamp set by Stampendous!®. This set is beyond adorable and features three adorable kitten stamps and three sentiments. IMHO, if you love cats, you need this set. 

Here's the card!


Stampendous!® Products Used:
Witch Hat from the Skeleton Style Perfectly Clear Stamps™ Set
Speech Bubble die from the Tweet Birdie Die Set

Other Products Used:
Jet Black Archival Ink
Dot-Stripe Rainbow Petite Prints 6x6 Patterned Paper Pad by Doodlebug Designs, Inc. ™
Midnight Magic Patterned Paper from the Boos & Brews™ Collection by Doodlebug Desings, Inc.™
Purple Cardstock by Bazzill Basics®
Copic® Markers:
   Cat: C3, C4, C5, C6, C7
   Cat's Eyes: YG21, YG23, FYG2
   Hat: V06, V09, YR16, YR18
   Grass: YG03, YG05, YG17
   Sky: BG000, BG11
Stamp-A-Ma-Jig® Stamp Positioner Tool by Inkadinkado®
Removable ID Labels by Avery®

Instructions:
  1. Cut a piece of 8.5" x 11" purple cardstock in half. Reserve one half.
  2. Score the other piece at 4.25" and fold to form an A2 card.
  3. Cut a piece of Midnight Magic patterned paper to 4" x 5.25" and edge with a dark marker.
  4. Adhere the patterned paper to the purple card, then set aside.
  5. Use Tuxedo Black Memento ink to stamp the witch hat towards the top of a piece of 4" x 5.25" mixed media paper. 
  6. Stamp the witch hat a second time onto a piece of the Removable ID Labels and fussy-cut to form a mask.
  7. Place the mask atop the witch hat on the image panel.
  8. Use the Stamp-a-Ma-Jig to stamp the kitten under the hat on the image panel.
  9. Remove the hat mask and color the image and the background with Copic markers.
  10. Use the smaller of the two rounded rectangle dies from the WindowRama Dome Shaker Die Set to cut the image panel.
  11. Use the larger of the two rounded rectangle dies from the WindowRama Dome Shaker Die Set to cut the other piece of purple cardstock.
  12. Mat the image panel onto the purple cardstock, then trim the bottom as shown.
  13. Use Jet Black Archival Ink to stamp the sentiment onto yellow dotted patterned paper.
  14. Cut the sentiment using the speech bubble die from the Tweet Birdie Die set.
  15. Adhere the image panel onto the reserved card as shown. 
  16. Adhere the sentiment to finish the card.
Thank you for visiting today!

Tuesday, October 27, 2020

I Appreciate You!

It's Tuesday, which means it's time to share a project created for Topflight Stamps! This week my teammates and I are creating Thank You cards, but somehow I can't quite let go of Halloween season yet. My solution? My focal panel features AALL and Create's fabulous Moody Kittens Clear Set (#171), which features costumed and/or adventurous cats and sentiments, including a thank you!

Here's my card:


Topflight Stamps Products Used:
Moody Kittens Clear Set (#171) by AALL and Create
Yellow SubmarineAutumn FireSage, and Guacamole Fresco Chalk Paints by PaperArtsy

PSA: There are lots of fantastic new products at Topflight Stamps, so you should definitely click on over there after reading my instructions! BTW, if you'd like to get 12% off your order at Topflight Stamps use THIS LINK!

Other Products Used:
Solar White Classic Crest® Cardstock by Neenah Papers
140 lb. Mixed Media Paper by Strathmore®
Grey Cardstock by Bazzill Basics Paper®
Tuxedo Black Memento™ Ink by Tsukineko®
Shadow Grey Archival™ Ink by Ranger Industries
Cheesecake Fresco Chalk Paint by PaperArtsy
Copic Markers: N2, N3, N4, N6, B60, BV20, C00, C0, YR02, YR04,  YR07, YR18, YR21, Y35, B21, G21, G24, R22, R24, R37
White Gelly Roll® Gel Pen By Sakura
Big and Little Chain Square Die Set by Gina Marie Designs
Small Rectangle and Label Dies by Spellbinders®

Instructions:
  1. Cut a piece of grey cardstock to 8.5" x 5.5". Score and fold to form an A2 card. Set aside.
  2. Put a small drop of Autumn Fire Fresco Chalk paint onto the craft mat. 
  3. Use the 2" Speedball Brayer to spread the paint, then randomly brayer the paint onto a piece of mixed media cardstock until that drop of paint was gone from both the brayer and the craft mat.
  4.  Repeat Steps #2 and 3 with each color of paint until the cardstock is filled and you're happy with the coverage. You will note in Exhibit A below that the paint colors were overlapped. Some colors blended, others not as much.
  5.  There were some blobby bits of dried paint, so those were sanded off with a sanding block
  6. Cut the painted 9" x 12" mixed media paper in half. Reserve one piece for a later use.
  7. Secure the painted piece of cardstock to the base of a stamping platform with magnets.
  8. Place the Grid Background Red Rubber Cling Stamp atop the painted cardstock and press the platform's lid into the back of the cling stamp,, then lift.
  9. Ink the stamp with grey Archival ink and close the lid to stamp.
  10. Repeat Step #9 if necessary to insure a good impression.
  11. Trim the stamped painted background to 4" x 5.25".
  12. Distress  the edges and set the background panel aside.
  13. Use Tuxedo Black Memento ink to stamp the  grumpy-looking clown cat from the Moody Kittens Clear Set onto white cardstock
  14. Color with Copic markers to match your background.
  15. Use one of the dies from the Big and Little Chain Square Die Set to cut the image panel.
  16. Stamp the sentiment onto a scrap of the painted cardstock using Onyx Black VersaFine ink. Heat set. 
  17. Cut the sentiment with a tiny rectangle die
  18. Cut grey cardstock with an ornamental sentiment die. 
  19. Adhere the die-cut sentiment onto the ornamental die-cut.
  20. Adhere the image panel and the sentiment onto the stamped and painted background panel
  21. Adhere the card front to the reserved grey card.
  22. Add red gemstones from the Diamond Sparkles Gemstones Festive Selection to the top left card and to the sentiment die-cut to finish the card.
Exhibit A: The brayered and sanded background.


Now that I've told you all about this card, I'll also mention that I'm playing along with the 2020 Cat Lovers Blog Hop and will be entering this card in in it. If you love cats and if you don't, you should, check out the entries on the link above. Additionally, there are great prizes to be had from some wonderful sponsors (Darkroom Door, whose Grid Background Stamp was used for my card, is one of them.). 


Tuesday, October 20, 2020

Scared? Hmmm. You should be.

It's Tuesday, which means it's time to share a project created for Topflight Stamps! I'm firmly in Halloween mode, even if we can't celebrate it normally this year. Hence, I decided to create a  scary scene using the spooky Humanoids (KT2223) Unmounted Rubber Stamp Set by Katzelkraft with the  FP001 Cling Rubber Stamp Set by France Papillon for PaperArtsy. The mood of the scene was further enhanced with the Halftone Skull Stencil and the 

Here's the card!


Topflight Products Used:

PSA: There are lots of fantastic new products at Topflight Stamps, so you should definitely click on over there after reading my instructions! BTW, if you'd like to get 12% off your order at Topflight Stamps use THIS LINK!

Other Products Used:
Solar White Classic Crest® Cardstock by Neenah Papers
140 lb. Mixed Media Cardstock by Strathmore®
Raven and Hollywood Bling Cardstock by Bazzill Basics Paper®
Tuxedo Black Memento™ Ink by Tsukineko®
Squeezed Lemonade, Fossilized Amber, Picked Raspberry, Blue Print Sketch, Chipped Sapphire, and Black Soot Distress® Ink by Tim Holtz® for Ranger Industries
Morning Mist and Nocturne VersaFine Clair™ Ink by Tsukineko®
New Canvas Palette™ Hybrid Ink by Stewart Superior Corporation
NYC Skyline Stencil & Masks by Michelle Ward for The Ink Pad NYC
Halloween Remnant Rubs by Idea-ology® by Tim Holtz® for Advantus
Washi Tape by Idea-ology® by Tim Holtz® for Advantus
Copic® Markers:
   Skin for the group of Humanoids: BV000, BG0, BG93, G0000, G00, G12, G20 
   Skin for the single Humanoid: E40, E42, BV000, BV20, G00, RV91, R20
   Clothes: B26, B28, B78, V09, FV2, R56, R59, YR16, YR18, RV52, E81, E84
   Signs: C1, C3, R27, R29, Y17, Y19
STAY-tion by Wendy Vecchi for Ranger Industries
Stamping Platform
Stamp-A-Ma-Jig® Stamp Positioner by EK Success, which is now owned by someone else. 

Instructions:
  1. Place a 6" square of Mixed Media cardstock onto the STAY-tion and secure with magnets.
  2. Using blending brushes, brush Squeezed Lemonade, Fossilized Amber, Picked Raspberry, Blue Print Sketch, and Chipped Sapphire onto mixed media cardstock, working from the bottom of the panel to the top, blending as you go. Heat set.
  3. Secure the NY City Skyline stencil and one of the mask pieces to the STAY-tion and brush Nocturne VersaFine Clair over the stencil and onto the image panel. 
  4. Remove the stencil and the mask and clean them immediately. I found that hand sanitizer works well.
  5. Heat set the panel.
  6. Move the corresponding part of the NY City Skyline stencil into position over where the mask sat and secure with magnets. 
  7. Brush Morning Mist VersaFine Clair Ink over the stencil onto the image panel. I found that the grey ink took on a warmer tone due to the yellow ink below it. Ah well.
  8. Repeat steps #4 and #5.
  9. Secure the Halftone Skull Stencil over the image panel with magnets.
  10. Brush white hybrid ink over the stencil onto the image panel.
  11. Repeat steps #4 and #5 again. What can I say? I like heat setting. 
  12. The word "Scared?", from the was Redemption Stencil , was positioned on the skull's forehead on the image panel, Post-It Notes were used to mask the other words, and the stencil and image panel were secured with magnets onto the STAY-tion.
  13. White ink was brushed over the word on the stencil onto the image panel.
  14. Repeat steps #4 and #5 again!
  15. Remove the image panel from the STAY-tion, trim it to 5 5/8" square, and edge it with Black Soot Distress ink. Heat set it because it can never be too dry and set it aside.
  16. Secure Copic-friendly cardstock to the base of a Stamp Positioner with magnets.
  17. Position two of the stamps from the Humanoids (KT2223) Unmounted Rubber Stamp Set and the hazard sign from the FP001 Cling Rubber Stamp Set facedown onto the paper, press the lid of the  platform onto the stamps, and lift the lid.
  18.  Ink all three stamps with Tuxedo Black Memento ink and stamp.
  19. Stamp the Caution Tape from the FP001 Cling Rubber set onto the plastic of the Stamp-a-Ma-Jig.
  20. Use the Stamp-a-Ma-Jig to stamp two continuous images of the Caution Tape. Seeing the card on my computer screen, I realize that I should have added a stripe as you can tell where one image ends and the other begins. Oh well.
  21. Color all the images with Copic markers, fussy-cut them, then edge them with a black marker.
  22. Add a spider rub-on from the Idea-ology Remnant Rub to the center of the Hazard Sign to reinforce the creep factor of the card. 
  23. Add Washi tape to the base of the card.
  24. Cut a piece of Hollywood Bling (yellow shimmery cardstock) to 5.75" square and adhere it to a 6" square black card.
  25. Adhere the stenciled and inked background to the yellow cardstock.
  26. Adhere the Humanoids and the Hazard Sign to the card front.
  27. Trim the Caution Tape and two  .25" strips of black cardstock to be a bit larger than 5.75".
  28. Adhere two black cardstock strips to each other, then adhere the Caution Tape to them.  This is to add a bit of dimension to the Caution Tape without using foam tape or squares.
  29. Adhere the Caution Tape as shown to finish the card.
Thanks for visiting today!

Monday, October 19, 2020

Shake It Up for Halloween!

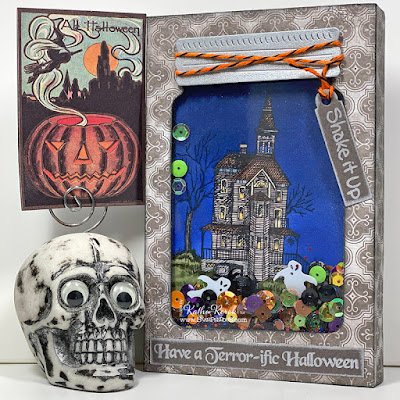
I'm definitely in Halloween mode and decided to create a shaker card using Stampendous!' wonderful WindowRama Dome Jar Shaker Die Set with the new Vintage Victorian Rubber Stamp and the Shake It Up Perfectly Clear Stamp Set. As usual, the shaker is overfilled and the image is a little wonky, but those adjectives describe me as well. So there's that.

 Here's a front view of the card.


Here's a view showing the side and that once again, I've got sequins stuck where they don't belong. Oh well. Perfection is overrated. 


Stampendous Products Used:
* This cardstock weight paper is great for coloring with Copic markers, especially when using a glass mat under it.

Other Products Used:
Copic® Markers:
  Roof: E15, E27
  Shingles: E70, E71
  Window Frames/Woodwork: E81
  Windows: YR31
  Car: C3, C6, C7
  Grass: G85, G94, G99
  Tree: W5
Midnight Magic 6x6 Pad by Recollections®
Dusk Cardstock by Bazzill Basics Paper®
Blueprint Sketch, Chipped Sapphire Distress® Ink by Tim Holtz® for Ranger Industries
Fresh Snow Hybrid Ink by Paper Trey
Tag Die by Spellbinders®
Trick or Treat, Pumpkin Spice, Nebula Sparkle Blends by Doodles Paper Playground
Spider Sequinish Thingies by Recollections
Baker's Twine
Removable ID Labels by Avery®
STAY-tion by Wendy Vecchi for Ranger Industries
Stamping Platform
Clear acetate or acrylic saved from packaging
Black Foam Tape by Craft Fancy
Black Foam Squares by Scrapbook Adhesives® by 3L
Sookwang Tape, Red Liner Tape, or strong liquid adhesive.

Instructions:
  1. Place a piece of white mixed media paper onto the stamping platform and secure with magnets.
  2. Position the Vintage Victorian rubber stamp on the paper, press the lid onto the stamp, and lift.
  3. Use Memento ink to stamp the image onto the paper to create the image panel.
  4. Repeat #3, this time stamping onto a piece of Removable Label paper to create a mask.
  5. Fussy-cut the label version and place it atop its counterpart on the image panel.
  6. Remove the image panel from the stamping platform. Remove stamp and clean. Or not. Whatever floats your boat.
  7. Place the image panel onto the STAY-tion and secure with magnets.
  8. Sponge or brush Blueprint Sketch Distress ink over the panel starting at the ruler and working your way up from the bottom to the top of the image panel.
  9. Sponge Chipped Sapphire Distress ink over the panel, concentrating the ink towards the top and along the sides.
  10. Remove the image panel from the STAY-tion.
  11. Lift the mask and color the house, car, tree, and grassy hill. Set aside.
  12. Use the base of the WindowRama Dome Jar Shaker Die Set to cut patterned paper for the front of the card and Dusk cardstock for the back
  13. For the front of the card, fold the patterned paper backwards on the scoreline on both sides of the die-cut. 
  14. For the back of the card, fold the green cardstock forwards on the scoreline on both sides of the die-cut.
  15. Use the jar-shaped die to cut the die-cut front.
  16. Use the lid die to cut silver cardstock for the jar's lid.
  17. Adhere acrylic over the window on the reverse of the card front.
  18. Add foam tape around the perimeter of the jar-shaped window opening over the acrylic.
  19. Tap the acrylic and the sides of the foam tape with an anti-static bag. Do this several more times than I did or do it more vigorously. I dunno.
  20. Add the shaker contents and some white cat fur to the well formed by the foam tape. I added too much. Clearly I haven't figured out how much to add. Oh well. 
  21. Adhere the image panel to the the back of the card front to seal the shaker.
  22. Adhere the front panel of the card to the back panel of the card using strong tape or liquid adhesive.
  23. Place a piece of the Dusk cardstock onto the stamping platform and secure with magnets.
  24. Position both sentiments on the cardstock, press the lid onto the stamp, and lift.
  25. Ink the sentiments with white ink, stamp, and repeat if necessary to achieve good coverage.
  26. Cut the "Shake" sentiment with the tag die.
  27. Trim the Halloween sentiment. 
  28. Edge both sentiment pieces with white ink.
  29. Color the black and white baker's twine with an orange marker.
  30. Thread the twine through the hole in the tag, then wrap the twine around the silver jar lid die-cut.
  31. Adhere the jar lid and the tag sentiment to finish the card.
Thanks for visiting today!

Sunday, October 18, 2020

Fa-Boo-Lous!

I don't know about you, but I get tired of seeing crone-haggy witches, probably because they look like me. So when I first saw Sassy and Crafty's new Sassy Girls Spooky Clear Stamp Set, I thought it was Fa-Boo-Lous. 

Here's my first card using this set.


Products Used:
Halloween Mini-Strips Cling Rubber Stamp by Taylored Expressions
Solar White Classic Crest® Cardstock by Neenah Papers
Black and Orange Cardstock by Bazzill Basics®
Tuxedo Black Memento™ Ink by Tsukineko®
Blueprint Sketch, Chipped Sapphire, Mowed Lawn, Forest Moss, and Black Soot Distress® Inks by Tim Holtz® for Ranger Industries
Nocturne VersaFine Clair™ Ink by Tsukineko
Fresh Snow Hybrid Ink by Paper Trey Ink
Copic® Markers:
   Skin: BV0000, BV000, E50, E21, E11, E00, 
   Lips: E04, R32, R56
   Cheeks: R20
   Hair: E08, E19
   Dress, Hat, and Shoes:  C6, C7, C8, V15, V17, V28, B24, B45, BV000
   Pumpkin: Y02, Y06, Y13, YR16, YR18, YR21, YR24, YR27, E09, E19, E44, E47, E49
Mini Strips Die by Taylored Expressions
Circles Nestabilities® Die Set by Spellbinders®
Removable ID Labels by Avery®
STAY-tion by Wendy Vecchi for Ranger Industries
Stamping Platform

*PSA: There are lots of fantastic new products at Topflight Stamps, so you should definitely click on over there after reading my instructions! BTW, if you'd like to get 12% off your order at Topflight Stamps use THIS LINK!

Instructions:
  1. Cut a piece of black cardstock to 8.25" x 9.25", score at 4 1/8", and fold to form a slimline-ish card that will fit in a #10 envelope. Set aside.
  2. Cut a piece of white card in half horizontally.
  3. Place a piece into the stamping platform and secure with magnets.
  4. Position the witch and pumpkin stamp towards the bottom of the paper, press the lid onto the stamp, and lift.
  5. Use Memento ink to stamp the image onto the paper to create the image panel..
  6. Repeat #5, this time stamping onto a piece of Removable Label paper to create a mask.
  7. Fussy-cut the label version and place it atop its counterpart on the image panel.
  8. Use one of the circle dies to cut a scrap of the label paper.
  9. Adhere the circle onto the image panel as shown to create a moon.
  10. Remove the image panel from the stamping platform. Remove stamps and clean 'em. Or not. Whatever floats your boat.
  11. Place the image panel onto the STAY-tion and secure with magnets.
  12. Place the ruler that comes with the STAY-tion horizontally across the image panel where you think the ground should be.
  13. Sponge** Blueprint Sketch Distress ink over the panel starting at the ruler and working your way up.
  14. Sponge Chipped Sapphire Distress ink over the panel, concentrating the ink towards the top, along the edges, and on the right side of the witch and pumpkin.
  15. I should have heat set, but I didn't. Luckily there were no huge mishaps.
  16. Lift the ruler and tear a scrap of cardstock that is wide enough to use as a mask-ish piece, and place it where the ruler was, so that the torn part is facing downwards.
  17. Sponge Forest Moss Distress ink over the torn edge of the cardstock at the border between the blue and the uninked part of the image panel. 
  18. Move the torn piece slightly down and continue to sponge Forest Moss Distress ink over the torn edge.
  19. Flip the torn edge and repeat step #18.
  20. Repeat steps #17 and #18, this time using Mown Lawn Distress ink until the "grass" part of the image panel is completely inked.
  21. Replace the strip of torn cardstock at the horizon with the torn edge facing down and lightly sponge Black Soot Distress ink to add dimension to the area where the sky meets the grass.
  22. Move the strip of torn cardstock downwards and randomly sponge Black Soot Distress ink to add more shadow to the grass.
  23. Wipe the image panel with a tissue or soft cloth to remove any wet ink.
  24. Remove all the masks.
  25. Color the image with Copic markers.
  26. Place the image panel back into the stamping platform and secure with magnets.
  27. Position the Bat Colony stamp as desired, press the platform's lid onto the stamp, and lift.
  28. Ink the stamp with Nocturne VersaFine Clair, which works well when stamping over other inks and/or stamping fine line images or sentiments.
  29. Stamp the image, repeat if necessary.
  30. Lift the image panel and clean the stamp.
  31. Trim the image panel to 3 7/8" x 8 7/8" and edge with Black Soot Distress ink.
  32. Trim orange cardstock to 4" x 9" and use to mat the image panel
  33. Adhere the matted image panel to the card.
  34. Use white ink to stamp the sentiments onto black cardstock.
  35.  Use the corresponding die to cut the sentiments and adhere the desired sentiment to the card to finish it.
**I now mostly use make-up brushes or the like to do my ink blending. However, old habits die hard. Hence "sponge".

Thanks for visiting today!

Saturday, October 17, 2020

Happy Halloween!

The mice were using the jack o'lanterns as scaffolding to reach the Halloween decorations that they were painting. They were taking a break, when two paint jars fell. Fortunately, they were almost done and no one was hurt, only embarrassed.

Here's my card with Stampendous!' new Pumpkin Paint House-Mouse Designs® Rubber Stamp.


Stampendous! Products Used:
Mixed Media White Paper

Other Products Used:
Copic® Markers:
   Pumpkins E95, E97, YR02, YR65
   Pumpkins' Stalks: E41, E42, E43, E44
   Pumpkin Faces; W1, W3, Y32, Y35
   Paint Jars: YR000, T0
   Paint: G20, G21, G24
   Painted Mouse: B32, G21, G24
   Mice Skin: BV0000, BV000, E50, E51, R00, R01, R20
   Mice Noses; R21, R22
   Mouse Fur: 
       Left: E33, E35, E44
       Middle Left: E21, E23, 325, E44
       Middle Right: E44, E53, E55
       Right: T1, T3, T4, T5
   Paint Brush: V25, V28, C00, C1, E81, E84, G24
   Ground: BG90, BG91
A2 Layers Die Set by The Stamp Doctor
Happy Halloween Dies by The Top Dog Dies
Green and Orange Cardstock by Bazzill Basics®
Master Detective 8x8 Patterned Paper Pad by Graphic 45®

Instructions:
  1. Cut a piece of 12x12 green cardstock in half. 
  2. Score one piece at 6" and fold to form a 6" square card. Set aside.
  3. Use Tuxedo Black Memento ink to stamp the image and color with Copic markers.
  4. Use the A2 Layers Die set to cut the image panel and orange and green cardstock.
  5. Double mat the image panel as shown.
  6. Use the sentiment dies to cut green and orange cardstock.
  7. Cut a piece of plaid patterned paper to 5.75" square. Edge with a dark marker.
  8. Adhere the plaid paper to the card.
  9. Adhere the matted image panel to the card.
  10. Adhere the green sentiment die-cut 
  11. Add the orange "innards" to the letters as shown to finish the card and reserve the orange Happy Halloween for another use.
Thanks for visiting today!

Tuesday, October 13, 2020

Merry Christmas

It's Tuesday, which means it's time to share a project created for Topflight Stamps! This week my teammates and I are sharing Christmas-themed projects, albeit during Halloween season! Oh! The Horror!

I chose to create both cards using the whimsical and wonderful Zinski Art 17 Rubber Cling Mounted Stamp Set by PaperArtsy. I also used the Snowflakes Background Rubber Cling Stamp by Darkroom Door and the Classic Sentiments Clear Stamps by Heffy Doodle.

Here's the first card, which uses two of the elves and the sentiment from the Zinski Art 17 Rubber Cling Mounted Stamp Set.


Topflight products used for both cards:

Other products Used for both cards:
Solar White Classic Crest® Cardstock by Neenah Papers
Red Cardstock by Bazzill Basics Papers
Tuxedo Black, Summer Sky, Lulu Lavender, London Fog, and Memento™ Inks by Tsukineko®
Fresh Snow Hybrid Ink by PaperTrey Ink
Brick Red and Aged Mahogany Distress® Ink by Tim Holtz® for Ranger Industries
Copic® Markers:
   Elves' Skin: BV0000, BV000, E50, E21, E11, E00, E000, R20, R81
   Girl Ef's Lips: E04, R30, R32
   Elves' Eyes: C1, B21
   Girl's Braids: E44, E47, YR31
   Clothing: G12, G20, G21, G24, G28, R37, R39, R56
   Big Bird: Y13, Y26, Y28, R32, E44, B21
   Small Bird: YG13, YG17, R24, R27, R37, 
   Ground: C0, C1, C3
Shapeabilities Dies by Spellbinders®
Simple Strips Dies by Taylored Expressions
Scalloped Frame Die Set by Gina Marie Designs
Clear Stardust® Glitter Pen by Sakura
Cotton Ball White Fun Flock by Stampendous!®
Knit Picky 6x6 Patterned Paper Pad by Lawn Fawn
Merry Days of Christmas 6x6 Patterned Paper Pad by My Mind's Eye™
Quickie™ Glue Pen by Sakura
Removable ID Labels by Avery®
STAY-tion by Wendy Vecchi for Ranger Industries
Stamping Platform

PSA: There are lots of fantastic new products at Topflight Stamps, so you should definitely click on over there after reading my instructions! BTW, if you'd like to get 12% off your order at Topflight Stamps use THIS LINK!

Instructions for the Elves Card:
  1. Cut red 12x12 cardstock in half, reserve half.
  2. Score at 6" and fold to form a 6" square card. Set aside.
  3. Use Tuxedo Black Memento ink to stamp the boy elf from the Zinski Art 17 Rubber Cling Mounted Set onto white cardstock and onto repositionable label paper to use as a mask. 
  4. Fussy-cut repositionable label paper image and place atop the elf on the cardstock.
  5. Position the girl elf on the image panel then stamp her onto cardstock and onto repositionable label paper
  6. Fussy-cut the girl elf and place her over her counterpart.
  7. Place the image panel on the STAY-tion and secure with magnets.
  8.  Cover the base of the image panel with a piece of torn paper and sponge Summer Sky, Lulu Lavender, and London Fog Memento ink over the masked images.
  9. Remove image panel from STAY-tion.
  10. Position the image panel onto the base of the stamping platform and secure with magnets.
  11. Position the Snowflakes Background Rubber Cling Stamp onto the image panel as desired. Press the lid of the stamping platform onto the stamp, then lift.
  12. Ink the stamp with white hybrid ink and stamp over the masked elves and the inked background onto the image panel. 
  13. Repeat Step #12 until you're happy with the snowflakes. :D
  14. Remove the image panel from the platform.
  15. Lift the masks and color the images and the snowy ground with Copic markers. 
  16. Add clear glitter pen to the ground and center of each snowflake to add a touch of glitter.
  17. Stamp the sentiment was stamped onto patterned paper from the MME pad, then die-cut. 
  18. Layer the patterned paper from the same pad to create a card front. 
  19. Trim to 5.75" square and edge with Distress ink.
  20. Adhere the image panel and the sentiment as shown.
  21. Adhere the card front to finish the card.
Here's the second card using the large and small birds from the Zinski Art 17 Rubber Cling Mounted Set, which also includes a super-cute penguin and a stack of gifts with elves hiding in it! I didn't use them, but I will!


Instructions for the Merry Christmas Bird Card:
  1. Cut a piece of red cardstock to 8.5" x 5.5", score at 4.25", and fold to form an A2 card. Set aside.
  2. Stamp the little Santa bird with Tuxedo Black Memento ink onto white cardstock, fussy-cut, color with Copic markers, edge with a black pen, and set aside.
  3. Stamp the big bird onto white carstock with Tuxedo Black Memento ink.
  4. He reminded me of Big Bird so he was colored with yellow markers. His scarf and boots were colored with red and green markers and he got pink cheeks. 
  5. Red-knit patterned paper  from the Knit Picky pad was cut with a scalloped frame die.
  6. The image panel was trimmed and adhered behind the frame die-cut.
  7. Once the image panel was secure in its frame, the green bird was adhered as shown. 
  8. Both the green and yellow birds' eyes received some Glossy Accents to make them a dimensional. 
  9. A dot of Quickie glue was used added to the pom-pom on the Santa hat and Fun Flock was sprinkled over the wet glue, and allowed to dry.
  10. The excess was blown off and step #8 was repeated.
  11. Grey knit-patterned paper and red cardstock were die-cut with the Simple Strips dies.
  12. The sentiment, from the wonderfully useful Classic Sentiments Clear Stamp Set, was stamped onto one of the strips of the grey-knit patterned paper then matted with a red cardstock die-cut.
  13. Patterned paper from the same patterned paper pad was layered to create the card front, the framed image panel was secured, and the sentiment adhered to finish the card.
Thanks for visiting today!

Saturday, October 10, 2020

Peeking through the Keyhole - Part 2

 I've shared the bookmarks I made with keyholes and Lavinia Stamps. They couldn't make the overseas trip all by themselves, so I had to make cards to go with them! The keyhole die set that I had was too small for my purposes and my cutting skills just are not that good, so I was a bit flummoxed! Then I remembered that I had a the Locks and Keys Thick Stencil by Stamperia and I decided to go one-layerish and mixed-media. Then I realized that I was out of my favorite all Gold Metallic Acrylic paint! Sheesh. But I solved that problem too. Yahoo!

These are the cards that I created.


Supplies Used:
140 lb. Mixed Media Paper by Strathmore®
Blue and Black Cardstock by Bazzill Basics®
Buttercup, Forget-Me-Not, and Cobalt Archival™ Ink by Ranger Industries
Scattered Straw, Mowed Lawn, Picked Raspberry, Blueprint Sketch, and Chipped Sapphire Distress® Inks by Tim Holtz® for Ranger Industries
Nocturne VersaFine Clair™ Ink by Tsukineko®
Mooka Clear Polymer Stamp by Lavinia Stamps
Mooch Clear Polymer Stamp by Lavinia Stamps
Three Dancing Fairies Polymer Stamps by Lavinia Stamps
Gold Uni-Posca Brush Tip Paint Pen
STAY-tion by Wendy Vecchi for Ranger Industries
Stamping Platform
Removable ID Labels by Avery®
Circle Nestabilities® Die Set by Spellbinders
Pitt Artist Pens by Faber Castell

Instructions for both cards.  I used different stamps for each card and also used a mostly different set of inks (Archival inks vs. Distress inks). Sadly, I don't recall which card used which combination. I did keep notes, then inadvertently put it out with the recycling. Oops. I'm going to be as clear as possible with my instructions, but will likely fail in that endeavor.
  1. Cut a piece of 9" x 12" Mixed Media paper in half vertically to create two card panels.
  2. Use a small circle die from the Nestabilities die set to cut the label paper.
  3. Secure one panel to the STAY-tion with magnets.
  4. Position the stencil so that the keyhole is where you want it on the  panel and secure it in place with magnets. *For one card only, place the Removable Die-cut Circle in the circular part of the keyhole
  5. Sponge Buttercup Archival or Scattered Straw Distress ink* over the bottom part of the keyhole aperture onto the cardstock so that it's covering a quarterish of the keyhole.
  6. Tear a piece of scrap paper, place it horizontally over the yellow sponged area, and sponge Mowed Lawn Distress ink over top. Move the piece up (or down) a bit and sponge Mowed Lawn Distress ink again. Remove the scrap.
  7. Sponge Picked Raspberry Distress ink over the top part of the yellow ink.
  8. Sponge the Buttercup Archival ink or the Scattered Straw Distress ink over the Picked Raspberry to blend.
  9. Sponge either Forget-Me-Not Archival ink or Blueprint Sketch Distress ink over the top section of the Picked Raspberry ink. 
  10. Sponge the Picked Raspberry ink over the blue ink to blend.
  11. Sponge either Cobalt Archival ink or Chipped Sapphire to the top of the circular part of the keyhole and a bit down the sides, covering the existing blue ink.
  12. Sponge the lighter blue ink (either Forget-Me-Not Archival ink or Blueprint Sketch Distress ink) over the darker blue to blend.
  13. Remove the stencil and the image panel(s) from the STAY-tion.
  14. Heat set the panels. Repeatedly. Then do it once more for good measure.
  15. Secure the image panel to the Stamp Platform with magnets.
  16. Position the Mooka (wolf) or Mooch (cat) stamps as desired on the lower part of the card, so that they appear to be sitting on the grass.
  17. Press the platform's lid onto the stamp(s), lift the platform, ink the stamp with Nocturne VersaFine Clair, and stamp. Repeat as often as needed to create a good solid impression.
  18. Remove the Mooka or Mooch stamps from the platform and give them a good cleaning.
  19. Position two of the Three Dancing Fairies as desired and repeat Step #17.
  20. Lift the circular mask off of Mooka-the-wolf's panel.
  21. *Trace and cut the circular part of the keyhole to create a mask and position it so that it's covering the top right part of the keyhole.
  22. Position the Bat Colony stamp and repeat Step #17.
  23. Remove the panels from the Stamp Platform and heat set thoroughly.
  24. Place the image panel(s) back onto the STAY-tion. 
  25. Position the stencil so that it's lined up with the image. Secure everything with magnets.
  26. Use a Pitt Artist Pen along the inside of the stencil to outline the image.
  27. Take the image panel(s) off of the STAY-tion.
  28. Use the Gold Uni-Posca Paint pen to paint the rest of the card moving horizontally. The cool thing about the paint is that it seems to shift between being gold and silver metallic when dry.
  29. Go back and touch up the outlines with the Pitt Artist Pen.
  30. Trim the image panel to 3 5/8" x 8 7/8".
  31. Cut Black cardstock to 3.75" x 9" twice and use to mat the image panels.
  32. Cut Blue cardstock to 8" x 9.25".  I used two different shades of blue cardstock for the cards to match the slight color difference in the blues.
  33. Score the blue cardstock at 4".
  34. Adhere the image panels. 
  35. Ta-Dah!
Thanks for visiting today!

I shall enter these cards into the following challenge: