Friday, June 21, 2019

Hang On Tight!

Here's the last House-Mouse Designs® card for the week! I must admit I do love sharing these with you all!


Supplies Used:
Stampendous Supplies Used:
House-Mouse Designs® Dragonfly Ride Stamp
Fitted Frames B Cutting Die Set
Spring Borders Cutting Die Set
Memento™ Tuxedo Black Ink by Tsukineko
VersaFine Clair™ Nocturne Ink Pad by Tsukineko

Other Supplies Used:
Copic® Markers:
  Mouse Skin: BV0000, E50, E51, E93, R20
  Mouse Fur: E31, E33, E35, E47, E53, E57, R01
  Mouse Noses: R21
  Dragonfly: B12, B14, B16, B28, RV000, V0000, B60
Solar White Classic Crest® Cardstock by Neenah
Blue Cardstock by Bazzill Basics
Double Dot Bold Patterned Papers by BoBunny Press®
Clear Spectrum Noir™ Sparkle Glitter Pen by Crafter's Companion

Instructions:
  1. Cut a piece of blue cardstock to 8.5" x 5.5". Score and fold to form an A2 card.
  2. Stamp the image and color with Copic markers.
  3. Use the Spectrum Noir pen to add clear glitter to the wings of the dragonfly.
  4. Die-cut the image panel with one of the dies from the Fitted Frames B Cutting Die set.
  5. Use the next largest die from the same set to cut blue cardstock and use this die-cut to mat the image panel.
  6. Cut three strips of blue patterned paper to 1.25" x 5.25", edge with blue marker and adhere to the card front.
  7. Using VersaFine Clair ink, stamp sentiment onto a scrap of patterned paper, then cut with one of the dies from the Fitted Frames B Die-cutting set.
  8. Use the next largest die from the same set to cut blue cardstock and use this die-cut to mat the image panel.
  9. Using one of the dies from the Spring Borders die set, cut blue cardstock and trim.
  10. Adhere the image panel, die-cut border, and sentiment as shown.
Thanks for visiting today!

Monday, June 17, 2019

Thank You for the Special Gift


Supplies Used:
Stampendous Supplies Used:
House-Mouse Designs® Tweet Treat Stamp
Best Day Perfectly Clear™ Stamp Set
Memento™ Tuxedo Black Ink by Tsukineko®
VersaFine Clair™ Nocturne Ink by Tsukineko®
Spring Borders Die Set

Other Supplies Used: 
Solar White Classic Crest® Cardstock by Neenah
Red Cardstock by Bazzill Basics
Tim Holtz® Pumice Stone Distress® Ink by Ranger
Floral and plaid papers fro the Secret Gardens Patterned Paper Collection by Graphic 45™
Copic® Markers:
  Mouse Skin: BV0000, E50, E51, R20, R21, E04, RV95
  Mouse Fur: E21, E23, E25, E37; We, W5, W6, W8; E31, E33, E35, E47
  *Bird: E43, E44, E47, E59, E95, E97, E99,  YR18,   Bird Legs: E31, E41, E42, E43
  Bird Beak: Yr23, YR31,
  Fence: W00, W0, W1, W3, W5
  **Tree Branch: E71, E74, E77, E79
  Tree Leaves: B12, B14, YG25
  Tree Flowers: R00, R02, R05
Triplus Fineliner by Staedtler

*American Robin
**Dogwood

Instructions:

  1. Cut a piece of red 12x12 paper in half, score, and fold to form a 6" square card.
  2. Cut the floral patterned paper to 5.75" square and edge with Pumice Stone Distress ink.
  3. Use Memento ink to stamp the image onto white cardstock.
  4. Color with Copic markers.
  5. Mat the image panel with red cardstock, plaid patterned paper, and red cardstock.
  6. Use VersaFine Clair ink to stamp the sentiment onto a strip of patterned paper. 
  7. Using one of the dies from the Spring Borders die set, cut red cardstock. 
  8. Adhere the sentiment strip onto the die-cut border, then trim to 5.75" wide.
  9. Adhere the matted image panel and the sentiment strip onto the floral patterned paper square card front.
  10. Adhere the card front to the card.
Thanks for visiting today!


Wednesday, June 12, 2019

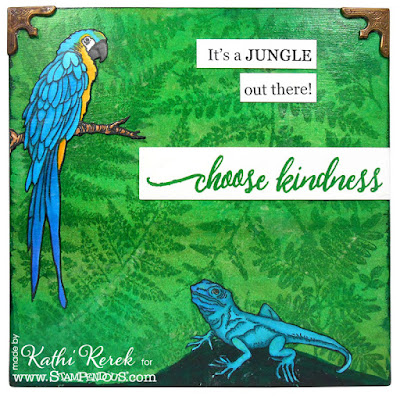
Choose Kindness Canvas

Here's a mixed media canvas using Stampendous' fabulous new Cling Fern Garden Rubber StampJungle Life Perfectly Clear™ Stamp Set, and the Smile Sentiments Perfectly Clear™ Stamp Set.


Supplies Used:
Stampendous Supplies Used:
Cling Fern Garden Rubber Stamp
Jungle Life Perfectly Clear™ Stamp Set
Smile Sentiments Perfectly Clear™ Stamp Set
Memento™ Tuxedo Black Ink by Tsukineko

Other Supplies Used:
Solar White Classic Crest® Cardstock by Neenah
Copic® Markers:
  Blue Yellow Macaw: B04, B06, B16, B18, BG01, BG02, BG05, BG07, BG09, Y15, Y17, Y19, T0, T1, T4, T5, T6, T7
  Blue Iguana: Same as Macaw plus B60, Y04, G43
  Branch: E21, E23
Media® Fluid Acrylic Paint by DecoArt®:  Blue Green Light, Translucent White, Pthalo Green Blue, Sap Green, Viridian
Brusho® by Colourcraft Ltd.®: Leaf Green, White
VersaFine Clair™ Ink by Tsukineko: Green Oasis
VersaFine™ Ink by Tsukineko: Olympia Green
StazOn® Ink by Tsukineko: Jet Black
Media® Matte Medium by DecoArt®
6x6 Canvas Board
Metal Corners: Source Unknown

Instructions:
  1. Add a drop of Blue Green Light Media Fluid Acrylic paint (MFA) to a palette, spritz with water, then brush the wash over the canvas.
  2. Repeat this step with the other greens until you have a background that you like.
  3. Brush Media Matte Medium over top to seal the paints. Set aside to dry.
  4. Using Tuxedo Black Memento ink, stamp the parrot and iguana. onto white cardstock.
  5. Fussy-cut both images, color with Copic markers, and edge with a dark marker. Set aside.
  6. Ink the Fern Garden stamp with Green Oasis VersaFine Clair and Olympia Green VersaFine inks. Use a stamp positioner to stamp the canvas. Repeat if necessary for good coverage. Heat set.
  7. Sprinkle some Leaf Green Brusho onto a craft mat, mist with water, then splash onto the canvas. Heat set.
  8. Sprinkle some White Brusho onto a craft mat, mist with water, and use a fan brush to dab white marks along the fern leaves. Heat set.
  9. Place the iguana onto the canvas and use a charcoal pencil to create a hill for him to perch upon.
  10. Paint the hill/perch with Viridian MFA paint. Heat set.
  11. Use Matte Medium to adhere the parrot/branch and the iguana to the canvas. Let dry.
  12. Computer generate "It's a jungle out there" and print onto cardstock with a laser printer.
  13. Using Green Oasis VersaFine Clair ink, stamp "Choose Kindness" onto white cardstock. Heat set.
  14. Trim the sentiments and use Media Matte Medium to adhere them to the canvas. 
  15. Coat the canvas with another layer of Media Matte Medium.
  16. Edge the entire canvas with Jet Black StazOn ink.
  17. Finish the canvas with brass metal corners.

Wednesday, June 5, 2019

Happy Birthday!

Here's a birthday card using one of Stampendous' fabulous new House-Mouse Designs® stamps!


Supplies Used:
Stampendous Supplies Used:
House-Mouse Designs® Icing Roses Stamp
House-Mouse Designs® Painted Wishes Perfectly Clear™ Stamp Set
Fitted Frames A Cutting Die Set
Memento™ Tuxedo Black Ink by Tsukineko®
VersaFine Clair™ Nocturne Ink by Tsukineko®

Other Supplies Used:
Solar White Classic Crest® Cardstock by Neenah
Dot Grid-Daisy-Stripe Rainbow Petite Prints Patterned Paper by Doodlebug Designs, Inc. ™
Very Vintage Double Dot Designs Patterned Paper by BoBunny Press®
Brown Cardstock by Bazzill Basics
Doily from my stash
Copic® Markers:
  Mouse Skin: BV0000, E50, E51, E93, R20, R21
  Fur: E21, E23, E25, E37
  Cake Innards: Y11, Y26, Y32, W1
  Frosting/Icing: RV53, RV63, RV91
  Roses: Y00, Y11, Y13, Y26
  Candles: E81, E84,   Doily: C0, C1, C2

Instructions:

  1. Cut a piece of 12x12 brown cardstock in half, score, and fold to form a 6" square card.
  2. Cut a piece of pink daisy-patterned paper 5.75" square.
  3. Use the Memento ink to stamp the House-Mouse image onto white cardstock, then color with Copic markers.
  4. Mat the image panel with yellow daisy-patterned paper and again with brown/yellow polka-dot paper.
  5. Using the VersaFine Clair ink, stamp the sentiment onto a scrap of pink daisy-patterned paper.
  6. Cut the sentiment with one of the dies from the Fitted Frames A Cutting Die Set and mat onto brown cardstock that was cut with the next largest die from that set.
  7. Position and adhere the doily onto the card front.
  8. Adhere the sentiment onto the doily, then adhere the double matted image panel as shown.
  9. Adhere the card front to the card.
Thanks for visiting today!