Do you still have crafty gifts to get for the holidays? Have you been nice? Or have you been naughty? Either way, you should pick up a few goodies from you to you. Topflight Stamps is holding a holiday sale that runs until midnight on December 18th EST!

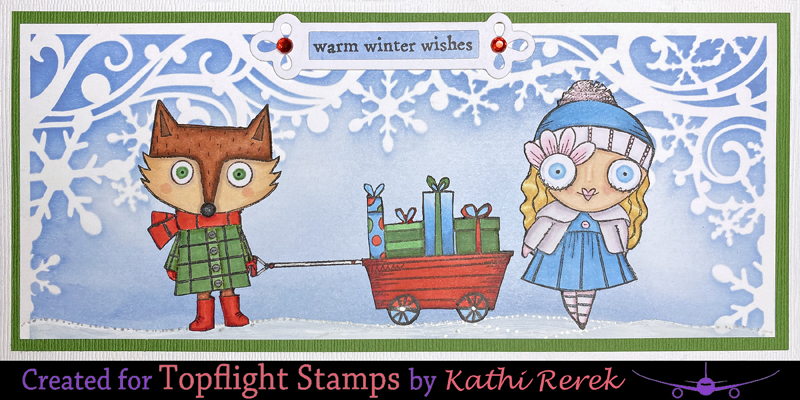
It's Tuesday which is my day to share a project created for Topflight Stamps! This week's theme is "Anything Goes". The winter holidays are rapidly approaching so I decided to make a slimline Holiday card using the Missy Merry Clear Stamp Set 607, the Holiday Fox Clear Stamp Set 608, and one of the stencils from the Scenic Winter Layering Stencil Set by Polkadoodles.
Here it is!
Topflight Stamps Products Used:
Missy Merry Clear Stamp Set 607 by Janet Klein for AALL and Create
Holiday Fox Clear Stamp Set 608 by Janet Klein for AALL and Create
Missy Merry Clear Stamp Set 607 by Janet Klein for AALL and Create
Holiday Fox Clear Stamp Set 608 by Janet Klein for AALL and Create
Della Blue Elements Inks by Lavinia Stamps
Black Blending Brushes by Time for Tea Designs
Nocturne VersaFine Clair™ Ink by Tsukineko®
Gelly Roll Bold Line Stardust® Clear Glittering Ink by Sakura®
Black Blending Brushes by Time for Tea Designs
Nocturne VersaFine Clair™ Ink by Tsukineko®
Gelly Roll Bold Line Stardust® Clear Glittering Ink by Sakura®
Festive Selection - Diamond Sparkle Gemstones by Hunkydory Crafts
Other Products Used:
Solar White Classic Crest® Cardstock by Neenah Papers
Patch and Avalanche Cardstock by Bazzill Basics Paper®
Obsidian Amalgam Ink by Gina K™ Designs
Copic® Markers:
Other Products Used:
Solar White Classic Crest® Cardstock by Neenah Papers
Patch and Avalanche Cardstock by Bazzill Basics Paper®
Obsidian Amalgam Ink by Gina K™ Designs
Copic® Markers:
Girl's Skin: BV0000, E50, E21, E11, E00, E0000, R20
Girl's Hair: W1, Y21, Y32, YR31
Girl's Lips: RV000, RV00, RV91
Girl's Eyes: B21, B34
Girl's Dress: B21, B34
Girl's Sweater and Hat: RV0000, RV000, RV91, C00, C0, C1
Fox Face: BV000, BV000, E50, E51, E53
Fox Fur: E1, E15, E17, E29
Fox Jacket: YG45, YG45, YG67, R14, R17, R29, N4, N6, N8
Wagon and Gifts: R14, R17, R29, N6, N8, B21, B34, YG41, YG45
Black Brush Multiliner Pen by Copic®
Silver Gel Pen
Silver Gel Pen
White Uni-Posca Paint Pen by Mitsubishi Pencils
Rectangle Die by Spellbinders
Nameplate Dies by Spellbinders
STAY-tion™ by Wendy Vecchi for Ranger Ink
Stamping Platform
Nameplate Dies by Spellbinders
STAY-tion™ by Wendy Vecchi for Ranger Ink
Stamping Platform
Instructions:
- Cut and score a piece of Avalanche cardstock to form a slimline card. Set aside.
- Use Obsidian Amalgam ink to stamp Miss Merry from the Missy Merry Clear Stamp Set 607 the fox and the gift wagon from the Holiday Fox Clear Stamp Set 608 onto white cardstock
- Fussy-cut the girl, the fox, and the gift wagon.
- Color the fussy-cut images with Copic markers and use the black brush Multiliner to edge them.
- Set the images aside while you create the background panel for them.
- Use magnets to adhere the snow header stencil from the Scenic Winter Layering Stencil Set over a piece of white cardstock.
- Use the largest brush from the Black Blending Brushes to brush Della Blue Elements Inks over the stencil onto the white card.
- Remove and clean the stencil.
- Use a white paint pen, white ink, and/or white chalk to add a snowy ground to the stenciled background scene.
- Gelly Roll Bold Line Stardust Clear Glittering Ink by Sakura was used to add some sparkly glittery dots along the snowline.
- Trim the background panel to 8" x 3.25".
- Use magnets to secure the stenciled background image panel to the base of a stamping platform.
- Place the reserved fussy-cut fox and the gift wagon onto the background panel.
- Position the wagon's long handle stamp, from the Holiday Fox Clear Stamp Set 608, face-down onto the background panel so that it's between the fox's hand/paw and the wagon.
- Press the platform's lid onto the back of the stamp and lift.
- Remove the fussy-cut fox and the gift wagon and set aside again.
- Ink the stamp with Nocturne VersaFine Clair Ink by Tsukineko and stamp the handle.
- Remove the long handle stamp from the stamping platform.
- Position the handle stamp facedown onto the image panel so that it's aligned with the long handle.
- Press the platform's lid onto the back of the stamp. Lift.
- Ink the handle stamp with Nocturne VersaFine Clair Ink and stamp.
- Remove the background panel from the stamping platform.
- Heat set the handle and the long handle.
- Use the silver gel pen to color the long handle.
- Use a red Copic marker to color the handle.
- Adhere the fox to the background panel so that his hand is on the wagon's handle.
- Adhere the gift wagon to the background panel on other side of the wagon's handle.
- Adhere Missy Merry to the background panel.
- Brush a scrap of white card cardstock with Della Blue Elements Inks.
- Secure the scrap to the base of the stampting platform.
- Place the sentiment stamp from the Missy Merry Clear Stamp Set facedown on the inked scrap.
- Press the platform's lid onto the back of the stamp and lift.
- Ink the sentiment with Nocturne VersaFine Clair Ink and stamp.
- Remove the sentiment scrap and heat set.
- Use a small rectangle die to cut the sentiment.
- Use a nameplate tag die to cut white cardstock.
- Adhere the sentiment onto the white nameplate die-cut.
- Cut green cardstock to .25" larger than the background panel.
- Mat the image panel onto the green cardstock.
- Adhere the green cardstock to the reserved white slimline card.
- Adhere the matted sentiment die as shown.
- Add gemstones from the Festive Selection - Diamond Sparkle Gemstones to the sentiment die-cut to finish the card.
Thanks for visiting today!


