Thursday, January 30, 2020

Thank You!

Stampendous' new release features wonderful new Frames stamps, that include an image with a space for a sentiment and several sentiments. This makes these stamp sets incredibly versatile. 


Products Used:
Stampendous Products Used:
Bird Frame Perfectly Clear™ Stamp Set (SSC1331)
Spring Borders Cutting Dies Set (DCP1009)
Tuxedo Black Memento™ Ink by Tsukineko®

Other Products Used:
Solar White Classic Crest® Cardstock by Neenah Papers
Red Cardstock
Euphoria 6x6 Patterned Paper Pad by Basic Grey®
Copic® Markers:
   Bird: B02, B04, B06, B18, B63, B66, T1, T3, T7
   Branch: E70, E71, E74
   Leaves: G20, G21, G24
   Frame: RV0000

Instructions:
  1. Cut a piece of red cardstock in half. Set one half aside. Score and fold the other half to form an A2 card. Set the card aside.
  2. Using Memento ink, stamp the image onto white cardstock and color with Copic markers.
  3. Trim image, then tatter the edges using the side of a scissor or a distressing tool. I actually used both. 
  4. Run a blue marker along the tattered edge.
  5. Cut a piece of patterned paper to 4" x 5.25" to form the card front.
  6. Edge the patterned paper with a blue marker and use the blue marker to deepen the blue spots that are already in the paper.
  7. Cut a coordinating sheet of patterned paper to 4 1/8" wide.
  8. Cut the reserved piece of red cardstock to 4.25" wide.
  9. Using one of the cutting dies from the fabulous Spring Borders Cutting Die set, cut both the coordinating patterned paper and the red cardstock. 
  10. Trim both the patterned paper and the red cardstock lengthwise as shown.
  11. Adhere the image panel to the die-cut patterned paper, then adhere to the die-cut red cardstock.
  12. Adhere the image panel to the card front.
  13. Adhere the card front to the card.

Tuesday, January 28, 2020

Love Letters!

Valentine's Day is rapidly approaching, so it's time to get busy making love-themed cards so that you can get them in the mail to arrive on time. 

That's just what Mr. Fox is doing in my card using the Fox Mail unmounted rubber stamp by Katzelkraft which you can find out Topflight Stamps!


Topflight Stamps Products Used:

Other Products Used:
Solar White Classic Crest® Cardstock by Neenah Papers
Tuxedo Black Memento™ by Tsukineko®
Copic® Markers:
   Mailbox: E04, R43, R46, R59, RV42, Y11, Y21, 23, Y26, Y28
   Fox: E11, E13, E15, E17, YR20, YR21, YR30
Prismacolor® Premier Pencils by Newell Office Brands
   Deco Blue (PC1015), Burnt Ochre (PC943), Terra Cotta (PC944) Sienna Brown (PC945), Golden Rod (PC1034), 10% French Grey (PC1068), 20% French Grey (PC1069), 30% French Grey (PC1070), 50% French Grey (PC1072), 50% Cool Grey (PC1063)
Prismacolor® Premier Colorless Blender Marker by Newell Office Brands
Masking Magic™ By Gina K Designs™/Thermoweb
Love Me 6x6 Patterned Paper Pad by My Mind's Eye Paper Goods
Red Cardstock by Bazzill Basics
Envelope Die by QuicKutz
Removable Scotch® Tape by 3M

Instructions: 
  1. Cut a piece of dark red 12x12 cardstock in half. Score one piece in half and fold to form a 6" square card.
  2. Stamp the image using Memento ink onto white cardstock and color using Copic markers. 
  3. After coloring the mailbox with the dreaded red Copic markers and be all happy, realize that one of your E markers has gone gummy and messed up your coloring.
  4. Try to repair your coloring with the colorless blender. 
  5. Epic fail.
  6. Decide to try to repair your wrecked fox using Prismacolor pencils, especially because you had just organized your colored pencils so you can actually use them. Serendipity for the win! 
  7. Blend out the colored pencils using a Prismacolor colorless blender.
  8. Stamp the image onto Masking Magic, fussy-cut, and adhere over the image to mask it.
  9. Apply Removable Scotch Tape along the base of the image.
  10. Sponge Periwinkle Prism ink over the masked image onto the image panel.
  11. Place the Grid of Hearts stencil onto the inked image panel.
  12. Randomly sponge Periwinkle Prism ink over the stencil to add subtle hearts.
  13. Randomly sponge Pink Jellybean Prism ink over stencil. This will blend with the blue hearts in some places and add pink hearts in other places.
  14. Trim the image panel and mat with dark red cardstock cut from the other half of the 12x12 sheet cut previously.
  15. Trim 'xoxo' patterned paper .5" larger than the red cardstock, edge with a pink marker, and use to mat the image panel.
  16. Cut another piece of dark red cardstock slightly larger than the xoxo piece. and adhere the image to it forming a triple mat. 
  17. Cut the red 'love' paper to 5.75" square. Edge with a dark red marker and adhere to the 6" square card.
  18. Adhere the image panel as shown.
  19. Die-cut the polka-dot patterned paper with the Envelope die three times, fold down the flaps, and edge with a dark grey marker.
  20. Use the same die to cut three hearts from a leftover scrap of the dark red cardstock.
  21. Adhere the hearts to the envelopes.
  22. Adhere the envelopes to the card to finish it up.

Thanks for visiting today!

Thursday, January 23, 2020

Wine and Cheese!

When I saw Stampendous' new Wine Frame Perfectly Clear™ Stamp Set, I immediately remembered that I had purchased this unfinished wooden cutting boards eons ago. I had a "Eureeka! moment" and decided to create a mixed media cutting board. 

Here's the front.


Here's the back.


Products Used:
Stampendous Products Used:


Other Products Used:
Solar White Classic Crest® Cardstock by Neenah Papers
Copic® Markers:
  Left Bottle: G29, G46, Y26, E81
  Right Bottle: YG97, YG99
  Red Wine Glass: R56, R59, YG91, V22
  White Wine Glass: Y21, Y23
  Grapes: V06, V28, BV08
  Grape Leaves: YG03, YG17, YG63
  Shield Edges: YG23, Y26
  Shield Center: E81
Tan, White, and Gold Vintage Effect Wash™ by DecoArt®
Media® Matte Medium by DecoArt®
Small Unfinished Wooden Cutting Board: Source Unknown because I can't remember where I got it. Oopsy.
Jet Black Archival™ Ink by Ranger Industries
Stamp Platform
Plastic Wrap or cellophane
Removable Scotch ® Tape by 3M

Instructions:
  1. Use Memento ink to stamp the Wine Frame onto white cardstock. 
  2. Use Memento ink to stamp the sentiment into the frame's opening.
  3. Color the frame with Copic markers, fussy-cut, and edge with a dark marker. Set aside.
  4. Sand the cutting board to achieve a smooth surface. Brush away dust.
  5. Mix Tan and White Vintage Effect Wash paints and paint the back, front, and sides of the cutting board.
  6. Sponge or paint both sides with Media Matte Medium to seal the paint. Heat set.
  7. Put some Gold Vintage Effect Wash paint onto a craft sheet.
  8. Ball up a piece of plastic wrap or cellophane, pounce into the paint, onto the craft sheet, then randomly over the cutting board. 
  9. Repeat this step until you're satisfied with the gold splotches. Heat set.
  10. Add another layer of Media Matte Medium to seal the paint.
  11. Take the Posted Script 6x6 stamp and place it stamp side up on your work surface. 
  12. Ink the stamp with Jet Black Archival ink and press the base of the cutting board onto the inked stamp. Leave the cutting board in place for a minute. Lift. Heat set.
  13. Since the cutting board is longer than the stamp, you will not have covered the entire surface, so place Removable Scotch Tape over the top of the image on the cutting board,.
  14. Repeat Step 12.
  15. Coat the entire front of the cutting board with a layer of Media Matte Medium to seal it. Heat set.
  16. Repeat Steps 12-15 on the back of the cutting board.
  17. Coat the front of the board and the reverse of the Wine Frame stamped image generously with Media Matte Medium. 
  18. Adhere the stamped Wine Frame onto front of the board, then coat with two layers of Media Matte Medium, heat setting between layers.
  19. Pour some Aged Gold Frantage Embossing Enamel onto a folded piece of paper.
  20. Squish a VersaMark pad onto one edge of the cutting board, then immediately press that side into the Frantage Embossing Enamel.
  21. Shake the excess Embossing Enamel powder back onto the folded piece of paper.
  22. Carefully heat set the Embossing enamel.
  23. Repeat Steps 20-22 until all sides of the cutting board are sufficiently covered with lovely golden texture.
Thanks for visiting today!

I shall enter this project into the following challenges:

Tuesday, January 21, 2020

Steampunk Post!

This week my Topflight Stamps team mates and I are sharing creations using Carabelle Studio's My Stamp Rubber Cling Stamp Set. This set includes three stamps, one of which is a postage stamp with a blank rectangle in the center. Carabelle Studio created coordinating Border Label Cling themed stamps that feature little scenes that fit perfectly inside the opening of the postage stamp! Genius!

I had such fun working with these stamps that I created two cards that are also a bit shocking as they are just one layer aside from the card base!


Topflight Stamps Products Used:
My Stamp Rubber Cling Stamp Set by Carabelle© Studio
Once Upon a Time Border Label Cling Stamp by Carabelle© Studio
Steampunk: The Butterfly Effect Cling Stamp Set by Carabelle© Studio
Steampunk News Foam Stamp by Stamperia (used on the bottom card)
Steampunk Man Stencil  by Stamperia (used on both cards)
Steampunk Sentiments by Creative Expressions (used on both cards)
Cogs Dinky Stencil by That's Crafty (used on the top card)
Thundercloud Prism Dye Ink by Hunkydory Crafts
Slate Grey Prism Dye Ink by Hunkydory Crafts

Other Products Used:
Ivory Classic Crest® Cardstock by Neenah Papers
Grey Cardstock by Bazzill Basics®
Tuxedo Black Memento™ Ink by Tsukineko
Copic® Markers:
   Iron: BV23, BV25, C00, C0, C1, C2, C3, C4, C6
   Rust: E08, E95, E97, YR27
   Tarnish: BG72, BG90
   Brass: Y11, Y21, Y23, Y26, Y28
   Skin: BV0000, BV000, E000, E11, E21, E50, R20
   Clothes: B32, B34, B37, C0, C1, C3, C4, R22, R24, R27, R39
   Bird: C4, C6, BV23, BV25, B32, B34, Y23, Y35, Y38
   Branch/Hair/Mustasche: E44, E47
   Hourglass Sand: E41, E42, E43
   Hourglass: BG000, BG01, BG10, BG90
   Background: G20, E40
London Fog Memento™ Ink by Tsukineko
Viridian, Pale Ochre,  Buttercup, French Ultramarine, Watering Can Archival™ Ink by Ranger Industries
Mixed Media Gears Foam Stamp by Stamperia (on the top card)
Stencil #2 by AALL and Create (on the bottom card)
Stamping Platform
Stamp-a-ma-jig® by EK Success
Eclipse Tape by Judikins
Post-It® Notes by 3M
Clear Mask Paper
STAY-tion™ by Ranger Industries

Instructions with some photos:
1. Cut two pieces of grey cardstock to 9.25" x 8.5". Score both at 4.25" and fold to form two cards. Set aside.

2. Cut a piece of 8.5" x 11" Ivory cardstock in half.

3. Secure the ivory cardstock to the Stamping Platform with magnets so that it's flush left with the closed edge of the platform and flush with the base of the platform.

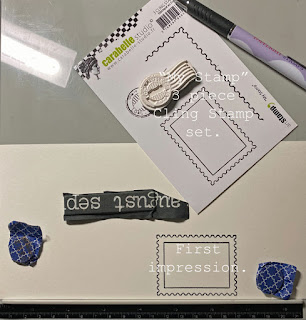
4. This photo shows the three stamps included in the My Stamp Rubber Cling Stamp Set
The stamp was positioned at a tad larger than 4.5" from the closed edge of the platform and flush with the bottom ridge.  The lid was lifted and the image was stamped with Tuxedo Black Memento ink.

5. This photo shows that stamp was left in the same position on the platform and the cardstock was moved ~2.25" to the right. I inked and stamped again!

6. ~~~Invisible Photo~~~
The invisible photo, if I had remembered to take it, would've shown that the cardstock was moved another ~2.25"wish to the right so that it was a bit over the 4.5" mark. There are now three stamps on the image panel.

7. Repeat Steps #3-6 on the second half of the Ivory cardstock. 

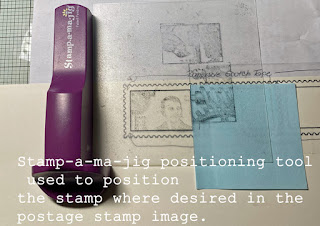
8. Using Repositionable Scotch Tape, I masked off the border and the image rectangle's lines on all four sides, then used a Post-it Note to mask the middle lines. This left a window in the center of each Postage Stamp.

9. Using the Stamp-a-ma-jig stamp positioner, I stamped the three labels into the openings.

10. Steps #8-10 were repeated for the second image panel. The tape was lifted from both image panels and discarded.

11. All images were colored with Copic markers

12. The postage stamp was stamped three times onto doubled-up Eclipse Tape and fussy-cut, which yielded six masks.

13. The Eclipse Tape masks were placed over the images and Viridian, Pale Ochre,  Buttercup, French Ultramarine ink was sponged over the image panels. 

14. The sentiments, from the Steampunk Sentiments set, were stamped on both cards, then covered with trimmed clear masking adhesive paper that I found in my stash. 

15. Grey ink was sponged over the Steampunk Man stencil on both cards and onto printer paper, which was fussy-cut to use as a loose mask.

16. Additional stenciling was done around the Steampunk man stencil on both cards using three grey inks, specifically Thundercloud and Slate Grey Prism inks and Watering Can Archival ink. 

17. The word "Steampunk" and the number strip from the Steampunk Sentiments set, were stamped onto cards.

18. The left side of the top card (Steampunk-Cog in the Machine) was covered with printer paper, the Mixed Media Gears foam stamp was placed stamp side up on my table and inked. The card was very, very carefully placed atop the stamp, and burnished with my hand. 

19. This process was repeated for the bottom card (Time Flies) using the Steampunk News Foam Stamp.

20. When all the stamping and stenciling was done, the masks were lifted, touch-ups were done, both cards were edged with the Watering Can Archival ink, and the card fronts were adhered to their cards.

I know this might not have been the clearest set of instructions I've ever written, so if you have questions, please don't hesitate to email me at merkattwo@yahoo.com.

Thanks for visiting today!

I shall enter my cards into the following challenges:

Wednesday, January 15, 2020

Purrfect Birthday!

The House-Mouse Fans Challenge's current theme is Food or Drink. You should participate for the chance to win a fabulous prize. I decided to play along with the theme.


Products Used:
Stampendous Products Used:
House-Mouse-Designs® Birthday Kitty (HMP117)
Cat Sayings Perfectly Clear™ Stamp Set (SSC1222)
Fitted Frames A Cutting Dies Set (DCP1005)
Tuxedo Black Memento™ Ink by Tsukineko®
Nocturne VersaFine Clair™ Ink by Tsukineko®

Other Products Used:
Solar White Classic Crest® Cardstock by Neenah Papers
Grey Cardstock
Paris Girl 6x6 Patterned Paper Pad by Carta Bella Paper Company
Copic® Markers:
   Cat's Fur: T0, T1, T2, T3, T4, T5
   Cat's Nose and Ears: RV91, RV93
   Cat 'sTongue: RV32, RV42, RV93
   Cat's Mouth: RV95, RV99
   Hamster/Poppet's Skin: BV000, E50, E51
   Hamster/Poppet's Nose and Cheeks: R20, R21
   Hamster/Poppet's Fur: T3 T4, T5, T7
   Cake Frosting: RV32, RV34, RV91, RV93, RV95
   Roses: RV34, RV93, RV95, RV99
   Cake: E40, E41
   Cake Plate: T5, T7

Instructions:

  1. Cut a 12x12 piece of grey cardstock in half, score, and fold to form a 6" square card.
  2. Cut the plaid patterned paper to 6" square and adhere to the front of the grey card. 
  3. Cut Grey patterned paper to 5.75" square and adhere to the card.
  4. Using Tuxedo Black Memento ink, stamp the image onto white hardtack.
  5. Color the image using Copic markers.
  6. Trim the image panel as shown, mat with pink patterned paper from the pad, then mat again with plaid paper cut to .5" larger than the pink patterned paper.
  7. Adhere the matted image panel to the card.
  8. Cut plaid paper to .5" x 5.75" and adhere to the card as shown.
  9. Using Nocturne VersaFine Clair ink, stamp the sentiment, then die-cut with one of the dies from the Fitted Frames A Die set. 
  10. Adhere the sentiment to finish the card.
Thanks for visiting today!


Tuesday, January 14, 2020

Cheers! Another 2020 Calendar!

Oh no! It's another 2020 calendar. I promise this will be the last one that I share with you (maybe). It's just that I bought a bunch of the little tear-off calendars, just like last year. This year I vowed to actually use 'em. So that's my excuse and I'm sticking to it.

This calendar features AALL and Create's Go Bananas Clear Stamp Set with their new Twirling Tendrils Stencil. This stamp set is adorable and has three drinking monkeys (below), three "evil" monkeys, a juggling monkey, and several sentiments. I bet you'll agree that the monkeys are adorable.


The Go Bananas Clear Stamp Set stamp set is absolutely fabulous and features three drinking monkeys (below), three "evil" monkeys, a juggling monkey, and several sentiments. The new Twirling Tendrils Stencil is very elegant and reminded me of jungle leaves.

Topflight Products Used:

Other Products Used:
Solar White Classic Crest® Cardstock by Neenah Papers
Tuxedo Black Memento™ Ink by Tsukineko
Copic® Markers: 
    Monkeys' Faces: BV0000, BV000, E21, E50, E51, R01, R02, R20
    Monkeys' Fur: E30, E31, E33, E35, E40, Er1, E43, E47, E49
    Hammock, Hat Stripe, and Wine: R24, R27, R39
    Hat Stripe and Top Drink: Y35, Y38
    Sunglasses and Bottle: YG61, YG63, YG67
Eclipse Tape by Judikins
Clear Glaze® 3D Glossy Gel Pen by Sakura
Gold Stardust ® Glitter Pen by Sakura
New Sprout and Bamboo Leaves Memento™ Ink by Tsukineko
Safari 8x8 Patterned Paper Pad by Graphic 45® Papers
Black Cardstock by Bazzill Basics Paper®
Cheers die by Frantic Stamper
Number Dies by QuicKutz
Black Chipboard
Post-it® Notes by 3M
Make Art STAY-tion™ by Wendy Vecchi/Ranger Industries.

Instructions:
  1. Use a tiny bit of a Post-It Note to cover a bit of the Hammock monkey's tail. Ink the stamp with Memento ink and stamp the image onto white cardstock.
  2. Use a stamp positioner or a stamp platform to position the Tail-hanger party-hat monkey so that his tail is hooked onto Hammock monkey's tail. Ink and stamp.
  3. Position Wine monkey as desired, ink and stamp.
  4. Stamp all three monkeys onto Eclipse Tape and  fussy-cut to create masks.
  5. Adhere the masks onto their counterparts on the image panel.
  6. Place the image panel onto the STAY-tion and position the ruler over the Wine monkey's paws.
  7. Using the Premier Ink Blending Tool* and the Premier Ink Blending Sponges*, sponge Sprout Memento ink over the monkeys.
  8. Place the Twirling Tendrils Stencil over the image panel and secure with the STAY-tion's magnets.
  9. Sponge Sprout Memento ink over the stencil onto the image panel.
  10. Lift the stencil, move the STAY-tion's ruler so that it covers the top part of the image panel.
  11. Sponge Sprout Memento ink over Wine monkey's paws to ground the image.
  12. Sponge Bamboo Leaves Memento ink over the bottom part of the image panel
  13. Trim the image panel to 2.75" x 7.25" then use the ink to edge the image panel.
  14. Lift the masks off of the monkey and reserve for a later use.
  15. Use a Clear Glaze 3D Glossy Gel pen to add several layers to the monkey's sunglasses, their drinks, the wine bottle, and the wine glass, being sure to let the gel dry between layers. This adds dimension and shine to those parts of the image.
  16. Use the Gold Stardust Glitter pen to add a dot to one of the Tail-hanger monkey's teeth. Next time I'm going to give him a gold grill. Just so that you know.
  17. Trim a piece of black cardstock so that it's slightly larger than the image panel and use to mat it.
  18. Trim the palm leaf patterned paper to 3.25" wide and edge with Midnight Black Prism ink, which is a lovely deep black.
  19. Trim a piece of leopard print paper to .25" wide and edge with Midnight Black Prism ink.
  20. Layer the palm leaf patterned paper onto the right side of the floral print paper.
  21. Adhere the strip of leopard-print paper next to the palm leaf paper as shown.
  22. Trim the 8x8 paper to 7 7/8" and edge with Midnight Black Prism ink.
  23. Trim a piece of the multiple animal-skin patterned paper to 3.25" x 2.5" and edge with the Midnight Black Prism ink.
  24. Cut black cardstock so that it's slightly larger than the animal skin paper and use to mat it.
  25. Cut black cardstock with the "Cheers" and numbers die.
  26. Adhere all the elements as shown, then adhere to black chipboard cut to 8.25" square.
**Hunkydory's Premier Ink Blending Tool and Blending Sponges have stolen my affection from their  Ranger cousins. The velcro is firmly attached to the tool and the sponges stick beautifully to the tool. Additionally, the foam seems slightly more absorbent. 

I also highly recommend the STAY-tion tool. It's a reasonably priced investment that makes stenciling almost foolproof.

Thanks for visiting today!

Saturday, January 11, 2020

Kitten Hugs Calendar

If you're a cat lover, you must get the new Kitten Hugs Cling Rubber Stamp Set by Stampendous. It's freaking adorable! Not only does it come with several adorable kitten stamps, it comes with a paw print stencil!

Here's a calendar using this fabulous stamp set!


Here's a close up of the kittens. The one in the back with his paw on the head of the orange kitten was colored to look a bit like my Domino...just a bit because Domino is pure white with grey markings on his head.


Products Used:
Stampendous Products Used:
Kitten Hugs Cling Rubber Stamp Set (CRS5111)
Tuxedo Black Memento™ Ink by Tsukineko®
Onyx Black VersaFine™ Ink by Tsukineko®
Mixed Media White Paper

Other Products Used:
Grey Cardstock
Copic® Markers:
   Ginger Kittens
      Fur: YR20, YR21,  YR65
      Ears and Noses:       Eyes: YR23, YR31
   Solid Grey Kitten's Fur: C3, C4, C6
   Grey Tabby Kitten's Fur: C2, C3, C4, C5
   Both Grey Kittens' Eyes: YG03, YG11
   Both Grey Kittens' Ears: RV93, RV95
   Domino* Kitten's Fur: C00, C0, C1, C3, C5
   Domino Kitten's Nose and Ears:    Domino Kitten's Eys: B32, YG11
New Sprout Memento™ Ink by Tsukineko
Bundled Sage, Dried Marigold, Carved Pumpkin, Squeezed Lemonade Tim Holtz® Distress® Inks by Ranger Industries
Alphanumeric Thinlits™ Tim Holtz® Alterations by Sizzix®
Acetate
Small Tear Off Calendar by Taylored Expressions
Eclipse Tape by Judikins
Repositionable Scotch Tape
Black Chipboard

Instructions:

  1. Stamp kitten pile image onto white cardstock, and onto Eclipse Tape.
  2. Fussy-cut Eclipse Tape version and adhere over its counterpart.
  3. Temporarily adhere cardstock to typing paper or a media mat.
  4. Place a piece of Repositionable Scotch Tape over the base of the image.
  5. Brush or sponge Squeezed Lemonade Distress ink over the masked image.
  6. Place the paw print stencil over the masked image. 
  7. Brush or sponge Dried Marigold Distress ink over the stencil onto the image panel.
  8. Using the Alphanumeric dies, cut 2020 onto acetate to create a stencil.
  9. Position the 2020 stencil as desired and sponge Carved Pumpkin Distress ink through the stencil onto the image panel.
  10. Remove the stencil and the Scotch Tape.
  11. Cover the top of the part of the image panel with scrap paper and sponge Bundled Sage Distress ink and New Sproudt Memento ink across the base of the paper.
  12. Lift the Eclipse Tape mask and retain for a later use.
  13. Color the kittens with Copic markers.
  14. Adhere grey cardstock to chipboard and trim to 5" x 7.25".
  15. Trim the image panel to 4.75" x 7" and adhere to the grey base.
  16. The calendar measures 3" x 2.25".
  17. Cut a piece of grey cardstock to 3.25" x ~2.75".
  18. Using VersaFine ink, stamp the sentiment at the base of the grey cardstock.
  19. Adhere the calendar to the grey cardstock.
  20. Adhere the matted calendar to finish the project.   
Thanks for visiting today!


Tuesday, January 7, 2020

A Tranquil 2020 Calendar

For my first official project for Topflight Stamps, I decided to create a calendar that reflects my goals for myself, my family, my friends, and for the world.

Here it is!


Supplies Used:
Topflight Stamps Supplies Used:

Other Supplies Used:
140 lb. Mixed Media Paper by Strathmore®
Marcasite Embossing Powder by Stampendous!®
Iridescent Violet Brushes® Crystal Color by Colourcraft
Eclipse Tape by Judikins
Black Shimmer Delicata™ Ink by Tsukineko®
Clouds Stencil by My Favorite Things
Alphabet dies by QuicKutz
Calendar by Taylored Expressions
White Chalk Pencil by General's®
Sketch and Wash® Charcoal Pencil by General's®

Instructions:
  1. Use Onyx Black VersaFine ink to stamp the meditating figure from the Mindful Moments stamp set onto mixed media paper.
  2. Heat emboss the image with Marcasite embossing powder, which is slightly sparkly.
  3. Stamp the image again onto Eclipse Tape, fussy-cut, and place atop the figure on the mixed media paper.
  4. Place a piece for torn scrap paper horizontally across the bottom of the meditating figure to form a horizon.
  5. Starting at the top of the page, use Premier Ink Blending Tools to sponge Periwinkle Prism Dye Ink over the Clouds stencil, moving the stencil and sponging as you go to form clouds.*
  6. Repeat Step #5 with Pink Jelly Bean Prism Dye Ink to add some pink tones to the cloudy sky background.
  7. Flip the torn scrap paper horizontally and sponge Rainforest Green Prism Dye Ink over another piece of torn cardstock to form a grassy background.
  8. Secure the Wellbeing Stencil over the figure and the background.
  9. Sponge the blue and green inks over the stencil and meditating figure.
  10. Lift the stencil and the mask. Set aside the mask for another use.
  11. Using a paintbrush or watermen, add water to the inside of the meditating figure. The exterior lines of the figure were heat embossed, so the lines are raised.
  12. Sprinkle Purple Brusho® Crystals onto the wet area, then spread with the paintbrush, being sure to completely fill the figure with color.
  13. When the figure is dry, add shadows using the charcoal pencil
  14. Wet scraps of mixed media paper and sprinkle with Purple Brusho® Crystals. Spread the color out with a paintbrush. While still wet, sprinkle Iridescent Violet Brusho® Crystals overtop, and spread with the paintbrush.
  15. Heat set the scraps and flatten them by running them through a die cut machine under the cutting plates. 
  16. Using number dies, cut the scraps for the date then edge with the Black Shimmer Delicata ink.
  17. Trim the other piece of purple Brushoed paper so that it's slightly larger than the calendar. Edge it with Black Shimmer Delicata ink.
  18. Adhere the date and the matted calendar as shown.
  19. Use Onyx Black VersaFine ink to stamp the three doves from the Guardian Angels  stamp set.
  20. Use a white chalk pencil to color the doves.
  21. Edge the entire image panel with Black Shimmer Delicata ink, then mat with black chipboard.
*Hunkydory's Premier Ink Blending Tools look like the Ranger Blending Tools, but the velcro side of the foam stays stuck to the handles and the foam itself seems to hold more ink, which makes the blending smoother. 
Thanks for visiting today!


Monday, January 6, 2020

Gnome Travel

Gosh! I love these gnew gnomes from Stampendous! They're just so cute and so much fun to use!

I decided to try to use all the stamps in the gnew Gnome Travel Perfectly Clear™ Stamp Set.  Check it out!


Products Used:
Stampendous Products Used:
Gnome Travel Perfectly Clear™ Stamp Set (SSC1343)
Tuxedo Black Memento™ Ink by Tsukineko®

Other Products Used:
Solar White Classic Crest® Cardstock by Neenah Papers
Desert Storm Cardstock by Neenah Papers
Blue Cardstock
Black Photocorners by Scrapbook Adhesives by 3L®
Deluxe Card 4 by Deluxe Cuts*
Adventure Stencil by The Crafter's Workshop
London Fog and Summer Sky Memento™ Ink by Tsukineko®
Copic® Markers:
  Taj Mahal: C00, C0, C1, C2, De40, G05, G07, G16, G28, De04, BG11, YG93
  Neuchwantstein Castle: R00, R01, C0, C1, C2, 4, C6, BG70, BG72, G05, G07, G16, G28
  Statue of Liberty: BG72, BG75, BG78, BG57, B34
  Pyramids: E40, E41, E42, E43
  Hollywood: YG3, YG57, YG91
  Eiffel Tower: E42, E43, G07, G16
  Great Wall: E41, E42, E43, C1, C2, C3, C4, G07, G16, G28
  Gnome: E11, B32, B34, C4, C6, R27, R39, R59, E33, E35, E37, E47, Y21, Y23
PostIt® Notes
*An alternate to this stencil would be to create your own stencil using one of the multi-windowed card cover dies.

Instructions:
  1. Cut blue cardstock to 6" x 12", score, and fold to create a 6" square card.
  2. Secure white cardstock to a work surface.
  3. Tape stencil over the white cardstock.
  4. Place PostIt Notes around each window in the stencil, then lightly brush or sponge Summer Sky Memento ink around the edges. Lift the corner of the stencil to check ink coverage and repair if necessary.
  5. Working on one window at a time, place PostIt Notes on the stencil, then use Tuxedo Black Memento ink to stamp a different scene in each window and the sentiment into the upper right window. 
  6. Place PostIt Notes around the middle bottom window and sponge Summer Sky over the entire opening.
  7. Color all the images with Copic markers, going over the sky and grass.
  8. Place the compass on the Adventure stencil over the solid blue window and sponge London Fog over the stencil.
  9. Remove all the PostIt Notes and remove the stencil.
  10. Trim the image panel to 5.5" square.
  11. Trim tan cardstock to 5.75" square.
  12. Adhere the image panel to the tan cardstock, using adhesive and black photo corners.
  13. Adhere the card front to the blue card.
Thanks for visiting today!

Saturday, January 4, 2020

Cheers and Happy New Year!

Cheers! I'm totally excited to announce that I've joined the talented designers for Topflight Stamps, a fantastic online stamp shop that carries wonderful products from around the world! I've been a satisfied customer for years and now I get to design for them. It's a dream come true!

Here's a shaker card to celebrate both the New Year and my new gig!

View from the front:


View from above so you can see the shaker's contents!


Products Used:
Topflight Stamps Products Used:

Other Products Used:
Solar White Classic Crest® Cardstock by Neenah Papers
Tuxedo Black Memento™ Ink by Tsukineko®
Copic® Markers: BV0000, C0, C1, C2, C3, C4, YG21, YG25, B02, B04, R81, RV91 YR20, YR31
Blue Stardust® Glitter Gel Pen by Sakura
Layered Champagne Die-namics Die Set by My Favorite Things®
Cheers Die Set by Cheery Lynn Designs
Confetti Stencil by Newton's Nook Designs
Polka Dot Parade and Gingham Jewel Tones Patterned Paper by Sunny Studio Stamps
Yellow DoubleDot Patterned Paper by BoBunny Press®
Orange Cardstock by Bazzill Basics Paper®
Glitter Paper Stack Pad by DCWV®
Celebrate, Citrine, Storm Clouds Sparkle Blends by Doodles Paper Playground
Disco Ball and Macarena Bead Dazzles by Ranger
Eclipse Tape by Judikins
Clear Acetate
Black Crafty Foam Tape by Scrapbook Adhesives® by 3L

Instructions:
  1. Cut a piece of orange cardstock in half, score, and fold to form a 6" square card.
  2. Cut polka dotted patterned paper to 5.75" square, edge with Fire Coral ink, then adhere to the card to create the card front.
  3. Use Memento ink to stamp the cat onto white cardstock and onto masking paper.
  4. Fussy-cut the Eclipse tape cat and adhere atop its counterpart to mask the image.
  5. Sponge Canary Yellow Prism Dye Ink over the image. 
  6. Place Repositionable Scotch Tape across the base of the image panel.
  7. Place the stencil over the image panel and sponge Fire Coral Prism over the stencil. 
  8. Lift the stencil and the tape. 
  9. Cover the stenciled top part of the image panel and lightly sponge Fire Coral and Canary Yellow across the bottom of the image panel. You'll find that the inks blend beautifully together.
  10. Trim the image panel and sponge the edges with Fire Coral ink.
  11. Trim blue glitter paper so that it's slightly larger than the image panel then mat the image panel.
  12. Position the champagne glass onto the image panel and die-cut. Reserve the stenciled and glitter paper die cuts for later use. I used the stenciled one on the inside of the card but didn't photograph it. Oops.
  13. Die-cut a scrap of the blue glitter paper with the Cheers die.
  14. Remove the Eclipse Tape mask and color the cat with Copic markers. 
  15. Use the glitter pen to add glitter to the stamped confetti.
  16. Adhere the sentiment as shown.
  17. Sponge the edges of the champagne glass opening with Fire Coral ink.
  18. Adhere acetate behind the aperture cut with the window die to create the window for the shaker card.
  19. Add a double layer of foam tape around the aperture to create the opening for the shaker contents.
  20. Add sparkles and micro-beads to shaker.
  21. Remove the backing of the tape and seal the shaker with a strip of yellow DoubleDot patterned paper.
  22. Cut a piece of gingham patterned paper .5" larger than the blue glitter paper and edge with Fire Coral ink.
  23. Adhere the matted image panel/shaker onto the gingham patterned paper. 
  24. Cut blue glitter paper slightly larger than the gingham paper.
  25. Mat the gingham paper with the glitter paper and adhere the image panel to the card front.
Thanks for visiting today!