Wednesday, May 15, 2019

It's Your Birthday! Go Bananas!

Meet the cute new Monkey Cling Rubber Stamps and Cutting Die Set, which is sized perfectly to work with the fabulous WindowRama Die Set.

Here's the front:


Here's a side-ish view so you can see the dimension a bit better.


Supplies Used:
Stampendous Supplies Used:
Monkey Cling Rubber Stamps and Cutting Die Set
WindowRama Die Set
Jungle Leaf Stamp and Die from the Elephant Cling Rubber Stamps and Cutting Dies Set
Jungle Leaves Metal Stencil
Speech Bubble Die from the No Probllama Die Set
Memento™ Tuxedo Black Ink by Tsukineko

Other Supplies Used:
Solar White Classic Crest® Cardstock by Neenah Papers
Green and brown Cardstock by Bazzill Basics
Memento™ Cottage Ivy and Bamboo Leaves Ink by Tsukineko
Copic Markers:
   Monkey Skin: BV0000, E00, E11, E21, E50
   Monkey Cheeks: R20
   Monkey Ears, Palms, and Soles of Feet: BV0000, R20
   Monkey Nose: R21, R22
   Monkey Fur: E33, E35, E37, E49
   Monkey Mouth: E04, RV32
   Leaves: B12, YB13, YG17, YG25, YG93, YG95
   Banana: Y0000, Y13, Y26, Y28, T0, T1
Triplus Fineliner by Staedtler
Premium Double-Sided Tape by HomeHobby™ by Scrapbook Adhesives® by 3L

Instructions:
  1. Use the WindowRama Base die and cut green cardstock three times.
  2. Sponge Cottage Ivy and Bamboo Leaves ink over the Jungle Leaves stencil onto one of green WindowRama Base die-cuts.
  3. Using the innermost score line, fold both sides of the stenciled card base forward, then set aside. This will become the back of the WindowRama card.
  4. Use the circle die from the WindowRama die set to cut two of the two green WindowRama die-cuts.
  5. Fold both sides of one of them to backward to form the front of the card.
  6. Reserve the other one for now.
  7. Use the vine-in-a-circle die from the Monkey Cling Rubber Stamp and Cutting Die Set to die-cut brown cardstock. Set this aside.
  8. Use the leaf die from the WindowRama Die set to die-cut green cardstock. Set aside.
  9. Use Memento ink to stamp the monkey, a banana, and the jungle leaf onto white cardstock.
  10. Use Copic markers to color them.
  11. Use the corresponding cutting dies to cut the images, then edge them with a dark marker.
  12. Take the brown circle/vine die-cut and adhere behind the circular aperture of the reserved green die-cut base from Step 6. Be sure that there is not any adhesive exposed.
  13. Cut along the scorelines that are 3/4" from either edge. Valley fold along the furthest scoreline on both sides, and adhere to the base/back of the WindowRama card.*
  14. Adhere the leaf die-cut over the vine as shown.
  15. Adhere the monkey die-cut so that one hand is on the vine and the other is on the leaf.
  16. Using a strong adhesive (tape or glue), adhere the front of the card to the back of the card.*
  17. Stamp the sentiment onto white cardstock with Tuxedo Black Memento ink.
  18. Die-cut the sentiment with the speech bubble.
  19. Adhere the colored, die-cut banana as shown.
  20. Finish the card with the colored die-cut leaves.
*For more information about how to use the fantastic WindowRama Die Set, check out my WindowRama Tutorial.


Friday, May 10, 2019

Pirate Fun Shaker Card

I figured that since once again, shaker cards are popular, I'd have a go and what better way than with an underwater pirate scene with the shaken elements being glittery?

So, here's my shaker card with Stampendous' new Pirate Fun Stamp Set.


Supplies Used:
Stampendous Supplies Used:
Pirate Fun Stamp Set
Build a Pop Up Die Set
WindowRama Cutting Die Set
Frantage Glass Glitter
Memento™ Tuxedo Black Memento Ink by Tsukineko®
VersaFine Clair™ Nocturne Ink by Tsukineko®

Other Supplies Used:
Copic® Markers:
  Crab: B64, B66, R14, R27, R30, YR12, E04,
  Seahorse: Y00, Y02, Y13, Y15, R02, YR04
  Pirate Hats and Belt: E33, E35, E37, E47
  Belt Buckle, Sword Hilt, Brass on Chest, Coins: Y04, Y11, Y11, Y21, Y23, Y26, Y28
  Sword Blade: C0, C2
  Treasure Chest: E23, E25, E37
  Sea Plants: YG41, YG45, Y02, Y13, Y15, YR02, YR04
  Left Coral: E70, E71, E74, V00, V01, R30
  Right Tubey Plants: E70, E71, E74, V00, V01, R30, V95
  Sand: E41, E42, E43, E44, E47
  Sea: BG13
Solar White Classic Crest® Cardstock by Neenah
Rain Cardstock by Bazzill®
St. Tropez 8x8 Patterned Paper Pad by Prima Marketing®
Silver Metallic Cardstock by Recollections
Nameplate Die by Spellbinders®
Aquamarine Archival™ Ink by Ranger
Tim Holtz® Pumice Stone Distress® Ink by Ranger
Macarena Beadazzles™ by Ranger
Clear Acetate (from packaging)
Foam Tape by 3M
Clear Glaze™3D Glossy Gel Pen by Sakura
White Gelly Roll™ Pen by Sakura
Clear Stardust™ Glitter Pen by Sakura
Static reducing thingy deal (its technical name)
Double-sided Tape by Sookwang
Mini Hardware Mechanicals by Prima Marketing®

Instructions:
  1. Cut a piece of cardstock to 7" x 10", score at 5", and fold to form a 5" x 7" card.
  2. Cut a piece of the wave patterned paper to 4.75" x 6.75" to become the card front.
  3. Cut another piece of the wave patterned paper to 4.25" square and use the circle die from the WindowRama die set to cut a circle in the center.
  4. Edge both patterned papers with Aquamarine Archival ink.
  5. Use Memento ink to stamp the Pirate Fun Stamp onto white card stock.
  6. Color with Copic markers. 
  7. Add white gel pen to the crab's claws.
  8. Add glitter pen to the bubbles and the antenna of the sea slug.
  9. Add several layers of Glaze pen to the eyes of the sea creatures, the crab's claws, the skull on the pirate hat, the crab's teeth, and the bubbles.
  10. Trim the image panel to 4" square.
  11. Using double-sided strong tape and/or liquid glue, a 3.75" square of clear acetate to the reverse of the wave patterned paper.
  12. Rub the static reducing thingy deal on the acetate.
  13. Fold lengths of foam tape in half and adhere around the circumference* of the circular aperture on the reverse of the wave-patterned paper over the acetate.
  14. Fold more foam tape in half and add to the edges on the reverse of the 4.25" square.
  15. Repeat step 11. Twice.
  16. Pour glitter and Beadazzles into the raised circular acetate window.
  17. Position double-sided tape around the circular aperture of the window, remove the backing, and  carefully adhere the image panel taking care to press firmly to secure the beads and glitter inside the aperture.
  18. Using the ticket shaped die-cut from the Build a Pop Up Card die set, cut white cardstock and color with BG11.
  19. Stamp the sentiment onto the ticket die-cut using Nocturne ink.
  20. Using the nameplate die, cut silver cardstock. 
  21. Adhere the sentiment onto the nameplate.
  22. Adhere the shaker scenic image panel to the card.
  23. Adhere the matted sentiment.
  24. Use screw-top Mechanicals to finish the card.
Thanks for visiting today.

Wednesday, May 8, 2019

Awesome on Porpoise

Stampendous's new release features several ocean-themed stamp sets that are all fabulous. Most of them were designed to be used with the terrific new WindowRama Die Set, though of course they're easily used on most any paper-crafting project!

Here's my WindowRama card with the new Porpoise Fun Cling Rubber Stamp Set.


Supplies Used:
Stampendous Supplies Used:

Other Supplies Used:
Copic® Markers used:
 Porpoise: C00, C0, C1, C2, C3, C4, C5, E04, RV32
 Palm Tree Fronds: YG03, YG05, YG17
 Palm Tree Trunks: E41, E42, E44
 Coconut; E11, E15
 Island: G05, G19, G85, YG05
 Sky:
 Clouds: C00, C0, BV000, RV000
 Sea: B16 B18, B24, B37, BG49
Solar White Classic Crest® Cardstock by Neenah
Metallic Silver Cardstock by Neenah
Grey Cardstock by Neenah
St. Tropez 8x8 Patterned Paper Pad by Prima Marketing®
Rings Die Set by WeR Memory Keepers®
Nameplate by Spellbinders®
Hardware Die Set by Frantic Stamper
White Gelly Roll® Gel Pen by Sakura
Clear Glaze™ 3D Glossy Gel Pen by Sakura
Tim Holtz® Hickory Smoke Distress® Ink by Ranger
Sky Rain Dots by Cloud 9 Designs/Fiskar's®


Instructions:
  1. Use the WindowRama Base die to die-cut the wood-paneled patterned paper and grey cardstock. 
  2. Use the circle die from the WindowRama die set to cut the wood-paneled die-cut. 
  3. Fold both sides of the wood-paneled die-cut towards the back to become the front of the card. 
  4. Edge both folds and all edges, including the circle opening, with the Distress ink.
  5. Fold both sides of the grey die-cut towards the front to become the back of the card.
  6. Use Memento ink to stamp the porpoise onto white cardstock.
  7. Use Copic markers to color the scene. 
  8. Use the rounded square from the WindowRama die set to cut the image panel.
  9. Use the white gel pen to add white highlights to tops of the waves. Also use the white gel pen to make horizontal marks along the water, then use a finger to smudge the ink.
  10. Use  the Glaze Glossy Gel Pen on the Porpoise's eye.
  11. Add the rain dots to the scene.
  12. Adhere the image panel to the center of the grey cardstock back.
  13. Use VersaFine Clair ink to stamp the sentiment onto white cardstock. 
  14. Use a rectangle die from the Build a Pop Up Die set to cut the sentiment.
  15. Color the sentiment with a blue marker to match the sky.
  16. Use one of the dies from the Nameplate set to cut silver cardstock.
  17. Use the screws from the Hardware die set to cut silver cardstock.
  18. Adhere the sentiment to the silver nameplate and add the screws on either side.
  19. Adhere the sentiment to the wood-paneled patterned paper card front.
  20. Adhere the card front to the card back with either strong tape or liquid adhesive.
Thanks for visiting today!

Saturday, May 4, 2019

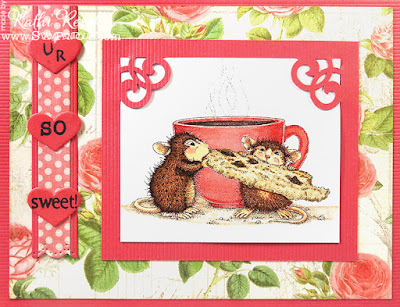
So Sweet! Coffees, Cookie, and Mice?

Stampendous is a sponsor of the Spring/Summer Coffee Lovers' Blog Hop. Some Stampendous DT members and I are participating by sharing our coffee-themed projects. Did I mention that there will be prizes? See below for more information about that!

Here's my card using the adorable House-Mouse Designs® Cookie Crumbles Rubber Stamps!


Supplies Used:
Stampendous Supplies Used: 
House-Mouse Designs® Cookie Crumbles Rubber Stamps
House-Mouse Designs® So Sweet Perfectly Clear™ Stamps
Small Typewriter Alphabet Perfectly Clear™ Stamps
Tiny Typewriter Alphabet Perfectly Clear™ Stamps
Spring Border Cutting Dies Set
Small Heart from the Wings Die Set
Memento™ Tuxedo Black Ink by Tsukineko®
VersaFine Clair™ Nocturne Ink by Tsukineko®

Other Supplies Used:
Solar White Classic Crest® Cardstock by Neenah Papers
Botanical Tea Patterned Papers by Graphic 45™
Tim Holtz® Pumice Stone Distress® Ink by Ranger Industries
PaperShaper® Corner Punch by EK Success
Copic® Markers Used:
  Mouse Skin: BV0000, E50, E51, E93, R20
  Mouse Noses: R21, R22
  Mouse Fur: E31, E33, E35, E47 and E21, E23, E25, E37
  Cup: R20, R21, R22, N0, N1, E47, E49
  Floor: E41, E43
Cardstock by Bazzill Basics

Instructions:
  1. Cut, score, and fold pink cardstock to create an A2 card. Set aside.
  2. Cut a piece of the rose-patterned paper to 5.25" x 4". Edge with Distress ink.
  3. Stamp the House-Mouse Designs image with Tuxedo Black ink and color with Copic markers.
  4. Cut a piece of pink cardstock .5" inches wider in width and height.
  5. Use the corner punch to punch the top edges.
  6. Insert the stamped image panel under the corner punched top edges and adhere to the pink cardstock.
  7. Cut a strip of coordinated polka-dot paper to .75" wide and use one of the Spring Border dies to cut the bottom edge. Mat onto pink cardstock cut 1/8" wider than the polka-dot strip.
  8. Using one of the heart dies from the Wings set, cut three hearts from pink cardstock.
  9. Using VersaFine Claire Nocturne ink, stamp the sentiment onto each of the hearts as shown.
  10. Adhere the image panel, the strip of matted cardstock, and the sentiment hearts.
Prize Information:
• Stampendous will offer a 25% discount on Coffee Themed stamps on their website with Promo Code CLBH2019.
• Three (3) House-Mouse Designs® Cookie Crumbles Rubber Stamps will be given away by us to US addresses for comments on our blogs. 
• Three (3) House-Mouse Designs® Cookie Crumbles Rubber Stamps will be given by CLBH on their blog hop as Flash Prizes.
• Stampendous will offer one $20 gift card to our site on their blog. 
All winners need U.S. Mailing addresses.

Thanks for visiting today!


Wednesday, May 1, 2019

Cat Tracking - A Tale of the House-Mouse Detectives!

There's been a cat around and the House-Mouse Detectives are on the scene! They've left out a red inkpad so they're sure to catch that cat red-handed!

Here's the card.


Supplies Used:
Stampendous Supplies Used:
House-Mouse Designs® Cat Tracking Rubber Stamp
Memento™ Tuxedo Black Ink by Tsukineko

Other Supplies Used:
Solar White Classic Crest® Cardstock by Neenah Paper
Copic® Markers Used:
  Mouse Skin: BV0000, E000, E50, E51, R20, R21
  Fur: E21, E23, E25, E31, E33, E35, E37, E47, W3, W5, W7
  Wallpaper: E40, E81, R05, R17, B52, G16, G29
  Floor: E21, W0, W1, W3, W5
  Broom: Y26, Y28
  Footprints: R05
  Inkpad: C0, C1, C3, C6
  Stamp: E21, W1, W3, $05
French Country Paper Collection by Graphic 45™
Cardstock by Bazzill Basics

Instructions:
  1. Cut a piece of 12"x12" cardstock in half, score, and fold to form a 6" square card.
  2. Stamp the image onto white cardstock and color with Copic Markers.
  3. Trim the image panel to 4.75" x 3.75" and mat with red cardstock.
  4. Trim the yellow patterned paper from the French Country collection to 5.75" square.
  5. Cut a 2.25" x 5.75" strip of the multi-striped patterned paper and mat with red cardstock.
  6. Adhere the matted strip of striped patterned paper onto the yellow patterned paper as shown.
  7. Adhere the image panel onto the card front.
  8. Adhere the card front to the 6" square card.
Thanks for visiting today!