Showing posts with label House-Mouse Designs®. Show all posts

Thursday, June 23, 2022

Stop and smell the roses

Now that it's officially summer and the roses are blooming, I figured that I ought to share this card created with the Rose Nap House-Mouse Designs® Rubber Stamp, the Cling Posted Script 6x6 Rubber Stamp, and the Slim Cling Woodgrain Rubber Stamp -- all by Stampendous!


Stampendous! Products Used:

Other Products Used:
Mini House-Mouse Designs Clear Stamp Set by Stampendous!®
Tuxedo Black Memento™ Ink by Tsukineko®
Onyx Black VersaFine™ Ink by Tsukineko®
Scattered Straw Distress® Oxide Ink by Tim Holtz® for Ranger Ink
Yellow, black, and brown cardstock
Copic® Markers:
Mouse Skin: BV0000, BV000, E51, E50, RV91, R01, R00, R000, R20 (Cheek) R21 (Nose)
Fur: E21, E23, E25, E37
Roses: Y00, Y23, Y26
Leaves: G20, G21, G40, G43, G46, YG21
Light Blue and Indigo Chalk Pencils by General's®
Black Pitt Artist Pen by Faber Castell
Framed Sentiment Die Die-namics Set by My Favorite Things®
Stamping Platform

Instructions:
  1. Cut a piece of brown cardstock to 5.5" x 11". Score at 5.5" and fold to form a 5.5" square card. Set aside.
  2. Cut a piece of yellow cardstock to 6".
  3. Use magnets to secure the yellow cardstock to the base of the stamping platform.
  4. Position the Cling Posted Script background stamp facedown on the yellow cardstock.
  5. Press the lid of the platform onto the back of the stamp and lift.
  6. Ink the stamp with Scattered Straw Distress Oxide ink and stamp. Repeat this step if needed to have a clean impression.
  7. Trim the yellow panel to 5.25" square and edge with Scattered Straw Distress Oxide ink. 
  8. Heat set the yellow panel and adhere to the brown card.
  9. Cut a piece of brown cardstock in half.
  10. Use magnets to secure the brown cardstock to the base of the stamping platform.
  11. Position the Slim Cling Woodgrain Stamp stamp facedown on the brown cardstock.
  12. Press the lid of the platform onto the back of the stamp and lift.
  13. Ink the stamp with Onyx Black VersaFine ink and stamp. Repeat this step if needed to have a clean impression.
  14. Trim the brown panel to 4.5" x 3.125" and heat set and set aside.
  15. Use Tuxedo Black Memento ink to color the images. Make sure you're happy with the coloring before preceding to the next step.*
  16. Use chalk pencils to add the sky background to the image panel.
  17. Trim the image panel to 3.875" x 2.5".
  18. Use a Black Pitt Artist pen to edge the panel.
  19. Mat the image panel on white cardstock cut to 4" x 2.625", then mat again with the stamped brown cardstock.
  20. Use Onyx Black VersaFine ink to stamp the sentiment.
  21. Use the framed sentiment dies to cut the sentiment and a leftover scrap of the wood-grain stamped brown cardstock.
  22. Adhere the double matted image panel to the card.
  23. Adhere the brown frame die-cut to the card front.
  24. Adhere the sentiment in the frame to finish the card.

Notes:
• Be sure to that you're finished coloring the image with Copic markers before adding the chalk background. The chalk will damage your markers!

Thanks for visiting today!

Friday, May 20, 2022

Comfy and Cozy!


Stampendous! Products Used:

Other Products Used:
Décor Cling Rubber Stamp by Stampendous!®
Tuxedo Black Memento™ Ink by Tsukineko®
Pine Elements Ink by Lavinia Stamps
Green Cardstock
Copic® Markers:
Flower: YR20, YR23, YR31, Y0000, Y000, Y23, RV52, RV55
Leaves: G40, G43, G46
Mouse Skin: BV000, E51, E50, RV91, R00, R000, R20 (Cheeks) R21 (Noses)
Mouse Fur (left to right): E31, E33, E35, E44, R00; E21, E23, E25, E37, E44, R00; R35, E44, E55, E57, E59, R00
Outline: N0, C00
Stamping Platform
Pouncy Tool (looks like steel wool on a  wood base)

Instructions:
  1. Cut a piece of 12x12 Green cardstock in half.
  2. Score one piece at 6" and fold to form a 6" card. Set aside.
  3. Use magnets to secure the other piece of green cardstock to the base of a stamping platform.
  4. Press the platform's lid onto the back of the stamp. Lift the lid.
  5. Ink the stamp with Pine Elements ink and stamp. Re-ink and stamp again if needed.
  6. Trim the green cardstock to 5.75" square and edge with Pine Elements ink.
  7. Press the Pouncy tool onto the ink pad and randomly pounce onto the green panel.
  8. Heat set the green panel and set aside.
  9. Use Tuxedo Black Memento ink to stamp the image.
  10. Color with Copic markers.
  11. Trim the image panel to 4.75" x 3.75" and mat with green cardstock cut to 5" x 4".
  12. Edge the mat with Pine Elements ink.
  13. Adhere the matted image panel to the green background panel as shown.
  14. Adhere the card front to the card.

Sunday, April 17, 2022

Happy Easter!

Here's an Easter card featuring the Easter Egging House-Mouse Designs® Rubber Stamp by Stampendous!®. 
 

Stampendous! Products Used:

Other Products Used:
Inspiring Words 6x6  Cling Stamp by Stampendous!®
Mini House-Mouse Designs® Clear Stamp Set by Stampendous!®
Tuxedo Black Memento™ Ink by Tsukineko®
Onyx Black VersaFine™ Ink by Tsukineko®
Black Soot Distress® Ink by Tim Holtz® for Ranger Ink
Copic Markers:
Eggs: G00, G02, Y11, Y13,, YR23, YR31, Y11, <B41, B41, RV91, RV93, BV00, BV02
Mouse Skin: BV000, E51, E50, R000, R00, R01, R20 (Cheeks), R21, R22 (Noses)
Mouse Mouth: E04
Mouse Fur: (left to right) E44, E31, E33, E35; E21, E23, E25, E37; E35, E44, E55, E57
Ground:E41, E42
Chocolate: E74, E77

Instructions:
  1. Cut a piece of yellow cardstock to 5.5" x 11".
  2. Score and fold to form a 5.5" square card. Set aside.
  3. Use VersaFine ink to stamp the background word stamp.
  4. Trim the stamped yellow panel to 5.25" wide.
  5. Tear approximately 1" off of the bottom of the word panel.
  6. Use Black Soot Distress ink to edge the panel. Set aside.
  7. Use Tuxedo Black Memento ink to stamp the image onto white cardstock.
  8. Color the image with Copic markers.
  9. Trim the image panel to 3.75" x 2.75".
  10. Cut a piece of yellow cardstock .25" larger than the image panel and use to mat it.
  11. Use VersaFine ink to stamp the sentiment onto base of the yellow card.
  12. Adhere the word panel to the card.
  13. Adhere the matted image panel to the card.
Thanks for visiting today!

Wednesday, March 30, 2022

Mice, Strawberries, and Fudge?

The strawberry season is well underway in the U.S. and the berries are looking great. They'll be even better when dipped in fudge sauce, which is the way that the House-Mouse critters like them best!


Other Products Used:
Spring Borders Die Set by Stampendous!®
Mini House-Mouse Designs Clear Stamp Set by Stampendous!®
Tuxedo Black Memento™ by Tsukineko®
Onyx Black VersaFine™ Ink by Tsukineko®
Black Soot Distress® Ink by Tim Holtz® for Ranger Ink
Red Cardstock
Copic® Markers Used:
Mouse Skin: BV000, E51, E50, RV91, R000, R00, R01, R20 (Cheeks), R21 and R22 (Noses)
Fur: (Left to right): T1, T3, T5, T7; E44, E35, E33, E31; E44, E25, E23, E21
Box: W0, W1, W2, W3, YR30
Strawberry Leaves and Stems: G40, G43, G46
Strawberries: R02, R05, R17
Rudge Drips: E74, E77
Fudge in Jar: E70, E71, E74
Jar: BG90, BG93
Label: YR0000, Y32, E74, E77
Ground: W1, W2, W3
Outline: G000
Freehand Graph and Dot Bella Besties 6x6 Patterned Paper Pad by Bella Blvd.™
Tiny Attacher by Tim Holtz® 

Instructions:
  1. Cut a piece of 12x12 red cardstock in half.
  2. Score one piece at 6" and fold to form a 6" square card. Set aside.
  3. Cut a piece of yellow patterned paper to 5.75" square and lightly edge with Distress ink. Set aside.
  4. Use Tuxedo Black ink to stamp the image onto white paper.
  5. Color the image with Copic markers.
  6. Trim the image panel to 4.75" x 3.5
  7. Mat the image panel with red patterned paper cut to 5" x 3.75". 
  8. Lightly edge the mat with Distress ink.
  9. Use one of the dies from the Spring Border Die set to cut red patterned paper.
  10. Edge the die-cut with Distress ink and cut in half.
  11. Use Onyx Black VersaFine ink to stamp the sentiment.
  12. Use one of the ticket dies to cut the sentiment and use the larger die to cut red patterned paper. Edge the red die-cut with Distress ink.
  13. Adhere the matted image panel as shown.
  14. Adhere border dies to the yellow patterned paper so that they are flush right and left as shown.
  15. Adhere the larger red patterned die-cut to the center of the border die-cut as shown.
  16. Adhere the sentiment die-cut to the red border die-cut.
  17. Adhere the matted image panel as shown.
  18. Use the Tiny Attacher to staple the border die-cut, the sentiment, and the image panel.
  19. Edge the card front with Distress ink.
  20. Adhere the card front to the reserved red card.
Thanks for visiting today!

Saturday, March 19, 2022

Springish Card

Now that spring is a few days, I've finally seen some trees beginning to bloom. Plus I have one (1) crocus. Imagine that. I don't know when Lilies of the Valley begin to bloom, but I think it's soon. 


Stampendous! Products Used:

Other Products Used:
Tuxedo Black and Cottage Ivy Memento™ Inkby Tsukineko®
Green Cardstock by Bazzill Basics Paper®
Copic® Markers:
Sky Background: <B41 and Colorless Blender Solution
Mouse Skin: BV000, E51, E50, RV91, R00, R000, R20 (Cheek)
Mouse Fur: E31, E33, E35, E4
Leaves and Stems: G20, G40, G43, G46
Flowers: C00, C0, C1, C2, B60, YR31
Stamping Platform

Instructions:
  1. Cut a piece of 8.5" x 11" green cardstock in half, score, and fold to form an A2 card. Set aside.
  2. Use magnets to secure the other half of the green cardstock (untextured side up) to a stamping platform.
  3. Place the Cling Leafy Breeze 6x6 Rubber Stamp facedown on the green cardstock.
  4. Press the lid of the stamping platform onto the back of the stamp.
  5. Lift the lid, ink the stamp with Cottage Ivy Memento ink and stamp.
  6. Repeat inking and stamping if necessary for a clean impression.
  7. Trim the green cardstock to 5.25" x 4" and edge with Cottage Ivy ink.
  8. Adhere the background panel to the card front.
  9. Use Tuxedo Black Memento ink to stamp the image onto white paper.
  10. Outline the image with the <B41 marker.
  11. Loosely color the sky with <B41 ink, then dab the marker away with a cotton pad dipped in Colorless Blending Solution.
  12. Let the Blending Solution dry completely. 
  13. Color the rest of the image with Copic markers.
  14. Trim the image panel to 3.75" x 3".
  15. Cut a piece of green cardstock to 3.875" x 3.125", edge with Cottage Ivy Memento ink, then use to mat the image panel.
  16. Adhere the image panel to the card as shown.
Thanks for visiting today!


Thursday, March 3, 2022

Play in the Puddles!


Other Products Used:
Tuxedo Black Memento™ Ink by Tsukineko®
Onyx Black VersaFine™ by Tsukineko®
Copic® Markers:
Sky: C00, C0, BG0000, BV0000
Water: BG0000, BG10, BG11, BG90, <B41, <B91
Umbrellas: RV00, RV91, RV93; BV00, BV02, BV20: <B41, B41, B91
Umbrella Handles: C4, C7
Mouse Skin: BV0000, E50, E51, RV91, R000, R00, R20 (Cheeks) R21, R22 (Noses)
Fur; (left to right) E31, E33, De35, E44, R00; E21, E23, E25, E37, E44, R00; E35, E44, E55, E57, R00
Grass: YG03, YG05
Watercolor Wash Brights 6x6 Patterned Paper Pad by My Favorite Things®
Purple Cardstock: Source Unknown
Circles Nestabilities® and Scalloped Circles Die Sets by Spellbinders®

Instructions:
  1. Cut a piece of 8.5" x 11" purple cardstock in half, score, and fold to create an A2 card. 
  2. Cut a piece of purple Watercolor Wash Bright patterned paper to 5.25" x 4" and edge with a purple marker.
  3. Adhere the purple patterned paper to the card.
  4. Use Tuxedo Black Memento ink to stamp the image onto white paper.
  5. Color with Copic markers.
  6. Trim the image panel to 4.25" x 3".
  7. Cut a piece of purple cardstock slightly larger than the image panel to be used to mat it.
  8. Adhere the matted image panel to the card front.
  9. Use Onyx Black VersaFine ink to stamp the sentiments.
  10. Use a circle die to cut the sentiments.
  11. Use the corresponding scalloped circle die to cut purple cardstock.
  12. Mat both sentiment circles with the scalloped circle die-cuts.
  13. Trim the top and bottom of the matted sentiment circles as shown.
  14. Adhere the sentiments to the card to complete it.
Thanks for visiting today!

Friday, February 11, 2022

Hooray!

When it comes to party tricks and balance, the mice in Candy Sticks House-Mouse Designs® Rubber Stamp really have it together! 


Stampendous! Products Used:

Other Products Used:
Tuxedo Black Memento™ Ink by Tsukineko®
Onyx Black VersaFine™ Ink by Tsukineko®
Brown cardstock
Dot-Stripe Rainbow Petite Prints 6x6 Patterned Paper Pad by Doodlebug Designs™
Dot-Grid-Daisy Rainbow Petite Prints 6x6 Patterned Paper Pad by Doodlebug Designs™
Copic® Markers:
Mouse Skin: BV0000, BV000 RV91, E51, E50, R01, R00, R000, R20 (Cheeks) R21, R22 (Noses)
Fur: (left to right): W3, W4, W6, W6, W7; E21, E23, E25, E44: E31, E33, E35, E44 R01: T1, T3, T5; and one in front E35, E44, E55, E57, R01
Candy Sticks: Y02, Y04, Y06, Y18, Y19; BB11, BV13, RV02, RV04; YG01, YG03, YG05, YG07; BV02, BV04, BV08, BV17, YR04, YYR07, YR09
Ground: N1, N2
Stitched Flags Die Set by Frantic Stamper

Instructions:
  1. Cut a piece of 12x12 cardstock in half.
  2. Score one piece at 6" and fold to form a 6" square card. Set aside.
  3. Use Tuxedo Black ink to stamp image.
  4. Color image with Copic markers.
  5. Trim image panel to 4.625" x 3.875" and mat with brown cardstock cut to 4.875" x 4".
  6. Cut brown dotted patterned paper to 5.75" and use a brown marker to edge.
  7. Cut yellow and orange striped patterned paper to 1.75" x 5.5". Use yellow and orange markers to edge.
  8. Cut green striped patterned paper to 1.875" x 5.5". Use a green marker to edge.
  9. Adhere striped paper to the brown dotted paper as shown, then adhere to the brown card.
  10. Adhere the image panel.
  11. Use Onyx Black VersaFine ink to stamp the sentiment onto brown dotted paper.
  12. Use one of the dies from the Stitched Flag Die Set to cut the brown dotted paper, then edge with a brown marker.
  13. Adhere the sentiment to finish the card.
Thanks for visiting today!

Thursday, January 6, 2022

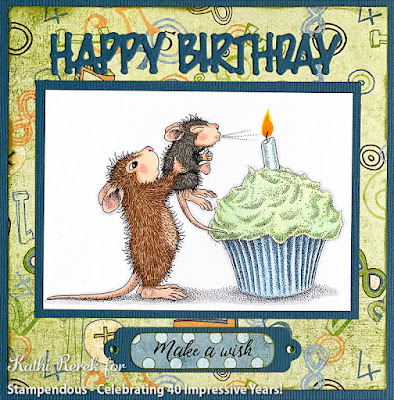
Happy Birthday!

It's always good to have a supply of birthday cards on hand. Here's one featuring Stampendous!' new House-Mouse Designs® Birthday Cupcake Rubber Stamp.


Stampendous!® Products Used:

Other Products Used:
Mini POP Clear House-Mouse Designs® Stamps by Stampendous!® *
Truck Load Die Set by Stampendous!® *
Blue Cardstock
Copic® Markers:
   Mouse Faces, Ears, Paws, Tails: BV0000, E51, E50, RV1, R00, R000, R20, R21
   Mouse Fur Left: E35 E33, E31, R000
   Mouse Fur Right: W3, W5, W6
   Cupcake Wrapper: <B41, B41, B45
   Cupcake Frosting: G0000, G000, G12, G20
   Candle: BG000, BG10, BG11,
   Flame: Y13, Y15, Y38, YR16
   Ground: N0, N1
   Outline: B60
Brigham, Nathan Patterned Papers from the Oh Baby! Boy Collection by Basic Grey®
Nameplates Die Set by Spellbinders®
Clear Jewels by Katzelkraft

* The mini  stamps and  Truck Load Die Set are available for purchase online. 

Instructions:
  1. Cut cardstock to 5.5" x 11". Score at 5.5" and fold to form a 5.5" square card.
  2. Use Tuxedo Black Memento ink to stamp the image.
  3. Color with Copic markers.
  4. Trim the image panel to 3" x 4.25".
  5. Trim blue cardstock to 3.25" x 4.5" and use to mat the image panel.
  6. Cut Brigham (numbers) pattern paper to 5.25" square.
  7. Use the word dies from the Truck Load Die Sets to cut blue cardstock.
  8. Stamp the sentiment, from the Mini set, onto polka dot cardstock. 
  9. Use the oval nameplate die to cut the sentiment.
  10. Use the nameplate die to cut blue cardstock.
  11. Mat the sentiment die-cut onto the blue nameplate die-cut.
  12. Cut Brigham (numbers) pattern paper to 5.25" square.
  13. Adhere the word die-cuts to the patterned paper as shown.
  14. Adhere the patterned paper the blue card.
  15. Adhere the image panel and sentiment.
  16. Add jewels to the sentiment die-cut to finish the card.
Thanks for visiting today!

Monday, December 20, 2021

Cold Days, Warm Hearts

Mmmmm. Cocoa! Those mice have the right idea, especially as winter has arrived!

Here's a card created with Stampendous!' House-Mouse Designs® Marshmallow Mice Rubber Stamp.


Stampendous!® Products Used:

Other Products Used:
Blue and Brown Cardstock 
Holly Jolly Patterned Paper by Fancy Pants Designs
Copic® Markers:
   Mouse Skin: BV0000, BV000, E51, E50, R00, R0, R20 (cheeks), R22 (Noses)
   Fur (from left to right): E21, E23, E25, E44;  E33, E35, E37 E44;  T1, T3, T5;  E47, E53, E55, E57;  W3, W5, W7
   Bag: <B21, B21, B91, Y21
   Label on Bag: Y21, E25
   Marshmallows: B60, C00, C0, C1, C2, C3
   Mug: R81, RV32, RV91, RV93
   Cocoa Can: B32, B34, B45, Y21
   Cocoa Can Label: E25, Y21, <B21, G40, G43
   Spoons: B90, T0, T1, T3
   Leaves; B32, G40, G43
   Straw: BV0000, Y11, Y21
   Floor: E42, T2
   Coffee Stain on floor from coffee. Oops
Pearlescent Shimmers Chalk by Pebbles

Instructions:
  1. Cut a piece of 12x12 brown cardstock in half. Reserve half. 
  2. Score the other piece at 6" and fold to form a 6" square card.
  3. Cut a piece of patterned paper to 5.75" square and adhere to the card.
  4. Use Memento ink to stamp the image onto white paper.
  5. Use Copic markers to color the image.
  6. Use shimmery chalk to carefully add the background around the mice.
  7. Trim the image panel to 5" x 3.75".
  8. Trim a piece of blue cardstock .25" larger and use to mat the image.
  9. Use black ink to stamp the sentiment onto white paper.
  10. Closely trim the sentiment and use the same chalk to add color to the sentiment panel.
  11. Trim a piece of blue cardstock slightly larger than the sentiment panel and use to mat the sentiment.
  12. Adhere the image panel and sentiment to the card.
Thanks for visiting today!
   

Wednesday, November 24, 2021

Friends Forever!

It's the time of year for friends and family to gather together and enjoy each others' company. Here's Stampendous!' House-Mouse Designs® Nut Cracker Rubber Stamp with a scene that illustrates just that!


Stampendous!® Products Used:

Other Products Used:
Parrot Cardstock by My Colors
Crush Patterned Cardstock from the Devoted Collection by Fancy Pants
Vintage Wasabi Double Dot Patterned Paper by BoBunny Press®
Copic® Markers:
   Cups: G20, G40, G43, G46, Y13
   Bowl: Y11, Y13, Y23
   Nuts: E21, E42, E43, E70, YR31
   Squirrel: E53, N0, N1, N2, N3, N4
   Nutcracker: Y21, Y23, Y26, Y28
   Mouse Skin: BV0000, BV000, E51, E50, R00, R0, R20 (cheeks), R22 (Noses)
   Fur from left to right: E44, E37, E35, E33;   E35, E53, E57;   E23, E25, E37;  T1, T3, T5

Instructions:
  1. Cut a piece of 12x12 Parrot cardstock in half. Reserve half.
  2. Score the other piece at 6" and fold to form a 6" square card.
  3. Use Memento ink to stamp the image.
  4. Color the image with Copic markers.
  5. Trim the image panel to 4 5/8" x 3 5/8".
  6. Cut a piece of Crush patterned paper to 4 3/4" x 3 3/4". 
  7. Use a green marker to edge the patterned paper.
  8. Mat the image panel with the trimmed, edged patterned paper.
  9. Use a die from the Spring Borders Cutting Die Set to cut Crush patterned paper.
  10. Use a green marker to edge the die-cut.
  11. Cut a piece of Wasabi patterned paper to 5.75" square. Edge with green marker.
  12. Stamp the sentiment onto patterned paper.
  13. Use a circle die or punch to cut the sentiment.
  14. Adhere the Wasabi patterned paper to the cardfront.
  15. Adhere the matted image panel, border die-cut, and sentiment circle to the card as shown.
Thanks for visiting today!

Thursday, September 9, 2021

Warm Greetings

Since it's now September,  the evenings are starting earlier and getting cooler, so it's time to share a new card created with Stampendous!® new House-Mouse Designs® Chiminea Roast Rubber Stamp and a sentiment from the Chickadee Holiday Perfectly Clear® Stamp Set.

Here it is!


Stampendous!® Products Used:

Other Products Used:
Blue Double-Dot Patterned Paper by BoBunny Press®
Light Blue and Rust Cardstock by Bazzill Basics Paper®
Copic® Markers:
   Chiminea: E04, E13, E15, E17, E23, E25, E27
   Flames: YR12, YR14,  YR15, YR16, YR18, R24, Y15, Y19
   Stone Wall: T0, T1, BG72, BG90, BG93, R30, E70, E93
   Grout: N0, N1, N3, N5, W0, W2, W4, W6
   Ground: N0, N1, N2
   Bowl: B32, B34, B45, RV32
   Marshmallows: B60, C00, C1, C3
   Cooked Marshmallows: E47, E50, E51, E53, E55, E77
   Stick/Branch: E74, E77
   Non-Mouse Rodent: BV0000, BV000, BV20, R00, R01, YR23, YR30, YR32, E52, E53, E55, E56, T0, T1, T3
   Mouse Skin: BV0000, BV000, RV91, E53, E52, E50, R00, R01, R20 (Cheeks), R21, R22 (Noses)
   Fur: E33, E34 E35, E37, E47; W3, W4, W6; Right: E23, E25, E37
Pink Rickrack Border Frills by Doodlebug Design Inc.™
Nameplates Dies by Spellbinders®

Instructions:
  1. Cut a piece of rust cardstock to 6" x 12". Score at 6" and fold to form a 6" square card. Set aside.
  2. Use Tuxedo Black Memento ink to stamp the image. 
  3. Color the image with Copic markers.
  4. Trim the image panel to 4.25" x 3.75"
  5. Trim light blue cardstock to 4.625" x 3.875".
  6. Trim rust cardstock to  4.875" x 4.125".
  7. Double mat the image panel.
  8. Cut a strip of light blue cardstock to 6" x .375".
  9. Cut a strip of clay cardstock to 6" x .5".
  10. Adhere the pink rick-rack frill to the light blue strip, then mat with clay strip.
  11. Use tape to mask part of the sentiment, then stamp Warm Greetings onto light blue cardstock.
  12. Use a nameplate die to cut the sentiment.
  13. Use the fancy nameplate die to cut clay cardstock.
  14. Adhere the matted border strip as shown to the top of a 6" x 6" square of Double-dot patterned paper, then trim to 5.75" square.
  15. Adhere the patterned paper square to the reserved 6" square card.
  16. Adhere the matted image panel to finish the card.
Thanks for visiting today!

Saturday, July 31, 2021

House-Mouse Christmas Shaker Card

It's the last day of July so I'm sharing one last Christmas card for now. It's a shaker card featuring the wonderful new Peppermint Hair House-Mouse Designs® Rubber Stamp by Stampendous!® 


Stampendous!® Products Used:
Mixed Media White Paper
Tuxedo Black Memento™ Ink by Tsukineko®

Other Products Used:
Classic Green and Grey Mono Cardstock by Bazzill Basics Paper®
Copic® Markers:
   Mouse Skin: BV0000, BV000, E51, E50, R00, R01, R20 (Cheeks), R20 (Noses)
   Fur: E34, E37, E44; E23, E25, E37, T1, T3, T5
   Candy Canes and Snowman Mouth Candy: R24, R37, N0, N1
   Snowman Eyes Candy: Y67, G07
   Snowman Nose: B00, B12,YG67, G07
   Snowman; B0000, B60, RV0000, C00, C0, C1, C2, B0000, B000,
Scraps of Patterned Paper by My Mind's Eye
Acetate from packaging
Rectangle Dies
Black Crafty Foam Tape by Scrapbook Adhesives® by 3L
Used Dryer Sheet
Christmas Candy and White Snowflake Sprinkles by Kat Scrappiness

Instructions:
  1. Cut a piece of 8.5" x 11" green cardstock to 7" x 10", score at 5", and fold to form a 7" x 5" card. Set aside.
  2. Use Tuxedo Black Memento ink to stamp the image onto mixed media paper.
  3. Color the images with Copic markers.
  4. Trim the image panel to 3.75" x 3".
  5. Cut green cardstock to 3.875" x 3.125".
  6. Mat the image panel with green cardstock. Set aside.
  7. Cut grey cardstock to 6.75" x 4.75"
  8. Use a rectangle die to cut two openings in the grey cardstock as shown.
  9. Use the Merry and Christmas dies from the Truck Load Die set to cut green cardstock.
  10. Adhere the matted image panel and the sentiments to the grey cardstock as shown.
  11. Flip the card over and adhere the acetate pieces over the apertures.
  12. Rub the acetate sheets with the dryer sheet.
  13. Add a double layer of Black Crafty Foam Tape around the perimeter of both apertures to form wells for the shaker contents.
  14. Add the shaker contents to both wells.
  15. Cut a piece of patterned paper large enough to cover both openings.
  16. Remove the backing from the foam tape and place the patterned paper face-down onto the tape, covering the shaker contents.
  17. Add pieces of doubled Black Craft Foam Tape to the edges of the back of the cardfront.
  18. Adhere the cardfront to the green card.
Thanks for visiting today!

Wednesday, July 21, 2021

Dreaming...

The cardmaking community is still celebrating Christmas/Winter in July, so I figured I'd share another card using brand new Stampendous!® stamps from their July 2021 release. Have you seen the new stamps yet? You really ought to pop right over to take a look at the new catalog!


Onyx Black VersaFine™ Ink by Tsukineko®

Other Products Used:
Copic® Markers:
 Mouse Skin: BV0000, BV000, E51, E50, R01, R00, R20 (Cheeks and Lips), R22 (Nose)
 Mouse Fur: E37, E25, E23
 Candy Jar: B00, B02, B91, B93
 Candy Canes: N0, N1, R24, R37
 Cup: G20, G21, G24
 Cocoa: E47, Err, E27, E2e, E74, E74
 Spoon: T0, T1, T2, T4, E70, G20
 Ground: N1, N0
 Background N0, N1, B000
White Snowflake Sprinkles by Kat Scrappiness
Bundled Sage and Tumbled Glass Distress® Ink by Tim Holtz® for Ranger Ink
Square Nestabilities® by Spellbinders®
Nameplate Dies by Spellbinders®
Rain Forest Cardstock by Bazzill Basics Paper®
Christmas Wish 6x6 Patterned Paper Pad by My Mind's Eye
Noel 6x6 Patterned Paper Pad by Teresa Collins

Instructions:
  1. Cut a piece of 8.5" x 11" green cardstock in half, score, and fold to create an A2 card. 
  2. Cut plaid patterned paper from the Christmas Wish pad to 5.25". 
  3. Cut two .5" strips of red striped patterned paper from the Noel 6x6 pad and edge with Tumbled Glass Distress Ink.
  4. Cut two .625" x 6" strips of green cardstock. Use them to mat the red striped strips.
  5. Adhere the two matted strips of striped patterned paper to the plaid patterned paper as shown to form the background panel.
  6. Trim the assembled background panel to 4" wide and edge with Distress inks.
  7. Use Tuxedo Black Memento ink to stamp the image.
  8. Color with Copic markers.
  9. Cut the image panel with one of the dies from the Square Nestabilities Die set.
  10. Cut green cardstock with the next largest die from the Square Nestabilities Die Set.
  11. Adhere the matted image panel as shown.
  12. Use Onyx Black VersaFine ink to stamp the sentiment from the House-Mouse Designs® Holiday Happy stamp set.
  13. Cut the sentiment with arounded rectangle Nameplate die.
  14. Cut a piece of coordinating patterned paper from the Christmas Wish pad with the fancy nameplate die. Edge the die-cut with Distress ink.
  15. Adhere the sentiment die-cut to the fancy nameplate die-cut.
  16. Adhere the matted sentiment die-cut to the top strip.
  17. Add the two snowflakes to finish the card.
Thanks for visiting!


Wednesday, June 30, 2021

Garlic Breath

Garlic is tasty. Garlic breath is stinky, which is illustrated by the expressions on the mice below.


Stampendous!® Products Used:
Drying Herbs House-Mouse Designs® Rubber Stamp
Spring Borders Cutting Dies Set
Tuxedo Black Memento™ Ink by Tsukineko®
White Mixed Media Paper

Other Products Used:
Brown and Kraft cardstock
Ancient Patterned Paper by Memory Box
Copic® Markers:
Mouse Skin: BV0000, BV000, RV91, E51, E50, R0000, R20 (Cheeks), R22 (Noses)
Fur: E23, E25, E37; E33, E35, E44; T1, T3, T4, T5
Fence: W0, W1, W2, W4, W6
Garllic Bulbs: YR000,  YR00,  YR30, YR31, YG0000, YG00, E40, E70, E71, E81, E84, BV0000, BV000, T0, T1, Te
Garlic Top/Leafy Things: YG00, YG61, YG63, YG91, YG93, YG95, YR21
Lavender Looking Plant: E55, E57, RV6e, YG63
Hoppy Plants: B32, G20, G40, YG41, YG45, YG91,YG93, YG95
Rose Stems: E55, E57 YG61, YG63
Rose Leaves: YG61, YG63, YG67
Rose Petals: RV52, RV64, RV93, RV95

Instructions:
  1. Cut a piece of brown cardstock to 12" x 6". Score at 6" and fold to form an 6" square card. Set aside.
  2. Use Tuxedo Black Memento ink to stamp the image.
  3. Color the image with Copic markers.
  4. Trim the image panel to 4.875" x 4.375"
  5. Cut the brown cardstock to 5" x 5.25".
  6. Cut the kraft cardstock to 5.125" x 4.625".
  7. Cut brown cardstock to 5.25" x 4.75".
  8. Triple mat the image panel as shown.
  9. Use the scalloped cutting die from the Spring Borders Cutting Die set to cut brown cardstock. Trim to 5.75".
  10. Trim patterned paper to 5.75" square to create the background panel.
  11. Adhere the trimmed border die-cut and the triple matted image panel as shown.
  12. Adhere the assembled card front to the 5" square card.
Thanks for visiting today!

Sunday, June 27, 2021

You Can Do It!

When you're small, like this little guy, sometimes you need encouragement. Hence this card.


Stampendous!® Products Used:

Teacup Paddler House-Mouse Designs® Rubber Stamp
POPHM03 – House-Mouse Everyday 02 
Gingham-Linen Rainbow Petite Prints 6x6 Patterned Paper Pad by Doodlebug Designs Inc.™
Very Vintage Double Dot Patterned Paper Pad by BoBunny Press®
Copic® Markers:
Mouse Skin: BV0000, BV000, RV91, E51,E50, R000, R01, R20 (Cheeks), R22 (Nose)
Fur:E21, E23, E25, E39
Water: <B41, B41, B53,  Y000
Spoons: T0, T1, T2, T3
Enamel Accents by Gina Marie Designs

Instructions:
  1. Cut a piece of brown cardstock to 5.5" x 8.5". Score at 4.25" and fold to form an A2 card. Set aside.
  2. Use Tuxedo Black Memento ink to stamp the image.
  3. Color the image with Copic markers.
  4. Trim the image panel to 4" x 2.5" and mat with brown Double Dot Patterned paper trimmed .25" larger.
  5. Cut yellow gingham patterned paper to 5.25" x 3" and mat with brown cardstock cut 2.5" larger.
  6. Cut turquoise Double-Dot patterned paper to 5.25" x 4".
  7. Assemble the card as shown.
  8. Use Onyx Black VersaFine ink to stamp the sentiment onto turquoise Double-Dot patterned paper. Trim and mat with brown cardstock cut slightly larger.
  9. Adhere the sentiment as shown.
  10. Add the Enamel Accents to finish the card.
Thanks for visiting today!
Cut the Pale Blossom cardstock to 4.75" x 3.5" and use to mat the image panel.
Cut patterned paper to 5.25" x 4" and adhere to the green card.
Adhere the matted image panel to finish the card.