Showing posts with label Bombshell Stamps. Show all posts

Tuesday, November 2, 2021

It's Dia de los Muertos!

It's Tuesday which is my day to share a project created for Topflight Stamps. It's the second day of the Día de los Muertos celebration, which is a wonderful Hispanic tradition whereby relatives and friends who have passed away are remembered and their lives celebrated. Imagery associated with the holiday include Sugar Skulls. 

That's Crafty's versatile Small Elements Stamp Set 2 contains a lovely, if small, sugar skull, which I used to create my card.


Topflight Stamps Products Used:

Other Products Used:
Solar White Classic Crest® Cardstock by Neenah Papers
Yellow Cardstock
Kiwi Double-Dots Patterned Paper by BoBunny Press®
Tuxedo Black Memento™ Ink by Tsukineko®
Copic® Markers: Y02, Y04, YR15, B04, B06, YG05, RV55, RV63, N6
Slimline - Stitched Rectangle Aperture Trio from the Sue Wilson Slimline Collection by Creative Expressions
Banner Die - Source Unknown
Día de los Muertos Stamp from the Sugar Skulls Unmounted Rubber Stamp Set by Bombshell Stamps
Removable Label Paper by Avery®
STAY-tion™ by Wendy Vecchi for Ranger Ink
Stamping Platform
Removable Tape

Instructions:
  1. Cut white cardstock into three 3" x 3" pieces. 
  2. Cut Removable Label Paper into three 3" x 3" pieces.
  3. Use magnets to secure one of the pieces to the base of a stamping platform.
  4. Place the sugar skull stamp face-down on the white cardstock.
  5. Press the platform's lid onto the back of the stamp, lift the lid, ink the stamp with Tuxedo Black Memento ink, and stamp.
  6. Keeping the stamp on the lid, replace the white cardstock, re-ink the stamp, and stamp again.
  7. Repeat Step #6 with the last piece of white cardstock and with all three squares of label paper.
  8. Fussy-cut all three of the label paper sugar skulls and place over their cardstock counterparts.
  9. Brush Sundance, then Pine Elements ink over the masked sugar skulls. 
  10. Remove the masks and reserve for another use.
  11. Heat set the image panels.
  12. Color all three sugar skulls.
  13. Cut a piece of white cardstock to 4.25" x 8.5"
  14. Cut the white cardstock with the largest die from the Essential Rectangle Frames Slimline Die Set.
  15. Center the Slimline Stitched Rectangle Aperture Trio die blade-side down onto the white die-cut, tape the die in place, and run through a die-cut machine.
  16. Remove the three white rectangles.
  17. Use magnets to secure the white die-cut onto the STAY-tion.
  18. Use more magnets to secure the Abundance Stencil on the die-cut.
  19. Brush Confetti Elements inks randomly-ish over the stencil onto the white die-cut.
  20. Brush Sundance Elements inks over the stencil covering un-inked parts.
  21. When you're pleased with the ink coverage and the blending, remove and clean the stencil.
  22. Heat set the die-cut which is now the card front. 
  23. Trim the sugar skull panels to slightly larger than the aperture (windows) in the die-cut/card front.
  24. Place the sugar skull panels on the STAY-tion and position the windows of the card front to cover the sugar skulls.
  25. Use magnets to keep the sugar skulls in place while applying adhesive to the rear of the die-cut/cardfront.
  26. Adhere the die-cut/card front over the sugar skulls.
  27. Cut a piece of green patterned paper .25" larger than the die-cut/card front.
  28. Adhere the die-cut/card front to the green patterned paper, then to a yellow slimline card.
  29. Use the banner die to cut white cardstock.
  30. Secure the banner die-cut to the base of the stamping platform using magnets.
  31. Estimate where the sentiment should fall* and place the stamp face-down on the banner.
  32. Press the lid of the stamping platform onto the back of the stamp and lift.
  33. Ink the stamp with Onyx Black VersaFine ink and stamp.
  34. Fold the banner and adhere to the card as shown.
*The banner die is solid metal and the sentiment stamp is cling mounted, so I had to estimate where it would fall. I got lucky. :D

Thanks for visiting today!

Wednesday, July 2, 2014

Bombshell Pin-Up Challenge!

Jenn Borjeson, who is Bombshell's Ms. July, has issued her challenge. It is "Sun, Surf, and Sand". You can play along with this challenge and you don't even have to use Bombshell Stamps. If you do, you'll receive an additional chance to win a $20 gift certificate to Bombshell's store. Visit Bombshell's Blog for details!

Here's my tag, which used Bombshell Stamps' Hula Girl and Tiki Party rubber stamp sets!

Whereas I love the beach in the off season, I'm really not one for "Sun, Surf, and Sand" unless they're accompanied by cool tropical drinks and hot cabana boys. Just sayin'.

A Die-namics tag die was used to die-cut white Neenah cardstock. I stamped the volcano scene from the Hula Girl set with Tuxedo Black Memento ink. Using my stamp positioner, I stamped Tiki Party towards the bottom of the tag. All elements of the tag were colored with Copic markers. The rims of both cocktail glasses received some Stardust Clear Glitter pen and then the cocktail glasses, cherries, and straws were coated with several layers of Clear Gelly Glaze pen to add glass-like shine and dimension. Sadly you can't see either the glittery or glassy bits in my photo which was taken in wonky light at dusk. It's also partially out of focus, but so am I. Too bad.

The same Die-namics tag die was used to die-cut kraft cardstock, which was edged with Brushed Corduroy Distress ink. A Mega Rectangle Nestabilities die from Spellbinders was used to cut lime green cardstock, then the larger size was used to die-cut kraft cardstock. Two Pinked Circles Nestabilities dies were used to die-cut the lime green cardstock. They were stacked and put behind the circular bit of the tag. The tag was assembled and a Tonic punch was used to create the tag's top. The outside edges of the tag were sponged with Brushed Corduroy Distress ink.

Lime green cardstock was die-cut with my "Cheers" die by Elizabeth Craft. I quite like these small word/phrase dies. Vellum was die-cut with the Tiny Bubbles die by Memory Box. The vellum bubbles were stacked then adhered over the volcano to finish the tag!

Thanks for visiting today!

I shall enter this tag in the following challenges:
The Artistic Stamper Creative Team Challenge Blog: By the Seaside
Live and Love Crafts Inspiration Challenge Blog: By the Sea
ETA: Moxie Fab World's Wonderful Words Dies Challenge. 

Thursday, June 5, 2014

Bombshell's June Pin-Up Challenge: Skulls!

The talented and lovely Cheryl Valadez has returned to the Bombshell fold in the role of Ms. June! As a guest designer, she got to select the challenge and chose "Skulls"!

I love me some skulls, so this one was a lot of fun, though my project went to visit Cheryl in Albuquerque, where it took a left turn.

Here it is!

I decided to use the Muertos Doll Digital stamp set for my project. I'll admit that I saw a "See no evil" skull thing somewhere on Pinterest and decided to put my own spin on it, so this digi set was perfect for it. The Muertos Doll Digital set contains two full skeletons and skulls 'n body parts. I took the skulls 'n body parts, manipulated them in Photo Elements, until I had a "See No Evil", "Hear No Evil", and a "Speak No Evil" doll. These were saved, reduced, printed out onto Neenah cardstock using my laser printer, then colored using Copic markers. I put a yellow Copic background around the dolls, then had a bit of a mishap with Antique Linen Distress ink and ended up having to add some Squeezed Lemonade Distress ink as well. This was put aside while I created my background.

While I was creating my "No Evil" trio, I realized that "No Evil" backwards was "Live On" and I went with that idea.

I dug deep into my stash and found ginormous slide mounts. I die-cut the title (Top Dog Dies), some skulls (BossKut), heart lockets, keys, pointing hand, (QuicKutz), flames (Die-Namics) and then punched some hearts and flowers. I dug up some old Jolie's flowers as well. All of the die-cuts and punches were adhered to the slide mount and coated with a layer of gesso. Then I went to pick up my CSA share.

When I got home, the gesso was dry. I decided to try out my new DecoArt's new Media Fluid Acrylics, which are part of the new DecoArt Media program. I painted the entire piece with Medium Grey Value 6 because I wanted to have good coverage in and around all of the die-cuts. I then blended Dioxazine Purple into Phthalo Blue from the bottom to the top and Cadmium Red into Quinacridone Red from top to bottom. Some watered down Titanium White was sponged onto the lower left hand corner and a few other places. The skulls were painted with straight up Titanium White and Carbon Black was dabbed into the skulls' eye and nose holes. The flames along the right side were painted with a combination of yellow, orange, and red (I forgot to mark the color names down, bad me). 

My first impression of these paints is that a little bit goes a long way, that they blend really easily, and that they dry quickly. I really like that their relative opacity is on the label, so I knew which were opaque and which were translucent.

But I digressed. When the paint was dry, I added White Fire, Pewter, Indigo, Rose Quartz, Onyxite, and Florentine Treasure Gold to all the die-cuts to make them metallic and shimmery. Jet Black StazOn ink was sponged through a skull stencil by Andy Skinner for Tando Creative. 

I adhered the two parts and decided that adding metallic charms was overkill, so I proclaimed it done. I'm not sure how I feel about the project, but I did have fun making it, so I guess that's what counts.

Thanks for visiting today!

Wednesday, May 28, 2014

Bombshell's Hump Day Hop!

It's the last Wednesday of the month which means it's time for Bombshell Stamps Hump Day Hop.

This month's theme is "A Cut Above", which means we're to use die-cuts! It's an easy-peasy challenge for me since I have a huge collection of dies and have been collecting them longer than I've collected stamps!

I'm the last stop on the hop. You should have arrived here from Kelli's blog, where you likely saw something fabulous! 


Here's my card! I took a photo of it using my new iPhone. The photo is surprising good, though some of the shading on the cowgirl was wiped out. Oh well.


The focal image is from Bombshell's Retro Cowgirls rubber stamp set. She was stamped with Tuxedo Black Memento ink, colored with Copic markers, fussy cut, and set aside.


I used a ton of dies and a ton of the small icon stamps that are included in all of the sets. 

It's late, so I'll come back tomorrow and add more information... Sorry!

OK. Back. Here's the scoop on what I used.
  1.  Cowgirl stamp from the Retro Cowgirls rubber stamp set
  2.  Record, bow, music notes, broken heart icons from Man's Ruin rubber stamp set
  3.  Cherries, skull icon from the Love and Luck rubber stamp set
  4.  Little bomb icon from the Cherry Bomb rubber stamp set
  5.  Lock and Key icons from the Bombshell Angel rubber stamp set
  6.  Dollar Sign icon from the Sugar Daddy rubber stamp set
  7.  Four-leaf clover icon from the Lady Luck rubber stamp set
  8. Compass icon from A Pirate's Life rubber stamp set
  9. Sentiment from the Harley Motorcycle rubber stamp set
  10. Picture Wheel Alterations die by Sizzix
  11. MPD Time Pieces by Die-Namics
  12. Daisy numbers by QuicKutz
  13. Gears by Cherry Lynn Designs
  14. Country Charms by Die-Namics
  15. Blueprints 1 by Die-Namics (the ribbon)
  16. Kraft and Neenah cardstock
  17. Patterned paper from Flair Designs
  18. Satan Red, Olympia Green, Majestic Blue, Onyx Black VersaFine inks
  19. Golden Glitz Silvery Shimmer Delicata inks
I thought that the Picture Wheel Alterations die-cut would be a great way to showcase the small icon stamps that come with all Bombshell's rubber stamp sets. I die-cut several layers of white cardboard with the Picture Wheel Alterations die. The numbers and the clock face were also die-cut from white cardboard. The clockface and numbers were adhered to the center of the Picture Wheel and painted with Picket Fence Distress paint.

I took another Picture Wheel Alterations die-cut and placed it on top of a large acrylic mount. The icon stamps were placed onto the acrylic mount using the apertures of the die for positioning. Then it was just a matter of inking the stamp with the various inks and stamping them. Some of the impressions were not perfect, so I used my Copics to deepen the color and fix the impression.

So there you have it!  

If you've gotten lost along the way, here's the blog roster!

Kim 

Wednesday, May 14, 2014

Bombshell Stamps' May Sketch Challenge!

As you may or may not know, I design the sketches for the Bombshell Sketches. I base them on cards or projects I've created in the past, but then seem unable to follow the sketch exactly. Rather odd.

Here's the sketch!
Feel free to take the sketch, flip it, flop it, and make it your own. The only rules are to use the sketch in some recognizable way and to have fun. Share your project on Bombshell's blog for the chance to win a fabulous prize. You don't have to use Bombshell's stamps, but if you do, you'll get an additional chance to win!

Here's my take on the sketch using the the Cowgirl Portrait stamp from the Western Gal set, which is available in both rubber and digital formats.


The Cowgirl Portrait was stamped with Tuxedo Black Memento ink and colored with Copic markers. I used a Nestabilities Circle die to die-cut the image panel and a slightly smaller Nestabilities Circle die to die-cut Eclipse tape. The  Eclipse tape circle was placed over the image and Old Paper Distress ink was sponged around the rim of the circle. I had planned to use Old Paper Distress Stickles, but I don't have that color. Oops. Oh well.

I still had Graphic 45's Domestic Goddess patterned paper out from a previous project, so I decided to use it, so my color palette is based on it. I cut strips from scraps of three different papers to follow the sketch and die-cut the cherry and gingham papers with Nestabilities Circles and Scalloped Circles dies. All the edges of the patterned paper were sponged with Barn Door Distress ink.

Thin rope-patterned Washi was used to cover the seam between the top and bottom halves of the card and to cover up the fact that I apparently can't cut straight. I should mention that this freaking yellow cardstock measures 11 15/16" x 11 15/16"! WTH!!!

The sentiment, also from the Western Gal set, was stamped onto the yellow cardstock with Jet Black Archival ink, then die-cut with Die-Namics Fishtails Flags.

The flowers are seriously old Prima flowers and are accented with Kaisercraft Rhinestones (on sale at SCACD!!!). 

Thanks for visiting today!

I shall enter this card in the following challenges:
Our Creative Corner: Love those Leftovers!
The Paper Shelter Challenge #158: Girly-Girl cards
Simon Says Stamp Wednesday Challenges: Die Crazy

Thursday, May 8, 2014

Squared

Valerie Wilson, Bombshell's Ms. May, set this month's Bombshell Pin-Up Challenge,  "Hip to Be Square". She didn't elaborate any further, opting to see how people interpreted her challenge.


I selected one of the five sacred hearts from the Sacred Heart Art rubber stamp set, stamped it onto Neenah cardstock with Tuxedo Black Memento ink and colored it with Copic markers. I carefully added the black background with Copic markers as well.

The 5" x 5" chipboard frame (from my stash) was painted with Little Black Dress Fresco Finish Acrylic paint and heat set. Crackle Glaze Fresco Finish Acrylic paint was applied over the black paint and heat set. A few drops each of London Bus, Yellow Submarine, and Blood Orange Fresco Finish Acrylic paint were applied to a piece of a car wash sponge, then quickly dabbed over the Crackle Glaze. This layer was heat set to hasten the crackling. Boss Gloss, clear embossing ink in a dabber bottle, was used to apply embossing ink through the Flames stencil by The Crafter's Workshop and the flames were heat set with Filigree Clear Detail embossing powder.

The smaller frame is actually a Technique Tile by Technique Tuesday. I've had it in my stash for ages. London Bus, Yellow Submarine, and Blood Orange Fresco Finish Acrylic paint were sponged over it and heat set. A thin layer of Crackle Glaze was added with a palette knife and heat set. Little Black Dress Fresco Finish Acrylic paint and heat set. Silver Leaf Krylon pen was used to edge the aperture of the frame.

The frames were stacked, the colored Sacred Heart Art piece was adhered, and black cardstock was used to back the piece. 

An Inkssentials Silver Foil Tape sheet was die-cut with a Die-Namics Barbed Wire die and adhered to the top and bottom of the piece.

Thanks for visiting today!

Saturday, April 26, 2014

Bombshell Sketch Challenge!

Whereas I did post my take on Bombshell's blog for the sketch I created for April's Bombshell Sketch Challenge, I forgot to post it on my own blog!

So, here's the sketch:

 If you like the sketch, feel free to take it. Flip it, flop it, and make it your own. Then enter your project into the challenge on Bombshell's Blog. You don't have to use Bombshell's stamps, but if you do, you'll receive an additional chance to win a $20.00 gift certificate to Bombshell's store!

Here's my take on the sketch using Bombshell's Homeward Bound set.

The ship from the Homeward Bound set was stamped with Tuxedo Black Memento ink onto Neenah cardstock and colored with Copic markers. 

The patterned papers are all from the Maritime 6x6 pad by 7 Gypsies. The edges of all the papers were distressed using Tonic Distressing tool, then a scissors' edge. When they were suitably shready, they were sponged with Distress ink. 

The sentiment from the Homeward Bound set was stamped onto a scrap leftover from one of the layers. I freehanded the banner, then cut it out, and distressed it. The card was finished with hoarded Black Raindots.

Thanks for visiting today!

Wednesday, April 2, 2014

Junk It Challenge!

Betz Gibson, Bombshell's Ms. April, has set her challenge for the month. It is "Junk It!". She challenged us to use junk mail, old packaging, etc. to create a project. You can take her challenge and enter your project at Bombshell's Blog. This challenge is open to everyone using any company's stamps. However, if you use Bombshell's stamps, you'll receive an additional chance to win!

Since it's finally spring time and we're enjoying somewhat warmer weather, I decided to make a wall hanging.

Here's my project using the Butterfly Dreams set and recycled corrugated cardboard.


Corrugated cardboard, from a used USPS Priority Mail Box, was die cut using an Alterations Tag die by Sizzix. The Alterations Pediments die was used to die-cut two sets of pediments. The top layer of the tag was pulled off. Then the tag was painted with Sky and Ice Blue Fresco Finish Acrylic paints by Paper Artsy and heat set. The pediments dies were stacked and painted first with Chocolate Pudding and Toffee Fresco Finish Acrylic paint and heat set. A thin layer of Crackle Glaze Fresco Finish was spread over the dry brown paint and heat set. A mixture of Sky and Ice Blue Fresco Finish Acrylic paint was painted over the Crackle Glaze and heat set, which produced lovely cracks. The pediments were sponged with Tree Branch Archival ink from Wendy Vecchi's collection for Ranger.

A scrap of 140 lb. Mixed Media cardstock by Strathmore and two old fence die-cuts were painted with Chocolate Pudding and Toffee Fresco Finish Acrylic paint and heat set. A thin layer of Crackle Glaze Fresco Finish was spread over the dry brown paint and heat set. Snowflake Fresco Finish Acrylic paint was painted over the brown paint and heat set. The crackled white cardstock was die-cut with a Die-Namics banner die and the sentiment was stamped using Tree Branch Archival ink, which was also sponged along the edges and the back of the die-cut. The fences were stacked to make 'em sturdier.

White cardstock was painted with a combination of A mixture of Sky and Ice Blue Fresco Finish Acrylic paint and heat set. Three butterflies from Bombshell's Butterfly Dreams set were stamped onto the painted cardstock using Jet Black Archival ink. The same butterflies were stamped two times onto Neenah cardstock, colored with Copic markers, and both their bodies and the butterflies minus their antennae were fussy-cut. The butterflies bodies were adhered over their counterparts on the fussy-cut butterflies, which were then parts of the butterflies were adhered to the painted cardstock. Their wings were left adhesive free and not attached to the painted cardstock at this point.

A strip of old fabric paper that I've had in my stash since my days as a Pink Lady at Scraptalk was painted with a combination of Hyde Park, Hey Pesto, and Limelight Fresco Finish Acrylic paint and heat set. This strip was die-cut several times using a Grass die by Memory Box.

The painted cardstock with the butterflies was adhered to the corrugated cardboard tag. The painted grass fabric die cuts were cut down width-wise and layered over the bottom of the tag. The stacked fence die-cut was layered over the grass. The pediment dies were adhered to the top and bottom of the tag, then the sentiment banner was folded and adhered using dimensional foam adhesive. The butterflies' wings were bent upward and adhered using dimensional foam adhesive.

The tag still needed something so colored twine was used to adhere a pocketwatch charm to the bottom and a layered metal flower to the top.

Thanks for visiting today!

I shall enter this card in the following challenges:
Simon Says Monday Challenges: Anything Goes
Come and Get It Challenges: In The Garden
Frilly and Funkie: Time After Time

Wednesday, March 26, 2014

Bombshell's Hump Day Hop!

Alison, Bombshell's Challenge Captain, has selected this month's theme, which is called "Washi Away!" Here's what she had to say about this theme.
I want you to use washi tape on your project. Use a little, use a lot....whatever you like. Washi tape comes in so many different colors and patterns, so I expect it to be a really fun hop!
You've reached the last stop on the hop! You should have arrived here from the talented and lovely Kelli's blog! During a recent AC Moore prowl, I found some Washi Tapes that went exceedingly well with Bombshell's Hot Rod Classic collection, which is now available as rubber AND digital stamps! Woo-hoo! Now these fabulous stamps can be manipulated digitally, which is just what I've done with this card!


I had some fun manipulating the Classic Coupe Hot Rod from the King of the Road digital set. It was flipped, resized, and the shadows were erased using PhotoElements software. It was printed out onto Neenah cardstock using my laser printer, then colored with Copic markers. The chrome bits were colored using a silver Prismacolor pencil which was blended out with a Prismacolor Colorless Blender. My design called for a mask, so the same image was printed out onto used generic printer paper using an inkjet paper. This image was fussy-cut and adhered to its counterpart using repositionable adhesive. The "roadway" was sponged using Watering Can Archival ink. The cloudy sky was created by sponging Stormy Sky Distress ink over an old FairyTale Creations cloud stencil.

Checkerboard and flame Washi tape was adhered to a piece of cardstock to use for my background. The stamped, sponged piece, was adhered to the Washi taped cardstock, and foil photo corner stickers were added. I haven't decided who will receive this card for what occasion, so I did not use a sentiment at this time.

Thanks for visiting today!

In case you've gotten lost, here's the blog hop roster.
Bombshell Blog
Alison
Marnie
Kim
Alaine
Monika
Kelli
Kathi

I shall enter this card in the following challenges:
A Random Fan Challenge: Plains, Trains, and Automobiles
Craft-Room Challenges: Transport
The Cheerful Stamp Pad: Modes of Transportation
A Little Bit Crafty: Are we there yet?

Wednesday, March 5, 2014

Bombshell Bingo -- Ms. March's Challenge

Leslie Turner, who is Ms. March, set this month's challenge over at the Bombshell's Blog! Her challenge is Bombshell Bingo!

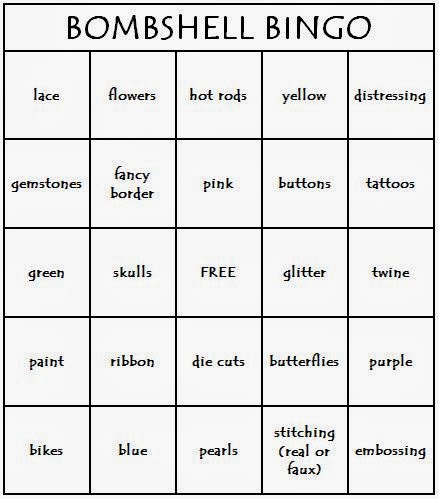
Here's the Bingo Board!


Here's my card using the Man's Ruin and Dead Necessities sets and the row containing
flowers, fancy border, skulls, ribbon, and blue.

My card uses the skull from the Man's Ruin set and the roses from the Dead Necessities set. The skull was stamped first with Tuxedo Black Memento ink onto Neenah cardstock. It was die-cut using a Die-Namics die. The trio of roses was then stamped onto two corners, using Tuxedo Black Memento ink. The images were colored with Copic markers. Old Paper Distress ink was sponged around the images over the roses a bit.

Wesley Border die by Top Dog Dies was used to die-cut blue cardstock. Red ribbon was threaded through the holes at the top. The corner dies are from that same Spellbinders set that I found on cut-out at AC Moore. Red metal roses were added to the corners to finish the card!

Feel free to take this challenge, which you can find over at the Bombshell Blog. This month you do NOT have to use Bombshell stamps. However, if you do have them (and you should), use them for a second chance to win a fabulous prize! 

BTW, if you love Bombshell Stamps, why not try out to be a Bombshell Pin-Up? Click on this link to check out the details on our blog.

Thanks for visiting today! 


Wednesday, February 26, 2014

Bombshell's Hump Day Hop!

Greetings! Bombshell's lovely and talented Challenge Captain, Alison, has set this month's blog hop theme, which is a color challenge, based on a fabulous color palette from Design Seeds.

Here's the palette:
You should have arrived here from Monika blog, where you no doubt, saw something totally fabulous!


Here's my card, which features rubber stamps from the Bombshell Patterns and the Hula Girl sets. Apparently, I was only supposed to use colors from the palette above, plus neutrals. However, I'm an anarchist and used green for my leaves.

The Hibiscus Pattern stamp from the Bombshell Patterns set was stamped several times onto Neenah cardstock using Peacock Feathers Distress ink, then colored with Copic markers. It was then diecut using a Spellbinders Corner die, which was part of a set that I got for $10.00. Gotta love a bargain. The four corners were set aside.

The Aloha Banner stamp from the Hula Girl set was stamped using Tuxedo Black Memento ink, then colored with Copic markers. It was also stamped onto Eclipse tape, fussy cut, and the mask was placed over its counterpart. Previously die-cut and saved Memory Box clouds were temporarily adhered to the background, which was then airbrushed with my Copic airbrush system. The masks were all lifted and the clouds were outlined and detailed with CO and CO0 Copic markers.

The corners were adhered, the entire piece was edged with Peacock Feathers Distress ink, and then mounted onto a plain white A2 card.

Thanks for stopping by today! Your next stop on the hop is Alaine's blog, where she's sure to wow and inspire you with her fantastic coloring and great design!

If you get lost along the way or want to revisit any of the blogs, here's the hop list!
Bombshell Blog
Alison
Kim
Glittery Katie
Monika
Kathi (You are here!)
Alaine

I shall enter this card in the following challenges:
Paperminutes: On the Fly
Crafty Cardmakers and More: Come Fly with Me
Stamping Sensations: Wings, Fantasy, and Fiction
Outlawz: Friday Alcohol Markers Challenges: Things with Wings

Monday, February 24, 2014

Bombshell Stamps Muse Monday!

Throughout February, the Bombshell Girls have been sharing some fun projects showcasing the Sugar Daddy set.  Click on over to Bombshell's Blog to check out all the great projects!

Here's the set!

Here's my card which also uses a modification of the sketch I created for February. 

Pimpin' Wolf (his real name), from the Sugar Daddy set was stamped using Tuxedo Black Memento ink and colored with Copic markers. His teeth, cufflinks, and the buttons on his jacket were coated with a layer of Clear Gelly Glaze pen to make 'em shiny and dimensional. 

The mat under the wolf is a patterned paper sheet from the Origins 6x6 pad by Basic Grey (the mat under the wolf) and the card suit patterned paper is from the Well Played 6x6 pad by Carta Bella. It's gone now, but you can find lots of other nifty pads HERE.

The sentiment die cut is a new one from Memory Box. It was edged with a silver leafing pen, which was also used to edge the card. The ribbon is from my stash.

Here's the sketch. 

Feel free to take it and make it your own. If you use Bombshell Stamps with it, be sure to share it with us on Bombshell's blog for a chance to win a fab prize.

Wednesday, February 5, 2014

Bombshell Stamps Challenge!

Holley Barnhart, Bombshell Stamps' Ms. February, has shared her challenge over on the Bombshell Stamps Blog. Her challenge is called Bring The Heat.

You should play along with her challenge! Share your artwork with us for a chance to win a fabulous prize.

Here's my card using the Bombshell Angel set and the All My Heart set.


This is the first card that I've created after my second cataract surgery which has given me a pair of bionic eyes that have marvelous distance vision. I still need spectacles for mid-distance (computer and cooking) and reading and will also need to make a spectacle of myself sporting fabulously cool sunglasses!

As soon as the doc said I could drive (Driving sans specs is beyond weird and it's kind of totally amazing to wake up and be able to see well with both eyes!), I hied to the nearest Dollar Store and bought four pairs of readers in various strengths for a buck each. It was timely since we got a freakin' !#$% foot of snow yesterday here in New Jersey. I hate driving in snow AND I have discovered that snow is really, really bright and sparkly!

Anyways, these two images are the first that I've colored and fussy-cut. The card is simple, but my eyes tire really easily.

Basically, I stamped the cherub from the Bombshell Angel set and the flying flaming heart from the All My Heart set, colored both imges with Copic markers, fussy cut them, airbrushed a B21 Copic marker background, used sticker letters, and called it done!

It's not my best work ever, but since I worried that I would not be able to paper craft post surgery, I think it's pretty darned wonderful.

Thanks to visiting today!

Monday, January 13, 2014

A Rose...

This month we're showcasing the Rose's Portrait set for Muse Monday over on Bombshell's Blog! Click on over every Monday to see some fabulous artwork by the Bombshell Girls and Pin-Ups!

This week it's my turn, so here's my tag!


I decided to try a technique that is new to me and am quite pleased with the way it came out, especially for a first go at it. Now I shall bore you all with a lengthy narrative.

As you might know, I've become enamored of Paper Artsy's Fresco Finish paints and have become a slavish devotee of their You Tube videos. I also follow their blog closely because their designers always share some really cool techniques, hints, tips, tricks, and even share their mistakes.

Over the months, I've seen several people do this technique and finally got the courage to go for it last night. Then I had to leave it on my craft table and go do social family type things today, but I got to see and hold a seriously cute baby and have a delicious dinner including two desserts! Yahoo.

Can I digress or what? Anyway. . . I stamped the Rose Banner stamp from Rose's Portrait set on Idea-ology Tissue paper using Jet Black Archival ink. I then flipped the tissue paper and painted the rose and banner with a few yellows, a green, and two brownish shades of Fresco Finish paints. I put it aside to let it air dry.

While it was drying, I applied two yellow paints to 140 lb. Mixed Media cardstock by Strathmore using the back (gray) side of a piece of Inkssentials Cut-N- Dry foam. Then I went to sleep, woke up, read the Sunday paper, surfed the net, showered, and left for a day of family fun.

When I came back this evening, I cut the  painted Tissue paper to size, used some Post-It notes to mask off the area above and below the Rose Banner, and painted over the Rose Banner with a pale yellow.

Forest Green StazOn ink was sponged over my new Harlequin Layering stencil onto the painted cardstock. Matte Glue n' Seal was then brushed over the stenciled, painted cardstock  and the tissue paper was adhered to it. I used a brayer to flatten the tissue as much as possible. The top corners were punched with my Tonic corner punch to make the cardstock into a tag. The edges were all distressed with a Tonic Distressing tool, then sponged with Frayed Burlap Distress ink.

Meanwhile, I still had a bit of painted yellow cardstock, so I stamped the poem (from Rose's Portrait set) onto it and heat set it. The sentiment panel was then die-cut using a Spellbinders die. The sentiment was kept in the die and Frayed Burlap Distress ink was sponged over the die.

Yellow and green Distress markers were applied directly to the rubber on the small rose stamp (included in the Rose's Portrait set). I huffed on the stamp and stamped over the sentiment verse. It's subtle, but there. I used my beloved Tiny Attacher to staple the sentiment to the tag.

A hole was punched at the top and colored jute was threaded through the opening. And I was done. Hurrah!

Monday, December 30, 2013

A gift!

I don't know if it's an age thang or a space cadet thang, but I need to have calendars throughout the house so that I know what day it is!

I've already made two calendars for my house and am sending a few out as gifts. This is one of them. Since the recipient doesn't visit here often, it will be a surprise!

I purchased several small tear-off calendars that were perfect for inclusion in a stamped piece. I also had a nice thick 6x6 piece of chipboard that was backing some patterned paper. So I upcycled it to back the calendar. It warped a tiny bit when I added glue, but such is life.

Here's the calendar!


I cut a piece of cardstock to 6x6 and stamped the mermaid from Bombshell's Mermaid Treasure set using Tuxedo Black Memento ink. A stamp positioner was used to place the treasure chest. The mermaid and the treasure chest were colored with Copic markers. I then stamped both the mermaid and the treasure chest onto Eclipse tape, fussy cut them, and placed them over their stamped colored counterparts on the piece.

Four Post-It notes were taped together then cut in a wavy pattern. This was placed over the bottom part of the scene, under the treasure chest. The Copic Airbrush system was used to airbrush the "sea" using various BG markers. When I was happy with the color, I took the other part of the Post-It note mask, positioned it over the "sea" and airbrushed the sea bottom using E40 markers. Palette chalk was used to add additional interest to the sea bottom.

The seaweed stamp, included in the Mermaid Treasure set, was stamped repeatedly along the sea bottom and along the sides of the piece.

The masks were lifted and the entire piece was airbrushed with BG11 to give it that under-the-water look. Then gold glitter was added to the coins and around the treasure chest and left to dry while I had a beverage and took an internet break.

Golden Glitz Delicata ink was used to ink Darling Dear wood-veneer numbers by Studio Calico. They looked odd floating above the calendar, so I added some very, very old gold mesh stuff to the upper right corner to anchor the letters and the calendar. It still looked a little sparse, so I added a big starfish charm (same shape as the starfish in the mermaid's hair don'tcha know) and a tiny starfish gold prongy thing (metal with prongs in the back that can stab you and draw blood, though they are really supposed to go through cardstock or fabric).

Now the piece looked unbalanced, which is not good. I'm the only unbalanced thing allowed in my craft room. So, I added another strip of the gold mesh stuff to the left side, added a shell charm, and a little gold crab punchy.

Since this is a gift, the back needed to look nice too, so I started to paint it with Tarnished Brass Distress paint and had a mishap. The paint wasn't flowing, so I squeezed the bottle very gently and paint kind of burst out of it . . . onto the chipboard, onto my hands, onto my hair, my sweatshirt, and my glasses. Yippee. Big fun. I was able to apply some of that paint to the piece, then cleaned myself off. The paint was flowing nicely now, so I finished painting the back, heat set it, added another coat, heat set that, then sponged Tempting Teal and Azure StazOn ink over a Prima Garden Gate stencil.

Here's a peek at the back!


The stamped, embellished cardstock was adhered to the chipboard and left to dry overnight. It is now residing under some heavy books in an attempt to flatten it out before mailing it.

Thanks for visiting today!

P.S. More calendars to come, so stay tuned.

I shall my calendar in the following challenges!
Simon Says Stamp Wednesday Challenges: Bling!
Fairytale Challenge Blog: Lucky Charms and New Year's Wishes
Crafter's Cafe Challenge #43: Happy New Year
Tando's Creative Challenges: Let's Sparkle

Wednesday, December 11, 2013

Bombshell's December Sketch Challenge!

Here's the sketch that I created for Bombshell's December Sketch challenge!


Here's the card I created using the sketch!


The card features Bombshell Stamps' Girl's Ruin and Holiday Accessory sets. The Santa hat from the Holiday Accessory set was stamped onto white cardstock and onto a Post-It note which was used as a mask. The Pin-Up in a Shoe from the Girl's Ruin set was stamped over the masked Santa hat, the mask was removed, and the image was colored with Copic markers.

The patterned papers are from a 6x6 holiday pad by Little Yellow Bicycle. I used old Emaginations punches for the snowflakes. They were punched from sparkly white metallic white cardstock.

The sentiment, from the Holiday Accessory was stamped onto white cardstock using Onyx Black VersaFine ink, then die cut.

Thanks for visiting today!

Wednesday, November 27, 2013

Bombshell's November Hump Day Hop

It's the last Wednesday of the month which means it's time for Bombshell's Hump Day Hop!

This month, Alison, our lovely and talented Challenge Captain has set the theme of Water World! Here's what she had to say about it.

"I want you to incorporate water or water-loving elements into your projects this month!"You should have arrived here from http://www.cajunstampingqueen.blogspot.com/

You should have arrived here from Kelli's blog, where you likely saw something altered, creative, and amazing!

Here's my project, using Bombshell's Mermaid Anchor rubber stamp set

I positioned the mermaid and the two dolphin stamps on my acrylic block, inked them with Tuxedo Black Memento ink, then stamped the images onto Neenah cardstock. I colored the images with Copic markers, then added some Clear Wink of Stella glitter pen to the mermaid's tail. I also added a few layers of Clear Gelly Glaze pen to both dolphins to make them look wet and slippery! Realism is everything, don'tcha think?

The cloudy sky was created and colored with Copic markers per my tutorial that appeared last Friday on Bombshell's blog. Here's a link if you want to take a gander, or a goose, or best yet, a look!

The sea was also colored, but then I decided to use vellum to make it look as though the lower part of the mermaid and her anchor were below the water line. I tore the tops of two sheets, then layered them over the stamped and colored panel. The vellum was attached with my Tiny Attacher stapler at the bottom and with colored twine that was threaded through punched holes on either side of the mermaid.

The staples were covered with a ribbon, a die-cut (QuicKutz) with a sentiment (from justjohanna's Odd Bird Planet) stamped onto it, and some more of that twine.

My Inkssentials White Gel pen was used to add some splashy drippy marks issuing from the dolphins' fins and tails. I went a bit overboard (giggling at my bad joke) with the white pen, but once it's on, it's on for good. *sigh*

I decided to keep the design simple and just matted the card and added some QuicKutz die-cut photo corners to the top corners.

Thanks for stopping by and have a wonderful holiday if you're celebrating!

If you've gotten lost along the way or stopped here first...
here's the complete hop list!
Bombshell Blog
Alison
Kim
Alaine
Leslie
Glittery Katie
Kas
Stempelientje
Marnie
Kelli

Friday, November 22, 2013

Lookin' at clouds...

I've written a Fabulous Friday tutorial for Bombshell Stamps that shares how I create a cloudy sky background using Copic markers. Click on over to Bombshell's blog to check it out.

Card One

Card Two

Card Three

Card Four (channeling my inner Hippie)

All cards feature Bombshell's Butterfly Dreams rubber stamp set. This set contains nine different butterflies plus a "Butterfly Dream" sentiment.

Card Three also features Bombshell's Banner Sayings rubber stamp set, which is on sale now!

All cards use the same basic design, tweaked here and there. The patterned papers are all from very old Basic Grey 6x6 pads. I also used Nestabilities Grand Labels Four, Die-Namics Blueprints 2, and a bunch of other dies. I must say that that Thanks die from Memory Box is fabulous. It's such a perfect size. I also must say that I love, Love, LOVE the new magnetic platform from Sizzix!

Thanks for visiting today!

Monday, November 11, 2013

Bombshell's Muse Monday!

Bombshell's Design Team, aka the Bombshell Girls, are showcasing the Indian Princess set on the Bombshell Blog every Monday throughout November! This set is available in both rubber and digital formats! Better yet, the rubber set is on sale this month! Click on over to the blog every Monday to see and be inspired by new artwork featuring this versatile set.

Here's my card for November 2013's Muse Monday!


The Indian Princess with Headress from the Indian Princess set was stamped with Tuxedo Black Memento ink onto Neenah cardstock and colored with Copic markers. When I was done, the image was outlined with a W0 marker and some chalk pencils were used to add some shading. Clear Wink of Stella glitter pen was added to the crystals on her headdress and earrings to make 'em sparkly.

The Dream Catcher from the Indian Princess set was stamped with Tuxedo Black Memento ink onto Neenah cradstock, colored with Copic markers, fussy cut, then edged with a black Big Brush pen.

The layered patterned papers are from the Marrakesh 6x6 pad by Basic Grey. It's an older pad, but I still love it. Fishtail dies by Die-Namics were used to die cut some of the papers, layered, and the Dream Catcher was adhered atop the fishtails. I used a very old 4x4 die by QuicKutz to die-cut some thin chipboard. The arrow was a bit too long, so I cut it down and added some solid blue paper from the Marrakesh pad to hide the seam between the arrow head and shaft.

It's a sunny cool day in New Jersey, so there are some pretty harsh shadows on my card from the Dream Catcher. Sorry 'bout that!

Thanks for visiting today!


Wednesday, November 6, 2013

Bombshell's Ms. November's Challenge!

Kas Mello, Bombshell's Ms. November, has issued her challenge, "Rough Chicks, Bikes, and Leather". Not all girls are into pink and bows, some are covered in grease and have helmet hair. Motorcycles are always a good girly accessory and what biker chick doesn't love leather?

I used Bombshell Stamps' A Pirate's Life set, Biker Bombshell Digital stamp set, and the Vintage Motorcycle set to create this card.


I decided that I wanted the entire scene to be in greyscale, except for one pop of color. The Pirate Pin-Up girl was stamped with Tuxedo Black Memento ink and just her head was colored using Copic markers, fussy cut, and put aside. I chose the outfit with the scarf from the
Biker Bombshell Digital stamp set and used Photo Elements to copy and paste two outfits which were printed onto Neenah cardstock using my laser printer.  The outfits were colored with Copic markers and then fussy cut. A Krylon Silver Leafing pen was used to add silver to the jacket's zippers and buttons. The jacket and the boots were painted with Fresco Finish Gloss Glaze (Paper Artsy), so that they would look like shiny leather.  The boots were layered over their counterparts and the rest of the Pirate-Pin-up-turned-Biker Babe was assembled. She was put aside while I worked on the scene.

The left-facing motorcycle from the Vintage Motorcycle set was stamped and colored with Copic markers. A VersaMark marker was used to color over the motorcycle, which was then heat embossed with Clear Filigree embossing powder. The same motorcycle was stamped again to the left and overlapping the first motorcycle. The embossing acted like a resist. The excess ink was wiped off using a cotton swab and this motorcycle was colored with Copic markers. I repeated the VersaMark/embossing powder process, and then stamped the motorcycle a third time, colored it with Copics, then the VersaMark marker, then heat embossed the image. I should note that I know squat all about motorcycles so the coloration of the motorcycles, especially the aqua one, is probably completely wrong. Such is life.

Pumice Stone Distress ink was sponged over the motorcycles. I pulled out my trusty Bricks stencil by The Crafter's Workshop and sponged Pumice Stone Distress ink over the stencil rather heavily to create a brick wall behind the motorcycles. I messed up with the embossing powder a bit at the base of the card, but Black Soot Distress paint came to the rescue. Gosh. I love paint!

Black cardstock was die cut with a Nestabilities die and then used to frame the motorcycle scene. This framed piece was adhered to a 5" x 7" card and the Bombshell Biker Babe was adhered as shown.

Thanks for visiting today!