Tuesday, September 22, 2020

Bat Cat Halloween Card

 It's Tuesday, which means it's my day to share a card created for Topflight Stamps! Since it's now officially fall, it's time to turn (almost) my full attention to things Halloween. 

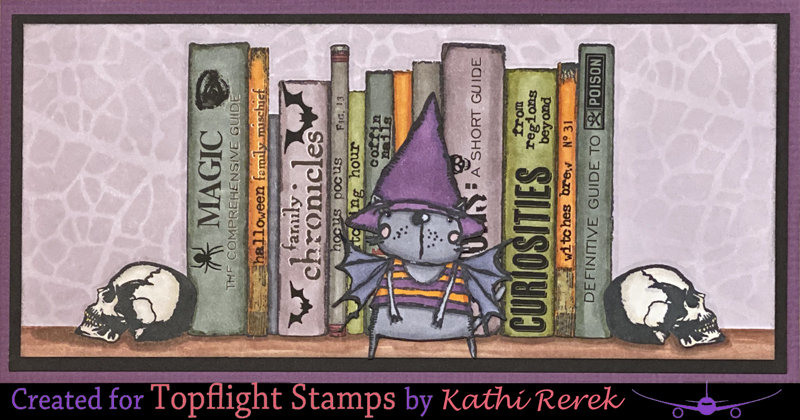
I decided to create a little scene with the Bat Cat Witch, aka Zinski Mini Zini 07 Rubber Cling Stamp by PaperArtsy, who is doing some research in her personal Halloween library, which was created with the Book Spines Frame Stamp Red Rubber Cling Stamp by Darkroom Door, two skull bookends from the Mr. Bone Jangles Clear Polymer Stamp Set by Visible Image, and wallpaper made with the Forest Leaf Stencil by Stamperia.

Here it is! 


Here it is staged on a bookcase with a friend.


Topflight Stamps Products Used:

PSA: There are lots of fantastic new products at Topflight Stamps, so you should definitely click on over there after reading my instructions! BTW, if you'd like to get 12% off your order at Topflight Stamps use THIS LINK!

Other Products Used:
Solar White Classic Crest® Cardstock by Neenah Papers
Purple and Black Cardstock by Bazzill Basics Paper®
Tuxedo Black Memento™ Ink by Tsukineko®
Milled Lavender and Black Soot Distress® Inks by Tim Holtz® for Ranger Industries
Copic® Markers:
   Bat Cat: C1, C3, C5, BV23, BV25, V15, V17, RV91, RV93, YR14, YR27
   Books: BG93, BG96, V91, V93, V95, V99, YG93, YG95, YG97, W4, W6, N4, N6, E84, R56
   Skulls: E40, E41, T1, YR30, YR31
   Bookshelf: E21 E23 E25, E4
Halloween and Apothecary idea-ology® Remnant Rubs by Tim Holtz® for Advantus
Family Matters and Disclame Fortunes Rub-Ons by 7 Gypsies
Presto™ Roman Rub-on Letters and Numbers
Helvetica Rub-Ons by WH Smith (that date from 1993)
Removable ID Labels by Avery®
STAY-tion™ by Wendy Vecchi for Ranger Industries
Stamping Platform

Instructions:
  1. The Bat Cat Witch, aka Zinski Mini Zini 07 Rubber Cling Stamp, was stamped onto white cardstock, fussy-cut, colored with Copic markers, and edged with a black marker. I took her photo before I set her aside to work on her library. See Exhibit A below!
  2. The Book Spines Frame Stamp and the two skulls from the Mr. Bone Jangles Clear Polymer Stamp Set were stamped onto white cardstock. I used both sides of the stamping platform and kept the paper secured to the base while I flipped the lid of the platform. That was a first for me at least in that regard because I have flipped my own personal lid before, which I am sure does not surprise you in the least.
  3. Since I knew that I'd want to add a background to  the image, I also stamped book spines and the skull onto repositionable label paper, which I use as masking paper after fussy-cutting it.
  4. So, yeah. I fussy-cut the skulls and the book spines and set them aside for a bit of time.
  5. The book spines, the skulls, and the "shelf" were colored with Copics.
  6. I secured the image panel to my STAY-tion with magnets, placed the magnetic ruler horizontally over the image panel to cover the "shelf", and adhered the masks over their counterparts on the image panel
  7. Milled Lavender Distress ink was sponged over the images to color the background. 
  8. The Forest Leaf Stencil was secured over the image panel with magnets  being sure to keep the magnetic ruler over the "shelf", then Milled Lavender Distress ink was sponged over the stencil onto the image panel to create a tone on tone background, which if you've been here before, you'll know is one of my fave things to do.
  9. All the masks were lifted and a whole batch of rub-ons were used to add titles to the book spines. I'll admit I had a lot of fun with that, so much so that I took a photo to share with you. See Exhibit B below!
  10. The image panel was edged ith Black Soot Distress ink.
  11. Black cardstock was cut larger than the image panel and used to mat it.
  12. The matted image panel was adhered to a purple 8.5" x 4" card. 
  13. The Bat Cat Witch was adhered to finish the card.
Exhibit A — The colored fussy-cut bat cat witch

Exhibit B — The book shelf, book ends, and shelf with wall paper behind them.


Thanks for visiting today! 

Friday, September 18, 2020

Talented Cat

My cats sing to me all the time. I kind of wish that they could entertain me with some Scot Joplin piano rags. Alas, I don't have a piano.


Here's my card with Stampendous!' new  House-Mouse Designs® Kitten on the Keys Rubber Stamp.


Stampendous!® Products Used:
House-Mouse Designs® Kitten on the Keys Rubber Stamp
Mixed Media White Paper
Tuxedo Black Memento™ Ink by Tsukineko®

Other Products Used:
Copic® Markers:
   Cat: C1, C2, C3, C4, C6, G20, G40
   Piano: E74, E77, E89, Y21, Y26, N0, N1, N3, N4, N6
   Mice:
      Skin: BV0000, BV000, E50, E51, R01, R20, R21
      Fur Left to Right: E35, E44, E53, E57;  E21, E23, E25, E44;  E31, E33, E35, E44;  T1, T3, T5
   Music: BG10, BG90
   Background: BG0000, BG10
Snow Day Remix 6x6 Petite Paper Pads by Lawn Fawn®
Ground Espresso Distress® Ink by Tim Holtz® for Ranger Industries
Bitter Chocolate Cardstock by Bazzill Basics Paper®

Instructions:
  1. Cut a piece of 12x12 cardstock in half. 
  2. Score one piece at 6" and fold to form a 6" square card.
  3. Cut minty green cardstock to 5.75" square.
  4. Cut music patterned paper to 5.75" x 4.25". 
  5. Edge music patterned paper with Ground Espresso Distress ink.
  6. Adhere music patterned paper to minty green patterned paper as shown. 
  7. Edge entire panel with Ground Espresso Distress ink and adhere to the brown card.
  8. Stamp the image with Memento ink. 
  9. Color with Copic markers.
  10. Trim image panel and mat with brown cardstock.
  11. Adhere the matted image to the card.
Thanks for visiting today!

Tuesday, September 15, 2020

It's the Most Wonderful Time of the Year!

It's Tuesday, which means that it's my day to share a project created for Topflight Stamps. This week, my TFS teammates and I are Halloween projects. You should check out the TFS blog during the week to see how we all interpreted this challenge!


Topflight Stamps Products Used:

PSA: There are lots of fantastic new products at Topflight Stamps, so you should definitely click on over there after reading my instructions! BTW, if you'd like to get 12% off your order at Topflight Stamps use THIS LINK!

Other Products Used:
Black Cardstock by Bazzill Basics®
Tuxedo Black Memento™ Ink by Tsukineko®
Fresh Snow Hybrid Ink by Paper Trey Ink
Gathered Twigs, Milled Lavender, and Black Soot Distress® Ink by Tim Holtz® for Ranger Industries
Copic® Markers: 
   Roses: BV23, R24, R27, R29, R59, YG67
   Skull: E40, E41, E43, YR30, YR31, T0, T1, T3, T5
   Table: E55, E57
White Gelly Roll® Gel Pen by Sakura
Occasions Small Talk idea-ology® Stickers by Tim Holtz® for Advantus
Removable ID Labels by Avery®
STAY-tion™ by Wendy Vecchi for Ranger Industries
Stamping Platform

Instructions:
  1. Skull N Roses was stamped onto white paper and onto removable label paper. The label paper version was fussy-cut to create a mask, which was placed over its counterpart on the white paper image panel.
  2. The image panel was was placed onto the STAY-tion and secured with magnets.
  3. A ruler was placed over the top part of the image and the bottom part of the image panel was sponged with Gathered Twigs Distress ink. 
  4. The ruler was moved to cover the bottom part of the image panel and the top part of the image panel was sponged Milled Lavender Distress ink. 
  5. The Berry Stencil was placed over the top part of the image panel and secured with magnets. 
  6. Milled Lavender Distress ink was sponged over the stencil, onto the image panel.
  7. The stencil and mask were lifted and the image panel was heat set.
  8. Barric the Crow was then stamped onto the skull using Onyx Black VersaFine ink and heat set.
  9. The Skull N Roses image was colored with Copic markers, as was the table under the skull. You can go over Distress ink with Copics, which is marvelous! BTW, retrospectively, the horizontal line delineating the parts of the the image panel should have been placed higher. Oh well.
  10. The spiderweb border stamp from the Skullduggery Borders Cling Mounted  Rubber Stamp Set was stamped with White Hybrid ink then again with Hickory Smoke Distress Ink. A white gel pen was then used to touch up the spider web.
  11. The image panel was trimmed to 4.75" x 6.75", edged with Black Soot Distress ink, and adhered to a black 5" x 7" card. 
  12. The sentiment stickers were added to complete the card.
Thanks for visiting today!


Thursday, September 10, 2020

Happy Hedgehog Holiday!

The theme at House-Mouse & Friends Monday Challenges is Anything Goes or Christmas. 


Stampendous!® Products Used:
House-Mouse Designs® Holiday Hedgehog Rubber Stamp
Fitted Frames B Cutting Dies Set
Mixed Media White Paper
Tuxedo Black Memento™ Ink by Tsukineko®

Other Products Used:
Copic® Markers:
   Hedgehog Feet: BV0000, BV000, R00, R01
   Hedgehog: E40, E41, E42, E44, E70, E71, E74
   Mouse Skin: BV0000, BV000, E50, E51, R01, R20, R21
   Mouse Fur: E31, E33, E35, E44
   Ornaments: R14, R17, $29:  G03, G05, G07
   Hangers and Ornaments: Y21, Y26, Y28
   Ground: T0, T1
Two shades of brown and red Triplus® Fineliner Pens by Staedtler
Spica Gold Glitter Pen by Copic®
Joy to the World 8x8 Patterned Paper Pad by Graphic 45®
Gold Sheer Shimmer™ Dauber Stix by Imagine®

Instructions:
  1. Cut a piece of 8.5 x 11 cardstock in half.
  2. Score one piece at 4.25" and fold to form an A2 card.
  3. Cut a piece of patterned paper to 5.25" x 4" to create the card front.
  4. Use one of the dies from the Fixed Frames B Cutting Dies set to cut a window in the center of the patterned paper.
  5. Use the Shimmer Dauber Stix to edge the window opening and the edges of the card. Set aside.
  6. Use Tuxedo Black Memento ink to stamp the image.
  7. Color the image with Copic markers and Triplus Fineliner pens which are compatible with Copics.
  8. Use the red Triplus Fineliner to color the cord across the top of the image.
  9. Use glitter pen to add highlights to the hangers and the tips of the ornaments.
  10. Trim the image panel so that it's smaller than the card front.
  11. Adhere the image panel behind the window in the patterned paper card front.
  12. Adhere the card front to the red card.
Thanks for visiting today!


Tuesday, September 8, 2020

Greetings Earthlings!

It's Tuesday, which means that it's my day to share a project created for Topflight Stamps. I've been watching a lot of old Twilight Zone episodes, so I decided to ink up my Alien Invader Clear Polymer Stamp Set by Visible Image and create a card!

Here's the card, which also uses Visible Image's Time Tunnel Stencil!


Topflight Stamps Products Used:

PSA: There are lots of fantastic new products at Topflight Stamps, so you should definitely click on over there after reading my instructions! BTW, if you'd like to get 12% off your order at Topflight Stamps use THIS LINK!

Other Products Used:
Solar White Classic Crest® Cardstock by Neenah Papers
Tuxedo Black Memento™ Ink by Tsukineko®
Copic® Markers: B60, BV000, BV00, BV20, YG03, YG04, C0, C1, C2, C4, BG90, YR24, YR27, YR31, FY1, R22, R24, R39
140 lb. Mixed Media Paper by Strathmore®
Salty Ocean, Blueprint Sketch, Chipped Sapphire, Dusty Concord, Wilted Violet, and Black Soot Distress® Oxide Inks by Tim Holtz® for Ranger Industries
Black Soot Distress® Ink by Tim Holtz® for Ranger Industries
Unicorn Pigment Hero Hues® by Hero Arts®
Constellations Stencil by The Crafter's Workshop
Glitter by Stampendous!®
Quickie Glue™  Pen by Sakura
STAY-tion™ by Wendy Vecchi for Ranger Industries
Stamping Platform
Big Shot by Sizzix®

Instructions:
  1. Use Memento ink to stamp the alien and one of the two flying saucers from the Alien Invader Clear Polymer Stamp Set onto white cardstock.
  2. Colored both images with Copic markers, fussy-cut, and edge them with a black pen.
  3. Several colors of Distress Oxide Inks were applied directly to my 5x7 Rectangle Gel Press, then blended with a brayer.
  4. A piece of 6x8 Mixed Media paper was pressed onto the Gel Press to pull the first print. Water was misted onto the print, which was heat set. 
  5. This step with different colors until I was happy with the color blend on the print.
  6. The print was heat set again to make sure it was dry as toast.
  7. The Time Travel Stencil was placed onto the Gel Press and Black Soot Distress Oxide was brayered over the stencil. The stencil was removed from the Gel Press and cleaned.
  8. The previously inked print was smoothed onto the Gel Press and the stenciled print was pulled to create the card's background
  9. The print was heat set, sandwiched between two pieces of clean scrap paper, placed on the cutting mat of my Big Shot. The two cutting plates were placed over the the paper sandwich, and run through the machine several times to flatten the paper.
  10. The print was placed onto the STAY-tion and the Constellation stencil was secured to it with magnets.
  11. White pigment ink was lightly sponged over the stencil onto the print and heat set.
  12. The background was trimmed to 4" x 5.25" and edged with Black Soot Distress Ink.
  13. The background was secured to the base of the Stamping Platform.
  14. The prone human stamp and sentiment stamp were positioned on the background. The lid was pressed into the stamps and lifted.
  15.  The stamps were inked with Onyx Black VersaFine Ink, and stamped. 
  16. The space debris stamp from the set was inked with Distress Ink and stamped randomly on the background panel, which was edged, and adhered to a black A2 card.
  17. The Alien and the Flying Saucer images were adhered to the background,
  18. The Quickie Glue Pen was used to add glue in front of the ray gun and under the alien's feet. 
  19. Black and orange glitter were added to complete the card front.
  20. The card front was adhered to a black A2 card.
Thanks for visiting today!


Saturday, September 5, 2020

Fall Robin Card and a SALE!

Happy Labor Day weekend! My  Topflight Stamps team mates and I are sharing Fall-themed cards this week.  Here's a card using the Robin Redbreast Unmounted Stamp by Crafty Individuals and the Profusion Stencil by AALL and Create.


Topflight Stamps Products Used:

PSA: There are lots of fantastic new products at Topflight Stamps and a SALE this weekend. So pop on over to check it out!  


Other Products Used:
Solar White Classic Crest® Cardstock by Neenah Papers
Obsidian Almagam Ink by Gina K Designs™
Copic® Markers: E04, E30, E31, E42, E44, R11, R12, R14, R56, Y000, Y00, Y02, Y32, Y35, Y38, BG000, BG11, BG53,YG03, YG11, YR12, YR27, YR31, BV20, BV23
Dandelion, Tangelo, New Sprout, Bamboo Leaves, Summer Sky Memento™ Inks by Tsukineko®
Vintage Double-Dot Designs 6x6 Patterned Paper by BoBunny Press™
Red and Kraft Cardstock by Bazzill Basics Designs®
Big and Little Pierced Chain Rectangles Layered Die Set by GinaMarie Designs
Removable ID Labels by Avery®
STAY-tion™ by Wendy Vecchi for Ranger Industries

Instructions:
  1. Create an A2 card from kraft cardstock.
  2. Stamp the image onto white cardstock and onto removable label paper.
  3. Fussy-cut the label paper to create a mask and adhere over its counterpart on the image panel.
  4. Place the magnetic ruler over the bird's feet on the image panel.
  5. Sponge Summer Sky Memento ink over the the masked image onto top part of the image panel.
  6. Move the ruler so that it covers the blue area, then sponge New Sprout Memento ink over the bottom part of the image panel.
  7. Use magnets to secure the stencil over the image panel on the STAY-tion.
  8. Sponge colored Memento inks over the stencil onto the image panel.
  9. Remove the magnets, the stencil, and the image panel from the STAY-tion.
  10. Remove the mask and color the image with Copic markers.
  11. Cut the image panel with one of the dies from the die-cutting set.
  12. Cut a piece of red cardstock 1/8" larger than the image panel and mat the image panel with it.
  13. Cut orange Double Dot patterned paper to 4 1/8" x 5 3/8".
  14. Adhere the image panel to the Double Dot patterned paper, then onto the card.
Thanks for visiting today.

Tuesday, September 1, 2020

Autumnal Thank You Card!

It's Tuesday, which means that it's my day to share a project created for Topflight Stamps. This week, my TFS teammates and I are created autumnal projects. You should check out the TFS blog during the week to see how we all interpreted this challenge!

I thought a bit and decided that fall meant monarch butterflies, sunflowers, and shades of orange, yellow, red, and greens. My interpretation meant that PaperArtsy's Tracy Scott 39 Rubber Cling Mounted Stamp Set was perfect for this challenge!  I also used the "Thank you" from the Classic Sentiments Clear Stamp Set by Heffy Doodle.

Here's my card.


Topflight Products Used:
PSA: There are lots of fantastic new products at Topflight Stamps, so you should definitely click on over there after reading my instructions! BTW, if you'd like to get 12% off your order at Topflight Stamps use THIS LINK!

Other Products Used:
Solar White Classic Crest® Cardstock by Neenah Papers
Orange and Green Cardstock by Bazill Basics Paper®
Tuxedo Black, Summer Sky, Dandelion, Canteloupe, Tangelo, New Sprout, and Bamboo Leaves Memento™ Inks by Tsukineko®
Copic® Markers: 
   Butterfly: YR12, YR14, YR16, YR18, R24, VB20, BV23, BV25 BV29, N6, N8
   Flowers: Y04, Y11, Y21, Y23, Y26, Y28, Y32, Y35, YR23, YR24, YR27, YR31, R24, R56, R59, V15, V28
   Leaves: YG03, YG05, YG511, YG63, YG67
Leaf Flourish Stencil by Dyan Reaveley
Small Oval Die by The Stamp Doctor
Small Flags Die
Removable ID Labels by Avery®
STAY-tion™ by Wendy Vecchi for Ranger Industries


Instructions:
  1. Create an A7 card from green cardstock.
  2. Stamp the image onto white cardstock and onto removable label paper. 
  3. Fussy-cut the label paper to create a mask and adhere over its counterpart on the image panel. 
  4. Sponge Summer Sky ink over the the masked image onto the entire image panel.
  5. Use magnets to secure the stencil over the image panel on the STAY-tion.
  6. Sponge colored Memento inks over the stencil onto the image panel.
  7. Remove the magnets, the stencil, and the image panel from the STAY-tion.
  8. Touch up the leaves with Copic markers.
  9. Remove the mask and color the image with Copic markers. 
  10. Use Onyx Black VersaFine ink to stamp the sentiment. VersaFine ink is perfect for stamping detailed fine image, such as this sentiment.
  11. Trim the image panel to 4 5/8" x 6 5/8".
  12. Cut orangish cardstock to 4.75" x 6.75" and use to mat the image panel.
  13. Create an A7 card from green cardstock.
  14. Use the small oval die to cut the sentiment.
  15.  Use the flags die to cut green cardstock
  16. Adhere the sentiment oval to the green cardstock.
  17. Adhere the matted image panel to the card.
  18. Adhere the sentiment to finish the card.
Thanks for visiting!