Showing posts with label Topflight Stamps. Visible Image. Show all posts

Tuesday, September 22, 2020

Bat Cat Halloween Card

 It's Tuesday, which means it's my day to share a card created for Topflight Stamps! Since it's now officially fall, it's time to turn (almost) my full attention to things Halloween. 

I decided to create a little scene with the Bat Cat Witch, aka Zinski Mini Zini 07 Rubber Cling Stamp by PaperArtsy, who is doing some research in her personal Halloween library, which was created with the Book Spines Frame Stamp Red Rubber Cling Stamp by Darkroom Door, two skull bookends from the Mr. Bone Jangles Clear Polymer Stamp Set by Visible Image, and wallpaper made with the Forest Leaf Stencil by Stamperia.

Here it is! 
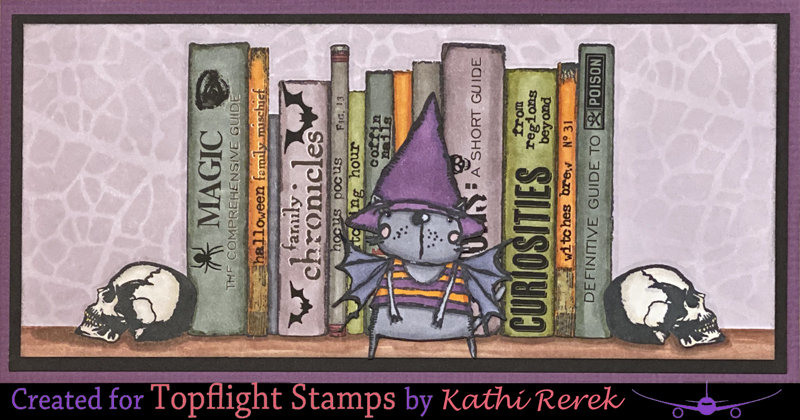

Here it is staged on a bookcase with a friend.


Topflight Stamps Products Used:

PSA: There are lots of fantastic new products at Topflight Stamps, so you should definitely click on over there after reading my instructions! BTW, if you'd like to get 12% off your order at Topflight Stamps use THIS LINK!

Other Products Used:
Solar White Classic Crest® Cardstock by Neenah Papers
Purple and Black Cardstock by Bazzill Basics Paper®
Tuxedo Black Memento™ Ink by Tsukineko®
Milled Lavender and Black Soot Distress® Inks by Tim Holtz® for Ranger Industries
Copic® Markers:
   Bat Cat: C1, C3, C5, BV23, BV25, V15, V17, RV91, RV93, YR14, YR27
   Books: BG93, BG96, V91, V93, V95, V99, YG93, YG95, YG97, W4, W6, N4, N6, E84, R56
   Skulls: E40, E41, T1, YR30, YR31
   Bookshelf: E21 E23 E25, E4
Halloween and Apothecary idea-ology® Remnant Rubs by Tim Holtz® for Advantus
Family Matters and Disclame Fortunes Rub-Ons by 7 Gypsies
Presto™ Roman Rub-on Letters and Numbers
Helvetica Rub-Ons by WH Smith (that date from 1993)
Removable ID Labels by Avery®
STAY-tion™ by Wendy Vecchi for Ranger Industries
Stamping Platform

Instructions:
  1. The Bat Cat Witch, aka Zinski Mini Zini 07 Rubber Cling Stamp, was stamped onto white cardstock, fussy-cut, colored with Copic markers, and edged with a black marker. I took her photo before I set her aside to work on her library. See Exhibit A below!
  2. The Book Spines Frame Stamp and the two skulls from the Mr. Bone Jangles Clear Polymer Stamp Set were stamped onto white cardstock. I used both sides of the stamping platform and kept the paper secured to the base while I flipped the lid of the platform. That was a first for me at least in that regard because I have flipped my own personal lid before, which I am sure does not surprise you in the least.
  3. Since I knew that I'd want to add a background to  the image, I also stamped book spines and the skull onto repositionable label paper, which I use as masking paper after fussy-cutting it.
  4. So, yeah. I fussy-cut the skulls and the book spines and set them aside for a bit of time.
  5. The book spines, the skulls, and the "shelf" were colored with Copics.
  6. I secured the image panel to my STAY-tion with magnets, placed the magnetic ruler horizontally over the image panel to cover the "shelf", and adhered the masks over their counterparts on the image panel
  7. Milled Lavender Distress ink was sponged over the images to color the background. 
  8. The Forest Leaf Stencil was secured over the image panel with magnets  being sure to keep the magnetic ruler over the "shelf", then Milled Lavender Distress ink was sponged over the stencil onto the image panel to create a tone on tone background, which if you've been here before, you'll know is one of my fave things to do.
  9. All the masks were lifted and a whole batch of rub-ons were used to add titles to the book spines. I'll admit I had a lot of fun with that, so much so that I took a photo to share with you. See Exhibit B below!
  10. The image panel was edged ith Black Soot Distress ink.
  11. Black cardstock was cut larger than the image panel and used to mat it.
  12. The matted image panel was adhered to a purple 8.5" x 4" card. 
  13. The Bat Cat Witch was adhered to finish the card.
Exhibit A — The colored fussy-cut bat cat witch

Exhibit B — The book shelf, book ends, and shelf with wall paper behind them.


Thanks for visiting today! 

Thursday, October 24, 2019

Rock On!

It's my fourth week as October's Guest Designer over at Topflight StampsToday's cards feature the Rock Out Clear Polymer Stamp Set by Visible Image and Brusho Crystal Color by Colourcraft, which were used to create the background for both cards.


Here's my first card with the Rock Out Clear Polymer Stamp Set and the Play Guitar Stencil.


Here's my second card with the Rock Out Clear Polymer Stamp Set and the Time Tunnel Stencil. I must note that my mad photographic skillz made this card a different size, when in reality both cards are standard A2s. *shrug* 


Products Used:
Rock Out Clear Polymer Stamp Set by Visible Image
Time Tunnel Stencil by Visible Image
Brusho® Crystal Color by Colourcraft
Sea GreenLeaf GreenEmerald GreenYellowSunburst YellowTurquoise Cobalt BlueUltramarine, and Crimson  Brusho Crystal Color by Colourcraft
Onyx Black VersaFine™ Ink by Tsukineko®
140 lb. Watercolor Paper by Strathmore®
Blueprint Sketch, Salty Ocean, and Black Soot Tim Holtz® Distress® Ink by Ranger
Play Guitar Stencil by Visible Image
Music Stencil by Newton's Nook Designs
Happy Birthday Sentiment from one of the House-Mouse Designs® Mini Clear Stamp set by Stampendous
You Rock Rubber Stamp by A Muse Studio® Stamps
Sentiment Banners Honey Cuts Dies by Honey Bee Stamps
Framed Oval Die, Source Unknown

Brusho Crystal Colors are such fun to use to create a painted background quickly. There are many ways to use them, but I went for my tried and true method.

To create the background paper for both cards:
  1. A piece of 9" x 12" piece of watercolor paper was spritzed with water, then sprinkled with Sea Green, Leaf Green, Emerald Green, Yellow, Sunburst Yellow, Turquoise, Cobalt Blue, and Ultramarine Brusho Crystal Color powders. 
  2. Water was lightly spritzed and left for a few moments to let the colors spread, then the paper was heat dried. 
  3. This process was repeated until I was happy with the color combination. 
  4. I decided it needed a pop of red, so Crimson Brusho Crystal Color was sprinkled sparingly and spritzed with water. 
  5. The paper was heat set until it was absolutely bone dry. 
  6. The background paper was cut in half, then run through my Big Shot to flatten it. 
  7. An oval frame die was used to die-cut the colored paper and black cardstock two times. All edges were sponged with Salty Ocean and Black Soot Distress inks. One set was set aside for my second card. 
To create the guitar card:
  1. The watercolor oval and the black oval frame were taped together on the back,  
  2. Blueprint Sketch Distress ink was sponged over the Play Guitar stencil, then heat set. 
  3. This was temporarily adhered to scrap paper and secured to the base of a stamping platform with magnets.
  4. The guitar stamp fwas positioned face down onto the oval, the lid of the stamping platform was pressed onto the stamp, and lifted.
  5. The stamp was inked with Onyx Black VersaFine ink, then stamped onto the oval. 
  6. This step was repeated until I got the coverage I wanted.
  7. The panel was removed from the platform then adhered to a black A2 card.
To create the birthday card:

  1. For this card, I separated the oval and the oval frame before stenciling and stamping. 
  2. Salty Ocean Distress ink was sponged over a music stencil onto the rectangular frame.
  3. Salty Ocean Distress ink was sponged  the the Time Tunnel Stencil onto the oval. 
  4. The guitarist stamp was positioned face down onto the oval, the lid of the stamping platform was pressed onto the stamp, and lifted.
  5. The stamp was inked with Onyx Black VersaFine ink, then stamped onto the oval. 
  6. This step was repeated until I got the coverage I wanted.
  7. A banner die was used to cut leftover scraps from the half the was die-cut. 
  8. Using Salty Ocean Distress ink, the two banners were stamped with the Grungy Stars border from the set. 
  9. The sentiments were stamped overtop with Onyx Black VersaFine ink.
  10.  The oval frame card front was adhered to a blue A2 card, then the black oval border, guitarist image panel, and sentiments were adhered to finish the card.
BTW, Some links in this post are affiliate links which do not affect the price you pay but allow me to earn a small percentage of a sale. Thanks! If you shop at Topflight Stamps, please use my coupon code, KATHIREREK855, for 10% off your order.

Thank you for visiting today!