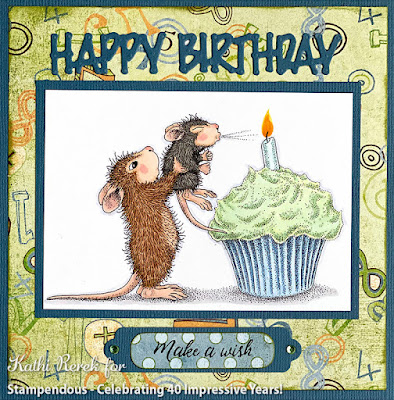
It's always good to have a supply of birthday cards on hand. Here's one featuring Stampendous!' new House-Mouse Designs® Birthday Cupcake Rubber Stamp.
Stampendous!® Products Used:
Other Products Used:
Mini POP Clear House-Mouse Designs® Stamps by Stampendous!® *
Truck Load Die Set by Stampendous!® *
Blue Cardstock
Copic® Markers:
Mouse Faces, Ears, Paws, Tails: BV0000, E51, E50, RV1, R00, R000, R20, R21
Mouse Fur Left: E35 E33, E31, R000
Mouse Fur Right: W3, W5, W6
Cupcake Wrapper: <B41, B41, B45
Cupcake Frosting: G0000, G000, G12, G20
Candle: BG000, BG10, BG11,
Flame: Y13, Y15, Y38, YR16
Ground: N0, N1
Outline: B60
Brigham, Nathan Patterned Papers from the Oh Baby! Boy Collection by Basic Grey®
Nameplates Die Set by Spellbinders®
Clear Jewels by Katzelkraft
* The mini stamps and Truck Load Die Set are available for purchase online.
Instructions:
- Cut cardstock to 5.5" x 11". Score at 5.5" and fold to form a 5.5" square card.
- Use Tuxedo Black Memento ink to stamp the image.
- Color with Copic markers.
- Trim the image panel to 3" x 4.25".
- Trim blue cardstock to 3.25" x 4.5" and use to mat the image panel.
- Cut Brigham (numbers) pattern paper to 5.25" square.
- Use the word dies from the Truck Load Die Sets to cut blue cardstock.
- Stamp the sentiment, from the Mini set, onto polka dot cardstock.
- Use the oval nameplate die to cut the sentiment.
- Use the nameplate die to cut blue cardstock.
- Mat the sentiment die-cut onto the blue nameplate die-cut.
- Cut Brigham (numbers) pattern paper to 5.25" square.
- Adhere the word die-cuts to the patterned paper as shown.
- Adhere the patterned paper the blue card.
- Adhere the image panel and sentiment.
- Add jewels to the sentiment die-cut to finish the card.
Thanks for visiting today!
No comments:
Post a Comment