I've been having so much fun participating in AALL and Create's Polaroid Pops Challenges that I just had to create two more cards for Topflight Stamps hat I'm going to share with you. I wanted to let you know that Topflight Stamps is well stocked with AALL and Create's products, including Janet Klein's wonderful stamps, plus there are loads of new products. So hop on over to check out all the new goodies!
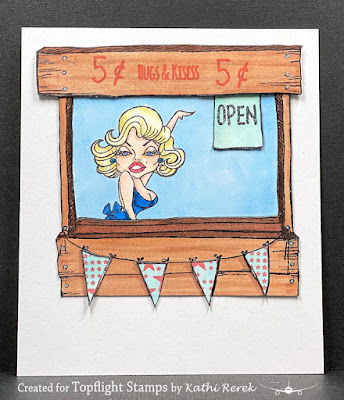
Here's my take on the Famous Face Challenge for Day 9, created with the Marilyn Clear Stamp Set 475, The Stand Clear Stamp Set 343, a sentiment from the Love Birds Clear Stamp Set 155 by Olga Heldwein, and the Reverse Stars Clear Stamp 484 by Bipasha BK.
#PolaroidPopsChallengesDay9, Famous Faces
Here's my take on the What's Cooking? Challenge for Day 22. This one was created with Nana's Kitchen Clear Stamp Set 410 and the Sugar Cookie Clear Stamp Set 421. All stamps are by AALL and Create.
#PolaroidPopsChallengesDay22, What's Cooking?

Topflight Stamps Products Used:
Other Products Used:
Solar White Classic Crest® Cardstock by Neenah Papers
Tuxedo Black and Desert Sand Memento™ Ink by Tsukineko®
Copic® Markers:
Marilyn's Skin: BV0000, BV000, E50,E21, E11, E00, E000
Marilyn's Cheeks, Shoulder, Cleavage: R20
Marilyn's Lips: R35, R46
Marilyn's Eyes: B66
Marilyn's Hair: Y0000, Y000, Y11, Y13, Y21, W0, W1, W2, W3
Marilyn's Dress: B23, B37, B39
Background: B21
The Stand/Kissing Booth: E21, E23, E27, E29, E47, W0, W1
Flags and Sign: BG13
Stove: G00, G02, B00, B60, BV20, N4, N6, T3, T5, R24
Coffee Pot and Percolator: C0, C1, C2, C3, C5
Floor: E21, E23, W1
Chef's Skin: BV0000, BV000, E50,E21, E11, E00, E000
Chef's Cheeks: R20
Chef's Lips: R32, R35
Chef's Eyes: G00, G02
Chef's Hair: E44, E47,
Chef's Toque: B60, C00, C0, C1, C2, C4
Chef's Coat: RV52, RV63, RV91
Chef's Tights: B00, BV20
Flower: R52, R63
Bowl: B00, B02, BV20, G00, G02
Silver Jimnie Gel Rollerball by Zebra
Blue Stardust® Glitter Gel Pen by Sakura® of America
White Gelly Roll Gel Pen by Sakura® of America
Repositionable Label Paper by Avery®
Post-It Notes® by 3M
STAY-tion™ by Wendy Vecchi for Ranger Ink
Stamping Platform
Instructions:
I made The Stand into a kissing booth with Marilyn as the star kisser. I bet she'd make a load of money!
- Use Tuxedo Black Memento ink to stamp the stand four times onto white cardstock.
- Trim one stand to 3" in height, then use a craft knife to cut out the interior of the stand.
- Use a scissor to trim around the exterior of the stand and set aside
- Trim the top part of one of the stands and set aside.
- Use Tuxedo Black Memento ink to stamp Marilyn into the aperture of one of the stands and trim around the opening, keeping in mind that this piece will be the bottom layer.
- Use Tuxedo Black Memento ink to stamp the "open" sign. Fussy-cut.
- Use Copic markers to color all of the wood elements, Marilyn, the sign, and the flags.
- Use the Stardust marker to add glitter to Marilyn's earrings.
- Use a dark marker to edge all of the elements.
- Use magnets to secure the top part of the stand to the base of the stamping platform.
- Place the 5¢ stamp facedown onto the top part of the stand.
- Press the platform's lid onto the back of the stamp and lift.
- Ink the stamp with Tulip Red VersaFine ink and stamp.
- Clean and dry the stamp.
- Position the 5¢ stamp facedown onto the other side of the top part of the stand.
- Press the platform's lid onto the back of the stamp and lift.
- Ink the stamp with Tulip Red VersaFine ink and stamp.
- Remove the stamp and clean it.
- Position the "Hugs and Kisses" sentiment stamp from the Love Birds Stamp Set facedown in the center of the top panel of the stand.
- Press the platform's lid onto the back of the stamp and lift.
- Ink the stamp with Tulip Red VersaFine ink and stamp.
- Use magnets to secure the flags piece to the base of the stamping platform.
- Position the Reverse Stars Clear Stamp facedown onto the flags.
- Press the platform's lid onto the back of the stamp and lift.
- Ink the stamp with Tulip Red VersaFine ink and stamp.
- Adhere the Marilyn panel behind one of the stamped and colored Stand/Kissing Booths.
- Adhere the "Open" sign to the Marilny panel as shown.
- Adhere the stamped upper panel in place.
- Fussy-cut each flag, edge with a dark marker, and adhere to the Stand/Kissing Booth.
- Adhere the assembled Kissing Booth to a 3.5" x 4" white card.
~~~
I decided to go retro with my take on the What's Cooking Challenge.
- Use magnets to secure a panel of white cardstock to the base of the stamping platform.
- Place the clear stamp guide from the set onto the white cardstock and position the the cook pot and the percolator from the Nana's Kitchen Clear Stamp Set facedown onto the stove's burners.
- Press the platform's lid onto the back of the stamps and lift the lid.
- Remove the stamp guide.
- Ink both stamps with Tuxedo Black Memento ink and stamp them onto the white cardstock and onto a piece of repositionable label paper.
- Fussy-cut the label paper version of both pots and place them over their counterparts.
- Remove the stamps.
- Position the stove stamp from the Nana's Kitchen Clear Stamp Set facedown so that the pots will be sitting on the burners.
- Press the platform's lid onto the back of the stamp and lift the lid.
- Ink the stamp with Tuxedo Black Memento ink and stamp onto the image panel and onto a piece of repositionable label paper.
- Remove the stamp.
- Fussy-cut the Label Paper version of the stove and mask the image.
- Use magnets to secure the image panel with the masked images onto the STAY-tion.
- Place a ruler horizontally over the base of the images and brush Jersey Cream Prism Ink overtop to create a colored background.
- Reposition the ruler to cover the top portion.
- Brush or sponge Desert Sand Memento ink over the base of the image panel.*
- Trim the image panel to 3" square.
- Remove the masks and use Copic markers to color the images and the wood floor.
- Use Tuxedo Black Memento ink to stamp the cute chef from the Sugar Cookie Clear Stamp Set onto white cardstock.
- Fussy-cut, color with Copic markers, and edge with a dark marker or pen.
- Adhere the Chef to the image panel.
- Adhere the image panel to a 3.5" x 4" piece of white cardstock.
Notes:
- Memento ink was used to sponge the bottom part of the image because I wanted to use Copic markers to create a wood floor. Copic markers do not play nicely with Prism ink. Alas.
Thanks for visiting today!
No comments:
Post a Comment