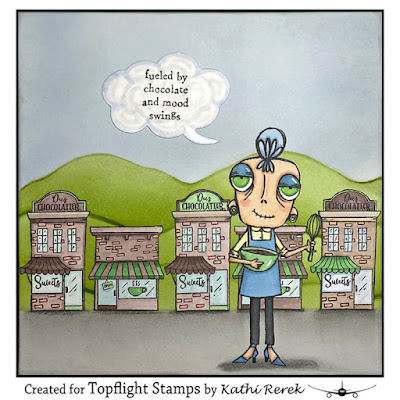
Here are my first two pages created with Miss Dee Barista Clear Stamp Set 760 and Miss Dee Chocolatier Clear Stamp Set 763. BTW, both pages are the same size. I guess I got confused when I was editing the photos).
Topflight Stamps Products Used:
Della Blue, Graphite, Pine, and Olive Elements Inks by Lavinia Stamps
Concrete Fresco Finish Acrylic Paints by PaperArtsy*
Other Products Used:
Solar White Classic Crest® Cardstock by Neenah Papers
Bristol Paper by Strathmore®
Tuxedo Black Memento™ Ink by Tsukineko®
Black Soot Distress® Ink by Tim Holtz® for Ranger Ink
Copic® Markers:
Skin: BV0000, BV000, E50, E21, E11, E000, E00, R20
Chocolatier: YG00, YG41, YG45, Y000, Y11, B23, B41, B45, B60, N5, N7, E74, E77
Barista: BG70, BG72, BG75, E70, E71, E74, E77, E79, E89, R30, R32, R35, R39, B97, B99, C00, C1, C2, C4
Houses: E40, E41, E42, E43, E70, E71, E74, E93, R30, R35,RV43 BG70, BG72, BG75, YG41, YG 45, B21
Clouds: B60, C00, C0, RV0000, BV0000
Black Multiliner Small Brush Pen by Copic®
Concrete Fresco Finish Acrylic Paints by PaperArtsy*
Thought Bubble Dies: Source Unknown
Black and Grey Chalk Pencils by General's®
Removable Scotch® Tape by 3M
STAY-tion by Wendy Vecchi for Ranger Ink
Stamping Platform
Instructions:
- Stamp Miss Dee Chocolatier and Miss Dee Barista in Tuxedo Black Memento ink.
- Stamp the chocolate shop and the cafe five times each.
- Fussy-cut all the images.
- Note that on the Miss Dee Barista page, I cut off the top part of the Chocolatier buildings. Similarly, I trimmed the top part of the Coffee Shop buildings on the Miss Dee Chocolatier page.
- Color all of the images were colored with Copic markers and edge with a black multiliner pen.
- Set aside the two Miss Dees and all the buildings while creating the background pages.
- Select one of the masks from the Acetate Hill Masks by Lavinia Stamps to use. I chose the rolling hills mask.
- Use magnets to secure a 6" piece of Bristol paper to the STAY-tion.
- Place a plastic ruler or the STAY-tion ruler horizontally across the base of the panel.
- Place the rolling hills mask over the paper and secure with magnets.
- Brush Della Blue and Graphite Elements Inks over the mask to create the sky.
- Repeat this process to create a second page.
- Trace the mask onto a piece of cardstock and fussy-cut.
- Place this cardstock mask over the sky portion and secure with magnets.
- Move the rolling hills mask down and slightly offset.
- Brush Pine Elements Ink downward over the cardstock mask and upwards over the rolling hills mask.
- Wipe off the rolling hills mask, flip it, and move it downwards.
- Brush Pine and Olive Elements Inks were brushed over the rolling hills mask again.**
- Repeat Steps #14 through #18 with the second background page.
- Put away the masks and remove the ruler.
- Use Removable Scotch Tape to cover the base of the hills.
- Use Concrete Fresco Finish Acrylic Paints by PaperArtsy to paint the bottom part of both background panels to look somewhat like pavement. Chalky paint works really well for this.
- Remove the tape from both panels.
- Cover the top part of the background panels.
- Apply black and grey chalk pencils along the top part of the painted background to add dimension to the pavement.
- Trim both panels to 5 5/8" square.
- Edge the panels with Black Soot Distress ink.
- Mat both panels with 5.75" squares of black cardstock.*
- Cut white cardstock with thought cloud dies.
- Color the thought cloud die-cuts with Copic markers.
- Use magnets to secure the thought cloud die-cuts to the base of stamping platform.
- Place each sentiment facedown onto a thought cloud die-cut.
- Press the lid of the stamping platform onto the back of the stamps and lift.
- Ink the sentiments with Onyx Black VersaFine Ink and stamp the sentiments.
- Adhere the buildings to both pages as shown.
- Adhere Miss Dee Barista and Miss Dee Chocolatier to the pages as shown.
- Adhere the thought bubbles to the pages as shown.
Notes:
- Well, I did it again. I was going to use a 6x6 Disc-bound Journal for this and measured from the binding holes, not realizing that the discs would add to the measurement. Of course, I realized this after gluing everything down securely on both pages. So, I will be making a special sized journal with my Bind-it-all once I figure out how large to cut the covers and the inner pages and then can mount these journal pages accordingly.
- I went way too heavy with the Olive Elements ink. Alas.
- Miss Dee reminds me of myself in some ways. Like me, she lacks a filter and can be snarky. Like me, her boobs sag, her hair is thinning, and she's bug-eyed. Unlike me, she's really thin.
Thanks for visiting today!


No comments:
Post a Comment