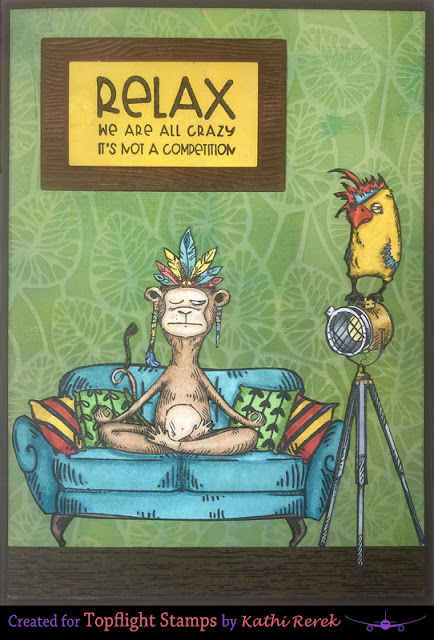
Here's my card.
Topflight Stamps Products Used:
Spring, Guacamole, Beach Hut, Haystack, Yellow Submarine, and Zesty Zing Fresco Chalk Paints by PaperArtsy
Rainforest Green and Roasted Coffee Prism Inks by Hunkydory Crafts
PSA: There are lots of fantastic new products at Topflight Stamps, so you should definitely click on over there after reading my instructions. especially since there are loads of new goodies. BTW, if you'd like to get 12% off your order at Topflight Stamps use THIS LINK!
Other Products Used:
140 lb. Mixed Media Paper by Strathmore®
Solar White Classic Crest® Cardstock by Neenah Papers
Brown Cardstock by Bazzill Basics Paper®
Tuxedo Black Memento™ Ink by Tsukineko®
Copic® Markers:
Monkey: BV000, E21, E31 E33, E35, E44, E51
Headdress and Earrings: BG09, BG57, Y18, Y26, R14, R24, B28
Couch: BG09, BG57, E74, E77
Pillows: Y19, Y26 R14, R24 R29
Light: Y11, Y21, Y23, Y26, Y28, C0, C1, C2, C3, C4, C6, C7
Parrot: Y19, Y26, BBG09, BG57, R04, R08, R29, R46, E74, E77
Red, Blue, Marine, and Gold Stardust® Glitter Pens by Sakura® of America
Wood Frame Infinity® Die Set by Hero Arts
Stamping Platform
STAY-tion by Wendy Vecchi for Ranger Industries
STAY-tion by Wendy Vecchi for Ranger Industries
Removable Scotch® Tape by 3M
Wood-grained Washi Tape from the stash
Instructions and Notes:
I decided that I was bored of doing my usual stamp, mask, ink, stencil thing and to use some of my neglected, but beloved Fresco Chalk Paints by PaperArtsy.
- Randomly brayer Spring, Guacamole, and Beach Hut Fresco Chalk Paints onto Mixed Media cardstock. It dries really quickly. Here's the result.
- I knew that I wanted to a jungle leaf background but I wanted it to be a bit textured, so placed the Elegance Stencil by Lavinia Stamps over the background, taped it in place, placed blank cardstock over the stencil, placed it on the Big Shot platform, with both cutting plates over top, and ran it through the machine several times, which yielded a slightly raised pattern, which you can see on the photo below.
- The image panel with the stencil still taped on the reverse was placed onto my STAY-tion and secured with magnets.Rainforest Green Prism Ink was brushed over the stencil.
- The monkey and elephant from the Jungle Animals Unmounted Red Rubber Stamp Set, the sofa, table, trunk, and light from the Living Room Unmounted Red Rubber Stamp Set, and Parrot were stamped onto white cardstock and fussy-cut.
- The unused images were set aside of another day. The monkey, sofa, parrot, and light were colored with Copic markers. They were edged with dark markers to avoid unsightly white edges.
- To create the background for the sentiment panel.Haystack, Yellow Submarine, and Zesty Zing Fresco Chalk Paints were brayered onto Mixed Media cardstock
- The painted cardstock was secured to the base of my stamping platform with magnets.
- The "Relax" sentiment was inked with Onyx Black VersaFine Ink, then stamped.
- The stamped painted sentiment panel and white cardstock were cut with one of the dies from the Wood-Frame Infinity die set.
- The frame was sponged with Roasted Coffee Prism Ink.
- The sentiment and frame were adhered to a piece of cardstock cut slightly smaller than the frame. This was to keep them together and to pop the framed sentiment off the page a bit.
- Wood-grained Washi Tape from my stash was adhered to the bottom of the image panel.
- The image panel was was trimmed, then edged with Roasted Coffee Prism Ink.
- All the elements were adhered to the image panel, which was mounted on a brown A7 card.
Thanks for visiting today!


No comments:
Post a Comment