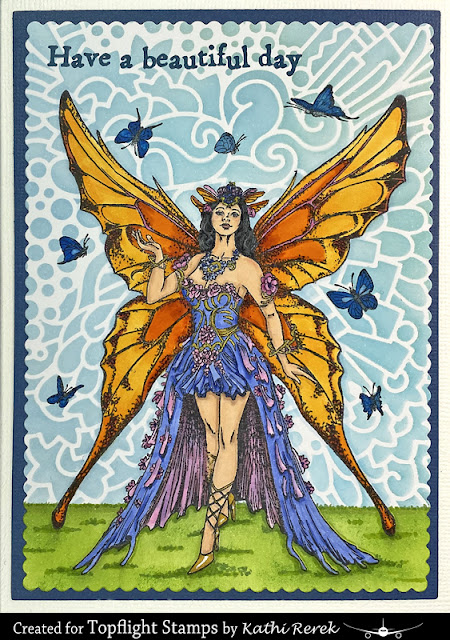
Here's my card.
Topflight Stamps Products Used:
Other Products Used:
Solar White Classic Crest Cardstock by Neenah Papers
Solar White Classic Crest Cardstock by Neenah Papers
Avalanche and Navy Textured Cardstock by Bazzill Basics
Mowed Lawn and Twisted Citron Distress Inks by Tim Holtz for Ranger Ink
Summer Sky Memento Ink
Copic Markers:
Skin: BV000, E50, E21, E11, E00, R20
Lips: E04, R32
Hair: N4, N5, N6
Clothing: B60, B3, B55, RV52, RV55, RV74, RV66, RV91, RV95
Shoes and Armbands: Y21, Y26, Y28
Wings: YR16, YR18, Y35, Y38, RV55, RV66
Grass: YG25, YG45
Miscellaneous Shinhan Touch and PrismacolorAlcohol Markers*
Gold Stardust Glitter Gel Pen by Sakura of America
White Gelly Roll Gel Pen by Sakura of America
Repositionable Sticker Paper by Avery
Low-tack Tape
STAY-tion by Wendy Vecchi for Ranger Ink
Stamping Platform
Instructions:
- Create an A6 card from Avalanche Textured Cardstock. Set aside.
- Use Tuxedo Black Memento Ink by Imagine Crafts/Tsukineko to stamp the Fairy Queen from the Fairy Queen of Hearts Clear Stamp Set 1101 twice — once onto a cardstock panel and once onto repositionable sticker paper.
- Use Copic markers to color the Fairy Queen.
- Use a C1 and a B21 Copic marker to outline the image.
- Fussy-cut the sticker paper version of the Fairy Queen and place it atop the colored counterpart on the image panel.
- Place a ruler horizontally where the back of the skirt is at its longest.
- Brush Mown Lawn Distress Ink (Copic-friendly) over the ruler and the masked image to create a horizon line.
- Randomly brush horizontal lines of Mown Lawn Distress ink along the bottom portion of the panel.
- When done, brush a Twisted Citron Distress Ink overtop, blending a you go.
- Remove the ruler and cover grassy background with low-tack tape or a piece of paper.
- Use magnets or low-tack tape to secure the Profusion Stenci over the image panel.
- Brush Summer Sky Memento Ink (Copic-friendly) over the stencil and the masked image onto the image panel.
- Use the largest scalloped die from the Card Passe Partout Rectangle Die Set to cut the image panel.
- Remove the mask and the tape from the die-cut image panel.
- Move the image panel die-cut back onto the base of the stamping platform and secure with magnets.
- Position the butterfly stamps from the Fairy Queen of Hearts Clear Stamp Set 1101 facedown around the Fairy Queen.
- Press the platform's lid onto the back of the stamps, lift the platform's lid, ink the stamps with Nocturne VersaFine Clair Ink by Imagine Crafts/Tsukineko, and stamp.**
- Color the butterflies with markers.
- Use a gold Stardust Glitter Pen to add a touch of shimmer to the Fairy Queen's headdress, armbands, and sash.
- Use a White Gelly Roll Gel pen to add highlights to her heels.
- Place the image panel die-cut back onto the base of the stamping platform and secure with magnets.
- Position the "Have a Beautiful Day" sentiment stamp from the Everyday Sentiments Clear Stamp Set 666 facedown on the top of the image panel as shown.
- Press the platform's lid onto the back of the stamp, lift the platform's lid, ink the stamp with Twilight VersaFine Clair Ink, and stamp. Re-ink and stamp again if necessary to attain a good impression.
- Use the largeest plain rectangle die from the Card Passe Partout Rectangle Die Set to cut navy cardstock.
- Use the navy die-cut to mat the image panel.
- Adhere the matted image panel to a white A6 card.
Notes:
- I have a few miscellaneous alcohol ink markers that I purchased when I was first exploring them as a coloring medium. I found the Prismacolor ones to be overly fragrant and never could find a decent stock of the Shinhan Touch Markers. I use these markers when I don't want to risk damaging or contaminating my beloved Copic markers.
- I used VersaFine Clair Ink to stamp the butteflies since they're tiny and very detailed. I suppose I could have tried to use Memento ink and then color with Copics, but I didn't feel like risking it after I finished coloring the Fairy Queen.
- Since perfection is overrated, one of my butterflies is upside down. Oopsy.
Thanks for visiting today!

No comments:
Post a Comment