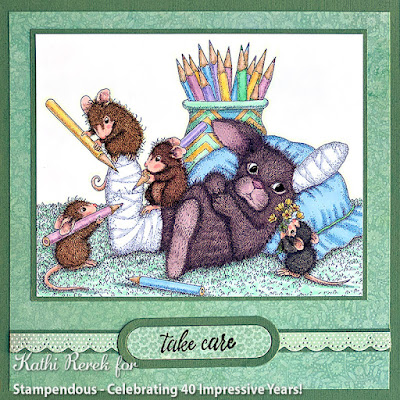
Here's a Get Well card created with Stampendous!' new Cast Signing House-Mouse Designs® Rubber Stamp.
Stampendous!® Products Used:
Mini Pop Stamp*
Spring Borders Die Set*
*These are still available online. Use Google to find them!
Other Products Used:
Tuxedo Black Memento™ Ink by Tsukineko®
Onyx Black VersaFine™ Ink by Tsukineko®
Copic® Markers:
Bunny: E70, E71, E74, RV91, RV93, RV95, R000, R00
Pillow: <B41, B41
Flowers: Y11, YR20, YR31
Leaves and Stemps: G43
Shag Carpet: B60, BV20, G000,G00, G02
Pencil Cup: B60, BV20, G0000, G00, G02, YR20, YR31, YR11, <B41
Pencil Wood: E21, W1, W2, YR30
Pencil Leads: G00, G02, BV00, BV02, YR20, YR31, Y11, RV91, RV93, <B41, B41
Casts: C0, C1, B60
Mouse Faces, Paws, Tails: BV000, E51, E50, RV91, R01, R00, R20, R2, R22
Fur: E34, E44, E55, E56, E57; E21, E23, E25, E37, E44, R01; W3, W5, W6, W7
Green Cardstock
Stella Rose and Mabel 6x6 Patterned Paper Pads by My Mind's Eye™
Oval Word Window Frame Die-Namics Dies ® by My Favorite Things®
Instructions:
- Cut a piece of 12x12 green cardstock in half.
- Score one piece of green cardstock at 6" and fold to form a 6" square card.
- Reserve the other half of green cardstock.
- Use Tuxedo Black Memento Ink to stamp the image.
- Use Copic markers to color the image and background.
- Trim the image panel, trim the reserved green cardstock slightly larger than the image panel, and use to mat the image panel.
- Cut green floral patterned paper to 5.75" square and use a G marker to color the white edges.
- Use the scalloped die from the Spring Borders Die Set to cut patterned paper.
- Edge the die-cut with green marker.
- Cut a strip of green cardstock.
- Adhere the scalloped die-cut to the strip of green cardstock.
- Cut the matted strip in half.
- Use Onyx Black VersaFine ink to stamp the sentiment.
- Use Word Window Frame Dies to cut the sentiment panel and green cardstock.
- Adhere the image panel as shown.
- Adhere each half of the border strip so that they're flush with the edges.
- Adhere the sentiment die-cuts to the center of the strip.
- Adhere the card front to the reserved card.
Thanks for visiting today!
Super cute-sure to make anyone feel better. The meece are good nurses!
ReplyDelete