Let's make a vintage-inspired flower card with Imagine Crafts' Walnut Ink Sprays!

Imagine Crafts Supplies:
Java, Cherry Blossom, Lilac, Terra Cotta, and Walnut Ink Spray
Pinecone, Verdant, Green Oasis, Cheerful, and Nocturne VersaFine Clair Inks *
Other Supplies:
Watercolor Paper by Canson
Avalanche Cardstock by Bazzill Basics
In the Blooms: Clover Die Set by Papertrey Ink
Thinlits Tag Collection Die Set by Tim Holtz for Sizzix
TerraCotta Pot Eclectic Red Rubber Cling Stamp by Darkroom Door *
Sentiment from the Mixed Messages Clear Sentiments by PaperTrey Ink
Lace from my stash
Tiny Attacher Idea-ology Stapler by Tim Holtz for Advantus
Curved Craft Scissors by Fiskar’s
Stamping Platform by Tonic Studios
Misti Stamping Platform by My Sweet Petunia
Please note that products marked with asterisks ( * ) are available at Topflight Stamps.
Instructions:

Step 1:
Spray Java Walnut Ink Spray onto a craft mat. Mist with water.

Step 2:
Press a 4.25” x 5” panel of watercolor paper into the Java Walnut Ink puddle. Lift and press the paper again until the panel is colored. Heat set.

Step 3:
Press lace into the remaining Java Walnut Ink puddle and let it soak it up to color the lace. Heat set.

Step 4:
Lightly mist the watercolor panel, then use a paper towel to dab spots to create a variegated background.
Step 5:
Place the panel between pieces of cardstock onto the base of a die-cut machine. Place cutting plates overtop, then crank the sandwich into the machine to help flatten the cardstock. (Sorry that there's no photo!)
Step 6:
Remove the cardstock, trim to 4” x 5.25” and edge it with Pinecone VersaClair Ink. Set aside.
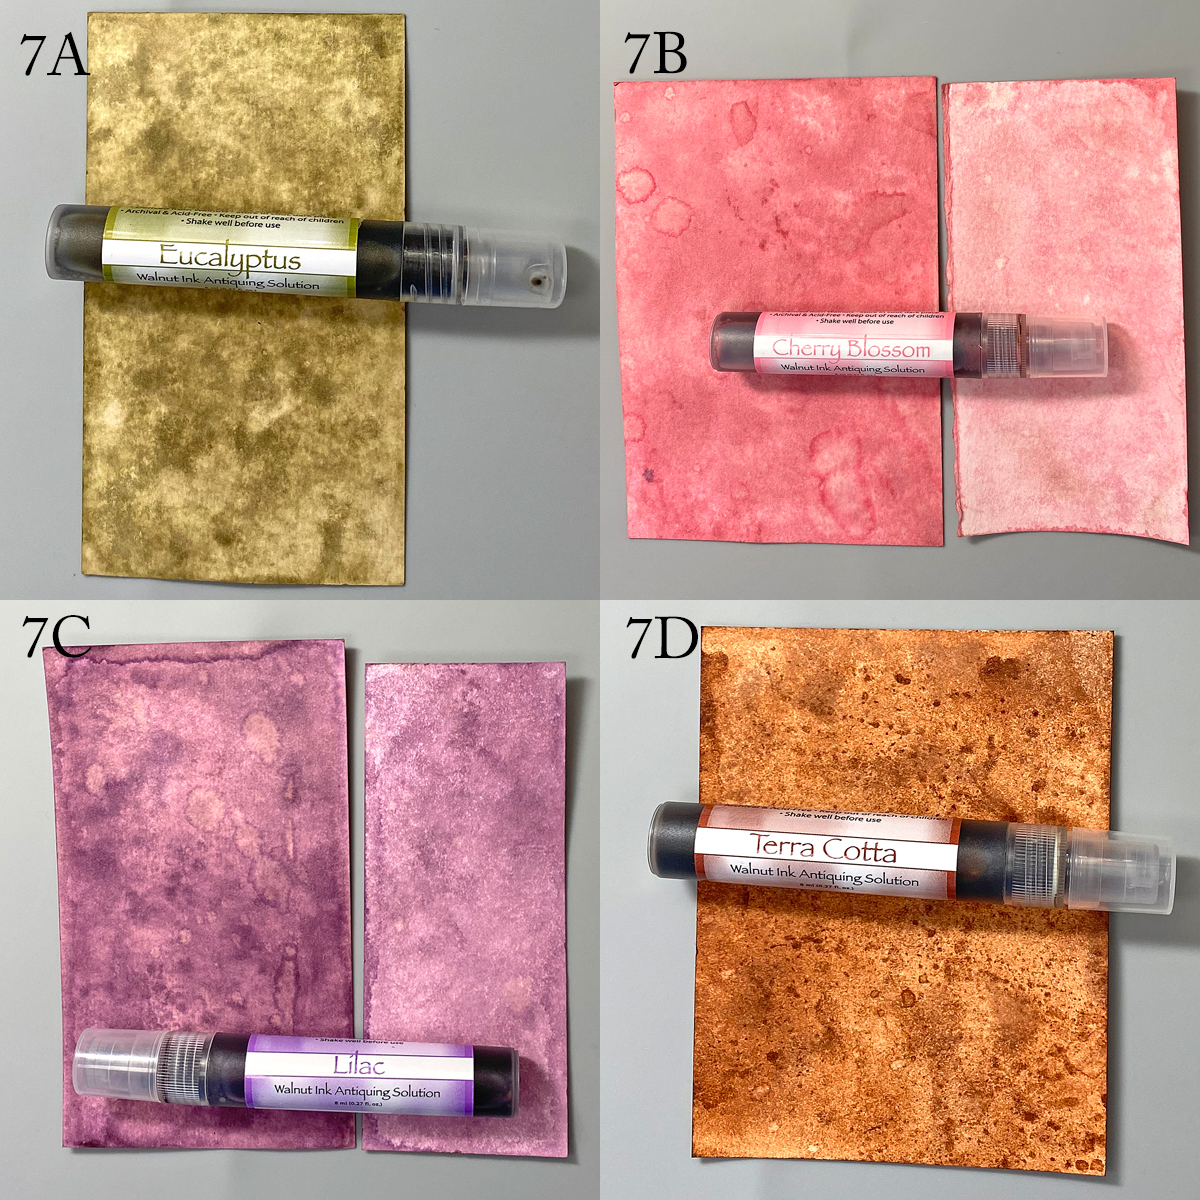
Spray watercolor paper with Eucalyptus Walnut Ink Spray. Mist with water. Heat Set (7A). Repeat with Cherry Blossom Spray (7B), Lilac Walnut Ink Spray (7C), and TerraCotta Walnut Ink Spray (7D). Please note that I created lighter panels by misting with more water.

Step 8 A and B:
Use the flower cutting dies from the Into the Blooms: Clover Die set to cut the Cherry Blossom and Lilac Walnut inked panels.

Step 9:
Use the Paper Blossoms Tool Kit to shape the flower die-cuts.

Step 10:
Use On Point Glue to layer and adhere the shaped flowers. BTW, my nails are dirty because the Walnut Ink Spray stains!

Steps 11A and 11B:
Use a sponge dauber to apply Verdant VersaFine Clair Ink to a piece of watercolor card. (11A). Use a second sponge dauber to apply Green Oasis VersaFine Clair Ink overtop. Go back over the panel with Verdant VersaFine Clair Ink to blend. Heat set.

Steps 12A and 12B:
Use the stem and leaves cutting dies from the Into the Blooms: Clover Die set to cut the Eucalyptus Walnut Inked panel and the VersaFine inked panels.

Step 13:
Use a sponge dauber to apply Cheerful VersaFine Clair Ink to a watercolor panel. Heat set.
Use the flower center die from the Into the Blooms: Clover Die set to cut enough centers for all the flowers created in step 10. Use On Point Glue to adhere the yellow flower centers to the flowers. Sorry that I forgot to take photos.

Steps 14A and 14B:
Use Pinecone VersaFine Clair Ink to ink the TerraCotta Pot Eclectic Red Rubber Cling Stamp. Stamp onto the TerraCotta Walnut Inked panel. Heat set. (14A) Fussy-cut the panel (14B) and edge with Pinecone VersaFine Clair Ink.

Steps 15A and 15B:
Use Pinecone VersaFine Ink to ink the “Birthday Wishes” stamp from the Mixed Messages Clear Stamp Set. Stamp onto the Lilac Walnut Inked panel. (15A). Use a tiny tag cutting die from the Thinlilts Tag Collection to cut the sentiment.

Step 16:
Use a sponge dauber to apply Pinecone VersaFine Clair Ink to the outside perimeter of a white A2 card. Heat set.

Step 17:
Staple the lace to the base of the Java Walnut Ink panel. Use On Point Glue and Tear-It! Tape to adhere the flowers, leaves, sentiment, and flower pot to the front of the card as shown. No photos. Sorry!
Use Tear-It! Tape to adhere the card front to the Pinecone VersaFine Clair-inked white card.
Thanks for visiting today!
No comments:
Post a Comment