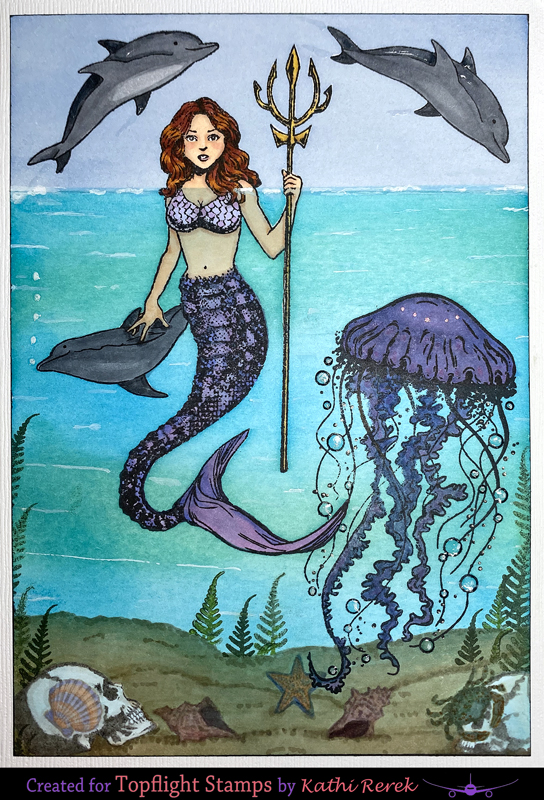
Here's the card!
Gelly Roll Bold Line Stardust® Clear Glittering Ink by Sakura®
Other Products Used:
Solar White Classic Crest® Cardstock by Neenah Papers
Avalanche White Cardstock by Bazzill Basics Paper®
Tuxedo Black and Desert Sand Memento™ Ink by Tsukineko®
Other Products Used:
Solar White Classic Crest® Cardstock by Neenah Papers
Avalanche White Cardstock by Bazzill Basics Paper®
Tuxedo Black and Desert Sand Memento™ Ink by Tsukineko®
Salty Ocean, Mermaid Lagoon, and Cracked Pistachio Distress® Ink by Tim Holtz® for Ranger Ink
Copic® Markers:
Copic® Markers:
Mermaid's Skin: B0000, BV000, De50, De21, E11, E00, E000, R20
Hair: E07, E17, E19, E29, YR27
Scepter: Y11, Y13, Y21,Y23, Y26, Y28
Top: RV52, RV63, RV91, RV93
Tail: RV52, RV63, BV11, BV13, BV25, BV29
Dolphins: C4, C6, C7
Shells: BV000, BV00, BV01, B11, BV13, YR61, YR5, YR68, YR82, RV42, RV91, RV93, RV95
Skulls: W00, W0, W1, W2, W4
Crab: BG72, BG90, BG93, BG96,YR27
Jellyfish: RV52, RV55, BV11, BV133, BV17
Sand: E41, E42, E43, E44
Black Brush Multiliner Pen by Copic®
White Gelly Roll® Gel Pen by Sakura® of America
Black Brush Multiliner Pen by Copic®
White Gelly Roll® Gel Pen by Sakura® of America
Clear Glaze® 3D Glossy Gel Pen by Sakura® of America
Repositionable Labels by Avery®
Post-It® Notes by 3M
STAY-tion™ by Wendy Vecchi for Ranger Ink
Stamping Platform
STAY-tion™ by Wendy Vecchi for Ranger Ink
Stamping Platform
Instructions:
- Cut a piece of Avalanche cardstock to 10" x 7". Score at 5" and fold to form a 5" x 7" card. Set aside.
- Cut a piece of white cardstock to 4.75" x 6.75".
- Use magnets to secure the cardstock to the base of a stamping platform.
- Place one of the dolphins and the mermaid facedown towards the top of the image panel.
- Press the platform's lid onto the back of the stamps, lift the lid, and ink the stamp with Tuxedo Black Memento ink. Stamp.
- Place a piece of Repositionable Label Paper of the image panel. Ink and stamp again.
- Remove the stamps from the platform and clean thoroughly.
- Reposition the dolphin stamp facedown on the image panel to the right of the mermaid's trident.
- Press the platform's lid onto the back of the stamps, lift the lid, and ink the stamp with Tuxedo Black Memento ink. Stamp.
- Place a piece of Repositionable Label Paper of the image panel. Ink and stamp again.
- Fussy-cut the label paper versions of both dolphins and the mermaid.
- Place the masks over their counterparts on the image panel.
- Position the other dolphin from the Mythical Mermaid Clear Polymer Stamp Set facedown to the left of the mermaid on the image panel.
- Press the platform's lid onto the back of the stamp, lift the lid, and ink the stamp with Tuxedo Black Memento ink. Stamp.
- Place a piece of Repositionable Label Paper of the image panel. Ink and stamp again.
- Fussy-cut the label paper version of the second dolphin and adhere over its counterpart on the image panel.
- Position the shells from the Mythical Mermaid Clear Polymer Stamp Set facedown along the bottom of the image panel.
- Press the platform's lid onto the back of the stamps, lift the lid, and ink the stamps with Tuxedo Black Memento ink. Stamp.
- Place a piece of Repositionable Label Paper of the image panel. Ink and stamp again.
- Fussy-cut the label paper versions of the scallop shell and the crab and place over their counterparts.
- Position both small skulls from the Mr. Bone Jangles Clear Polymer Stamp Set facedown on the image panel, noting that you will be covering the masked scallop shell and part of the crab.
- Press the platform's lid onto the back of the stamps, lift the lid, and ink the stamp with Tuxedo Black Memento ink. Stamp.
- Position the Jellyfish from the Dare to Swim Clear Polymer Stamp Set facedown to the right of the mermaid.
- Press the platform's lid onto the back of the stamp, lift the lid, and ink the stamp with Tuxedo Black Memento ink. Stamp.
- Place a piece of Repositionable Label Paper of the image panel. Ink and stamp again.
- Fussy-cut only the dome of the label paper jelly-fish and place it over its counterpart.
- Use magnets to secure the image panel to the STAY-tion.
- Place a clear piece of plastic horizontally across the image panel, slightly above the mermaid's shoulders.
- Brush Della Blue Elements Inks over the the mermaid's head, trident, and the dolphins to create the sky.
- Move the plastic to cover the sky.
- Tear a piece of scrap cardstock into a hilly shape and place itover the base of the image panel.
- Brush Salty Ocean, Mermaid Lagoon, and Cracked Pistachio Distress® Ink horizontally across the masked images to create the sea.
- Place the negative part of the torn hilly shape over the sea and brush Desert Sand Memento ink -over torn paper to create a sandy sea bottom.
- Remove all the masks and color the images with Copic markers, taking care to use colors that are dark enough cover the Distress ink on the jelly-fish's tentacles.
- Use Copic markers to add shading and dimension to the sandy sea floor.
- When happy with the coloring. cover the sky portion of the image panel.
- Brush Salty Ocean, Mermaid Lagoon, and Cracked Pistachio Distress® Ink across the sea and sea bottom parts of the image panel and the images to add the tint of the sea over the colored images.
- Apply White Gelly Roll Gel pen in dots, wiggly lines, and straight lines on the sea area of the panel to simulate waves and/or sea foam.
- Apply Gelly Roll Bold Line Stardust Clear Glittering Ink Pen by Sakura to the dots around the tentacles and the water bubbles.
- Apply Clear Glaze 3D Glossy Gel pen to the bubbles and the flying dolphins' skin to simulate water.
- Let dry, then apply another coat. Repeat until you're happy with the dimension and glossy.
- Randomly stamp the small fern from the Woodland Fern Clear Polymer Stamp Set with Shady Lane VersaFine Clair Ink around the objects on the sea floor.
- Edge the image panel with a black marker.
- Adhere the image panel to the reserved card.
Thanks for visiting today!
No comments:
Post a Comment