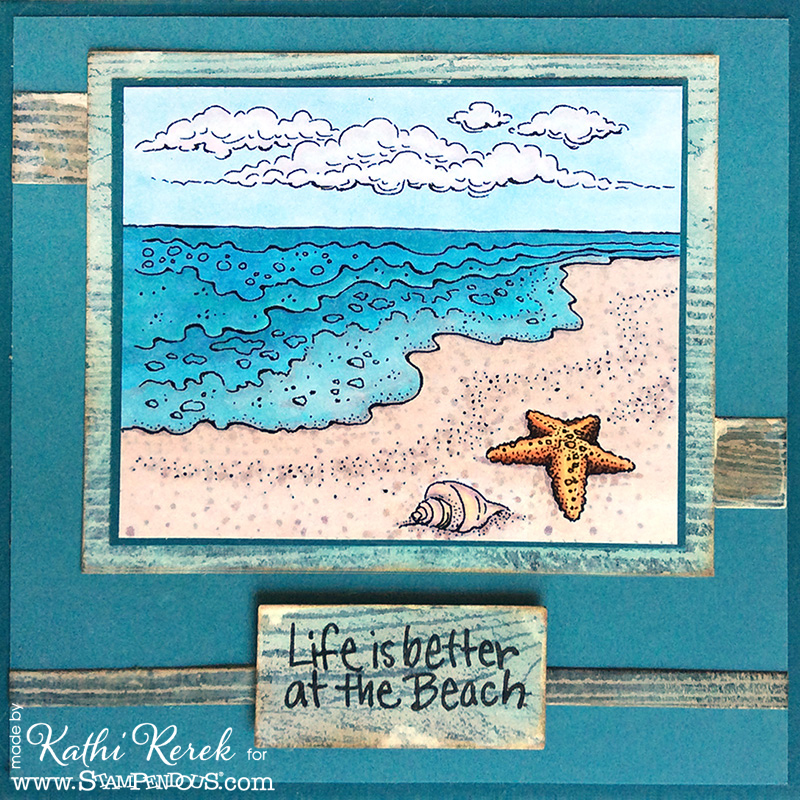
If you haven't purchased Stampendous!' Slim Cling Woodgrain Rubber Stamp, you're missing out on a truly versatile stamp. If you visit here regularly, you might remember that I created and shared a beach-themed wall hanging a while back. I revisited the technique that I used to create the tinted white washed wood to make this card.
Stampendous!® Products Used:
Other Products Used:
Desert Storm Smooth Cardstock from the Environment® Papers Collection by Neenah Papers
Two shades of teal blue cardstock
Jet Black Archival™ Ink by Ranger Ink
Copic® Markers:
Ocean: B32, B34, B52, BG53, BG57
Sand: E41, E42, E43, E44, E70, E71
Sky: B21
Clouds: C00, C0, B60, RV000
Starfish: YR14, YR24, YR27, E25
Conch Shell: B000, BV00, Y000, Y00, YR000, YR20, R0, R30, W1, W3
Picket Fence Distress® Stain by Tim Holtz® for Ranger Ink
Tumbled Glass, Brushed Corduroy, and Gathered Twigs Distress® Ink by Tim Holtz® for Ranger Ink
Tumbled Glass Distress® Reinker by Tim Holtz® for Ranger Ink.
Media® Sand Paste by DecoArt®
Stamping Platform
3D Square Foam Adhesives by Scrapbook Adhesives® by 3L
Instructions:
- Cut a piece of darker teal cardstock to 11" x 5.5". Score at 5.5" and fold to form an 5.5" square card.
- Cut a piece of light teal cardstock to 5.25" square and adhere to the darker teal card. Set aside.
- Use Memento ink to stamp the beach scene from the Ocean Frames Perfectly Clear Stamp Set onto mixed media paper.
- Color with Copic markers and set aside.
- Cut a piece of Desert Storm cardstock to 8.5" square.
- Use magnets to secure the cardstock to the base of the stamping platform.
- Position the Woodgrain Stamp facedown horizontally onto the paper.
- Press the platform's lid onto the stamp, lift, ink with Archival ink, and stamp. Repeat if necessary.
- Remove the stamp, clean well, and dry it.
- Flip the stamp, position it facedown above the stamped impression.
- Repeat Step #4.
- Apply Picket Fence Distress Stain over the stamped woodgrain to create a white-washed look. Heat set.
- Repeat Step #8.
- Liberally apply Tumbled Glass Distress reinker to the ink pad, then sponge over the white washed wood grain until you're happy with the appearance. Heat set.
- Cut the wood grain background paper created in Steps #4 - 13 as follows: one piece cut to to 4.25" x 3.625"; one strip cut to .625" x 5.5"; another strip cut to .25" x 5.25"; and rectangle cut to 2" x 1".
- Edge all of the pieces with Brushed Corduroy Distress ink, and set aside.
- Cut a piece of dark teal cardstock to 3.875" x 3.25" and set aside.
- Cut image panel to 3.75" x 3.125".
- Double mat the image panel as shown.
- Cut the .625" x 5.5" strip so that you have two pieces. Adhere them as shown.
- Adhere the double matted image panel as shown over the two strips.
- Use VersaFine ink to stamp the sentiment onto the 2" x 1" square cut in Step #15. Heat set.
- Adhere the .25" x 5.25" strip to card front as shown.
- Use 3D Foam Squares to adhere the sentiment over the strip to finish the card.
Thanks for visiting today!
No comments:
Post a Comment