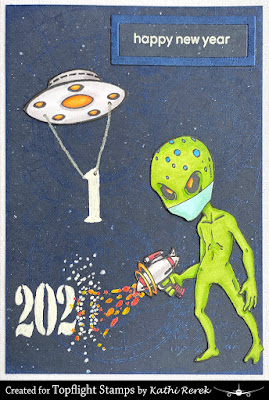
I've used the Alien Invader Clear Polymer Stamp Set by Visible Image with a sentiment from the Classic Sentiments Clear Polymer Stamp Set by Heffy Doodle on a background stamped with the Celestial Navigation Clear Stamp #398 by Olga Heldwein for AALL and Create.
Here's the card.
Topflight Stamps Products Used:
PSA: There are lots of fantastic new products at Topflight Stamps, so you should definitely click on over there after reading my instructions! BTW, if you'd like to get 12% off your order at Topflight Stamps use THIS LINK!
Other Products Used:
Solar White Classic Crest® Cardstock by Neenah Papers
Avalanche White Cardstock by Bazzill Basics Paper®
White Speckled Navy Cardstock
Tuxedo Black Memento™ Ink by Tsukineko®
Sapphire Blue Delicata® Ink by Tsukineko®
Unicorn Hero Hues Pigment Ink
White Detail Embossing Powder by Stampendous!®
Zig® Cartoonist White Brush Pen by Kuretake
Have Your Say Stencil by Andy Skinner for DecoArt®
Orange and Lemon Spica Glitter Pens by Copic®
Red Stardust® Glitter Gel Pen by Sakura® of America
Silver Pen
Copic® Markers:
Alien: YG03, YG05, YG17, FB2, Y15, YR15, YR18
Gun and Spaceship: BG90, T0, T1, T2, T3, R24, R56, Y15, YR15, YR18
Mask: BG000, BG10
Framed Rectangle Die-Namics by My Favorite Things
Metallic Silver Pen
Instructions:
- Stamp the alien and the spaceship from the Alien Invader Clear Polymer Stamp Set with Tuxedo Black ink, fussy-cut them, edge with a dark marker, then color them with Copic markers.
- Trace the lower part of the the alien's jawline onto white cardstock and trim into a mask shape. Edge the mask with a black marker, color it with Copic markers, then adhere it to cover the alien's nose and mouth.
- Use the white paint pen and a stencil to add the "202", the "1", and the blasted "0" to white speckled blue cardstock. Add the ray gun rays to the right of the blasted "0"When the paint is dry, apply several layers of glitter pen over the white-painted rays.
- Use Sapphire Blue Delicata ink, which is shimmery/sparkly, to stamp the Celestial Navigation Clear Stamp onto the image panel. You can see bits of the sparkle though it's really difficult to capture the tone on tone glittery sparkle of the total image. I guess you'll have to take my word for it.
- Trim the background panel to 4" x 5.25", edge with the sparkly blue ink, heat set, and adhere to a white A2 card.
- Uses white pigment ink to stamp the sentiment onto the white speckled blue cardstock, sprinkle on White Detail embossing powder, and heat emboss.
- Sponge another scrap of the blue cardstock with Sapphire Blue Delicata ink. Heat emboss.
- Cut the sentiment and the inked scrap with a framed rectangle set.
- Adhere the alien and the spaceship to the card front. Use a silver gel pen to add cables from the spaceship to the "1".
- Adhere the sentiment and frame rectangles as shown to finish the card.
*I'd like to mention that I truly love this sentiment size. The small plain font is perfect to fit into smaller spaces and there are so many useful sentiments included in it.
Thank you for visiting today!

Absolutely brilliant Kathi, so funny and clever. Have a wonderful 2021 xx
ReplyDelete