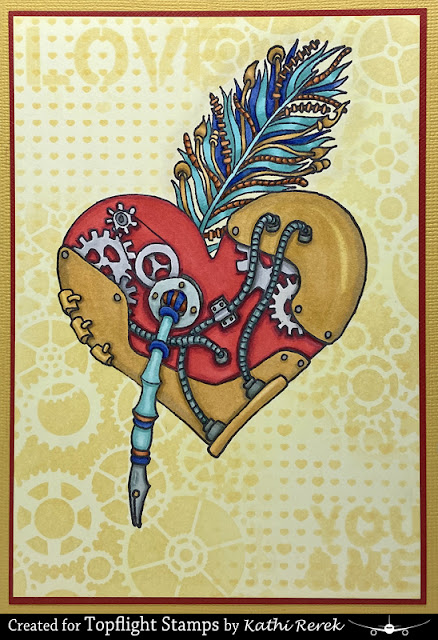
It's Tuesday, which means it's time to share a project created for Topflight Stamps. We're celebrating Valentine's Day on the blog this week although the holiday is a month away. I decided to to go Steampunk style-wise and to use an unconventional color scheme.
Here's my card that I created with the Mixed Media Steampunk Heart and Feathers Clear Polymer Stamp Set by Studio Light and the Steam Cogs Stencil #71 by AALL and Create.
Topflight Products Used:
Other Products Used:
Solar White Classic Crest® Cardstock by Neenah Papers
Red Cardstock by Bazzill Basics Paper®
Yellow Cardstock by Bazzill Basics Paper®
Tuxedo Black Memento™ Ink by Tsukineko®
Copic® Markers:
Cogs: C0, C1, C2, C3, C4, C6
Heart: R24, R37, R59
Brass: Y11, Y13, Y21, Y23, Y26, Y28, T1, T2
Tubes: BG70, BG72, BG75, BG90, BG93
Pen and Feather: BG45, BG57, BG70, BG72, BG75, B63, B66, B68, YR12, YR14, E97, E99
Rivets: N0, N1, N2
Background: Y0000
Altered Circuit #2 Stencil by AALL and Create
Grid of Hearts Stencil by Alexandra Renke
Glaze® 3D Glossy Gel Pen by Sakura® of America
Stamping PlatformSTAY-tion by Wendy Vecchi for Ranger Ink
Removable Label Paper by Avery®
Instructions:
- Cut, fold, and score yellow cardstock to create a 5" x 7" card.
- Use Tuxedo Black Memento ink to stamp the heart from the Mixed Media Steampunk Heart and Feathers Clear Polymer Stamp Set onto white cardstock and onto Label Paper.
- Use Copic markers to color the heart. Use Y0000 to color the background of the entire image panel.
- Stamp the heart onto repositionable label paper and fussy-cut. Cut closely around the heart and the pen. Cut around the periphery of the feather plume. By coloring the background, I avoided having to fussy-cut around the top of the pen, which would have been a daunting task.
- Adhere the fussy-cut mask over its counterpart.
- Place the image panel onto the STAY-tion, then place the Grid of Hearts Stencil over top left of the image panel, secured with magnets.
- Brush Jersey Cream Prism Ink over the stencil.
- Move the Grid of Hearts Stencil to the bottom right of the image panel, then repeat step #7.
- Lift the heart stencil.
- Place the Steam Cogs Stencil #71 on the top right of the image panel, secure it with magnets, then brush Jersey Cream Prism Ink over the stencil.
- Move the Steam Cogs Stencil to the lower left of the image panel, secure it with magnets, and brush the Jersey Cream Prism Ink over the stencil.
- Remove the Steam Cogs Stencil.
- Position the word "Love" from the Altered Circuit #2 at the top left of the image panel then brush the Jersey Cream Prism Ink over the stencil.
- Position "& Me" from the same stencil on the bottom right then brush Jersey Cream Prism Ink over the stencil.
- Position "You" as shown and brush Jersey Cream Prism Ink over the stencil.
- Lift the image panel from the STAY-tion and add several layers of Glaze pen to the rivets on the heart to add dimension and shine.
- Trim the image panel and edge it with Jersey Cream Prism Ink
- Mat the image panel with red cardstock and adhere it to the card.
Thanks for visiting today!

No comments:
Post a Comment