Wednesday, February 15, 2023

A Gift Box -- An Imagine Crafts Project

It's time to announce that I'm now on Imagine Crafts' Design Team! I'm so excited to be working with such fabulous products and look forward to sharing my projects with you.

I always keep the gift boxes I receive and use my crafting supplies to decorate them to hold special gifts! It's two gifts in one!

Here it is!


Imagine Crafts Products Used:

Pink and Cardinal VersaColor Ink

Golden Glitz and Rose Gold Delicata Ink

Rich Cocoa Memento Ink

VersaMark Ink

Hint of Pesto VersaMagic Ink

Acorn VersaFine Clair Ink

Ink Sweepers

Ink Daubers

Fantastics

Tear It! Tape

On Point Glue


Other Products Used:

Gift Box

140 lb Mixed Media Cardstock by Strathmore

Scalloped Heart Nestabilities Die Set by Spellbinders

Plain Heart Nestabilities Die Set by Spellbinders

Big and Little Chains Square Die Set by Gina Marie Designs

Rose Die Set by QuicKutz

Elegant Script Background Cling Rubber Stamp by Darkroom Door

Jenine’s Mindful Collection - Inner Peace Slimline Baroque Stencil by Studio Light

Paper Blossoms Tool Kit by McGill Crafts

Martha Stewart Heat Gun by EK Success

Big Shot by Sizzix


Instructions: 


Step 1:

We’re going to work on the box’s lid first. Use an Ink Sweeper to apply Pink VersaColor ink onto all sides of the lid. Heat set. Continue to apply ink around the edges of the box top. You don’t need to ink the entire top of the box because you will be covering it. Heat set thoroughly and set aside. 


Step 2: 

Use an Ink Sweeper to apply Pink VersaColor to a piece of Mixed Media cardstock. Heat Set. 


Step 3: 

Secure the inked cardstock to the base of a stamping platform. Position the Elegant Script Background Rubber Stamp facedown on the cardstock. Press the lid into the back of the stamp and lift.


Ink the stamp thoroughly with VersaMark ink and stamp. Re-ink and stamp again to ensure a good impression. (You'll note that the inked cardstock was temporarily adhered to a scrap piece of paper which was secured to the base of the cardstock).


Step 4: 

Ink the Elegant Script stamp with Rich Cocoa Memento ink and stamp.*


Apply MBoss embossing powder, dump the excess powder back into the bag, and heat set. (Forgot to take photo. Oops!


Step 5:

Use a heart die to cut the stamped embossed cardstock and use Rich Cocoa Memento Ink to edge the heart. 


Step 6: 

Use a scalloped heart cutting die to cut Mixed Media cardstock. Apply Rich Cocoa Memento ink to the scalloped heart. Heat set. Use a Sponge Dauber to apply Rose Gold Delicata ink to the brown-inked heart to make add a touch of rosy shimmer.


Step 7:

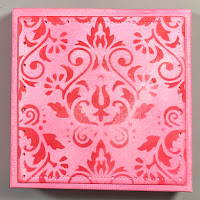
Use one of the Big and Little Chains Square dies to cut Mixed Media cardstock. Use an ink sweeper to apply Pink VersaColor ink to the square. Heat set. Tape the inked square die-cut to the back of the Slimline Baroque Stencil. Use a Sponge Dauber to apply Cardinal VersaColor ink to the inked square die-cut.  Remove the stencil. Heat set.


Step 8: 

These are the elements created for the top of the box.


Step 9: 

Adhere the stenciled die-cut square to the top of the box then adhere the inked scalloped heart die-cut followed by the stamped heat embossed heart die-cut.


Step 10:

Use an Ink Sweeper to apply Cardinal VersaColor to a piece of Mixed Media cardstock. Heat set. 


Step 11:

Secure the inked cardstock to the base of the stamping platform.Clean the Elegant Script Background Rubber Stamp that is still on the lid of the stamping platform. Ink the stamp with Acorn VersaFine Clair ink. Stamp onto the red cardstock. Heat set.


Step 12:

Trim the stamped red panel slightly smaller than the box. Edge with Acorn VersaFine ink and heat set. Adhere to the interior of the box.


Step 13:

Use QuicKutz Rose dies to cut Mixed Media cardstock. Flip the die-cuts over and use embossing styluses to add dimension to the die-cuts. Press the flower petals into the Cardinal VersaColor ink pad. Remove the petals and heat set. Sponge the flower petals with Rose Gold Delicata ink. Heat set. 


Step 14:

Use a sponge dauber to apply the stem and the rose-hip with Hint of Pesto VersaMagic ink. Heat set. Use a Sponge Dauber to apply Golden Glitz Delicata ink to the rose stem.


Step 15:

Use On Point Glue and Tear It! Tape to assemble the rose.


Step 16: 

Adhere the rose to finish the box.


Notes:

Topflight Stamps carries Darkroom Door and Studio Light products.


If you don’t have the right color pigment ink to use for heat embossing, you can stamp first with VersaMark, then re-ink your stamp with any dye-based ink. The embossing powder will stick to the ink with no problem and you will not contaminate your dye ink pad!


If you are using a new-to-you substrate and you’re not sure what ink will work best, apply a small amount of ink to an inconspicuous place.


When in doubt, heat emboss to avoid ink smears!


Tuesday, February 14, 2023

Toucan Love Valentine's Day Card

Happy Valentine's Day! It's Tuesday which is my day to share a project created for Topflight Stamps. This week's theme over at the Topflight Stamps blog is "Anything Goes". I've made a card with the Strange Birds Clear Stamp Set 464 by Janet Klein for AALL and Create. the Card Passe Partout Rectangle Essential Die Set by Studio Light, the Palm Fronds Stencil by Craft Emotions, the Foliage Stencil by Lavinia Stamps, and six colors of VersaFine Clair Inks by Imagine Crafts.

Here's the card!


Topflight Stamps Products Used:

Other Products Used:
Solar White Classic Crest Cardstock by Neenah Papers
Patch, Lime, and Raven Cardstock by Bazzill Basics 
Core'dinations Black Magic Cardstock by Darice
Heart Die by Spellbinders
Mini Alphabet Die by All Occasions
Twig Dies By The Stamp Doctor
Tuxedo Black Memento Ink by Imagine Crafts
Copic Markers: Y02, Y04, Y06, Y15, YG00, YG05, YG21, YG23, YG25, YR16, YR68, R22, R24, R27, B32, B34, B45, C7, C7, C8
Black MultiLiner by Copic
Clear Detail Embossing Powder by Stampendous
White Gelly Roll Gel Pen by Sakura of America
STAY-tion by Wendy Vecchi for Ranger Ink
Removable Scotch Tape by 3M
2" Sookwang Two-sided Tape

Instructions:
  1. Cut, score, and fold a piece of Patch cardstock to form an A6 card. Set aside.
  2. Use Tuxedo Black Memento ink to stamp the toucans from the Strange Birds Clear Stamp Set 464 by Janet Klein onto white cardstock. 
  3. Fussy-cut and color them with Copic markers. 
  4. Use a white Gelly Roll Gel pen to add a white highlights to their eyes.
  5. Edge them with a black pen then set them aside to canoodle.
  6. Tape the Palm Fronds Stencil to the black side of a piece of black/green Black Magic cardstock.
  7. Use magnets to secure it to the STAY-tion.
  8. Sponge Verdant, Green Oasis, Rainforest, and Shady Lane  VersaFine Clair Inks over the Palm Fronds Stencil onto the Black Magic cardstock. 
  9. Pour Clear Detail embossing powder onto the wet ink, dump off the excess, and heat set.
  10. Use the largest scalloped rectangle die from the Card Passe Partout Rectangle Essential Die Set to cut the embossed panel. 
  11. Use the largest plain rectangle die from Card Passe Partout Rectangle Essential Die Set to cut black cardstock, then mat the embossed scalloped rectangular panel.
  12. Use a large heart die to cut another piece of the black/green Black Magic cardstock. 
  13. Mist the heart lightly with water and place the Foliage Stencil by Lavinia Stamps over the heart.
  14. Crank the heart and stencil through the Big Shot to dry emboss the foliage onto the stencil. 
  15. With the stencil still in place, gently sand the surface of the cardstock.
  16. Remove the stencil and sand the edges of the heart to reveal the green core.
  17. Use a smaller plain rectangle die from the same die set  to cut another piece of black/green Black Magic cardstock. 
  18. Apply Nocturne VersaFine Clair Ink the green side, heat set, then randomly sand to reveal the underlying color. 
  19. Lightly brush Verdant, Green Oasis, Shady Lane, Rainforest, and Acorn VersaFine Clair Inks onto the sanded areas to enhance the color. Heat set.
  20. Cut a piece of plain black cardstock was cut .25" larger and use to mat this piece.
  21. Cut a piece of the green/black Black Magic paper with the twig die two times. 
  22. Gently sand the twigs to reveal the core color, then brush the twig die-cuts with Verdant VersaFine Clair Ink.
  23. Cut a piece of Lime cardstock to the size of the alphabet die. 
  24. Apply Sookwang Tape to the back of the cardstock, then use the alphabet die to cut it. 
  25. Adhere the matted base layer to the reserved green card.
  26. Adhere the small matted rectangle was adhered to the card.
  27. Adhere the heart in the center of the card. 
  28. Adhere the twigs.
  29. Perch the toucans on the twigs.
  30. Adhere the alphabet die-cuts to finish the card.
Thanks for visiting today!

Tuesday, February 7, 2023

Purrfect Valentine's Day Card with Crafty Individuals Stamps

It's Tuesday which is my day to share a project created for Topflight Stamps. This week my teammates and I are showcasing Crafty Individuals' wonderful stamps. Not surprisingly, I've made another Valentine's Day card. In this card, one of the cats got a special dinner for his partner. The card was created with the one cat from the Trilby Cat Unmounted Stamp, one cat from the Burglar Cat Unmounted Stamp, and one of the fish and plants from the Morning Commute Unmounted Stamp. I also combined sentiments from Heffy Doodle's Classic Sentiments Clear Stamp Set and the Purrfect Day Clear Stamp Set.

Here's the card.


Other Products Used:
Solar White Classic Crest Cardstock by Neenah Papers
Pale Yellow Cardstock by Bazzill Basics
Kiwi Double Dot Patterned Paper by BoBunny Press
Tuxedo Black and Bamboo Leaves Memento Ink by Imagine Crafts
Copic Markers:
Big Cat: B45, B95, BV25, BV34, Y11, Y23, Y25, YG03, YG25, N5, N6, N7
Small Cat: RV52, RV63, RV95, B21, B23, YG21, YG23, YG25, YG45
Fish: Y11, Y23, Y26, Y35, FY1, YR16, YG21, YG23, YG25, YG45, RV52, RV3, B45, N5, N6, N7
Fish Tank Water: BG45, BG53, BG57
Copic Air Brush System
Black Multiliner Pen by Copic
Embossable Window Plastic by Judikins
White Gelly Roll Gel Pen by Sakura of America
White UniPosca Paint Pen by Mitsubishi Pencil
5x7 Scalloped Rectangle Honey Cuts Die Set by Honey Bee Stamps
Circle Nestabilities Die by Spellbinders Paper Arts
"Uh-Oh" and "Yum" Wood Stamps by justjohanna/odd bird planet
Speech Bubble Die-namics Dies by My Favorite Things
Sparkly Washi Tape: Source unknown
Stamping Platform
Removable Scotch Tape by 3M
Post-It Notes by 3M

Instructions:
  1. Cut a piece of pale yellow cardstock to 7" x 10". Score at 5" and fold to form an A7 card. Set aside.
  2. Use Tuxedo Black Memento ink to stamp the small cat from the Trilby Cat Unmounted Stamp, the rounder cat from the Burglar Cat Unmounted Stamp, and one of the fish from the Morning Commute Unmounted Stamp onto white cardstock.
  3. Fussy-cut both cats and the fish with the fish losing his sailor's hat in the process. 
  4. Use Copic markers to color all three images. Edge with a black pen.
  5. Use a circle Nestabilities die to cut embossable window plastic and white cardstock. 
  6. Lop the tops off both circles to make them look like a fishbowl. 
  7. Use Removable Scotch tape to mask the top of the embossable window plastic circle.
  8. Use the Copic Airbrush System with BG45, BG53, and BG57 to add a clear aqua tint the plastic circle. Heat set.
  9. Use a white paint pen to add a highlight to the plastic circle. Set aside to dry.
  10. Use Bamboo Leaves Memento ink to repeatedly stamp one of the plant stamps from the Morning Commute Unmounted Stamp along the base of the decapitated white paper circle.  
  11. Use Copic markers were used to color the plants and to add dimension and shading to the "glass" bowl. Sadly, I went too dark which I didn't realize until the card was together.*
  12. Adhere  to the colored cardstock circle. 
  13. Use White gel pen to add bubbles on the plants and above the fish's mouth.
  14. Use a stamping platform and Nocturne VersaFine Clair Ink to stamp "Valentine's Day" from  the Classic Sentiment Clear Stamp Set and "Have a Purrfect" from the Purrfect Day Clear Stamp Set onto a scrap of pale yellow cardstock.
  15. Use Nocturne VersaFine Clair Ink to stamp the other two sentiments onto pale yellow cardstock. Try to keep the sentiments nice and straight. "Do as I say, not as I do."
  16. Use Speech bubble dies to cut the sentiments.
  17. Use the largest scalloped rectangle die from the 5x7 Scalloped Rectangle Honey Cuts Die Set to cut Double-dot patterned paper, which will be used as the background for the images.
  18. Use a YG21 marker to edge the scallops so that the nasty white interior is not showing. Ick.
  19. Adhere the paper circle to the die-cut.
  20. Adhere the colored fussy-cut fish to the paper circle and add the "uh-oh" sentiment speech bubble.
  21. Place the airbrushed plastic circle over the paper circle. 
  22. Place sparkly washi tape slightly above the stitch line, covering part of the plastic circle.
  23. Use tape and staples to adhere the plastic circle. 
  24. Adhere both colored fussy-cut cats using regular adhesive and 3-D Foam Pads taking care to cover the staples and the tape.
  25. Adhere the image panel to the reserved A7 card.
  26. Adhere the other sentiment speech bubbles as shown to finish the card.
Thanks for visiting today!