Tuesday, January 11, 2022

Love is in the Air

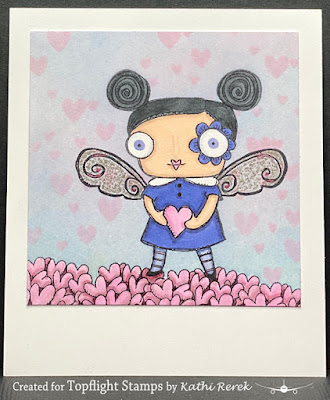
It's Tuesday which means it's time to share a project created for Topflight Stamps. This week my TFS teammates and I are getting ready for Valentine's Day. I combined this challenge with AALL and Create's Polaroid Pop Challenge, which is to create polaroid cards showcasing Janet Klein's wonderful stamps. There's a theme for each day of January and we have until the end of March to complete all the challenges. Since there was not a "love/Valentine's Day" category, I decided to go with Day 2's Thing with Wings Theme. 

I used the girl from the Cat Lover Clear Stamp Set 256 and added the wings from the Wish Clear Stamp Set 360 to make her a fairy. I had her standing in a field of hearts from the Lil Love Clear Stamp Set 481 and then added cascading hearts from the Love Birds Clear Stamp Set 155 by Olga Heldwein to the sky.

Here's the polaroid. #polaroidpopschallengeday2

Topflight Stamps Products Used:

Other Products Used:
Solar White Classic Crest® Cardstock by Neenah Papers
Tuxedo Black Memento™ Ink by Tsukineko®
Copic® Markers:
   Skin: BV000, E50, E21, E11, E000
   Hair: N5, N6, N7
   Dress: BV13, BV17
   Tights: BV31, BV34
   Hearts: RV52, Rv63, RV91, RV93, RV99
Clear Starlight® Glitter Gel Pen by Sakura® of America
Stamping Platform
STAY-tion™ by Wendy Vecchi for Ranger Ink
Removable Label Paper by Avery®

Instructions:
  1. Use Tuxedo Black Memento Ink to stamp the girl from the Cat Lover Clear Stamp Set 256 and the pile of hearts from the Lil Love Clear Stamp Set 481 onto white cardstock and onto removable label paper.
  2. Fussy-cut the images and place over their counterparts on the image panel to mask the images. 
  3. Stamp the pile of hearts three or four more times and fussy-cut all of them.
  4. Stamp the second pile of hearts to the left of the first pile then adhere a fussy-cut mask overtop.
  5. Continue stamping and masking until there's a row of stamped and masked heart piles on the image panel.
  6. Lightly brush Periwinkle Prism Ink the the masked images until you're happy with the coverage. 
  7. Lightly brush Pink Jellybean Prism Ink over the Periwinkle sky. 
  8. Use Pink Jellybean Prism Ink to randomly stamp the cascading hearts from the Love Birds Clear Stamp Set 155 around the the girl. 
  9. Realize that there isn't a love or Valentine's Day theme in the Polaroid Pops Challenges, so improvise and stamp the wings from the Wish Clear Stamp Set 360 on either side of the girl.
  10. Lift the masks and reserve for later use. 
  11. Use Copic markers to color the girl and the hearts.*
  12. Use Clear Stardust Glitter Gel pen to add glitter to the wings.
  13. Trim the image panel to 3" square and adhere to a 3.5" x 4" piece of white cardstock.
Notes:
  • The stamping platform was used to stamp all the images.
  • When stamping multiples of the same image, clean and dry the stamp after each impression.
  • The STAY-tion was used to secure the image panel in place during the addition of the brushed background.
  • Since the wings were stamped onto a Prism inked background, I could not color them with Copic markers. So I used a Stardust Glitter Gel pen to add sparkle to them.
Thanks for visiting today!

Thursday, January 6, 2022

Happy Birthday!

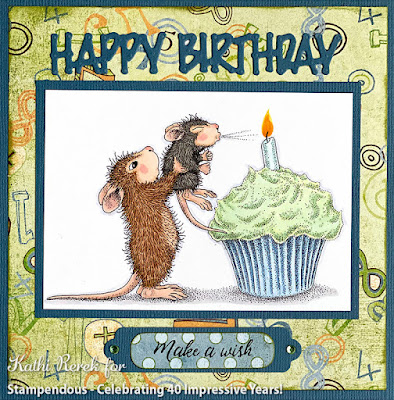
It's always good to have a supply of birthday cards on hand. Here's one featuring Stampendous!' new House-Mouse Designs® Birthday Cupcake Rubber Stamp.


Stampendous!® Products Used:

Other Products Used:
Mini POP Clear House-Mouse Designs® Stamps by Stampendous!® *
Truck Load Die Set by Stampendous!® *
Blue Cardstock
Copic® Markers:
   Mouse Faces, Ears, Paws, Tails: BV0000, E51, E50, RV1, R00, R000, R20, R21
   Mouse Fur Left: E35 E33, E31, R000
   Mouse Fur Right: W3, W5, W6
   Cupcake Wrapper: <B41, B41, B45
   Cupcake Frosting: G0000, G000, G12, G20
   Candle: BG000, BG10, BG11,
   Flame: Y13, Y15, Y38, YR16
   Ground: N0, N1
   Outline: B60
Brigham, Nathan Patterned Papers from the Oh Baby! Boy Collection by Basic Grey®
Nameplates Die Set by Spellbinders®
Clear Jewels by Katzelkraft

* The mini  stamps and  Truck Load Die Set are available for purchase online. 

Instructions:
  1. Cut cardstock to 5.5" x 11". Score at 5.5" and fold to form a 5.5" square card.
  2. Use Tuxedo Black Memento ink to stamp the image.
  3. Color with Copic markers.
  4. Trim the image panel to 3" x 4.25".
  5. Trim blue cardstock to 3.25" x 4.5" and use to mat the image panel.
  6. Cut Brigham (numbers) pattern paper to 5.25" square.
  7. Use the word dies from the Truck Load Die Sets to cut blue cardstock.
  8. Stamp the sentiment, from the Mini set, onto polka dot cardstock. 
  9. Use the oval nameplate die to cut the sentiment.
  10. Use the nameplate die to cut blue cardstock.
  11. Mat the sentiment die-cut onto the blue nameplate die-cut.
  12. Cut Brigham (numbers) pattern paper to 5.25" square.
  13. Adhere the word die-cuts to the patterned paper as shown.
  14. Adhere the patterned paper the blue card.
  15. Adhere the image panel and sentiment.
  16. Add jewels to the sentiment die-cut to finish the card.
Thanks for visiting today!

Tuesday, January 4, 2022

New Year = Cocktails?

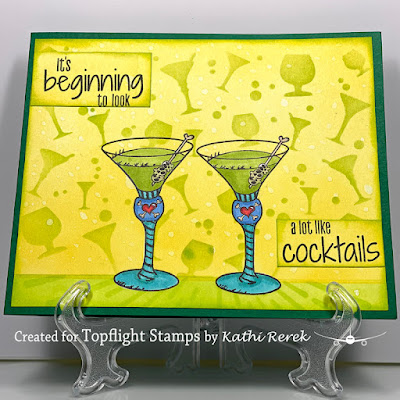
Happy New Year! It's the first Tuesday of 2022, which means that it's my day to share a project created for Topflight Stamps. I've made a New Year's card with the wonderful cocktail stamp and a sentiment from the Nicci Battilana Eclectica ENB06 Rubber Cling Mounted Stamp Set by PaperArtsy on a background created with the Nicci Battilana Stencil PS291 by PaperArtsy and Sundance, Lime Punch, and Pine Elements Inks by Lavinia Stamps.

Here's the card.


Topflight Stamps Products Used:

Other Products Used:
Solar White Classic Crest® Cardstock by Neenah Papers
Classic Green Cardstock by Bazzill Basics Paper®
Tuxedo Black Memento™ Ink by Tsukineko®
Copic® Markers: YG21, YG25, BG53, BG57, B23, B26, R24 R39, E40, E41, E42, E43
Burst Layering Stencil by Tim Holtz® for Stampers Anonymous
Removable Label Paper by Avery®
STAY-tion™ by Wendy Vecchi for Ranger Ink
Stamping Platform

Instructions:
  1. Cut a piece of 12" x 12" Classic Green cardstock to 12" x 5". 
  2. Score the cardstock at 6" and fold to form a 6" x 5" card. Set aside.
  3. Use Tuxedo Black Memento ink to stamp the cocktail from the Nicci Battilana Eclectica ENB06 Rubber Cling Mounted Stamp Set twice onto a piece of 6" x 6" white cardstock and onto label paper.
  4. Use Copic markers to color the cocktails.
  5. Fussy-cut the label paper versions and place them over their counterparts on the image panel.
  6. Place a strip of label paper horizontally over the bottom of the cocktail glasses to ground the images.
  7. Use magnets to secure the image panel to the STAY-tion.
  8. Brush Sundance Elements Ink over the masked images to create a yellow background. 
  9. Lightly mist the image panel with water to create some white splotches and dots. 
  10. Use magnets to secure the cocktail portion of the Nicci Battilana Stencil PS291 over the image panel.
  11. Brush Lime Punch Elements Ink was brushed over the cocktails. 
  12. Lift the horizontal mask, cover the top of the image, and brush Lime Punch Elements Ink over the base of the image panel.
  13. Use magnets to secure the Burst Layering Stencil over the base of the image panel and brush Lime Punch Elements Ink over the base to create a tone on tone pattern.
  14. Trim the image panel to 6" x 4.75", which left a scrap of plain Sundance Yellow inked cardstock. 
  15. Stamp the sentiment onto the scrap, then cut between the sentences.
  16. Use  Lime Punch and Pine Elements Inks to edge the image panel and the sentiments
  17. Adhere the image panel and sentiments to the green card as shown.
All my wishes for a happy, healthy, serene, and prosperous New Year. Let's hope that 2022 doesn't require daily cocktails!


Tuesday, December 28, 2021

2022 Calendar

It's Tuesday so it's my day to share a project created for Topflight Stamps. This week my teammates and I are celebrating the new year and/or new beginnings. I decided to make a calendar card. It was created with the appropriately named New Beginnings Unmounted Rubber Stamp #578 by Crafty Individuals, which features a wonderful hatching baby dragon. I also used the Mystic Swirl Clear Polymer Stamp by Lavinia Stamps to make the background paper with Confetti and Della Blue Elements Inks by Lavinia Stamps.

Here's the card which will stand on its own and fit into an A7 envelope.


Topflight Stamps Products Used:

Other Products Used:
140 lb. Mixed Media Cardstock by Strathmore®
Cryogen White Curious Metallics Cardstock by Arjowiggins
Commodore Blue Cardstock by My Colors
Crocodile Textured Specialty Paper by FiberMark*
Tuxedo Black Memento™ Ink by Tsukineko®
Copic® Markers:
   Dragon's Body: B60, B63, B66, RV52, RV63, RV91, RV93, V000, V01, V22, V91, V93
   Dragon's Wings: V000, V01, V91, V93, BV20
   Dragon's Talons, Spikes, and Horns: RV63, RV91, V91, Y11, Y13, Y15, Y19
   Dragon's Eyes: BG45, BG49, Y13
   Dragon's Shell: BVe1, BV34, N1, N3, N5, Y000
   Inside of Shell: BV23, BV34, N1, N3, N5, Y000
   Rocks: BG000, BG90, BG93, E41, E42
   Sky: BG0000, B0000, <B21, <B41, BV0000, RV0000, V0000, Y0000, C0, C00
Stamping Platform
Sookwang Tape
Gold Staples
2022 Tear Off Calendar: Taylored Expressions or Vippies.com
Stamping Platform
Big Shot or other Die Cutting Machine

Instructions:
  1. Cut a piece of 12x12 blue cardstock to create two 7" x 5.5" pieces.
  2. Score both pieces lengthwise at .5" and 5".
  3. Pinch the middle of one piece then mountain fold to form the front panel.
  4. Pinch the middle of the other piece then valley fold to form the back panel.
  5. Set aside.
  6. Use Tuxedo Black Memento Ink to stamp the New Beginnings Dragon image onto a piece of Cryogen White cardstock. This cardstock is sparkly and when you use Copic markers to color and image, the image gets sparkly. It also makes plain ordinary dye ink sparkle. See the close-up photo below which shows a bit of the sparkle.
  7. Cut a piece of blue cardstock slightly larger than the image panel and use it to mat the image panel.
  8. Cut a piece of blue cardstock slightly larger than the calendar.
  9. Adhere the calendar to the cardstock and then use gold staples to secure it.
  10. Set the matted image panel and the calendar aside to work on a background panel.
  11. Smoosh Confetti and Della Blue Elements Inks onto a craft mat, spritz the inks with water, then dip a 4.25" x 6.75" piece of mixed media cardstock into the puddles until happy with the coverage and blending.
  12. While the cardstock is still wet, use a 2" Speedball Brayer to apply Della Blue Elements Ink to a the shiny side of a piece of crocodile textured specialty paper.
  13. Immediately place the wet inked cardstock ink-side down onto the inked textured paper.
  14.  Place those two pieces of inked mixed media cardstock and inked specialty cardstock atop the platform of a Big Shot.
  15. Add both cutting plates over the inked paper combo, then crank the sandwich through the machine a few times to transfer the crocodile pattern to the inked paper. 
  16. Remove the papers from the Big Shot and dry the platform with a paper towel.
  17. Heat set the newly patterned and inked mixed media cardstock.
  18. Wipe the ink off the specialty paper and set aside to dry.
  19. Place the dried patterned and inked mixed media cardstock onto the platform of the Big Shot, top with the two cutting plates, and some scrap cardstock, and crank the sandwich through the Big Shot a few times to flatten the background panel.
  20. Use magnets to secure the flattened background panel to the base of a stamping platform.
  21. Place the Mystic Swirl Clear Polymer Stamp facedown on the upper left of the background panel.
  22. Press the platform's lid onto the back of the stamp, lift, and ink the stamp with Della Blue Elements ink. 
  23. Re-ink the stamp and stamp again if necessary to attain a good impression.
  24. Keeping the stamp in place, flip the background panel 180°, and secure with magnets.
  25. Re-ink the stamp with Della Blue Elements ink and stamp. Again, re-ink and stamp if necessary.
  26. Use Della Blue Elements ink to edge the background panel.
  27. Adhere the image panel and the calendar as shown.
  28. Adhere the card front to the mountain folded front card base.
  29. The two folded sides of the card front will cover the two folded sides of the card back.
  30. Add tape to the inside of the left side of the card front and the outside of the left side of the card back.
  31. Remove the tape liners, align the sides, and press.
  32. Repeat Steps #30 and #31 for the right side of the card.
Notes:
• My card is a bit wobbly, so I think that next time, I'll make the sides wider by not trimming the 7" x 6" panels. Stay tuned! 

Here's the close-up of the colored image. I had to really tilt it so the camera would catch the shimmer. 


Thanks for visiting and Happy New Year!


Saturday, December 25, 2021

Merry Christmas!

Poor Amanda Mouse! She's snug asleep in her bed and her friends decide that it's time for her to wake up. I guess they're impatient to open those gifts!

Here's my card with Stampendous!® House-Mouse Designs® Christmas Morning Rubber Stamp.


Stampendous!® Products Used:

Other Products Used:
Classic Green Cardstock by Bazzill Basics Paper®
Holly and Mistletoe Patterned Paper from the Christmas Time Collection by Graphic 45 Papers®
I Heart the Bells Patterned Paper from the Joy to the World Collection by Graphic 45 Papers®
Copic® Markers:
   Mouse Faces, Hands, and Tails: BV0000, BV000, E51, E50, R00, R01, R20 (Cheeks), R22 (Noses)
   Fur (from left to right): E33, E34, E35, D37, E44;  E35, E43, E44, E53, E55, E57;  E23, E25, E37;  E23, E33, E34, E43
   Hats: R24, R37, B000, B60, C00, C0, C1
   Horns: Y21, Y23, Y26, Y28
   Bowl/Bed: B00, B12, B91
   Pillow: B60, B000, C1
   Blanket, Ribbon, and Bows: G03, G05, G17
   Gifts: R24, R39, R59

Instructions:
  1. Cut a piece of green cardstock to 7" x 10". Score at 5" and fold to form a 7" x 5" card.
  2. Cut a piece of Holly and Mistletoe patterned paper to 6.75" x 4.75". 
  3. Cut a piece of I Heart the Bells patterned paper to 2.25" x 4.75".
  4. Fold a piece of scrap paper in half and dump some Gold Tinsel embossing powder into the fold.
  5. Drag the right edge of the strip of patterned paper from Step #3 along the VersaMark pad, then through the Gold Tinsel embossing powder. Heat set.
  6. Adhere the strip of patterned paper to the left side of the Holly and Mistletoe patterned paper to create the card front.
  7. Drag the edges of the card front along a VersaMark pad, then through the Gold Tinsel embossing powder. Heat set.
  8. Adhere the card front to the card.
  9. Use Memento ink to stamp the image onto white paper.
  10. Color the image with Copic markers.
  11. Trim the image panel to 4.875" x 3.6225".
  12. Cut a piece of green cardstock to 5.125" x 3.875".
  13. Drag the edges of the green cardstock cut in Step #12 along a VersaMark pad, then through the Gold Tinsel embossing powder. Heat set.
  14. Mat the image panel with the gold-edged green cardstock.
  15. Adhere the matted image panel to the card.
Thanks for visiting today!

Merry Christmas!

Merry Christmas! Here's my last Christmas card created for Topflight Stamps this year! This one was created with the llama and the tall cactus from the Zinski Art 59 Rubber Cling Mounted Stamp Set by PaperArtsy. The llama is wearing a Santa hat from the Baa Humbug Clear Polymer Stamp Set by Hobby Art Ltd and carrying presents from the Funny Accessories Unmounted Stamp Set by Katzelkraft. The desert scene was created with the mountains stamp from Marlene's World Happy Holiday Clear Stamp Set by Studio Light and a sentiment from the ever useful Classic Sentiments Clear Stamp Set by Heffy Doodle.


Topflight Stamps Products Used:

Other Products Used:
Solar White Classic Crest® Cardstock by Neenah Papers
Classic Green Cardstock by Bazzill Basics Paper®
Tuxedo Black, Desert Sand, Toffee Crunch, Peanut Brittle, and Lulu Lavender Memento™ Ink by Tsunkineko®
Jet Black StazOn® Ink by Tsukineko®
VersaMark® Ink by Tsukineko®
Copic® Markers:
   Hat: R27, R39, B60, <B91, BV0000, RV0000, Y0000, C00, C0, C1, C2
   Llama: BV000, E40, E41, E42, E70
   Glasses: G05, BG17
   Blanket and Gifts: G05, G17, R27, R39, B18, Y23, Y26
   Cactus: G05, G17, G29
   Mountains: E41, E42, E43
   Desert Plants: YG61, YG63
Red and Green Stardust® Glitter Pens by Sakura® of America
Clear 3D Glaze® Glossy Gel Pen by Sakura® of America
Gold Tinsel and Jeweled Gold Embossing Powder by Stampendous!®
Assorted Gemstones from Ye Olde Stash :D
Gold Star Brad from Ye Old Stash
Vellum by Strathmore®
Speech Bubble Die by Spellbinders®
Sookwang Tape
Removable Label Paper by Avery®
STAY-tion™ by Wendy Vecchi for Ranger Ink
Stamping Platform

Instructions:
  1.  Trim Green cardstock to 10" x 7" wide.
  2. Score at 5" and fold to form a 5" x 7" card. Set aside.
  3. Use Tuxedo Black Memento ink to stamp the llama cactus, the pile of presents, and the Santa hat onto white cardstock.
  4. Fussy-cut all images, color with Copic markers, and edge with a dark marker to get rid of those annoying white edges.
  5. Add several layers of Clear Glaze pen to the frame and lenses of the sunglasses allowing the gel ink to dry between the layers. This process adds dimension and shine. 
  6. Use Red and green glitter pens to add sparkle to the llama and the blanket tassels. Then smear the ink and swear loudly. Upside to this is that you'll scare the cat away before he eats more ribbon.
  7. Stamp the mountains onto label paper, fold the label paper, and fussy-cut through both layers to create masks which will be used to create both the mountain range and the desert sky.
  8. Use magnets to secure a piece of 5" x 7" cardstock to the STAY-tion.
  9. Tear a piece of scrap paper and place horizontally towards the top of the image panel, secured with more magnets.
  10. Adhere the label paper mountains on top of the horizontal torn paper.
  11. Brush or sponge Periwinkle Prism ink to create a lovely blue desert sky.
  12. Remove the label paper mountains mask and reserve for another day.
  13. Heat set the image panel.
  14. Adhere the negative part of the fussy-cut label paper over the sky, which should reveal the mountains.
  15. Brush Lulu Lavender Memento ink on the base of the mountains and along the edges. 
  16. Brush Desert Sand, Toffee Crunch, and Peanut Brittle Memento ink onto the mountains.
  17. Remove the mask covering the sky and reserve. 
  18. Touch up the mountains using Copic markers.*
  19. Create the desert with the torn strip of paper by brushing or sponging upwards from the torn edge from left to right with Desert Sand ink.
  20. Move the torn paper strip downwards and continue to brush the ink over the top of the torn edge. 
  21. Repeat Step #18 until the the background panel is covered.
  22. Use Copic markers to touch up the desert background and to add desert plants.
  23. Trim the background panel to 4.75" x 6.75".
  24. Adhere the background panel to the reserved green card.
  25. Use Peanut Brittle Memento ink to edge the panel.
  26. Adhere the Santa hat to the llama, then adhere the llama to the image panel as shown.
  27. Add a large red gemstone to cover the heart.*
  28. Adhere the cactus to the image panel as shown.
  29. Add self adhesive gemstones to decorate the cactus.
  30. Squish the star brad onto the VersaMark pad.
  31. Use either a hemostat clip thingy or reverse tweezers to hold the brad.
  32. Dip the brad into Jeweled Gold Embossing Powder. Shake excess into the jar.
  33. Heat set. Let cool.*
  34. Press the star onto the VersaMark pad.
  35. Dip the brad into the Gold Tinsel Embossing Powder. Shake excess into the jar.
  36. Heat set. Let cool.
  37. Cut the brads' wings off and flatten any spurs.
  38. Adhere to the top of the Christmas cactus.
  39. Cut a strip of vellum and back with a strip of Sookwang tape.
  40. Use Jet Black StazOn ink to stamp the sentiment onto vellum.
  41. Clean the stamp immediately.*
  42. Use the speech bubble die to cut the sentiment.
  43. Adhere the speech bubble sentiment to finish the card as shown.
Notes:
  • Memento ink was used for the mountains and the desert because it's Copic friendly and I knew I'd want to use Copic markers to add detail.
  • I had found super-cute little epoxy stickers and had one that said Santa on it. It was perfectly sized to fit inside a sequin and to cover the heart. I put it together, put it aside, and promptly lost it. 
  • If you don't let the brad cool, you will melt your VersaMark pad. Again. 
  • StazOn ink is a solvent ink. Solvent inks may/may not hurt your clear stamps. So if you must use it (for instance to stamp on vellum), clean the stamp immediately.
Thanks for visiting today!

Tuesday, December 21, 2021

Wine For You!

It's Tuesday, which means that it's time to share a project created for Topflight Stamps. This week my teammates and I are showcasing Visible Image's wonderful stamps and stencils. My husband and I are big Winos Wine Afficionados. We love wine, have been part of a wine tasting group, and have vacationed several times in the wine country in California. So when I saw Visible Image's new 99% Chance of Wine Clear Polymer Stamp Set, I had to get it!

Since it's holiday time,  I'm hopeful that we will be able to attend several holiday parties, which means that we'll be bringing wine as a gift and more wine to share! I decided that I should try to make a wine gift thingy using my new 99% Chance of Wine Clear Polymer Stamp Set.

Here's the front of it.


Here's a close-up of the front.


Here's the back of it.


Here's a close-up of the back.


Topflight Stamps Products Used:

Other Products Used:
Solar White Classic Crest® Cardstock by Neenah Papers
Dark Red Cardstock by Bazzill Basics Paper®
Tuxedo Black Memento® Ink by Tsukineko®
Obsidian Amalgam Ink by Gina K® Designs
Chianti Versa Fine Clair™ Ink by Tsukineko®
Copic® Markers: G16, G29, E41, E42, BG0001, Y11, Y23, G05, G07, N4, N5, N6: R56, R59, BG000, G00
White Uni POSCA Acrylic Paint Pen by Mitsubishi Pencil Company
Dark Grey Chalk Pencil by General's
Nestabilities® Circles Die Set by Spellbinders
Labels and Tags Crea-Nest-Lies XXL #6 Die Set by CREA-lies
1/8" Circle PaperShaper® Punch by EK Success®
STAY-tion™ by Wendy Vecchi for Ranger Ink
Stamping Platform
Repositionable Label Paper by Avery®
Ribbon

Instructions and Notes:
  1. Use magnets to secure white cardstock to the base of the stamping platform.
  2. Position the wine bottle face-down onto the image panel.
  3. Press the platform's lid into the back of the stamp and lift.
  4. Use Tuxedo Black Memento ink to ink the stamp and stamp the wine bottle onto the image panel and onto repositionable label paper.
  5. Fussy-cut the label paper version and place over its counterpart on the image panel.
  6. Position the wine glass stamp face-down to the right of the wine bottle.
  7. Press the platform's lid into the back of the stamp and lift.
  8. Use Tuxedo Black Memento ink to ink the stamp and stamp the wine bottle onto the image panel and onto repositionable label paper.
  9. Remove the image panel from the stamping platform. 
  10. Use magnets to secure the image panel onto the STAY-tion.
  11. Place the STAY-tion's ruler horizontally over the base of the wine bottle and the wine glass.
  12. Brush Spring Meadow Prism Ink over the image panel to add a light green background.
  13. Use magnets to secure the Ripples Stencil over the masked images on the image panel.
  14. Brush Spring Meadow Prism Ink over the stencil onto the image panel.
  15. Remove the stencil. 
  16. Reposition the ruler so that it's covering the top part of the image panel.
  17. Brush Spring Meadow Prism Ink over the base of the stamped, masked images and the panel.
  18. Use a die from the Labels and Tags Crea-Nest-Lies XXL #6 Die Set to cut the image panel.
  19. Set the image panel aside.
  20. Cut red cardstock to create two 3" x 10" panels.
  21. Score both pieces at 7/8", 2 5/8", and 3 5/8". See template below.
  22. Pinch the cardstock at the score lines and fold.
  23. Use a 1.5" circle die to cut the cardstock as shown below. 
  24. Use magnets to secure one of the red cardstock panels to the base of the stamping platform. 
  25. Position "Just for you" from the Roundabout Sentiments face-down on the top of the panel. 
  26. Press the platform's lid into the back of the stamp and lift.
  27. Ink the stamp with Obsidian Amalgam ink and stamp. Repeat if necessary to obtain a good impression since you are stamping on textured cardstock.
  28. Remove and clean the stamp.
  29. Position "Wine" from the featured stamp set face-down on the bottom of the panel. 
  30. Press the platform's lid into the back of the stamp and lift.
  31. Ink the stamp with Obsidian Amalgam ink and stamp. Repeat if necessary to obtain a good impression.
  32. Remove the front panel from the stamping platform and adhere the image panel die-cut.
  33. Use magnets to secure the other red cardstock panel to the base of the stamping platform. 
  34. Position the wine glass face-down towards the right bottom of the panel.
  35. Press the platform's lid into the back of the stamp and lift.
  36. Ink the stamp with Obsidian Amalgam ink and stamp. Repeat if necessary to obtain a good impression.
  37. Thoroughly clean the wine glass stamp and position it facedown towards the top left of the panel as shown. 
  38. Press the platform's lid into the back of the stamp and lift.
  39. Ink the stamp with Obsidian Amalgam ink and stamp. Repeat if necessary to obtain a good impression.
  40. Remove and clean the stamp.
  41. Position the wine splash stamps face-down as desired on the wine glasses.
  42. Press the platform's lid into the back of the stamps and lift.
  43. Ink the stamps with Chianti VersaFine Clair Ink and stamp. Repeat if necessary to obtain a good impression.
  44. Remove the stamps and clean.
  45. Position the word "Wine" and one of the sentiments face-down as shown.
  46. Press the platform's lid into the back of the stamp and lift.
  47. Ink the stamp with Obsidian Amalgam ink and stamp. Repeat if necessary to obtain a good impression.
  48. Repeat Steps #45 - 47 using a different sentiment.
  49. Clean the stamps.
  50. Remove the panel from the platform.
  51. Use Chianti VersaFine Clair to stamp the splats as desired.
  52. Use strong tape or liquid adhesive to adhere the two panels so that the circle apertures overlap each other.
  53. Slide the wine gift jacket thingy over the neck of a wine bottle.
  54. Discover that it's a bit floppy, so slide it back off, and punch holes on each side of both panels.
  55. Thread ribbon through the holes.
  56. Slide the wine gift jacket thingy back over the neck of the wine bottle.
  57. Tie the ribbons to finish.
Notes:
  • I kept this one pretty straight forward as I really suck at math and it took forever and a day to figure out the template since it involved all this mathy stuff, though I complicated things initially because I thought I needed circumferenes and radii and all that crap I learned in high school. (Cue Paul Simon's Kodachrome).
  • I figure I'll be making more of these and gussying 'em up some as I get better at it. 
  • I thought you all might want the template, so it follows.


Thanks for visiting today!