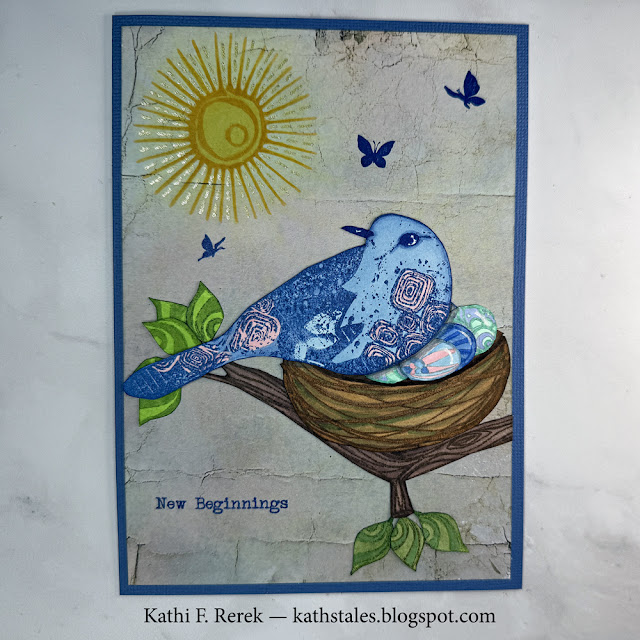
It's Saturday, my day to share a card created for Funky Fossil Designs. There were two new collections released last Wednesday, which sadly will be their final collections. They're both beautiful, so you should definitely check them out as they are selling like hotcakes.
I've made a card that could be used for new beginnings in general, but would be great for people who have a new addition in the family, be it a new baby or a new grand-baby.
Here it is!
Other Products Used:
Solar White Classic Crest Cardstock by Neenah Papers
Blue Textured Cardstock by Bazzill Basics
Danube Blue, Summer Sky, Angel Pink, London Fog, and Canteloupe Memento Inks by Imagine Crafts/Tsukineko
Mowed Lawn, Rustic Wilderness, Forest Moss, Walnut Stain, Frayed Burlap, Gathered Twigs, and Hickory Smoke Distress Ink by Tim Holtz for Ranger Ink
Tranquil Dye Ink by Catherine Pooler Designs
Blue Belle VersaFine Clair Ink by Imagine Crafts/Tsukineko
Copic Markers:
Sun: Y15, Y13
Bird: B29, B23, B21, B18, R81
Nest: E59, E57, E55, E49, E47, YG67, YG63
Branch: E79, E77, E74, E71
Leaves: YG63, YG45, YG17, YG05
White Gelly Roll Gel Pen by Sakura
Pearlescent Chalk by Pebbles
Yellow Glitter Marker by Grabie
Low-tack Tape
STAY-tion by Wendy Vecchi for Ranger Ink
Glassboard by Glassboard Studios
Stamping Platform
Instructions:
- Create a 5" x 7" card from blue cardstock. Set aside.
- Use Danube Blue Memento Ink to stamp the bird from the New Beginnings Clear Stamp Set.
- Fussy-cut the bird, color it with Copic markers, and edge it with the B29 marker.
- Use Gathered Twigs to stamp the nest from the New Beginnings Clear Stamp Set.
- Fussy-cut the nest, color it with Copic markers, and edge it with a dark brown marker.
- Use Walnut Stain to stamp the branch from the New Beginnings Clear Stamp Set.
- Fussy-cut the branch, color it with Copic markers, and edge it with a dark brown marker.
- Stamp the leaf from the New Beginnings Clear Stamp Set two times each with Mowed Lawn, Rustic Wilderness, and Forest Moss Distress Inks.
- Fussy-cut all the leaves, color them with Copic markers, and edge the with a green marker.
- Use London Fog Memento Ink to stamp the eggs from the New Beginnings Clear Stamp Set.
- Fussy-cut the eggs, color them with Copic markers, and edge them.
- Use a white Gelly Roll gel pen to add highlights to the eggs.
- Select a piece of plain greyish patterned paper from the Vintage Patchwork 8x8 Patterned Paper Pad.
- Trim the patterned paper to 4.75" x 6.75" to create the background panel and edge with Hickory Smoke Distress Ink.
- Brush or sponge Tranquil, Summer Sky, and Angel Pink Inks onto the patterned paper leaving an area at the top left relatively uninked.
- Use Canteloupe Memento Ink to stamp the sun on the upper left.
- Color the sun and rays with Copic markers.
- Apply yellow Pearlescent chalk around the sun.
- Use the yellow glitter marker to add additional glittery rays to the sun.
- Adhere the eggs to the nest.
- Adhere the bird to the nest so she's sitting partially atop the eggs.
- Adhere the branch and the leaves to the background patterned paper panel.
- Adhere the bird and the nest atop the branch on the background patterned paper panel.
- Place the background panel onto the the base of a stamping platform. Secure it with low-tack tape and/or magnets.
- Position the sentiment from the New Beginnings Clear Stamp Set facedown on the bottom left of the background panel.
- Press the lid of the platform onto the back of the sentiment stamp, lift, ink the stamp with Blue Belle VersaFine Clair Ink, and stamp.
- Position the three butterflies from the A6 In The Meadow Clear Stamp Set facedown on the background panel as shown.
- Press the lid of the platform onto the back of the sentiment stamp, lift, ink the stamp with Blue Belle VersaFine Clair Ink, and stamp.
- Heat set the ink.
- Adhere the background panel to the reserved blue card.
Thanks for visiting today!

No comments:
Post a Comment