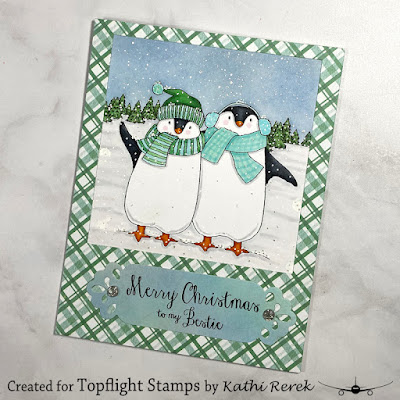
Happy New Year! It's the first Tuesday of 2024 and my first blog post for the year. Here's a Christmas card that I created for Topflight Stamps with Hobby Art Ltd.'s the Penguin Family and Penguin Besties Bundled Clear Stamp Sets. My bestie was away for Christmas and came home sick, so I haven't had the chance to give her Christmas card to her. I'll be bringing this card to her tomorrow!
Topflight Stamps Products Used:
A Gingham Christmas 8x8 Patterned Paper Pad Creative ExpressionsGelly Roll Bold Line Stardust Clear Glittering Ink by Sakura
Other Products Used:
Solar White Classic Crest Cardstock by Neenah Paper
Avalanche White Cardstock by Bazzill Basics
London Fog Memento Ink by Imagine Crafts/Tsukineko
Copic Markers: C00, C0, C1, C6, C7, C8, BG0000, BG000, BG01, BG10, BG11, YG41, YG45, G21, G24, G85, YR12, YR14, BV0000
White UniPosca Paint Pen by Mitsubishi Pencil Company
Polaroid A2 Die: Source Unknown
Fancy Labels Dies by Spellbinders US
Removable Sticker Paper by Avery
Post-It Notes by 3M
STAY-tion by Wendy Vecchi for Ranger Ink
Stamping Platform
Notes:
- If, like me, you like penguins, the Penguin Family and Besties Bundled Clear Stamp Sets by Hobby Art Ltd. is a great deal -- you get two super-cute penguin sets (good year round) for the price of one!
- Lately, I've been cleaning ink applicators (sponge daubers, foam, brushes) by sponging or brushing the excess ink onto scraps of plain white cardstock, which has resulted in some cool backgrounds.
Instructions:
- Cut a piece of 8.5" x 11" Avalanche cardstock in half, score at 4.25", and fold to form an A2 card. Set aside.
- Use Tuxedo Black Memento Ink by Imagine Crafts/Tsukineko to stamp the penguins from the Penguin Besties Clear Stamp Settwice — once onto white cardstock and a second time onto removable sticker paper.
- Fussy-cut the label paper version and place it over its counterpart on the image panel.
- Place Post-It Notes under the trees to protect the bottom portion of the image panel.
- Brush Della Blue Elements Ink, then London Fog Memento Ink over the top part of the penguins and trees to create a stormy winter sky.
- Tap a white Posca Paint Pen to splatter white paint onto the background to look like snow. Let dry.
- Remove the mask and Post-It Notes.
- Color the penguins, trees, and the snowy foreground with Copic markers.
- When done, use same white paint pen add more white paint dots to add more snow to the scene.
- Go over some of the snow dots with the Gelly Roll Bold Line Stardust Clear Glittering Ink pen to add some sparkle to the snow fall.
- Use the A2 Polaroid die to cut a piece of blue/green plaid paper from the Gingham Christmas 8x8 Patterned Paper Pad.
- Adhere the die-cut over the penguin scene so that the window is framing the scene.
- Adhere the penguin scene polaroid combo onto the reserved white A2 card.
- The sentiment from the Penguin Besties Clear Stamp Set was stamped with Nocturne VersaFine Clair Ink by Imagine Crafts/Tsukineko onto one of the inked backgrounds mentioned above.
- A fancy label die was used to cut the sentiment was die-cut.
- The sentiment die-cut was adhered to the card as shown.
- Gemstones were added to the sentiment die-cut to finish the card.
Thanks for visiting today!

Love this, Kathie! I tried to comment on the Topflight Blog but it wouldn't let me. I'm trying to find out how - Help! Your penguins are darling, the winter sky so realistic (I hadn't considered adding grey!) and the "Bestie" was so good I will have to borrow it and claim Happy Winter or something like that!
ReplyDelete