Tuesday, January 30, 2024

Yikes! Another Calendar Card

It's Tuesday, my day to share a project created for Topflight Stamps. I've made another calendar card since a New Year's resolution was to actually use all the mini calendars that I purchased AND mail them. This card features the cranky, yet adorable Dragon Unmounted Red Rubber Stamp by Katzelkraft posing in front of a castle wall made with the Stones Stencil by Lavinia Stamps.

Here it is!


Topflight Stamps Products Used:
Nocturne VersaFine Clair Ink by Imagine Crafts/Tsukineko

Other Products Used:
Bristol Paper by Strathmore
Raven Cardstock by Bazzill Basics
Copper Metallic Cardstock by Recollections
London Fog and Desert Sand Memento Ink by Imagine Crafts/Tsukineko
Lost Shadow and Black Soot Distress Inks by Tim Holtz for Ranger Ink
Castle Stencil by Pebbles
Copic Markers: Y21, Y23, Y26, Y28, BG11, BG13, BG90, E08, E19, E95, E97
Pouncy Tool
Pale Grey, Light Grey, Cool Grey 1, Cool Grey 3, Cool Grey 6,  Shadow Pink, and Aquamarine Tint Zig Clean Color Real Brush Markers by Kuretake
Van Dyke Brown and Burnt Sienna Chalk Pencils by General's
Pearlescent Chalk by Pebbles
Shiny Series Dot and Mica Dot Watercolors by Iuile
Thin Strip Die by Spellbinders
Flag Dies: Source Unknown
White Gelly Roll Gel Pen by Sakura of America
Low-tack Tape
Mini Calendar
Removeable Sticker Paper by Avery
STAY-tion by Wendy Vecchi for Ranger Ink
Stamping Platform

Instructions:
  1. Cut a piece of Raven cardstock to 10" x 7". Score at 5" and fold to form a 5" x 7" card. Set aside.
  2. Use Tuxedo Black Memento Ink to stamp the Dragon Unmounted Red Rubber Stamp twice — once onto Bristol Paper and once onto masking paper. 
  3. Color the Dragon on the Bristol Paper with Copic markers. 
  4. Fussy-cut the masking paper Dragon and placed him his counterpart on the image panel as a mask.
  5. Place a piece of low-tack tape horizontally over the bottom of the Dragon.
  6. Use magnets to secure the image panel onto the STAY-tion.
  7. Place the castle stencil onto the image panel towards the top and secure it with magnets. 
  8. Brush Della Blue then Confetti Elements Inks over the ramparts of the castle to create a sky.
  9. Invert the stencil so that the sky is covered and the rampart/crenellations are visible.
  10. Brush Lost Shadow Distress Ink onto the image panel between the castle stencil and the tape to start a stone castle wall. 
  11. Secure the Stones Stencil by Lavinia Stamps onto the image panel.
  12. Brush London Fog Memento Ink over the stencil onto the image panel.
  13. Use steel wool or a "pouncy tool" (looks like copper wool attached to a stamp block) to  randomly pounce/apply  Russet OrangePaprikaSaharaBermuda, and Graphite Elements Inks onto the stones to make them more look stonier.
  14. Use watercolor markers to outline the stones on the wall and add dimension and cracky details to the castle's crenellation/ramparts. 
  15. Remove the low tack tape.
  16. With the mask still covering the Dragon, brush Desert Sand Memento Ink along the bottom of the image panel. 
  17. Use chalk pencils to add shadows and detail to the ground.
  18. Use pearlescent yellow palette chalk to add a glow around the dragon.
  19. Remove the Dragon's mask.
  20. Use glittery watercolors to add details to the Dragon's scales, eyes, and the ornaments on his head and tail.
  21. Use a white gelly roll gel pen to add highlights to the dragon's eyes.
  22. Color a scrap of white cardstock with BG11 and BG13.
  23. Position the "Happy New Year" sentiment from the Classic Sentiments Clear Stamp Set facedown onto the Copic colored white cardstock. 
  24. Press the lid of the platform onto the back of the stamp and lift.
  25. Ink the stamp with Nocturne VersaFine Clair Ink  and stamp.
  26. Re-ink and stamp again if necessary to attain a good impression.
  27. Use a flag die was used to cut the sentiment. 
  28. Edge the die-cut with the BG13 marker.
  29. Use the thin strip die to cut metallic copper cardstock. 
  30. Adhere the thin piece of copper cardstock over the Dragon on the image panel as shown.
  31. Adhere the flag to the copper cardstock "flagpole" as shown.
  32. Use Copic markers and grey watercolor markers to add shadows and shading to the image panel.
  33. Trim the image panel to 4.625" x 6.625" and edge with Black Soot Distress Ink.
  34. Cut a piece of metallic copper cardstock to 4.75" x 6.75" and use to mat the image panel.
  35. Adhere the matted image panel to the reserved black card.
  36. Cut a piece of metallic cardstock .25" larger than the mini calendar.
  37. Cut a piece of black cardstock .5" larger than the calendar.
  38. Adhere the copper cardstock to the black cardstock. 
  39. Use double-sided tape to adhere the calendar to the matted cardstock.
  40. Use double-sided tape to adhere the matted calendar to finish the calendar card.
Thanks for visiting today!

Tuesday, January 23, 2024

Lovebirds - A Red & Pink Valentine's Day Card

This week my Topflight Stamps teammates and I are focusing on a red and pink color scheme, so I've created a Valentine's Day card with PaperArtsy paints, stamps, and a stencil. 

Here's my card!


Topflight Stamps Products Used:

Other Products Used:
Solar White Classic Crest Cardstock by Neenah Papers
140 Lb. Mixed Media Paper by Strathmore
Red Cardstock by Bazzill Basics
Lightning Black Brilliance Ink by Imagine Crafts/Tsukineko
Copic Markers: B95, R56, R59, R81, R83, R89, N7, N8, Y21, Y23, Y26
Black MultiLiner by Copic
White Gelly Roll Gel Pen by Sakura of America
White Prismacolor Colored Pencil by Sanford
Pouncy Tool (looks like steel wool)
Clear Detail Embossing Powder by Stampendous
Rectangle Nestabilities Die Set by Spellbinders Paper Arts.
Fancy Sentiment Ribbon Dies: Source Unknown
Inkssentials Foam by Ranger Ink
Craft Mat
Low-tack Tape
STAY-tion by Wendy Vecchi for Ranger Ink
Stamping Platform

Notes:
Instructions:
  1. Trim a piece of red cardstock to 10" x 7", score at 5", and fold to form a 5" x 7" card. Set aside.
  2. Use Tuxedo Black Memento Ink to stamp the birds from the JOFY Lovebirds JM20 Cling Rubber Stamp onto white cardstock. 
  3. Use a black Multi-liner pen to add some linework to the birds heads to facilitate fussy-cutting.
  4. Color both birds with Copic markers and edge with a black marker. 
  5. Add a dot of white gel pen to add accents to the birds' pupils.
  6. Use a white pencil to add highlights to their beaks.
  7. Add small drops of Blah MangeTaro Milk Tea, and Bubble Gum Fresco Finish Chalk Acrylic Paints to a piece of Inkssentials foam.
  8. Smoosh the foam onto a craft mat to drive the paint into the foam. 
  9. Pounce the foam onto a piece of mixed media paper until the panel is mostly covered. 
  10. Add small drops of ClaretBlood Orange, and London Bus Fresco Finish Chalk Acrylic Paints to a second piece of foam. 
  11. Smoosh the foam onto a craft mat to drive the paint into the foam. 
  12. Randomly pounce the foam over the pink background to add translucent reds to the background.*
  13. Add small drops of Blah MangeTaro Milk Tea, and Bubble Gum Fresco Finish Chalk Acrylic Paints onto the craft mat one color at a time, spread each color with the 2" Speedball Breyer, then randomly roll the brayer over the background to knock back the bolder red colors. 
  14. Add small drops of Claret Fresco Finish Chalk Acrylic Paint onto the craft mat and spread with the 2" Speedball Breyer
  15. Press the pouncy tool into the paint, then randomly pounce the tool onto the background to add flecks of paint to the background to create visual interest. 
  16. Repeat Steps #14 and #15 with Blood Orange and London Bus Fresco Finish Chalk Acrylic Paints.
  17. Trim the pink/red background to 4.5" x 6.5" and set aside. Retain the rest of the panel
  18. Add small drops of Claret Fresco Finish Chalk Acrylic Paint onto the craft mat and spread with the 2" Speedball Breyer
  19. Roll the brayer over either another piece of mixed media paper or rejected painted paper.
  20. Repeat Steps #18 and #19 with Blood Orange and London Bus Fresco Finish Chalk Acrylic Paints to create a variegated red on red piece of mixed media paper which will be used as the background layer of the card.
  21. Use a rectangle die to cut a piece out of the center of the red painted background.
  22. Use Lightning Black Brilliance ink and a stamping platform to stamp the clock heart from the Darcy 02 Cling Rubber Stamp Set onto the red painted background.
  23. Add clear detail embossing powder, dump off the excess, and heat set. 
  24. Fussy-cut the heart and edge with Lightning Black Brilliance ink.
  25. Trim the red-painted background panel to 4.75" x 6.75" and edge with the Lightning Black Brilliance ink. 
  26. Heat set the edges, then adhere the background to the reserved red 5" x 7" card.
  27. Use low-tack tape to secure the section you want to use from the Scrapcosy PS374 Stencil by PaperArtsy over the remaining piece of red painted background. 
  28. Use magnets to secure the stencil and the paper to the STAY-tion.
  29. Sponge Lightning Black Brilliance Ink over the stencil onto the red painted background. 
  30.  Cut the stenciled paper into a .25" strip and a wider one.
  31. Edge both stenciled red-painted strips with Lightning Black Brilliance Ink.
  32. Cut another remaining piece of red painted cardstock withhe two decorative ribbon slider sentiment dies.
  33. Edge both die-cuts with the Lightning Black Brilliance ink. 
  34. Use magnets to secure the leftover pink-painted paper (from Step #17) to the base of a stamping platform. 
  35. Position the "Lovebirds" sentiment from the JOFY Lovebirds JM20 Cling Rubber Stamp facedown onto the leftover pink-painted piece of paper.
  36. Press the lid of the platform onto the back of the stamp and lift. 
  37. Ink the stamp with Nocturne VersaFine Clair Ink and stamp.
  38. Re-ink the stamp with Lightning Black Brilliance ink and stamp again.
  39. Add clear detail embossing powder to the sentiment panel and dump off the excess.
  40. Heat emboss the sentiment.
  41. Use the small rectangle die to cut the sentiment.
  42. Use Lightning Black Brilliance ink to edge the pink/red panel.
  43. Adhere the edged pink panel to the card front.
  44. Adhere the bottom strip to the pink panel as shown. 
  45. Center the heart and adhere to the pink panel as shown.
  46. Position and adhere both birds so that they're perching upon the heart. 
  47. Thread the small red painted strip through the large ribbon slide die and adhere to the top of the card as shown. 
  48. Adhere the smaller ribbon slide die atop the larger one.
  49. Adhere the sentiment die-cut onto the layered ribbon slide.
Thank you for visiting today!


Tuesday, January 16, 2024

Year of the Dragon Calendar

It's Tuesday, my day to create a project for Topflight Stamps. This week is "Anything Goes" for the TFS team, so I opted to make a wall calendar to hang in my craft room. I've used Lavinia Stamps' Medeela Dragon Large, Far World Castle, and the Dragon Verse Clear Polymer Stamps.

Here it is:


Topflight Stamps Products Used:

Other Products Used:
Solar White Classic Crest Cardstock by Neenah Papers
Black Cardstock by Bazzill Basics
Circle Punch by EK Success
Frost VersaMark Ink
Crystal and Detail Clear Embossing Powders by Stampendous
Flourish Corner Die by Memory Box
Small Numbers, Upper Case, and Lower Case Alphabet Dies by All Occasions
Red and Yellow Posca Paint Pens by Mitsubishi Pencil Company
Mini Calendar
91% Isopropyl Alcohol
Repositionable Sticker Paper by Avery 
STAY-tion by Wendy Vecchi for Ranger Ink
Stamping Platforms

Instructions:
  1. Use magnets to secure one of the mountain masks from the Hills Acetate Masks/Stencil Set across the base of a piece of 5" x 8.5" piece of white cardstock onto the STAY-tion.
  2. Punch a circle from sticker paper and adhere it towards the top of the panel. 
  3. Starting at the top of the image panel, brush Midnight Blue Elements Ink horizontally across the panel.
  4. Brush Dark Denim, then Blue Lagoon Elements Inks across the panel, blending as you go.
  5. Brush Sundance Elements Ink upwards from the top of the mountain mask.
  6. Brush Confetti Elements Ink between the yellow and blue inks taking care to blend the inks.
  7. Remove the mountain mask from the panel and trace it onto a piece of white cardstock to create a paper mask.
  8. Fussy-cut along the trace lines and secure the paper mask with magnets to cover the sky.
  9. Brush Olive Elements Ink downwards from the paper mask onto the image panel. 
  10. Remove the paper mask and retain. 
  11. Use magnets to secure the hilly mask from the Hills Acetate Masks/Stencil Set across the image panel. 
  12. Brush Olive Elements Ink over the top of the stencil to add some hills to the base of the image panel. 
  13. Fill in the grassy area with Pine Elements Ink
  14. Use magnets to secure the image panel onto a stamping platform. 
  15. Position the Far World Castle Clear Polymer Stamp facedown onto the image panel as shown.
  16. Press the lid of the platform onto the back of the stamp and lift.
  17. Ink the stamp with  Morning Mist VersaFine Clair Ink. Stamp. 
  18. Remove the panel from the platform and heat emboss with Crystal (sparkly) embossing powder. 
  19. Place the image panel back into same position on the stamping platform secured with magnets.
  20. Ink the castle stamp with Frost VersaMark Ink, stamp, and remove the panel from the platform. 
  21. Add clear detail embossing powder, dump the excess, and heat emboss.
  22. Place the image panel back onto the platform secured with magnets. 
  23. Position the Medeela Dragon Large Clear Polymer Stamp facedown on the image panel so he appears to be hovering over the castle. 
  24. Press the platform's lid onto the back of the stamp and lift.
  25. Ink the stamp with Nocturne VersaFine Clair Ink by Imagine Crafts/Tsukineko and stamp. 
  26. Re-ink and stamp again if necessary to attain a good stamped image. 
  27. Remove the stamping platform and heat set the image panel. 
  28. Trim the image panel to 3.5" x 7.125". 
  29. Edge the panel with Nocturne VersaFine Clair Ink
  30. Mat with black cardstock cut to 3.75" x 7.375". Set aside.
  31. Trim a second piece of white cardstock to 8.25" x 9.75". 
  32. Repeat Steps #1 to 6.
  33. Use the paper mask created in Step #7.
  34. Repeat Steps #9 to 13.
  35. Place the inked panel onto a larger stamping platform secured with magnets.
  36. Place the Dragon Verse Clear Polymer Stamp facedown on the left side of the image panel.
  37. Press the platform's lid onto the back of the stamp and lift.
  38. Ink the verse with Medieval Blue VersaFine Clair Ink and stamp. Heat set. 
  39. Clean the stamp, dry it, and reposition it facedown at the top.
  40. Press the platform's lid onto the back of the stamp and lift.
  41. Ink the verse with Medieval Blue VersaFine Clair Ink and stamp. Heat set. 
  42. Clean the stamp, dry it, and reposition it facedown on the right side.
  43. Press the platform's lid onto the back of the stamp and lift.
  44. Ink the verse with Medieval Blue VersaFine Clair Ink and stamp. Heat set. 
  45. Edge the panel with Nocturne VersaFine Clair Ink, then adhere to a black cardstock cut to 8.5" x 10".
  46. Adhere the image panel to the matted background panel positioned so that the scene continues to the left and right of the panel. 
  47. Cut black cardstock with the corner flourish, numbers, and words dies. 
  48. Adhere the die-cuts as shown. 
  49. Mat the calendar with black cardstock and adhere to finish the piece.
Thanks for visiting today!

Tuesday, January 9, 2024

Sending Love -- A Valentine's Day Card

It's Tuesday, my day to share a project created for Topflight Stamps. This week my teammates and I are focusing on Valentine's Day. I've made a shaker card with the Flying Hearts Ephemera Die-Cuts 18 by Janet Klein which contains love letter envelopes, a variety of hearts, flying hearts, cupcakes, and the word "love". I've used The Crafter Clear Stamp Set 378 and the baker from the Sugar Cookie Clear Stamp Set 421 for AALL and Create.

Here's the card!


Topflight Stamps Products Used:

Other Products Used:
Solar White Classic Crest Cardstock by Neenah Papers
Blue Cardstock by Bazzill Basics
Sky Patterned Paper by Cosmo Cricket
Copic Markers:
Skin: BV0000, BV000, E50, E21, E11, E000, R20 (Cheeks)
Lips: E04, RV42
Eyes: B52, YG61, YG53; B52, B91
Hair: C0, C2, C4
Toque/Chef Jacket: E30, E31, E33, E34
Flower: RV63, RV66; V12, V15, V17
Smock: V12, V15, V17
Black Brush Multi-Liner Pen by Copic
Square Nestabilities Die Set by Spellbinders Paper Arts
Tag Set: Spellbinders Paper Arts
Heart Washi Tape: Little L Designs
Acetate from packaging
Miscellaneous sequins and such
Black Foam Tape
Stamping Platform

Instructions:
  1. Use Tuxedo Black Memento Ink  to stamp both the crafter from the The Crafter Clear Stamp Set 378 by Janet Klein and the baker from the Sugar Cookie Clear Stamp Set 421 by Janet Klein onto white cardstock.
  2. Fussy-cut both images.
  3. Color them with Copic markers, edge with a black pen., and set aside.
  4. Cut a piece of blue cardstock to 10" x 7". Score at 5" and fold to form a 5" x 7" card. Set aside.
  5. Cut the remaining piece of blue cardstock to 4.75" x 6.75" to create a background panel. 
  6. Use a square Nestablities diecut a window in the top part of the panel. 
  7. Adhere a piece of clear acetate to the reverse of the window on the background panel. 
  8. Outline the acetate covered window with foam tape to create a well for the shaker contents.
  9. Use a black multi-liner to edge a variety of small hearts and envelopes from the Flying Hearts Ephemera Die-Cuts 18.
  10. Place the ephemera into the well created by the foam tape. 
  11. Add sequins and other glittery bits to the well. 
  12. Carefully remove the backing of the foam tape.
  13. Seal the well with a piece of sky-patterned paper.
  14. Apply Wishy-Washy Washi Tape 19 to the base of the background panel. 
  15. Place the 1/8" wideheart-patterned washi tape was overtop. 
  16. Edge the background panel with a black marker then a dhere it to the reserved  5" x 7" blue card.
  17. Use the black multi-liner pen to edge a flying heart, a large cupcake, and a large envelope ephemera from the Flying Hearts Ephemera Die-Cuts 18.
  18. Adhere the cupcake, the colored fussy-cut baker from the Sugar Cookie Clear Stamp Set 421, the envelope, and the colored, fussy-cut Crafter to the background panel as shown. 
  19. Use E33 and E31 Copic markers to color a strip of white cardstock.
  20. Use magnets to secure the strip of colored cardstock to the base of a stamping platform.
  21. Use Nocturne VersaFine Clair Ink by Imagine Crafts/Tsukineko  to stamp the sentiment from the With Love Clear Stamp Set 831 by Tracy Evans onto the scrap. 
  22. Use a tag die was used to cut sentiment.
  23. Adhere the sentiment tag and the flying heart ephemera to finish the card.
Thanks for visiting today!

Tuesday, January 2, 2024

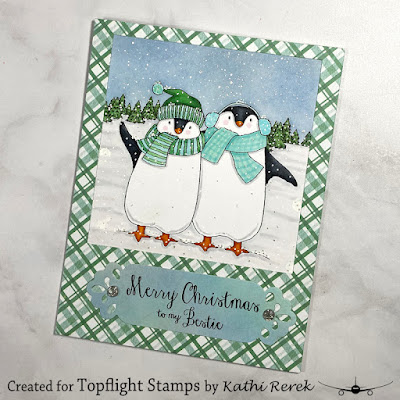
Belated Christmas Card

Happy New Year! It's the first Tuesday of 2024 and my first blog post for the year. Here's a Christmas card that I created for Topflight Stamps with Hobby Art Ltd.'s the Penguin Family and Penguin Besties Bundled Clear Stamp Sets. My bestie was away for Christmas and came home sick, so I haven't had the chance to give her Christmas card to her. I'll be bringing this card to her tomorrow! 


Topflight Stamps Products Used: 
A Gingham Christmas 8x8 Patterned Paper Pad Creative Expressions
Gelly Roll Bold Line Stardust Clear Glittering Ink by Sakura

Other Products Used:
Solar White Classic Crest Cardstock by Neenah Paper
Avalanche White Cardstock by Bazzill Basics
London Fog Memento Ink by Imagine Crafts/Tsukineko
Copic Markers: C00, C0, C1, C6, C7, C8, BG0000, BG000, BG01, BG10, BG11, YG41, YG45, G21, G24, G85, YR12, YR14, BV0000
White UniPosca Paint Pen by Mitsubishi Pencil Company
Polaroid A2 Die: Source Unknown
Fancy Labels Dies by Spellbinders US
Removable Sticker Paper by Avery
Post-It Notes by 3M 
STAY-tion by Wendy Vecchi for Ranger Ink
Stamping Platform

Notes: 
  • If, like me, you like penguins, the Penguin Family and Besties Bundled Clear Stamp Sets by Hobby Art Ltd. is a great deal -- you get two super-cute penguin sets (good year round) for the price of one!
  • Lately, I've been cleaning ink applicators (sponge daubers, foam, brushes) by sponging or brushing the excess ink onto scraps of plain white cardstock, which has resulted in some cool backgrounds.
Instructions:
  1. Cut a piece of 8.5" x 11" Avalanche cardstock in half, score at 4.25", and fold to form an A2 card. Set aside.
  2. Use Tuxedo Black Memento Ink by Imagine Crafts/Tsukineko to stamp the penguins from the Penguin Besties Clear Stamp Settwice — once onto white cardstock and a second time onto removable sticker paper.
  3. Fussy-cut the label paper version and place it over its counterpart on the image panel.
  4. Place Post-It Notes under the trees to protect the bottom portion of the image panel.
  5. Brush Della Blue Elements Ink, then London Fog Memento Ink over the top part of the penguins and trees to create a stormy winter sky. 
  6. Tap a white Posca Paint Pen to splatter white paint onto the background to look like snow. Let dry.
  7. Remove the mask and Post-It Notes.
  8. Color the penguins, trees, and the snowy foreground with Copic markers. 
  9. When done, use same white paint pen add more white paint dots to add more snow to the scene. 
  10. Go over some of the snow dots with the Gelly Roll Bold Line Stardust Clear Glittering Ink pen to add some sparkle to the snow fall.
  11. Use the A2 Polaroid die to cut a piece of blue/green plaid paper from the Gingham Christmas 8x8 Patterned Paper Pad.
  12. Adhere the die-cut over the penguin scene so that the window is framing the scene.
  13. Adhere the penguin scene polaroid combo onto the reserved white A2 card.
  14. The sentiment from the Penguin Besties Clear Stamp Set was stamped with Nocturne VersaFine Clair Ink by Imagine Crafts/Tsukineko onto one of the inked backgrounds mentioned above. 
  15. A fancy label die was used to cut the sentiment was die-cut.
  16. The sentiment die-cut was adhered to the card as shown. 
  17. Gemstones were added to the sentiment die-cut to finish the card.
Thanks for visiting today!