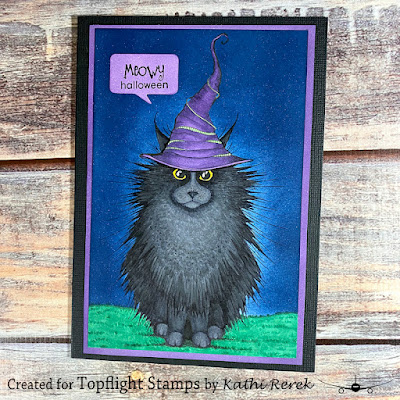
It's Tuesday, my day to share a project created for Topflight Stamps. This week my teammates and I are focusing on Halloween! Since I love both Halloween and cats, I decided to make a black witch cat using the gorgeous Noof Clear Clear Polymer Stamp and the Witches' Hat Clear Polymer Stamp by Lavinia Stamps.
Here's the card!
Topflight Stamps Products Used:
Other Products Used:
Solar White Classic Crest Cardstock by Neenah Papers
Raven Cardstock by Bazzill Basis
Tuxedo Black Memento Ink by Imagine Crafts/Tsukineko
Copic Markers:
Fur: BV20, BV23, BV25, BV29, N4, N5, N6, N7
Nose: C6, C8
Eyes: Y08, &23, Y26
Witch Hat: B08, V17, G14
Grass: G16, G17, G29
Black Multi-liner Pen by Copic
Meowy Christmas Rubber Stamp by JustJohanna/odd bird planet
Speech Bubble Die: Source Unknown
Black Multiliner by Copic
Repositionable Sticker Paper by Avery
Post-It Notes
STAY-tion by Wendy Vecchi for Ranger Ink
Stamping Platform
~~~
Announcement:
Before I bore you with the instructions for my card, I wanted to give you more information about Topflight Stamps' Darkroom Door Challenge! Don't forget that the challenge closes on September 30th!
To enter the Topflight Stamps Darkroom Door challenge, just create a project using at least one Darkroom Door product. Post it to the Topflight Stamps Design Gallery on Facebook and/or post it on your Instagram feed and use the hashtag #TFSDDC. I'm looking so forward to seeing all the amazing things that will be created. I encourage you all to be on the lookout and leave positive comments on these projects. Let's all spread some kindness in memory of Rachel.
The prize for this challenge is a huge package of Darkroom Door stamps with a retail value of over $200!!! To be eligible to win, post your project any day in September and be sure to use the hashtag #TFSDDC. A winner will be chosen at random on October 1 and announced shortly thereafter. The more projects you post the better your chances of winning!
~~~
Instructions:
- Cut a piece of Raven cardstock to 10" x 7". Score at 5" and fold to form a 5" x 7" card. Set aside.
- Secure a piece of white cardstock to the base of a stamping platform.
- Position the Witches' Hat facedown towards the top of the image panel.
- Press the platform's lid onto the back of the stamp, lift the lid, and ink the stamp with Tuxedo Black Memento ink.
- Stamp the hat twice – once onto the image panel and once onto repositionable sticker paper.
- Fussy-cut the sticker paper version and place it over its counterpart as a mask.
- Position Noof facedown on the image panel so that the witch hat is covering his head, but not his ears.
- Press the platform's lid onto the back of the stamp, lift the lid, and ink the stamp with Tuxedo Black Memento ink.
- Stamp Noof twice – once onto the image panel and once onto repositionable sticker paper.
- Fussy-cut the sticker paper version and place it over Noof on the image panel a a mask.
- Position the flattest of the masks from the Acetate Hills Mask-Stencil horizontally across the image panel to ground Noof.
- Brush Della Blue and Dark Denim Elements Inks over the masked images and the Hills mask.
- Remove and save the sticker paper masks for another use.
- Remove and clean the Hills mask.
- Use Copic markers to color Noof, the the Witches' Hat, and the grass.
- Use a black Copic Multi-liner to correct any missed lines caused by the masks.
- Trim the image panel and edge with Dark Denim Elements Ink.
- Cut a piece of white cardstock .25" larger than the image panel.
- Brush Violet Chalk Elements Ink around the edges of the cardstock, leaving the center white.
- Use this to mat the image panel. *
- Brush Violet Chalk Elements Ink over a scrap of white cardstock to color it.
- Use a Post-It Note to cover the word "Christmas". Ink "Meowy" withNocturne VersaFine Clair Ink .
- Remove the Post-It Note and stamp.
- Place the Lavender Chalk inked scrap with "Meowy" onto the stamping platform.
- Position "Happy Halloween" from the Classic Sentiments Clear Stamp Set facedown under the word "Meowy".
- Press the platform's lid onto the back of the stamp and lift the lid.
- Use the Post-It Note to cover the word "Happy" .
- "Halloween" was inked with Nocturne VersaFine Clair Ink, remove the Post-It Note, and stamp.
- Heat set the sentiment scrap.
- Cut the sentiment scrap with a speech bubble cutting die.
- Adhere the matted image panel to the reserved black 5" x 7" card. *
- Adhere the sentiment speech bubble to finish the card.
Notes:
- I measured wrong when I was cutting the mat piece. I clearly need to remember the adage, "measure twice, cut once"!
- I also adhered the matting piece really securely and very, very crookedly. However, I couldn't lift it because the image panel started to tear.
- Then to complete this clusterduck, the matted image panel isn't straight either. Sheesh. Perfection is overrated. I'm a Virgo, so I'm seriously annoyed with myself.
- However, I am fairly happy with Noof's coloring. So there's that.


No comments:
Post a Comment